Customize cards on a Kanban board
TFS 2017 | TFS 2015
With the Kanban board, you gain a rich set of tools and a rich set of customization options. Kanban boards display work items as cards. Each card corresponds to a work item that you use to share information, track status, and assign work. Information rich cards provide at-a-glance info of interest to you and your team and allow you to update a field without opening the work item. With style rules, you can highlight cards and tasks based on the criteria you set.
When you enable annotations, you gain quick access to linked work items and other features. If you're new to working with the Kanban board, see Kanban basics.
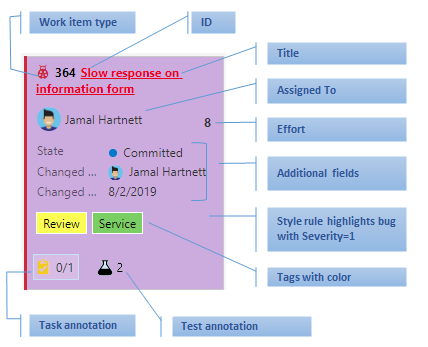
In the card shown below, the following options have been set for the bug work item type:
- Show all core fields: ID, Assigned To, Story Points, Tags
- Show three more fields: State, Changed By, and Changed Date
- Apply tag colors
- Apply styling rule to display bugs with Severity=1 as yellow and bold and underline the Title field
- Enable Tasks and Test annotations
Note
This article addresses customization of a Kanban board. For information on customizing a Taskboard, see Customize sprint Taskboards.
You can either increase or simplify the information that displays on your cards. It all depends on what's of interest to your team.
- Does your team like to refer to work items by their ID?
- Do they want to see estimates?
- Do they want to highlight work items according to set criteria?
- Or, will just the bare bones of title and assignment suffice?
Your best bet is to show fields on cards based on what your team frequently refers to or updates when using the Kanban board. Also, add fields with information that you can use to filter the board.
Note
You can customize a work item type which is different than customizing the card displayed on the Kanban board. You customize a work item type by adding fields, changing the workflow, adding custom rules and more. You can also add custom work item types and custom backlog levels. For details, see Customize the On-premises XML process model.
Prerequisites
- You must have a Kanban board you want to configure. When you add a team, you add a Kanban board for that team. To learn more, see About teams and Agile tools.
- To configure team settings, you must be added to the team administrator role or be a member of the Project Administrators security group. To get added, see Add a team administrator or Change project-level permissions.
- Users assigned Basic access or higher can exercise all backlog and board features.
- Users assigned Stakeholder access have limited access to backlog and board features. Stakeholders can edit work items on the board and add existing tags to a work item. They can't add work items to a board, can't drag-and-drop work items to update status or reorder cards, and can't update fields displayed on cards. For details, see About access levels.
Card customization options
Once you open the Settings dialog for the Kanban board, choose one of the following tabs to set your customization options.
Settings tab
Use to...
Add or remove fields from cards.
Add styling rules to change card color and title style based on field criteria.
Specify a tag color, and enable or disable a tag color.
Enable or disable annotations to appear on cards.
Configure how you want tests to appear and behave on the cards.
Choose expected behavior when reordering cards on the board.
Note
Each team can customize the cards for their Kanban board. Board settings are not inherited from other teams that they may share portions of area paths.
Card customization sequence
Before you configure the cards, you'll want to make sure the following tasks are complete as possible. Otherwise, you'll find yourself revisiting your configuration.
Process Administrator:
- Add custom work item types that you want to appear on your backlog or board. For details, see Add and manage work item types.
- Customize your product and portfolio backlogs to ensure all work item types you want to have will appear on the backlogs and boards. For details see Customize backlogs & boards.
- Customize each work item type to have any custom fields you want to show. For details, see Customize a workflow.
Team Administrator:
- Meet with your team and determine how the team wants to manage bugs, similar to requirements or tasks.
- Add any tags you want to customize on cards to work items.
- Meet with your team and determine which annotations should appear on cards and how they want to configure inline tests.
Open your Kanban board settings
If you're not a team admin, get added as one. Only team and project admins can customize the Kanban board.
You can customize cards that appear on the Kanban board for your product backlog or portfolio backlog such as features and epics. You follow similar steps, however you start from the corresponding portfolio backlog.
Choose the backlog level you want to customize.
Choose
 to open the common configuration settings dialog for the Kanban board.
When done with your changes, choose Save.
Choose which fields appear on cards
By showing a field on a card, you can edit that field directly on the board without having to open the card, unless it's a read-only field, such as the Change By and Changed Date fields. This quick update feature is useful when you need to update many work items at once. For example, you can add estimates for backlog items on the Kanban board.
To change the Title, choose the pencil icon in the upper-right corner.
As a first step, you'll see that you can determine which fields appear on each card type. To add a custom field, you must first add it to the work item type definition.
From the Settings dialog, choose Fields and then a work item type to see all the settings you can modify. Your initial column settings will look something like this.
Here we choose User Story. Your choices will vary based on the process used to create your project and whether your team has chosen to treat bugs like requirements or like tasks.
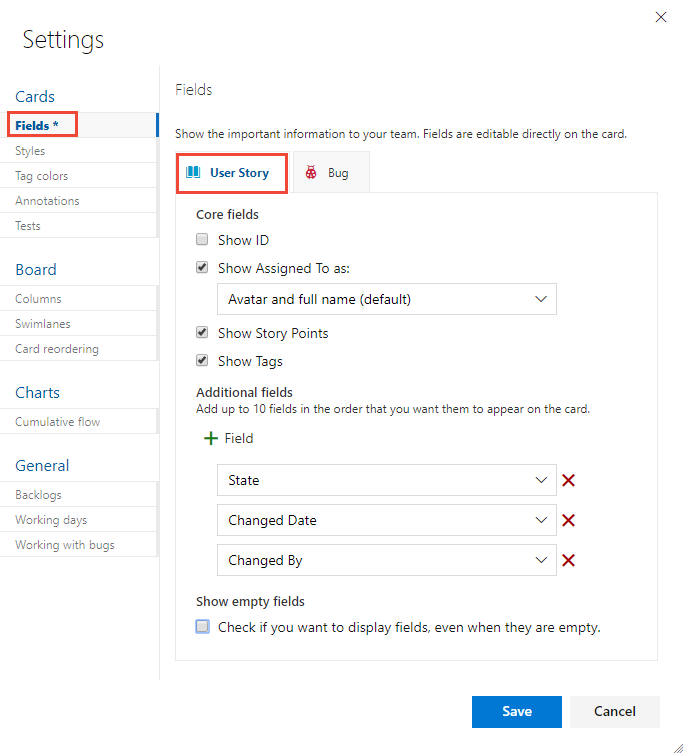
Place a check mark in the check box for those fields you want to have appear on the board.
If you want work estimates to show, check Show Effort. Show Effort corresponds to these fields: Effort (Scrum), Story Points (Agile), and Size (CMMI).
To add a field, choose the
 plus icon and enter the name of a field you want to add.
To remove a field, choose the
 delete icon next to the field.
When done with your changes, choose Save.
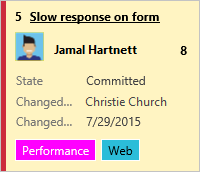
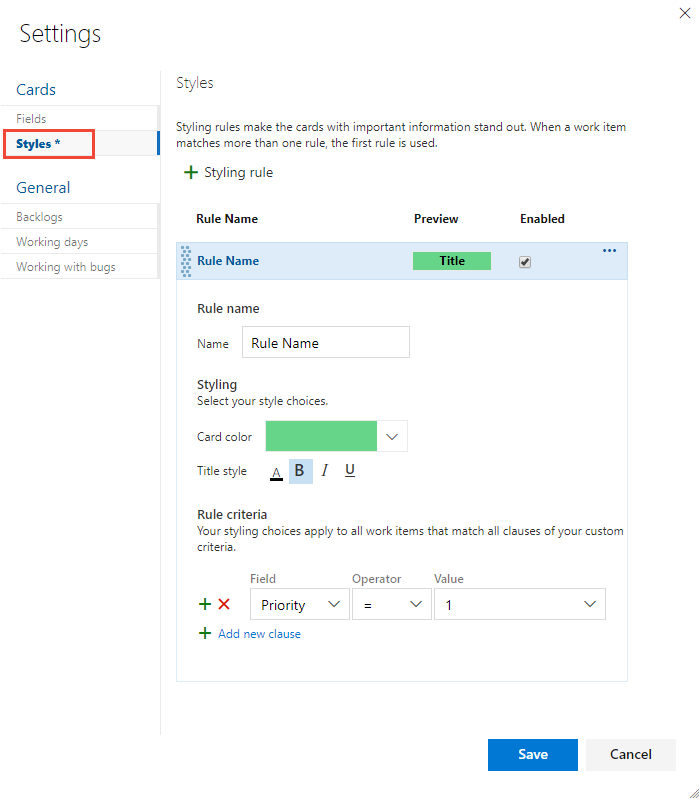
Define style rules to highlight cards
With styling rules, you can cause cards to change color when their corresponding work items meet criteria that you set. Here, we highlight severity 1 bugs by having the cards display as yellow.
Examples of styling rules
What rules should you apply to highlight work items? Here are a few examples and their associated criteria.
| Work items | Criteria |
|---|---|
| High priority items | Priority = 1 |
| High effort items | Effort 20 or Story Points 20 |
| Stale items unchanged in the last 5 days | Changed Date @Today-5 |
| Title contains a key word | Title Contains Yes |
| Severity 1 bugs | Severity = 1 - Critical AND Work Item Type = Bug |
| High value business items | Business Value 50 |
| Items assigned to specific feature area | Area Path Under Fabrikam Fiber\Phone |
| Contains specific tag | Tags Contain RTM |
| Blocked tasks (Scrum process only) | Blocked = Yes |
You can apply style rules to change the color of cards on Kanban boards and taskboards.
From the Settings dialog, choose Styles to specify a style rule. Choose the
 plus icon to add a style. Select the color to apply to the card and define the criteria for the style rule.
In this example, we show the Styles dialog for the dashboard.
Follow these rules when creating and ordering your style rules:
The criteria you specify works in a similar fashion as when constructing a query
All clauses are considered AND clauses, grouping clauses isn't supported
Card rules apply to all work items that meet the rule criteria
Rule color applies to work items based on the order in which rules are listed. If you add more than one style rule, make sure that you move them in the order of most importance. Drag them into the order you want them applied.
You can quickly enable and disable a style rule.
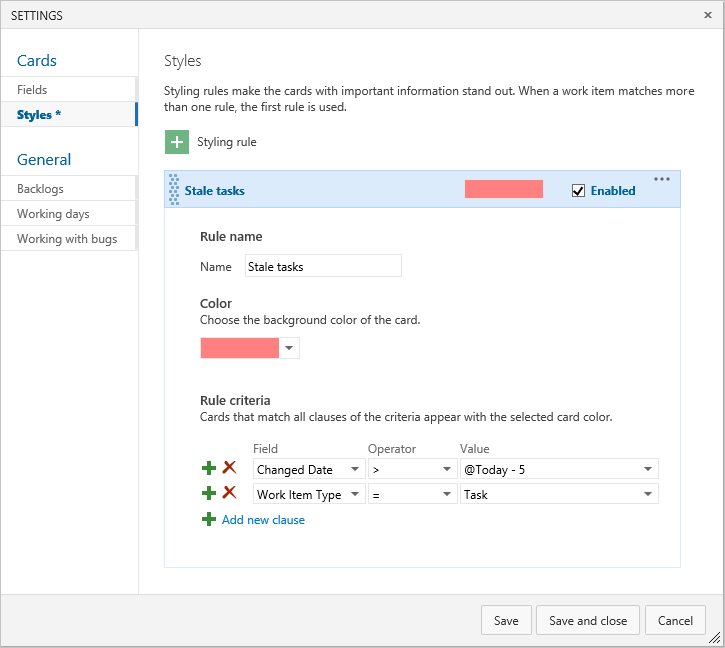
Here we add a Stale tasks rule that highlights tasks that haven't changed in the last five days.
To copy or delete a style rule, choose the
 actions icon and select Clone or Delete.
When done with your changes, choose Save.
Assign a color to a tag
Before setting tag colors, add tags to backlog items that you want to highlight with color.
From the Settings dialog, choose Tag colors and then choose the
plus icon to add a tag color. Then, select the tag and the color you want to appear on the cards.
Tip
If tags don't display on the cards, choose Fields and make sure that you've checked Show Tags.
When done with your changes, choose Save.
Enable or disable an annotation
By default, all annotations are enabled that are applicable for the board you selected. These annotations include all work item types added to the next level backlog, GitHub, and Tests. Disable those annotations, which your team won't use or which you don't want teams to use for a particular backlog level.
When you disable an annotation, you also disable the feature to add the associated object from the Kanban board. For example, if you disable the Tests annotation, you disable the ability to add tests from the currently selected Kanban board.
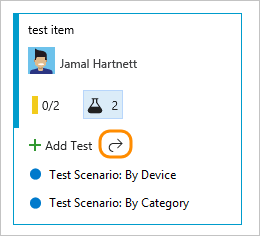
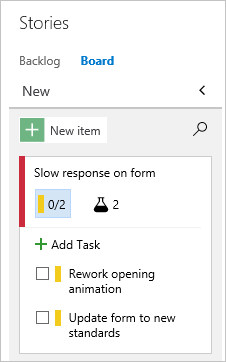
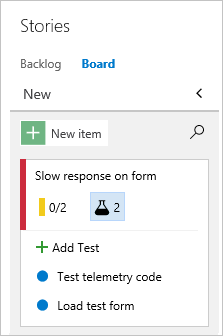
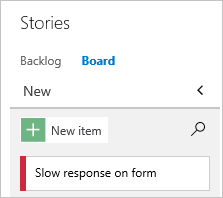
As shown in the following examples, the Task and Test annotations indicate that two each of tasks and tests have been defined for the work item. Disable the annotations your team doesn't use from the Annotations tab.
| Task annotations | Test annotations | No annotations |
|---|---|---|
 |
 |
 |
To learn more about using these features, see Add tasks or child items as checklists and Add, run, and update inline tests.
Open the Settings dialog for the Kanban board you want to customize and choose Annotations
Check those annotations that you want enabled. For example, to enable tasks but disable tests, check the following boxes.
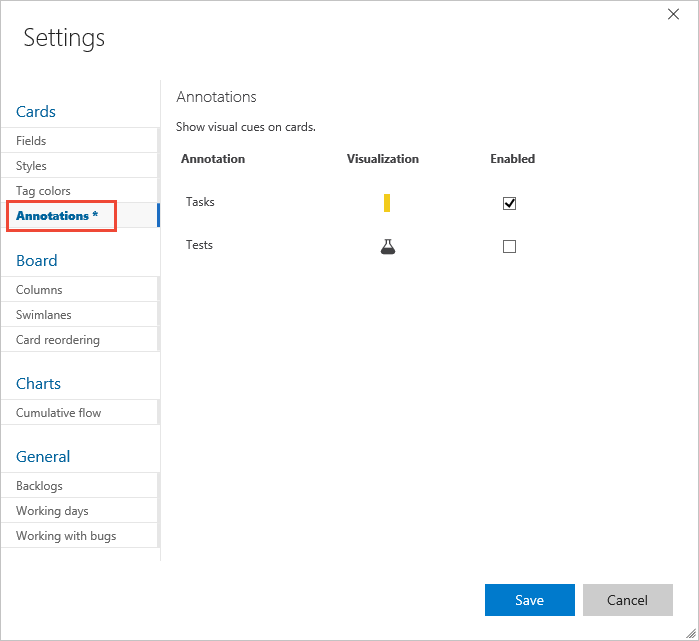
When done with your changes, choose Save.
Configure inline tests
You can control the test plan under which inline tests you add through the Kanban board are created. You can choose to create a new test plan for each new test that you add. Or, add all new tests to a selected test plan.
Open the Settings dialog for the Kanban board (product backlog only) you want to customize.
Choose Annotations and make sure that Test annotation is enabled. This is a requirement to configure inline tests.
Choose Tests, and then choose the options you want. To select a test plan, choose the
actions icon and select one test plan from the query provided.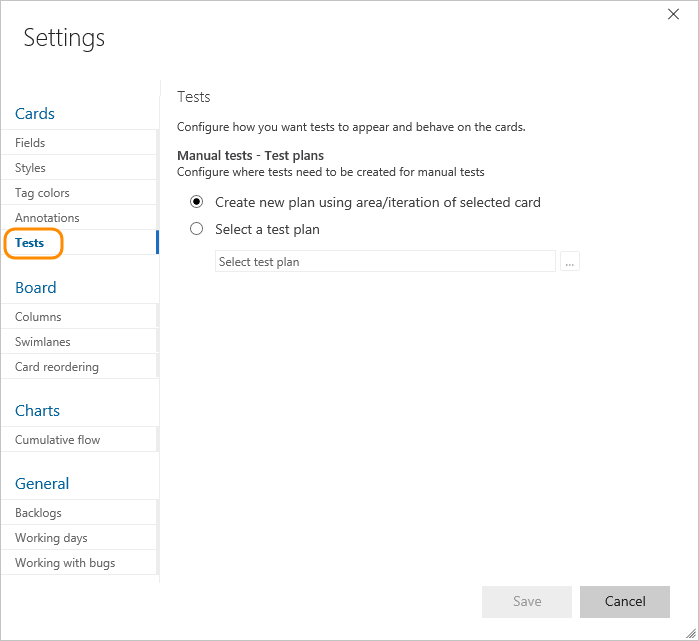
Save your changes.
Open the test plan, test suite from a card
From a card on the Kanban board, you can easily navigate to the underlying test plan and test suite under which the tests are created. Choose the ![]() open icon to open another browser tab showing Test and associated test plan and test suite that controls the inline tests.
open icon to open another browser tab showing Test and associated test plan and test suite that controls the inline tests.