Using Oslo to Speed Up Database Development
[This content is no longer valid. For the latest information on "M", "Quadrant", SQL Server Modeling Services, and the Repository, see the Model Citizen blog**.]****
Stephen Forte, Telerik
Building applications and services today, for business or just about anything else, always involves data. Most developers have to build a database or several databases to support their application or service. Larger organizations usually assign this task to a data analyst or database administrator (DBA). The analyst or DBA is traditionally in very short supply and becomes a bottleneck in the process. And while they’re experts in creating complex data models, they usually aren’t experts in the specific application domain (that is, its field of operation). This disadvantage only adds to the bottleneck.”
Over the last ten to fifteen years, corporations have tried to mitigate this problem by bringing the developers and business domain experts more into the process through modeling tools such as Erwin- or UML-based CASE tools. In general, these tools are meant to encapsulate DBA-level expertise behind a more standard, developer-friendly, flexible, and useful representation that is easier to work with than SQL. However, the results have been less than expected. Modeling tools like Erwin and CASE are large, complex, and expensive. They have a high barrier to entry and require a large investment in budget dollars and training. As a result, they have not been successful in speeding up database development and have only mildly increased collaboration.
What Oslo Means for Database Developers
As you may already know, “Oslo” is a Microsoft effort to make it easier to build data-driven applications. “Oslo” consists of three major pieces:
- A modeling language: ”M”
- A modeling and data visualization tool: “Quadrant”
- A repository: a SQL Server database
This paper is the view of “Oslo” from a data perspective. The components most important to an enterprise and databases, “M” and the repository, will be discussed first; we’ll take the data visualization tool just introduced in the “Oslo” May CTP, “Quadrant”, for a spin towards the end of the paper.
The “M” Language
The “M” language will make your organization more productive in dealing with data in many ways. “M” allows you to define a structure for your data as well as represent it in graph-based values, giving you the ability to transport and bind your data easily. “M” is analogous to XML, XSLT, and XSD. For example, you usually don’t work with unstructured XML, you create an XML grammar (XSD) to give your XML some meaning. “M” has two ways to give your data some meaning: values and types. Representing values in the “M” language is very similar to JSON, which will allow you to represent your data in name/value pairs. Working with values in “M” is a lot like XML, here is an example of values in action:
People
{
{ Id=>1, Name=>"Steve", Age=>36},
{ Id=>2, Name=>"Mike", Age=>29}
}
Just like JSON and XML, values in “M” are human-readable. You can infer the meaning of this data just by looking at the values. Unlike JSON, “M” values are strongly typed (notice that the Age is not in quotes because it’s a number, not a string.) You strongly type “M” values by creating types. Types in the “M” language are used for defining your data store, extents that will be used, and the relationships between those extents. To continue our XML analogy, types are like XSD. An example of a type is shown here:
type Person
{
Id : Integer32;
Name : Text#50;
Age : Integer32;
}
Putting some structure around the data is pretty easy; you can see how the Person type is defined above by declaring fields and data type definitions. Even though we will look more closely at “M” types in the next section of this paper, here is an example of using a type defined in “M” (Person) and also represented in “M” as values (People):
//Types
type Person
{
Id : Integer32;
Name : Text#50;
Age : Integer32;
}
//Values
People:Person*;
People
{
{ Id=>1, Name=>"Steve", Age=>36},
{ Id=>2, Name=>"Mike", Age=>29}
}
Oslo’s Value Proposition: Completing the Picture
You may be thinking: how does this give me benefits over modeling my database using T-SQL or even CASE tools? In truth, you have not seen many benefits so far unless your developers like languages with curly braces better than T-SQL (which is generally the case). To see the immediate benefits you need to explore two other pieces of the “Oslo” puzzle: “M” languages (ones that you define yourself) and the repository.
With “Oslo” you will define your own language using the contextual Domain Specific Language (DSL) creation facilities of “M”. Such a DSL—also called an “M” language (not to be confused with the “M” language itself) will convert your users’ or applications’ input (the users of your DSL) into “M” values. To complete the XML analogy, creating a DSL using the language-definition facilities of “M” is similar to creating XSLT. We will look more closely at “M” languages later in this paper.
The repository is the final piece that ties this all together since it is the foundation for building and managing applications. The repository is a special SQL Server 2008 database for storing all types of metadata and models for an organization. The repository database is pre-populated with several items in the base domain library (BDL), providing an infrastructure and service model for model-driven applications. One of the key benefits of “Oslo” is that you can model application data and application metadata, storing both in the repository. What defines your application’s metadata and models are “M” types, “M” values, and domain-specific languages. Having the entire definition of an application in a repository database is a very useful thing. Currently applications are usually spread out over several places including configuration files, binaries on disk, and database servers.
By being a central location to store and retrieve these models, the repository is a unifying foundation for your application. Using the repository will speed up application development as well as lower maintenance costs by providing base models (schemas) out of the box and some additional core patterns for your application: storage, globalization/localization,(claims-based) security, versioning, and deployment. “Oslo” can execute your application via a runtime dynamically (such as .NET, Sharepoint, or WCF). Since your application’s metadata and models are already stored in the repository and you’ve already deployed your application’s binaries, you can change your application by changing the models in the repository without having to redeploy it, similar to refreshing a web application. By using the repository, you can take steps to ensure that every server and workstation using your application is using the correct version, globalization settings, and language, and is properly secured.
Since the repository is just a SQL Server database (with lots of goodies, I admit!), it is easy to get at your metadata and models, and it is easy to build tools on top of the repository. Want to share a model between applications? Fetch that model from the repository. Want to move an entire application from staging to production? Just move the metadata and models from your staging repository to the production repository with SSIS (SQL Server Integration Services). Since the repository will inherit the capabilities of SQL Server, things like permissions at the SQL level can be used to determine what data that can be viewed and updated by a specific user or role.
Since the “Oslo” repository is built on top of SQL Server, “M” types have a natural mapping to SQL. Let’s take a look at how to use “M” types and values to model an application. While the focus of this paper is using data, specifically databases, in your application, “M” can be used to model a tremendous amount of other items including XML, WF, and CLR languages. It is up to the developer to build the appropriate “M” types and DSLs.
Using “M” Types and Values to Model an Application
In order to take advantage of the repository, we must model our application and its database and metadata in “M”. Let’s take a closer look at how we can do that using the “Oslo” May CTP and how “M” types map to SQL.
IntelliPad, the Tool
To use “M” types today, there is a tool that ships with the “Oslo” May CTP called “IntelliPad” that makes authoring types (as well as values and languages) pretty easy. “IntelliPad” is a lightweight text editor that can be placed into “modes” wherein “IntelliPad” behaves differently by providing contextual IntelliSense™ and syntax checking (“M” T-SQL Mode, SQL Mode, DSL Grammar for example). While this tool will certainly change before “Oslo” ships, it is an efficient way to write “M” today. If you prefer, you can also author “M” in Visual Studio 2008 and 2010. Visual Studio will allow you create projects (which can also be read by “IntelliPad”) and compile “M” code. “IntelliPad” is shown here:
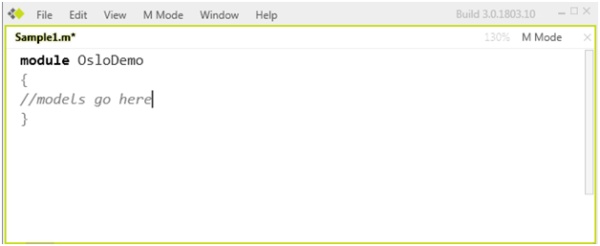
Figure 1: "Intellipad" editor
To understand the basics of “M” types and values, let’s model a simple database and look at the results. We’ll have users and projects with a one-to-many relationship between them (each user can have many projects assigned to them). In the interest of the length of this paper, I will resist building a complete application in “M”, showing you only enough to get your feet wet and get a feel for the basics.
To get started we will need to open up “IntelliPad” and declare a module to contain our “M” code. This is done simply by using the module keyword and giving it a name while enclosing your module in curly brackets as shown here:
module OsloDemo
{
}
Now let’s create our first type. We’ll model the user for the application since every application has a user table. Here is the type:
//"M" type to define a user type
type user
{
UserID : Integer64=>AutoNumber();
FirstName : Text#15;
LastName : Text#25;
Password : Text#10;
Notes : Text?;
} where identity UserID;
Here is the user type in “IntelliPad”:
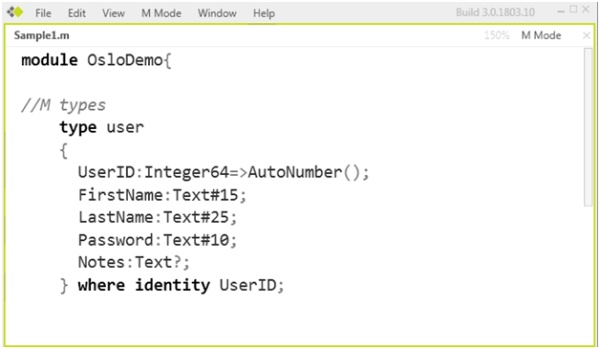
Figure 2: Editing User Type
This is the most basic of types, but I figured we would get our feet wet with an easy one. We are defining the fields that will make up the user type. I defined UserID as an AutoNumber (identity), FirstName as a 15 character text field, LastName as text 25, and password as text 10. The # specifies the text length in characters. The notes field is set to be optional (using ?) and because we did not set the number of characters the Notes field will contain, it will be dynamically sized. Also notice that we are defining the UserID as a SQL Server identity (autonumber).
Now we need to add an extent and an instance of the type. This is done using “M” values. To create an extent of User, use the syntax User: user*; which tells “M” that we will create a User extent to contain instances of the user type we just created. I won’t go too deep into how “M” types work, since Shawn Wildermuth has a great 3 part series on “M” types and values here. Just notice that “M” values take on this format:
InstanceName
{
DataInstanceName//Optional Instance Name
{
FieldName="Value"
}
}
Now let’s fill in some data. This is one area where “Oslo”–and “M” in particular—is so handy; you can model your application and then start to fill in some sample data and change it while you are still modeling. I don’t know about you and your developers, but only when I look at sample data do I really start to understand the mistakes I have made in my model and start to refactor. When I use “M”, I am not working with a real live database (yet!). Here are the full “M” values of the User extent:
module OsloDemo
{
//"M" type to define a user type
type User
{
UserID : Integer64=>AutoNumber();
FirstName : Text#15;
LastName : Text#25;
Password : Text#10;
Notes : Text?;
} where identity UserID;
//Create an extent using "M" values
User:user*; //the extent User of type user (case sensitive)
User
{
Steve
{
FirstName => "Stephen",
LastName => "Forte",
Password => "Telerik",
Notes => "this is the notes field"
},
Vassimo
{
FirstName => "Vassil",
LastName => "Terziev",
Password => "123"
},
Zarko
{
FirstName => "Svetozar",
LastName => "Georgiev",
Password => "456"
}
}
}
You will notice a few things right away. First, I don’t define the UserID in our “M” values since it is considered an autonumber: I rather named my instances Steve, Vassimo, and Zarko. This will come in handy later on when we utilize IntelliSense. You will also notice that the notes field was only used in the Steve instance. Now let’s model the second table (type and extent) of our application and then see how it produces T-SQL. Here is the “M” for the project type:
type project
{
ProjectID : Integer64 => AutoNumber();
ProjectName : Text#25;
Priority : Integer32 where value <= 3; //constraint
DateCreated : DateTime;
Description : Text?;
ProjectOwner : user; //this is a FK
} where identity ProjectID;
Notice here that we are putting a constraint on the Priority field, only allowing items less than the value of 3. We are using the DateTime data type and also define a foreign key by putting in user for the type of ProjectOwner. When we fill in the “M” values, we will get IntelliSense as shown below. The IntelliSense will show us the foreign key values of the User extent. Even though the named instances of your “M” values are optional, it is beneficial for you to name them as they will show up in IntelliSense.
//this will define a SQL foreign key relationship
Project : project* where item.ProjectOwner in User;
Project
{
Project1 {
ProjectName => "My Project 1",
Priority=>3,
DateCreated=>2009-06-01T00:00:00,
Description=>"Project blah blah",
ProjectOwner=>User.Steve //direct ref to steve (FK)
},
Project2 {
ProjectName => "My Project 2",
Priority=>1,
DateCreated=>2009-01-01T00:00:00,
Description=>"Project 1234",
ProjectOwner=>User.Zarko //direct ref to Zarko (FK)
}
}
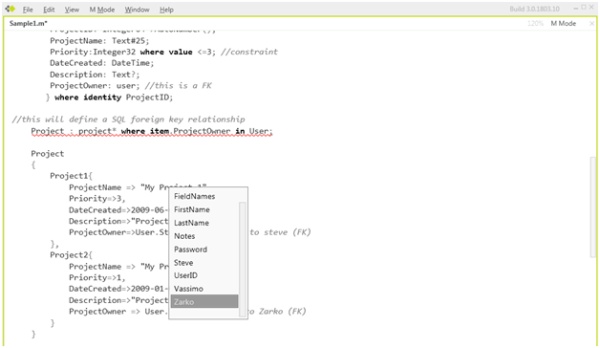
Figure 3: Intellisense showing foreign key values
Creating a View
Next we want to create a view of the data that only shows certain values. You do by creating a method and then using a lambda expression to restrict what you want to see. In the example below we create a view named “HighPriorityProjects” and return only projects that have a priority of 3.
HighPriorityProjects()
{
Project where value.Priority==3
}
Mapping “M” to T-SQL
Now that we have our model the way we want it, let’s map the “M” to T-SQL. There are several ways to do this, but let’s look at the easiest way. Using “IntelliPad”, click on M Mode| T-SQL Preview menu item as shown here and you will see the results of the “M” types and values:
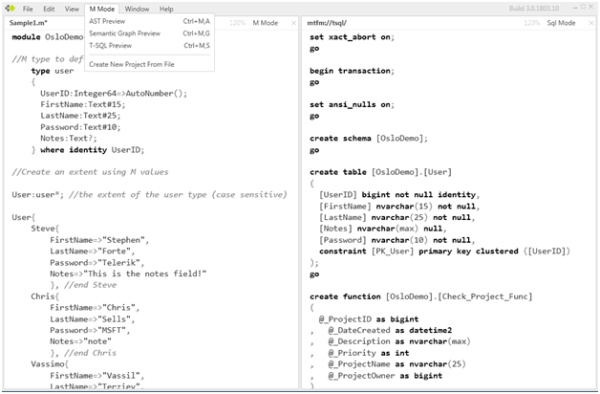
Figure 4: Viewing T-SQL
As you can see, extents map to tables the module mapped to a SQL Server schema, and our view mapped to a SQL Server view. The “M” values even mapped to SQL INSERT INTO statements to populate your database. The SQL code is shown here (some parts left out due to space):
create table [OsloDemo].[User]
(
[UserID] bigint not null identity,
[FirstName] nvarchar(15) not null,
[LastName] nvarchar(25) not null,
[Notes] nvarchar(max) null,
[Password] nvarchar(10) not null,
constraint [PK_User] primary key clustered ([UserID])
);
go
create table [OsloDemo].[Project]
(
[ProjectID] bigint not null identity,
[DateCreated] datetime2 not null,
[Description] nvarchar(max) null,
[Priority] int not null,
[ProjectName] nvarchar(25) not null,
[ProjectOwner] bigint not null,
constraint [PK_Project] primary key clustered ([ProjectID]),
constraint [FK_Project_ProjectOwner_OsloDemo_User] foreign key ([ProjectOwner]) references [OsloDemo].[User] ([UserID]),
constraint [Check_Project] check (([OsloDemo].[Check_Project_Func]([ProjectID], [DateCreated], [Description], [Priority], [ProjectName], [ProjectOwner])) = 1)
);
go
create view [OsloDemo].[HighPriorityProjects]
(
[ProjectID],
[DateCreated],
[Description],
[Priority],
[ProjectName],
[ProjectOwner]
)
as
select [$value].[ProjectID] as [ProjectID], [$value].[DateCreated] as [DateCreated], [$value].[Description] as [Description], [$value].[Priority] as [Priority], [$value].[ProjectName] as [ProjectName], [$value].[ProjectOwner] as [ProjectOwner]
from [OsloDemo].[Project] as [$value]
where [$value].[Priority] = 3;
go
insert into [OsloDemo].[User] ([FirstName], [LastName], [Password], [Notes])
values (N'Stephen', N'Forte', N'Telerik', N'this is the notes field');
declare @OsloDemo\_User\_UserID0 bigint = @@identity;
insert into [OsloDemo].[User] ([FirstName], [LastName], [Password])
values (N'Vassil', N'Terziev', N'123');
insert into [OsloDemo].[User] ([FirstName], [LastName], [Password])
values (N'Svetozar', N'Georgiev', N'456');
declare @OsloDemo\_User\_UserID2 bigint = @@identity;
insert into [OsloDemo].[Project] ([ProjectName], [Priority], [DateCreated], [Description], [ProjectOwner])
values (N'My Project 1', 3, '2009-01-01T00:00:00', N'Project Comment', @OsloDemo\_User\_UserID0);
insert into [OsloDemo].[Project] ([ProjectName], [Priority], [DateCreated], [Description], [ProjectOwner])
values (N'My Project 2', 1, '2009-01-01T00:00:00', N'Project Comment', @OsloDemo\_User\_UserID2);
go
The following table shows how “M” maps to T-SQL:
| “M” | T-SQL |
|---|---|
module OsloDemo {} |
SQL Server schema OsloDemo |
type user {} and extent User {} |
Table OsloDemo.User |
Fields in User extent |
Fields in OsloDemo.User table |
Data in User extent |
INSERT INTO OsloDemo.User table |
where value <= 3 |
SQL Server Function: Check_Project_Func |
where item.ProjectOwner in User |
Foreign Key Constraint |
Project extent and project type |
OsloDemo.Project table |
HighPriorityProjects{} view |
OsloDemo.HighPriorityProjects View |
If you just want to explore what the “M” to SQL mapping looks like, let’s run the T-SQL script in a new database. To run this in the database you can copy and paste the T-SQL into a Query window in SQL Server Management Studio (you can also use an “M” image file, as described in the next section). After you run the T-SQL, you will now have two new tables in your database, a new schema and function, as well as some data.
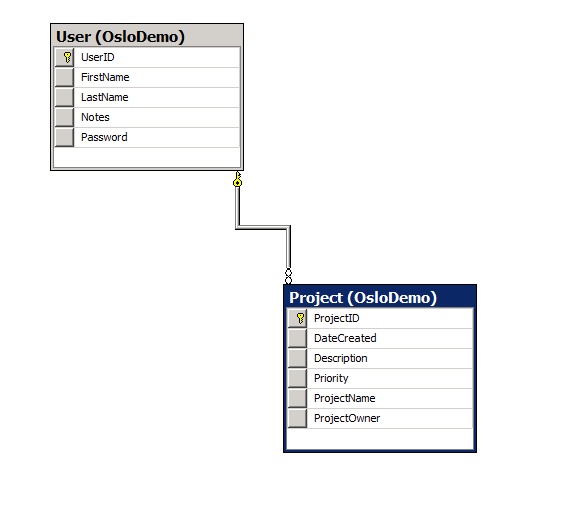
Figure 5: Created tables
To continue to explore what the results of your “M” are in T-SQL, you can explore database objects in the Object Explorer as well as execute a T-SQL query as shown here.

Figure 6: Instance data
The Power of the Repository
As already described, the “Oslo” repository is a special SQL Server 2008 database that is used to store and manage your application models. To see the complete “Oslo” picture we will take a look at adding our user model to the repository by compiling it to an image file, loading that image into the repository, then looking at it “Quadrant”.
Compiling the “M” into an Image
In “Intellipad” I am going to save the work that I have just done. Using the File menu, I choose Save and choose Sample1.m. Now I‘ll create a project out of that by selecting the M Mode | Create New Project From File menu item. This brings up the project file in “IntelliPad”, a project that is also accessible in Visual Studio. The code in “Intellipad” looks like this:
Project1.mproj
Compile
[Sample1.m]
By going to the Project menu and selecting “Build Project”, “Intellipad” will compile your “M” file into an “M” image (mx) file.
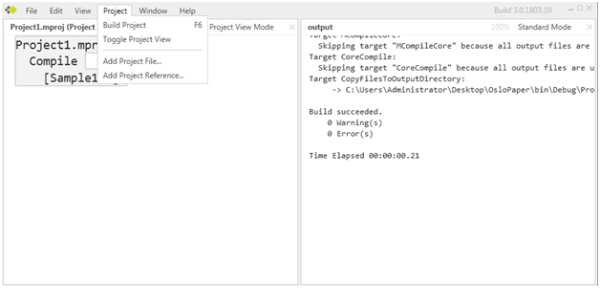
Figure 7: Generating image file
The Project1.mx file is outputted to the /bin/debug folder.
Loading the Image File to the Repository
The next step is to take the image file and load it to the repository. The “Oslo” SDK has a command line tool to help you do this called mx.exe that is located in the /bin folder of the “Oslo” directory on your computer (usually %Program Files/Microsoft Oslo/1.0/Bin). Bring up a command window and navigate to that folder . Then you have to use the install command of mx.exe to install your image to the repository. The full command is shown here:
mx.exe install imagefilename.mx -database:Repository
When the command is complete, your model has been loaded into the repository.
Viewing the Model in the Repository using ”Quadrant”
When you load up “Quadrant, you can drill down into the Catalog node and look for “OsloDemo”, the name of our module (and SQL Server schema.) You can click on the types and view the extents in the next window as shown below. Since “Quadrant” is tied to the repository itself, you can customize “Quadrant” based on data contained in the repository, allowing custom views and even custom visual DSLs.
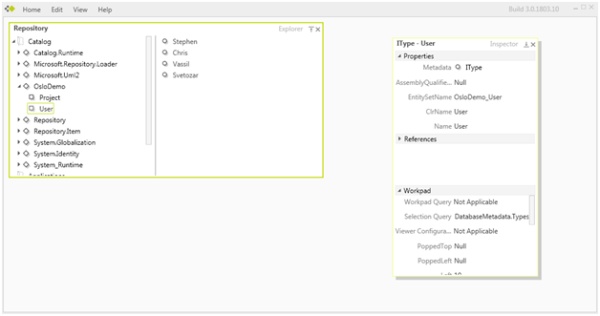
Figure 8: Quadrant editor
Benefits of Using the Repository
The “Oslo” Repository includes the Base Domain Library (BDL), an infrastructure and service model for model-driven applications. Having one central location for an application’s model, data, and meta-data helps an organization organize itself and provide opportunities for sharing of the models and data. The repository also will enforce enterprise level security via SQL Server security and ease the versioning and localization efforts. Deployment becomes easier as well since an application’s meta-data may include application configuration information, server and machine configuration information, plus deployment scripts and business process definition.
Using LINQ to “M” in .NET
As stated above, “Oslo” gives the developer the ability to create a domain specific language (DSL). DSLs are very useful because if you build a DSL on top of your application, you can abstract away some of the difficult details. For example, you can put in a layer on top of your standard communication method (DALs, web services, etc.). Let’s say you work at Expedia and you want to give your providers (the airlines) a way to enter flight data to your site. You will most likely have a data entry screen with lots of boxes and drop downs. An alternative of course is a Web Service as well as a CSV text import. But another alternative is to provide a DSL, so if someone wants to go in and make a quick change, they can type:
Delta flight 280 on Friday's new price is $780.
Using a DSL, you can transform this to an “M” value format:
Flights
{
{Carrier="Delta", Flight=280, DepartDate="July 10, 2009", Price=780}
}
This is one area where you can experiment with “Oslo” with .NET today—you can call the “M” DSL DLLs from .NET and perform the transformation in C# or VB. The problem is that the “M” value format is difficult to work with in .NET; parsing the “M” values can be a challenge. Telerik has released a LINQ to “M” implementation. It is pretty easy to use and is for evaluation purposes only at this time. After you download it and set a reference to it in your application, you then use standard LINQ statements against “M” values. For example, let’s say that your application has some “M” values that look like this:
People {
{Id=1,Name="Stephen Forte",Age=37},
{Id=2,Name="Mehfuz Hossain",Age=29},
{Id=3,Name="Vassil Terziev",Age=31},
{Id=4,Name="Nadia Terziev",Age=27},
{Id=5,Name="Chris Sells",Age=37},
{Id=6,Name="Todd Anglin",Age=27},
{Id=7,Name="Joel Semeniuk",Age=37},
{Id=8,Name="Richard Campbell",Age=42},
{Id=9,Name="Kathleen Gurbisz",Age=31}
}
You could have gotten this “M” code from the results of a DSL or some other process. For our purpose, we will just put it into a constant and query against it:
const string MGraphCode = @"
People {
{Id=1,Name=""Stephen Forte"",Age=37},
{Id=2,Name=""Mehfuz Hossain"",Age=29},
{Id=3,Name=""Vassil Terziev"",Age=31},
{Id=4,Name=""Nadia Terziev"",Age=27},
{Id=5,Name=""Chris Sells"",Age=37},
{Id=6,Name=""Todd Anglin"",Age=27},
{Id=7,Name=""Joel Semeniuk"",Age=37},
{Id=8,Name=""Richard Campbell"",Age=42},
{Id=9,Name=""Kathleen Gurbisz"",Age=31}
}";
Now you need to load the “M” code into a QueryContext object so you can work with it in LINQ:
var personM = QueryContext.Instance.Load(MGraphCode);
There is not a lot you can do with it just yet, but you can bind it to an ASP.NET data grid:
//fill GridView1 with all the results-untyped
var personM = QueryContext.Instance.Load(MGraphCode);
GridView1.DataSource = personM;
GridView1.DataBind();
This alone will save you some time, but if you want to do typed queries and have the cool IntelliSense experience, you have to strongly type your LINQ statement. To do this, create a class that has the same shape as your “M” data, so we will create a Person class:
//this gives us a strongly typed version
public class Person
{
public int Id { get; set; }
public string Name { get; set; }
public int Age { get; set; }
}
Now it gets fun. Let’s create a simple LINQ statement that will query just the 37 year old people not named Joel Semeniuk:
//fill GridView2 with LINQ statement
//need to strongly type with a Person class
var persons = QueryContext.Instance.Load<Person>(MGraphCode);
var result = from person in persons
where person.Age == 37 && person.Name != "Joel Semeniuk"
orderby person.Name ascending
select person;
GridView2.DataSource = result;
GridView2.DataBind();
| ID | Name | Age |
|---|---|---|
1 |
Stephen Forte |
37 |
5 |
Chris Sells |
37 |
This will return just Chris and Stephen. You can see that we are using the standard LINQ statements FROM, WHERE, ORDERBY, and SELECT.
Let’s do some aggregation, this query will aggregate a list all of the ages and count how many people are that age, but we will exclude from our query any age that only has one person:
//Using a Group By and SUM
var result1 = from person in persons
group person by person.Age into g
where g.Count() > 1
orderby g.Count() descending
select new { Age = g.Key, Count = g.Count() };
GridView4.DataSource = result1;
GridView4.DataBind();
| Age | Count |
|---|---|
37 |
2 |
31 |
2 |
27 |
2 |
Lastly, just for the true geeks, here is how to use a lambda expression:
//fill a GridView3 using LINQ and LAMBDA
GridView3.DataSource = QueryContext.Instance.Load<Person>(MGraphCode)
.Where(p => p.Name == "Mehfuz Hossain");
GridView3.DataBind();
| ID | Name | Age |
|---|---|---|
2 |
Mehfuz Hossain |
29 |
As you can see, using LINQ to “M” is one of many ways you can interoperate with the .NET framework.
Conclusion
By using the “M” language capabilities to model application data and its corresponding metadata while taking advantage of the repository as well as utilizing the domain specific languages, you can see that “Oslo” is a complete modeling package. Using “Oslo” to model your enterprise level data-driven applications will give you a distinct speed improvement in developing your applications as well as increase the level of collaboration in your environment.
About the Author
Stephen Forte is the Chief Strategy Officer of Telerik, a leading vendor in .NET components. He sits on the board of several start-ups including Triton Works and is also a certified scrum master. Prior he was the Chief Technology Officer (CTO) and co-founder of Corzen, Inc, a New York based provider of online market research data for Wall Street Firms. Corzen was acquired by Wanted Technologies (TXV: WAN) in 2007. Stephen is also the Microsoft Regional Director for the NY Metro region and speaks regularly at industry conferences around the world. He has written several books on application and database development including Programming SQL Server 2008 (MS Press). Prior to Corzen, Stephen served as the CTO of Zagat Survey in New York City and also was co-founder of the New York based software consulting firm The Aurora Development Group. He currently an MVP, INETA speaker and is the co-moderator and founder of the NYC .NET Developer User Group. Stephen has an MBA from the City University of New York.