New information has been added to this article since publication.
Refer to the Editor's Update below.
Desktop Deployment
Techniques for Simplifying Desktop Image Creation
Shelly Bird
At a Glance:
- Using Sysprep to create a single desktop image
- Managing and testing Plug and Play drivers
- Building a Sysprep folder
- Creating and using Cmdlines.txt
Windows XP
Windows Drivers
Sysprep
There are two main goals in constructing a custom system image using Sysprep. First, you want to incorporate all the necessary drivers that need to be loaded during the initial
startup Plug and Play scans. This limits the number of images that are necessary due to hardware differences. Second, you want to automate as many post-installation routines as possible so that, by the time your user presses Ctrl+Alt+Del, the vast majority of the work is already done. Post-installation activities include commands that must be run after the system boots for the first time, Sysprep changes to the Security Identifier (SID), joining the system to a domain, and so on. Examples might include adding the local domain's helpdesk security group to the local Administrators group or changing the default configuration of the network interface card (NIC).
Why is maintaining as few images as possible so essential? Besides simplifying maintenance, consistency is vital to improving security. The more images a baseline build shop must maintain, the greater potential there will be for small differences between the images and slower updates to the images as new security and application updates are released. Consequently, it is important to achieve as few images as possible.
Most organizations can agree on lowest common denominator baselines for software. However, they then often assume that they have to generate one image per computer model (to account for differences in hardware and drivers). Given the number of computer models, it is common to see organizations maintaining dozens of images. Compound that with monthly or even weekly updates for each image and you can quickly fall months behind schedule for rolling out important updates.
This article runs through some techniques that you can use to boil your images down to the smallest possible set. Much of the discussion centers on getting the right drivers in the right place. Once you complete the first pass of work described in this article, it isn't difficult to continue adding drivers as new computers are rolled out and need to be supported. I'll describe methods that anyone can quickly pick up using nothing more than the capabilities within Windows® XP Sysprep.
Building a Sysprep Folder
The process starts with building the master image on a legacy system with a basic hardware configuration; it should not have a fancy chipset or any unusual hardware attached. Preferably the system should require no custom drivers so Windows XP can be installed without any additional manufacturer-provided drivers. It is much easier to create a single base image when you start with a very spare master system.
The next step is to copy the latest version of Sysprep.exe from the \Support\Tools\deploy.cab file on the Windows XP Service Pack 2 (SP2) CD to a \Sysprep folder on the master system. There are two useful help files included with deploy.cab: ref.chm and deploy.chm. These include all the possible entries into the Sysprep answer file (Sysprep.inf) and extensive explanation of how Sysprep works.
It's particularly worth noting the limitations for what any single Sysprep image can cover in terms of Hardware Abstraction Layers (HALs). These limitations are described in deploy.chm. Figure 1 summarizes the destination computer types where you can install a given master image, depending on the HAL type of the computer used to create the master installation. This basically means that if the master image was built upon an ACPI system, it will fail if the image is applied to a non-ACPI system. This is one of the only firm restrictions to creating as few images as possible. You must create at least one image for each major HAL type in your organization. The good news is that the vast majority of systems are now ACPI. In my experience, many failures that are attributed to HAL issues are instead related to either a missing hard disk controller or to problems with the chipset drivers.
Figure 1 Summary of HAL Compatibility
| Master System HAL | Destination System HAL | |||
| ACPI APIC UP | ACPI APIC MP | Non-ACPI APIC UP | Non-ACPI APIC MP | |
| ACPI APIC UP | ||||
| ACPI APIC MP | ||||
| Non-ACPI UP | ||||
| Non-ACPI APIC MP | ||||
You can use the Setup Manager (Setupmgr.exe) in the Sysprep folder to walk you through creating your first Sysprep.inf file. Once you have this file, you can open it in Notepad to make further customizations. In the [Unattended] section, make sure these entries exist:
OemPreinstall = Yes
OemPnPDriversPath= [path to each PnP driver
    Sysprep scan for]
InstallFilesPath=C:\Sysprep\I386
DriverSigningPolicy=Ignore
UpdateInstalledDrivers=Yes
And elsewhere in the file, make sure these entries were created:
[SysprepMassStorage]

[Sysprep]
BuildMassStorageSection=Yes
The [Unattended] section entries make Sysprep aware of the \i386\$OEM$ folder, which ensures that, if a Cmdlines.txt file exists there, it will be run. Also, the OemPnPDriversPath entry alerts Sysprep, during its scan, to the existence and location of any additional drivers you have provided. Note that there is a 2,048-character limit for this entry.
The BuildMassStorageSection entry directs Sysprep to create a list of available mass storage controller drivers based on those which are available by default, and listed in Machine.inf, Scsi.inf, Pnpscsi.inf, and Mshdc.inf, and include it in the SysprepMassStorage section of the Sysprep.inf file. This is a long list, and if you want to get more precise, you can limit which controllers the scan looks for and which drivers are slipped in dynamically. However, if you are at all uncertain about which computer models will receive the image, include the scan for all of these devices. You may need additional mass controller drivers, particularly if your systems have newer SCSI controllers, but the default drivers cover most hardware that is available today.
Creating and Using Cmdlines.txt
Cmdlines.txt is an optional file that can launch post-Sysprep routines at the tail end of an image's installation process (after changing the SID and optionally joining a domain). This is useful if you must edit hardware configurations or add security groups that won't exist until the image has been installed on a target machine.
To use this feature, create a \Sysprep\i386\$OEM$ folder and then create a text file called Cmdlines.txt in this folder. Make sure the dependent executables are in the same folder—you can't use absolute or relative paths.
Through Cmdlines.txt you can perform such tasks as editing the registry and configuring NIC bindings. But keep in mind that the desktop is not available and you may need to start a service to get your routine running. Although you can use this functionality to install entire applications, it doesn't make much sense to do that here. Cmdlines.txt is best suited for making tweaks to the configuration that cannot be done within the master image.
The commands listed in Cmdlines.txt must be embedded within quotes. The Cmdlines.txt file must follow this format:
[Commands]
"command_1"
"command_2"
...
"command_x"
Unfortunately, this can result in quotes embedded within quotes, and this doesn't work well. If you have this situation, you should place the commands in a batch file located in the \Sysprep\i386\$OEM$ folder and use Cmdlines.txt to run the batch.
This Cmdlines.txt example performs a couple of frequently requested tasks:
[Commands]
".\nowifi.bat"
"cmd /c .\netcfg.exe -v -u ms_psched"
"cmd /c rmdir /s /q C:\D"
It runs a batch file to disable any wireless NICs (all connections except the Local Area Connection are disabled), removes the Quality of Service (QoS) IPsec service on the internal NIC, and removes the \D folder in the root of the C: drive. To make sure these commands run, rmdir.exe, cnic.exe, nowifi.bat, and netcfg.exe have to be in the same folder as Cmdlines.txt.
Some people like to disable wireless networking for security reasons (especially when no secure wireless connection is available). But there is no way to do this in the master image—you can't disable a wireless connection until it exists. The same challenge exists for changing the configuration of a NIC. Until the NIC is there, with bindings established, you cannot change those configurations. The first task is accomplished with a command in the batch file nowifi.bat:
.\CNIC.exe "Local Area Connection" -d -e –v.
[Editor's Update - 8/2/2006: The CNIC.exe tool described here is now available for download. ]
The second task is performed through the call to netcfg.exe.
Removal of the QoS binding is occasionally requested for a fear that IPsec tunneling allows desktop clients to make intrusion detection systems useless by sidestepping the traditional perimeter firewalls. There is also some misunderstanding of how valuable it can be to have IPsec on clients. Rather than editing every single NIC in Windows XP, it makes more sense to simply block IPv6 traffic at the perimeter firewall. Regardless of the approach taken, the good news is that if security policy makers insist on turning off this rather useful feature, it is just as easy to reverse the decision later by using netcfg.exe.
The \D folder is where the installation process stored additional drivers for Sysprep during its Plug and Play scan. You can place the \D folder under \Sysprep to have it automatically removed, but some users like to keep the drivers on the final build for later restoration should a driver need to be reinstalled. This line can be removed if you want to keep the drivers on the final build.
Sysprep Plug and Play Drivers
The next step is to set up the folder that Sysprep uses for its Plug and Play drivers scan—which is the folder that was specified for deletion in the previous section. Create a \D folder for drivers in the root, then use the shorthand directory names shown in Figure 2 to create a subfolder for each category of device.
Figure 2 Driver Folder Names
| Folder Name | Description |
| \A | Audio drivers |
| \C | Chipset drivers |
| \I | Input device drivers (such as mice, touchpads, and trackballs) |
| \M | Modem drivers |
| \N | Network interface card drivers |
| \S | Smart card reader drivers |
| \V | Video card drivers |
Note that these folders are organized by categories of devices, not by computer model. Why? Because the goal is to have Sysprep clearly loading just one unique driver for each type of device—in the Plug and Play world, the devices are differentiated by their IDs (see Michael Murgolo's Utility Spotlight column in this issue for details). Different computer models often have the same video cards or NICs, so it's better to focus on the devices in this case.
Additional Resources
This article discusses just one of a variety of ways to manage the driver integration process when creating a managed desktop image. For other alternatives, see:
- Michael Murgolo’s Utility Spotlight column in this issue of TechNet Magazine
- The Computer Imaging System Feature Team Guide of the Business Desktop Deployment Solution Accelerator
- The Server Baseline Imaging Guide of the Windows Server Deployment Solution Accelerator
You should make a list of computer models and note whether any additional drivers are necessary beyond what is included in Windows XP. (For advice on using drivers that are not included by default, see the sidebar "Driver Download Tips.") Cross reference any duplicate drivers (for instance, an ATI Radeon video card that exists in four of the target six machines) in separate lists of the devices. Create subfolders under each category for the devices listed and either number them or name them, keeping names short. For instance, you might have three video card drivers, which you would store in \D\V\1, \D\V\2, and \D\V\3.
Naming conventions aren't a hard and fast rule—you can rename these to anything you want if it's more convenient or easier to maintain. However, this shorthand is handy since there is a 2,048-character limit to the length of the OemPnpDriversPath line that can be placed inside the Sysprep.inf, and it is a good idea to leave plenty of room for growth.
You may apply an image and find that several devices show up in Device Manager as unrecognized. Don't forget to highlight the machine name at the top, select View on the MMC menu, and then choose Show Hidden Devices. Again, confirm whether there are any unrecognized devices. Do not add the missing drivers by running the manufacturer's executable. Instead, take the opportunity to isolate the minimum driver required, and prove that it will work with Sysprep Plug and Play scans.
Occasionally, devices will show up as Unknown Device, making it difficult to determine which device is failing. In such cases, it is often a newer chipset driver that is missing.
It helps to determine the ID of the missing driver. You can do this in one of several ways. First, you can check the properties of the device. Right-click on the device in Device Manager, click Properties, and then select the Details tab. On the dropdown menu, select Device Instance Id. This will display something like that shown in Figure 3. Note the ID string. Alternatively, to determine the Plug and Play ID you can run Msinfo32.exe and examine the report for details, or you can use a Windows Management Instrumentation (WMI) script to retrieve the ID.
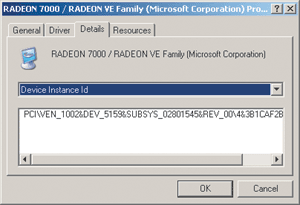
Figure 3** Device Plug and Play ID **
With the Plug and Play ID in hand, search the Internet to track down more information or drivers for the device. In addition, you can use the Plug and Play ID to confirm that you don't already have a driver (perhaps named slightly differently) with this ID included in your list of drivers. Conflicts between drivers are another common problem with Sysprep Plug and Play scans.
Testing Drivers
Though it's not always possible, I recommend that you test a driver before slipping it into the Sysprep driver directory. This is one reason I don't recommend simply running the manufacturer's installer. Too often I find multiple drivers in the same pack, and it can be a challenge to determine exactly which driver is the one that is missing.
Here's a method you can use to nail the right driver. It's somewhat crude, but it's effective and requires no special scripts or tools:
- Open Device Manager.
- Right-click on the malfunctioning device (or Unknown Device entry), and choose Update Driver.
- Don't run the Hardware Update Wizard.
- Click on the Install from a list or specific location (Advanced) option.
- Make sure the Search removable media option is unchecked, and select the Include this location in the search option. Browse to the folder where your extracted drivers exist.
At this point, if the OK button is grayed out, the system isn't finding an .inf file and installation through Plug and Play will not succeed. If the OK button is available, click on OK and see if the driver loads successfully. If there is a mismatch, you will be informed and you can then try the next driver set. If the installation proceeds, confirm there are no errors, restart the machine, and inspect Device Manager one more time to confirm the device is now fully operational.
Now, if everything has been successful, you can copy the folder that succeeded to the \D directory and include the folder path in Sysprep.inf under the OemPnpDriversPath entry. You should make sure your OemPnpDriversPath also points to the exact folder that worked; this is the failsafe method for ensuring it gets picked up by Sysprep PnP.
Wrapping Up
Driver Download Tips
Always download the latest drivers unless there is a known problem with it. Updates for drivers often include improvements to increase stability or eliminate known security issues.
The computer manufacturer’s site is the first place you should check for the latest drivers. Also check the original device manufacturer’s site, especially video and sound cards, since they often have more recent drivers.
If you suspect a problem is caused by a chipset driver, check the manufacturer's documentation or support services to determine which chipset is present; then download the latest chipset driver from the manufacturer. Including a chipset driver in the Sysprep drivers directory is slightly different than including other driver types, and requires some extra attention.
Always look for drivers that include an .inf file. This is the installation information file, and must be present in order for Sysprep to perform its Plug and Play operations properly. If the manufacturer provides drivers in an executable format, the driver must be extracted so that the .inf file is exposed. Often, this task can be accomplished by running the executable with /? parameter, and viewing the available options.
- If there are several .inf files, you can open the files with Notepad and browse through their contents to confirm which driver each will install.
- If a manufacturer provides both the executable and a developer or OEM version of the driver, the latter is intended for use with Sysprep or unattended installations, and is where you will find the .inf file.
- When there appears to be only an executable driver file available and you are unable to extract the files yourself, try running the installation and checking C:\Temp, C:\Windows\Temp, and the local user account’s \Temp directories for files that have been extracted. If you can, capture these files and store them in a separate folder before completing the installation of the driver. While this is a last-ditch effort, it has been known to work on occasion.
Once you have downloaded all the necessary drivers, organized them in your driver folders, and confirmed that the drivers are compatible with Sysprep Plug and Play, you can back up the \Sysprep and \D folders and begin testing. For each image, simply pull in the \Sysprep and \D directories to the root of your C: drive and run Sysprep. As new generations of your image are created, you can simply slip in any new drivers and run Sysprep again.
Finally, note that the same methods discussed here can be used to incorporate Tablet PC-specific drivers into the same build (keeping in mind any HAL constraints). Just make sure you have any new, non-native Windows XP drivers required for Tablet PCs in the \D folder. For more information about this, see "Deploying Windows XP Tablet PC Edition 2005: Single-Image Deployment Supplemental Guide."
Shelly Bird is a Senior Consultant II with Microsoft Consulting Services Public Sector. For over 10 years she has assisted government, military, and state agencies in mass deployments of desktops and servers, with security as the focus.
© 2008 Microsoft Corporation and CMP Media, LLC. All rights reserved; reproduction in part or in whole without permission is prohibited.