Greg Shields
Contents
Clustering Hyper-V
Working with Clustered Hyper-V
Increasing Your Availability
In the early days of my IT career, I used to answer the oft-asked “What do you do for a living?” with “Oh, I fi x computers.” But for years, something bothered me about that statement. It felt too negative, as if computers were always breaking and the security of my living relied on that fact. So, after answering that question over and over, it finally hit me. My real priority as IT technician and systems administrator wasn't necessarily to fix computers—it was to keep them running.
That priority hasn't changed. In fact, as computing becomes more and more critical to the daily operations of most businesses, being able to fix computers has grown less important. What's become much more critical is that the computers keep on working. Nowhere is this more important than in your job as a jack-of-all-trades IT professional. Struggling to keep computers running with a minimum of resources and a shrinking budget often requires a healthy measure of duct-tape and bailing-twine.
With the right combinations of technology, however, you can inexpensively increase the availability of your servers. By converting your physical servers to virtual ones, you immediately get extra capabilities that make them less likely to go down and easier to bring back up when they do:
- Snapshots enable you to go back in time when a software update or configuration change blows up an otherwise healthy server.
- Virtual hard disks consolidate the thousands of files that comprise a Windows server into a single file for backups, which significantly improves the reliability of those backups.
- Volume Shadow Copy Service (VSS) support, which is natively available in Hyper-V, means that applications return from a restore with zero loss of data and immediately ready for operation.
- Migration capabilities improve planned downtime activities by providing a mechanism for relocating the processing of virtual machines to new hosts with little to no disruption in service.
- Failover clustering means that the loss of a virtual host automatically moves virtual machines to new locations where they can continue doing their job.
The hard part in all of this is figuring out exactly what technologies you need to deploy—and which you can afford. There is a direct relationship between the levels of redundancy you can deploy in an IT environment and the cost. With that in mind, adding a technology like Windows Server 2008 Failover Clustering to Hyper-V might get overlooked because of the perceived complexity. Yet you can implement not necessarily highly reliable, but "reasonably reliable" virtualization for less than you'd think.
To that end, let's explore one very simple solution that integrates these two technologies. Be aware that this implementation doesn't immediately bestow the highest levels of availability, but it is the simplest solution you can deploy today. Once you understand the basics, I'll suggest some ways you can add even more, with added cost and complexity, of course. Let your budget be your guide.
Clustering Hyper-V
To get started, take a look at the article called "Hyper-V Step-by-Step Guide: Hyper-V and Failover Clustering." I'll describe the high-level steps necessary to implement a clustered configuration. For the detailed click-by-click instructions, refer to this document.
Implementing redundancy with Hyper-V involves clustering its services across two or more computers. Each computer must have installed a copy of the x64 version of Windows Server 2008 Enterprise Edition, and each should include a minimum of two network cards per server plus one or more network cards for iSCSI. In this very simple example, you will use the network to connect these two servers to a third server or device that hosts a set of shared iSCSI disks. iSCSI is used here because it is easy to set up, requires little to no additional equipment or specialized training, and runs across your existing network.
On those disks you will store the files for your virtual machines so they can be directly accessed by both hosts. As shown in Figure 1, two network cards connect each server to two different networks (one for the cluster's private network, the other for your production network), while the third connects to the iSCSI disks. In this example, your iSCSI connections are on different networks from your production traffic. Segregating iSCSI from regular network traffic is important protect the traffic of each type from the network congestion of the other.
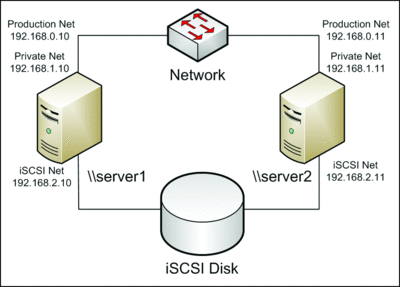
Figure 1 At minimum, six network connections are needed to start a cluster.
The first step in preparing this environment is validating that your servers can in fact run the Hyper-V role. Hyper-V has three hardware requirements:
- The server must be capable of running the x64 version of the Windows OS.
- The server's processor must be equipped with hardware Data Execution Prevention ( DEP ).
- The server's processor capabilities must include virtualization extensions.
These three requirements are all determined by the processor capabilities available on the server, and there are two ways to determine whether your servers meet these needs. For server-class equipment purchased from a server hardware vendor, you can verify your server's make and model against the Windows Server Catalog. There, click on the Hyper-V link in the left column to narrow the results to just those servers that have been tested and found to successfully support Hyper-V.
If your server is not in this list or is your own design, you can download the Securable test tool. This tiny tool tests your processor's capabilities against these three requirements. If your maximum bit length is 64 and the tool reports Yes for both hardware DEP and hardware virtualization, you've got what you need.
The next step in the process is to create two disks that are exposed to your network via iSCSI. The first disk will be 512MB in size for your witness disk, while the second disk will be of a size that is needed for the full installation of one virtual machine. The exact steps to do this will be different depending on what product you use to host the disks. If your environment has iSCSI hardware in place, simply create and expose two new disks through its interface. If you don't have iSCSI hardware, iSCSI target software exists on the Internet that you can install to a third server in your environment for this purpose.
If you need to use software-based iSCSI, look carefully at the features available. Microsoft clustering requires iSCSI to support SCSI Primary Commands-3, specifically the support of Persistent Reservations. Most for-cost iSCSI software currently supports this capability, but there is very little support for it in most open source software packages.
One inexpensive and easy-to-use software package is the StarWind iSCSI Target from Rocket Division. You need to use one of the paid versions for clustering because the no-cost Personal Edition does not support connecting multiple servers to the same disk. Other options exist, but at present there are no freeware downloads from Microsoft that can help.
Once you have created and exposed these two disks to the network via iSCSI, follow these steps on each computer that will be a part of the cluster to connect to the disks:
- Navigate to Administrative Tools | iSCSI Initiator. On your first attempt to connect to the tool, you will be prompted twice to enable the Microsoft iSCSI Service and unblock its firewall connection. Choose Yes for both to start the console.
- To find your disks, go to the Discovery tab and click Add Portal. In the resulting screen, enter the IP address for the iSCSI disk and click the Advanced button. Next, change the local adapter to Microsoft iSCSI Adapter. Next, change the source IP to the IP address for the network card you have selected for your disk connection. Firewalls can prevent the initiator from accessing the target if an error in connecting occurs at this point.
- If you have successfully connected to your disks via the network, you will see the name of each disk under the Targets tab. The next step is to log on to each disk. Do this by clicking the disk and selecting Log On. On the resulting screen, check the box for Automatically restore this connection when the computer starts and click the Advanced button. Again, set the local adapter to Microsoft iSCSI Adapter, the source IP to the IP address for the correct network card, and the target portal to the IP address and port for the iSCSI device. Repeat this step for each disk. A successful logon will look similar to Figure 2.
- Under the Favorite Targets tab, click the Refresh button. The disk names should appear in the list of favorite targets.
- Under the Volumes and Devices tab, click the Autoconfigure button. If everything has been done correctly to this point, you will see references to each disk appear in the box.
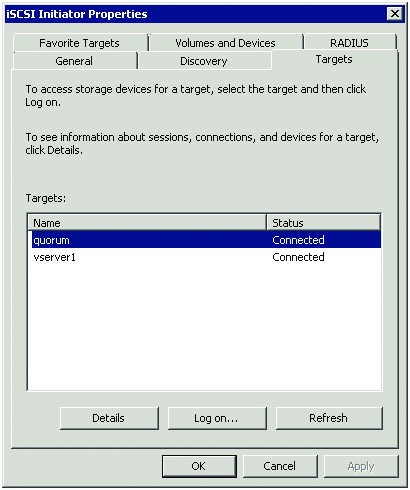
Figure 2 A successful connection to iSCSI disks
After connecting to your disks, you need to initialize and format them to make them ready for use. You do this in Server Manager under the Storage | Disk Management node. This process must be run on each computer, but must be done only when the other computer is powered down. Do this now and launch Disk Management. Now right-click each disk and bring the disk online. Then right-click again and initialize the disk. Finally, right-click a third time to create a new Simple Volume, formatting the disk as NTFS and assigning it a drive letter. For this example, we will assign Q: to the quorum drive and F: to the drive for our virtual machine.
Power down the first computer and start the second. On the second computer, ensure that the disk is assigned the same drive letter as was assigned on the first computer. When this is complete, both computers can be turned on. Your disks are now ready for clustering.
The next step in this process is to install the Hyper-V role to your computer as well as the Failover Clustering feature. You do both from Server Manager. Prior to installing the Hyper-V role, upgrade your server's Hyper-V code to the RTM version by installing update 950050 first. You will find it in the Windows Update control panel as a Recommended update. Installing these components requires a reboot.
Two steps remain. First, validate your cluster by navigating to Administrative Tools | Failover Cluster Manager. There, click the link to Validate a configuration. This step ensures that everything you've configured is correct to prepare for a successful cluster creation. If your configuration passes the validation tests, click the link to Create a cluster. The wizard will ask for the names of the cluster members as well as an IP address to be used for cluster communication. This address will be an unused IP address on your network and should not be any of the IP addresses you've used to this point in this procedure. Complete the wizard to create the cluster.
Working with Clustered Hyper-V
When you use Hyper-V alone and without System Center Virtual Machine Manager, the process of managing your clustered virtual hosts happens in two places. You create and work with virtual machines from within the Hyper-V Manager. The configuration of both clustering itself and the necessary cluster resources is done from within the Failover Cluster Manager.
To create a new virtual machine, open the Hyper-V Manager and select New | Virtual Machine. Answer the questions in the wizard and ensure that you store that virtual machine's disk files on the F: drive. All files associated with a clustered virtual machine must always be stored on shared disks. Once you've created your virtual machine, power it down and launch the Failover Cluster Manager. This next step configures the resources necessary to make the virtual machine cluster aware. Right-click Services and Applications, and select Configure a Service or Application. Select the Virtual Machine item in the menu, and click next. Your screen will look similar to Figure 3. There, select the machine you want to be made cluster aware. You will be unable to select machines that are powered on or whose disk files are not stored on shared drives. Complete the wizard to finish this process.
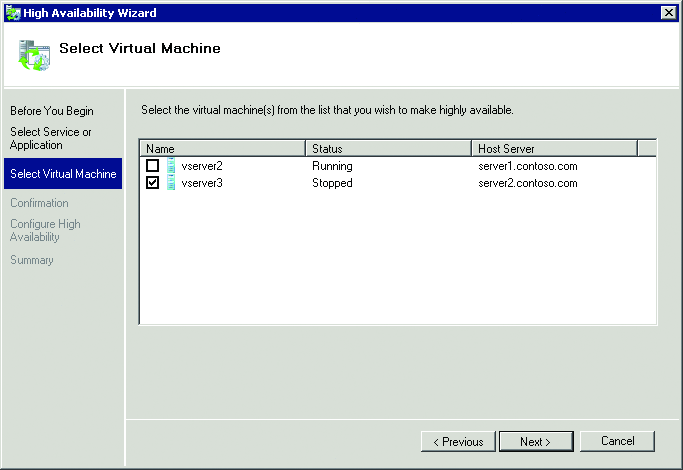
Figure 3 Selecting a machine to be made cluster aware
You now have a virtual machine that is cluster aware, and this machine now benefits from the high availability provided by Windows Server 2008 Failover Clustering. This means that if the host of the virtual machine goes down or if the machine experiences any problems, it will automatically restart itself on the other cluster node. Figure 4 shows an example of how your virtual machine appears in the Failover Cluster Manager.
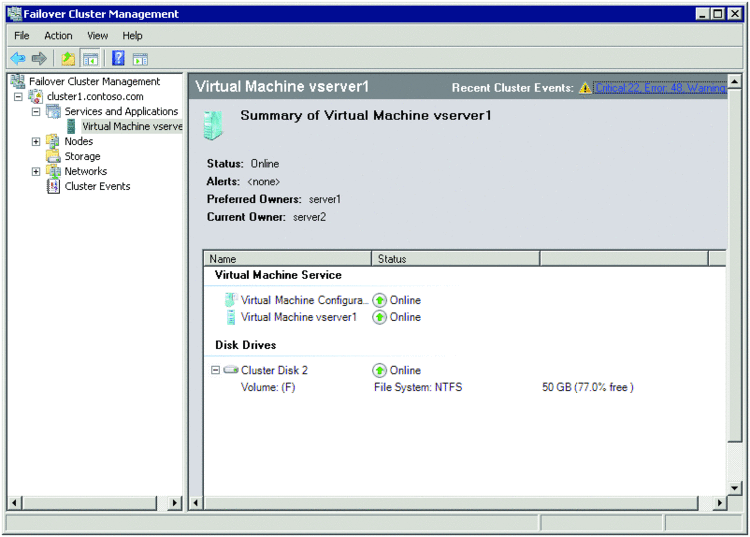
Figure 4 A virtual machine hosted in Failover Cluster Manager
If you need to perform maintenance on the cluster host, you can now also quick migrate that virtual machine to the other host by right-clicking its instance in Services and Applications and selecting Move this service or application to another node. In the same location, the properties of this virtual machine group provide a place to instruct the cluster which nodes are preferred for hosting the machine. In Windows failover clusters, a preferred owner corresponds to the cluster nodes on which you prefer the machine to be hosted in the event of a failover. This choice has greater impact on clusters with more than two nodes but can be a way of manually load-balancing virtual machines across multiple nodes.
Increasing Your Availability
These steps are presented to show how easy adding extra availability to your servers can be. If you have two copies of Windows Server 2008 Enterprise Edition lying around and either an iSCSI hardware device or software installation, these few steps will build a basic Windows cluster for supporting high availability.
Yet, as I explained in the beginning of this column, this is only the first step. There are other layers of technology you will likely want to add to this architecture to gain even more availability. Each layer adds a little more resiliency to your environment—but also adds a little more cost and complexity. Depending on your needs and your budget, consider the following as potential add-ons:
Server-class equipment. The use of equipment that is not listed in the Windows catalog can impact supportability and may not best meet the needs of your virtual machines. Moving to tested and supported server-class equipment will ensure full support in the case of a problem.
Network card redundancy. With the minimum three network cards connecting each cluster node to its disks and networks, the loss of any can mean the loss of that server as a cluster node. Thus, adding more network cards for multipath iSCSI or network redundancy should be your first choice for more hardware. And, remember, NICs are cheap Many servers these days can inexpensively support four, six, or even more network cards, so this simple addition will net a lot of resiliency bang for your budgetary buck.
Network path redundancy. The use of iSCSI across your production network can have a significant impact on its performance. The reverse holds true as well because traditional network traffic can have an impact on a cluster node's connection to its disk. Isolating iSCSI traffic to its own network path isolates that traffic to its own network segment, ensuring its full availability as network conditions change.
Using hardware-based iSCSI. Although iSCSI target software works, it can pose a problem. The loss of the server hosting your iSCSI disks means the loss of the entire cluster. Because servers require reboots from time to time, hardware-based iSCSI tends to assure higher levels of availability.
iSCSI redundancy. Whether you use hardware or software for your iSCSI connection, either is still a single point of failure if it is not made redundant. Look for solutions that provide redundancy for your iSCSI disks.
System Center Virtual Machine Manager. Using Hyper-V alone across multiple systems can be challenging. There is a lot to be configured and many steps involve manual intervention. Adding the extra management capabilities gained through System Center Virtual Machine Manager makes the process of managing your virtualization environment much easier, which reduces the potential of mistakes and costly downtime.
Additional cluster nodes. Windows Server 2008 Enterprise Edition x64 can support up to 16 nodes in a failover cluster. Adding additional nodes to a cluster requires running through the steps described here on an additional server and adding that server to the cluster. Once you have that extra server, you have another location where virtual machines can be failed over when problems occur. This is especially handy when you consider how the loss of a single node can affect virtual machine performance. For example, if you store four virtual machines on each cluster node of a two-node cluster, the loss of one node moves all eight virtual machines onto a single node. Collocating this many machines onto one server affects the performance of all virtual machines.
Multi-site Clusters. Traditional failover clusters are designed to protect against the loss of a host, but they don't do well in the case of a disaster. To protect against the loss of every cluster node at once, consider building a geocluster. A much-more complex undertaking, geoclusters span subnets and leverage replication technology for keeping far-removed data stores in sync. With a geocluster, if you lose one entire site, your virtual machines will automatically migrate to another site with only a small outage.
All these options add more cost to your environment and many add significant levels of complexity. But all of them take a highly-available architecture and make it even more so.
If you've got thoughts about clustering and Hyper-V, or you've built an inexpensive virtual cluster you'd like to share, drop me a line at gshields@concentratedtech.com.
Greg Shields, MVP, is a partner at Concentrated Technology. Get more of Greg's Jack-of-all-Trades tips and tricks at www.ConcentratedTech.com.