Manage plugins for apps built with Visual Studio Tools for Apache Cordova
Apache Cordova uses plugins to provide access to native device capabilities that aren’t available to simple web apps, such as access to the file system. A plugin is a cross-platform Cordova library that accesses native code and device capabilities through a JavaScript interface. When required, the plugin also updates the platform manifest to enable device capabilities. Not all plugins are supported or needed on all device platforms.
You enable plugins by using the Cordova config.xml file. Visual Studio provides ways to update this file using the configuration designer.
Note: For more information on plugins, see the Cordova config.xml documentation.
Add a core plugin
You can add a core Cordova plugin by using Visual Studio. When you build your solution, the plugin is installed from the Cordova registry.
In Solution Explorer, open the shortcut menu for the config.xml file, and then choose Open or View Designer.
In the configuration designer, choose the Plugins tab, and then choose the Core page.
Select a plugin, and then choose the Add button.
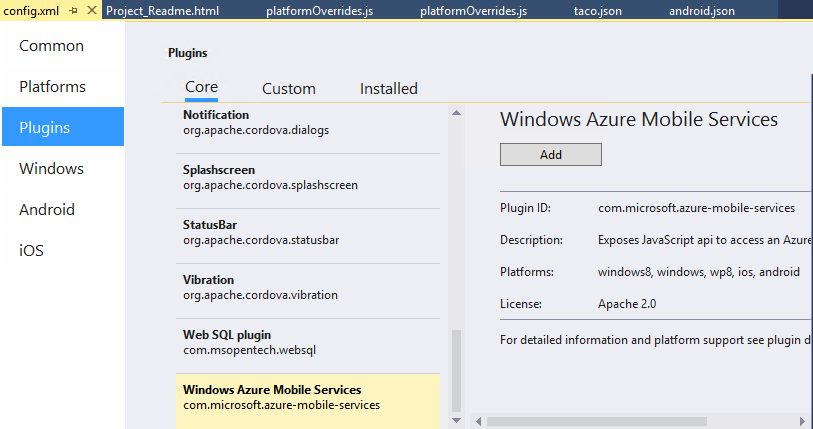
When you add the plugin, Visual Studio adds an element to your config.xml file.
To write code for a particular plugin, see the Plugin APIs.
Add a custom plugin
In Solution Explorer, open the shortcut menu for the config.xml file, and then choose Open or View Designer.
In the configuration designer, choose the Plugins tab, and then choose the Custom page.
Specify Plugin ID, Local or Git as the source, and then provide the location by entering the npm package name (the id), browsing to a local folder, or specifying a Git repository (ex. https://github.com/cordova-sms/cordova-sms-plugin).
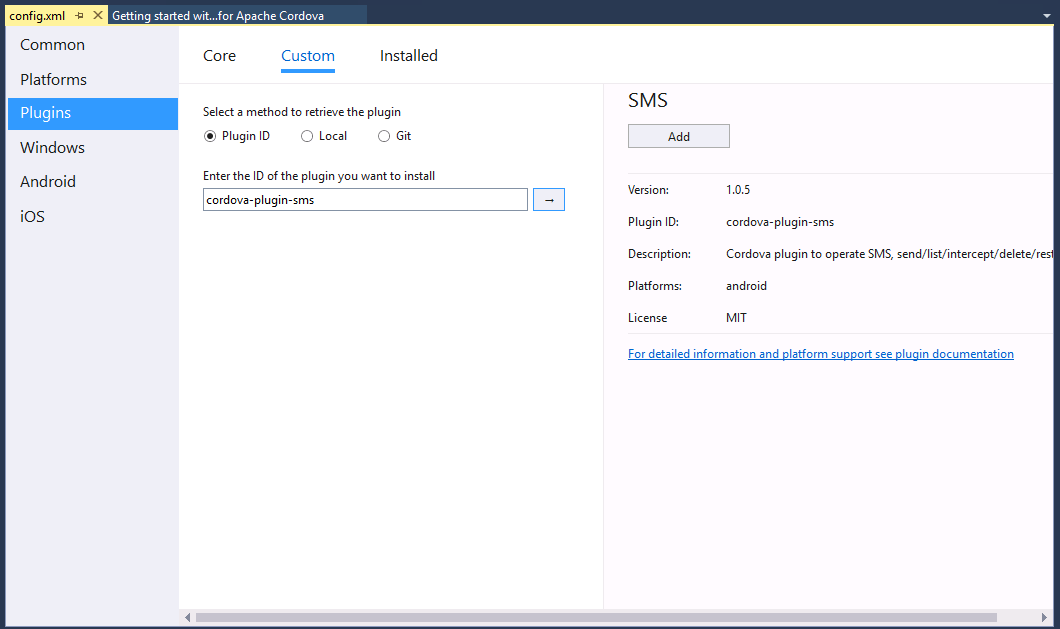
Visual Studio adds a plugin folder for that custom plugin. The important plugin files include: plugin.xml, the plugin’s src folder and www folder.
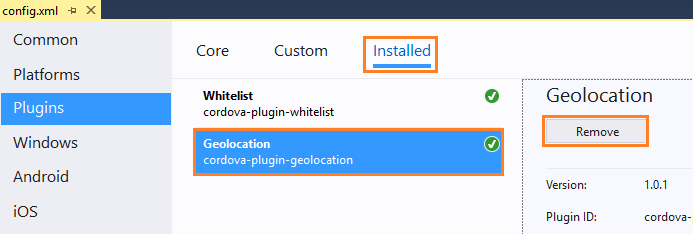
Remove a plugin
In Solution Explorer, open the shortcut menu for the config.xml file, and then choose Open or View Designer.
In the configuration designer, choose the Plugins tab, and then choose the Installed page.
Choose a plugin, and then choose the Remove button.
If you experience any errors when you add remove a plugin, see these tips and workarounds.
Update a plugin to use the latest version
Use the configuration designer to update a plugin to a newer version. The configuration designer always adds the most recent version of a plugin to your project when it is installed.
To update, simply remove the plugin and then Add it again.
The Cordova plugins registry provides information about different plugin versions.
Update a plugin to use an older version
Remove the plugin, and then add the appropriate version of the plugin by directly editing Config.xml file of your project. See the next section for guidance on how to add it.
The Cordova plugins registry provides information about different plugin versions.
Add a plugin that is not present in the configuration designer
Occasionally you might need to install a specific version of a Cordova plugin that is not listed in the configuration designer. If this plugin is available in plugins.cordova.io when using any version of Cordova, or in npm when using Cordova 5.0.0+, you can add the following element to config.xml and the plugin will be installed on when you next build your project:
If any of plugins you intend to install were already added to your project (particularly with an older ID), remove them.
In Solution Explorer, open the shortcut menu for config.xml and choose View Code.
Add the following element to config.xml under the root widget element:
<vs:plugin name="org-apache-cordova-pluginname" version="0.1.1" />Replace
org-apache-cordova-pluginnamewith the correct ID, and replace0.1.1with the correct version. The plugin will be installed the next time that you build the app.
You can add plugins using a Git URI or the local filesystem by using the Custom tab of the Plugins section in the config.xml designer. Using a Git URI can cause you to get a “dev” version of a plugin. See these instructions if you want to use a specific version of a GitHub sourced plugin.
Configure plugin parameters
Specify parameters by adding some additional XML elements in the Config.xml file of your project. For example, to configure the Facebook plugin, you can edit the following parameters in config.xml.
<vs:plugin name="com-phonegap-plugins-facebookconnect" version="0.8.1">
        <param name="APP_ID" value="12345678" />
        <param name="APP_NAME" value="My Facebook App" />
</vs:plugin>
This has the same result as running the following command from the command line (if you were not using Visual Studio):
cordova plugin add https://github/com/Wizcorp/phonegap-facebook-plugin.git
 --variable APP_ID="12345678" –variable APP_NAME="My Facebook App"
Important: Cordova 4.3.1 and previous versions have a set of known issues that can prevent plugins with parameters from working properly. We recommend using Cordova 5.1.1 or later when using plugins that require parameters.
Extend a custom plugin
At times, the custom plugins in the Cordova registry might not meet all your app requirements, and you might want to extend a plugin or create your own plugin. For example, if you need to offload computationally expensive functions to native code, expose new device capabilities to your app, or apply a fix to an existing plugin that you would prefer not to release publicly, you might want to extend or create a plugin. You can find more information about creating your own plugins in the plugin development guide in the Cordova documentation.
If you need to extend your app using a custom plugin, check the plugin registry first and use code that others have already written. If an existing plugin is close to what you need, download it, make improvements, and then submit those changes to the original author. This is a great way of giving back to the Cordova community and making it easier for others to solve similar problems. Install the custom plugin using the configuration designer. When the plugin.xml file is next to the www folder in the project folder tree, the required JavaScript files from the plugin’s www folder will be loaded automatically at runtime. You do not need to reference these files from an HTML file. You can also set breakpoints within these code files if needed. The build process also compiles any platform-specific files in the src folder.
 Get the Visual Studio Tools for Apache Cordova or learn more
See Also
Concepts
Install Visual Studio Tools for Apache Cordova
Other Resources
Cordova config.xml documentation Cordova plugins registry FAQ