Azure Storage SDK for Unity 2017
Note
This is a Sandbox project. The content in this article is unsupported, and therefore may be out of date or not in a working state. That said, we still think it was awesome enough to include here. Enjoy!
Important
This is an experimental Unity SDK for Azure Storage. As such, please note that this SDK is not supported and is not provided by the Azure Storage team. If you run into problems, please let us know using the GitHub Issues page for this fork.


Requirements
- Unity 2017.1 (or greater)
- Unity 2017.1 includes a new scripting runtime that supports .NET 4.6. This feature allows us to use the existing Azure SDKs with some tweaks. Please see this blog post from Unity for more information.
- An Azure Storage account (Sign up for free!)
Compatibility
This has been tested with the following Unity exporters. Others may work -- we haven't tested every platform, so please let us know if you've had success!
- Windows standalone
- UWP (.NET)
- iOS
- Android (Mono)
- Unity editor
Known Issues and Limitations
There are a few known issues and workarounds.
Unity and SSL support
Due to a Unity limitation, HTTPS requests using the standard .NET networking stack (i.e. not using UnityWebRequest) will fail. To workaround this, you will need to modify the DefaultEndpointsProtocol entry in your connection string to use http instead of https. This means your data will not be encrypted to and from the server. Here's an example:
DefaultEndpointsProtocol=http;AccountName=yourazureaccount;AccountKey=abcdef12345;EndpointSuffix=core.windows.net
UWP Builds
To build for UWP, ensure that the DLLs in the root Plugins directory are excluded from the build, while the DLLs in the WSA directory are included in the build. To do this:
In the Project window, select all DLLs that are in the root Plugins\<SDK> directory (note that the DLLs and SDK directory name will vary based on the SDK).

In the Inspector window at the right, make sure both Any Platform and WSAPlayer are not selected.
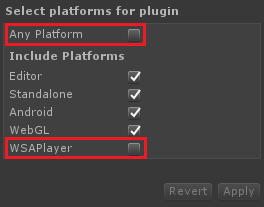
In the Project window, select all DLLs that are in the root Plugins\<SDK>\WSA directory (note that the DLLs and SDK directory name will vary based on the SDK).
In the Inspector window at the right, make sure Any Platform is not selected and WSAPlayer is selected.

With these selections, you should be able to export your UWP build without issue. To go back to building for another platform, reverse the process -- make sure both Any Platform and WSAPlayer are selected and then export.
Other Platforms
We have not had success in compiling or running games using the following platforms:
- Android (IL2CPP)
- UWP (IL2CPP)
- WebGL
We will continue working on these and update as we find fixes.
Import the SDK
To import the SDK into your own project, make sure you have downloaded the latest .unitypackage from GitHub. Then, do the following:
Open Unity and select Edit > Project Settings > Player to open the PlayerSettings panel.
Select Experimental (.NET 4.6 Equivalent) from the Scripting Runtime Version dropdown in the Configuration section.

Add the .unitypackage you downloaded in the first step to Unity by using the Assets > Import Package > Custom Package menu option.
In the Import Unity Package box that pops up, you can select which things you'd like to import. By default everything will be selected. If you don't care to use the sample, you can uncheck that box.
Click the Import button to add the items to your project.
With the package added, you can now use the normal API in your scripts as you would in any other application. Please take a look at the corresponding sample (also included in each .unitypackage) which demonstrates how to use each of the services to perform simple tasks.
Please refer to the Azure Storage Docs for even more samples and tutorials on using the API.
Try the Sample
To use the sample, you will need to have an Azure Storage account setup along with a valid connection string. You can learn more about that here.
To use the sample, do the following:
Download the Unity SDKs repo from GitHub (or import it from the .unitypackage and continue to step 4).
Unzip to a location on your hard drive.
Open Unity 2017.1 (or greater) and point it to the Storage directory inside the unzipped package.
In the Project window, double-click the AzureSample scene inside the AzureSamples\Storage directory to open the main scene for the sample.
In this scene, select the StorageObject item in the Hierarchy window.
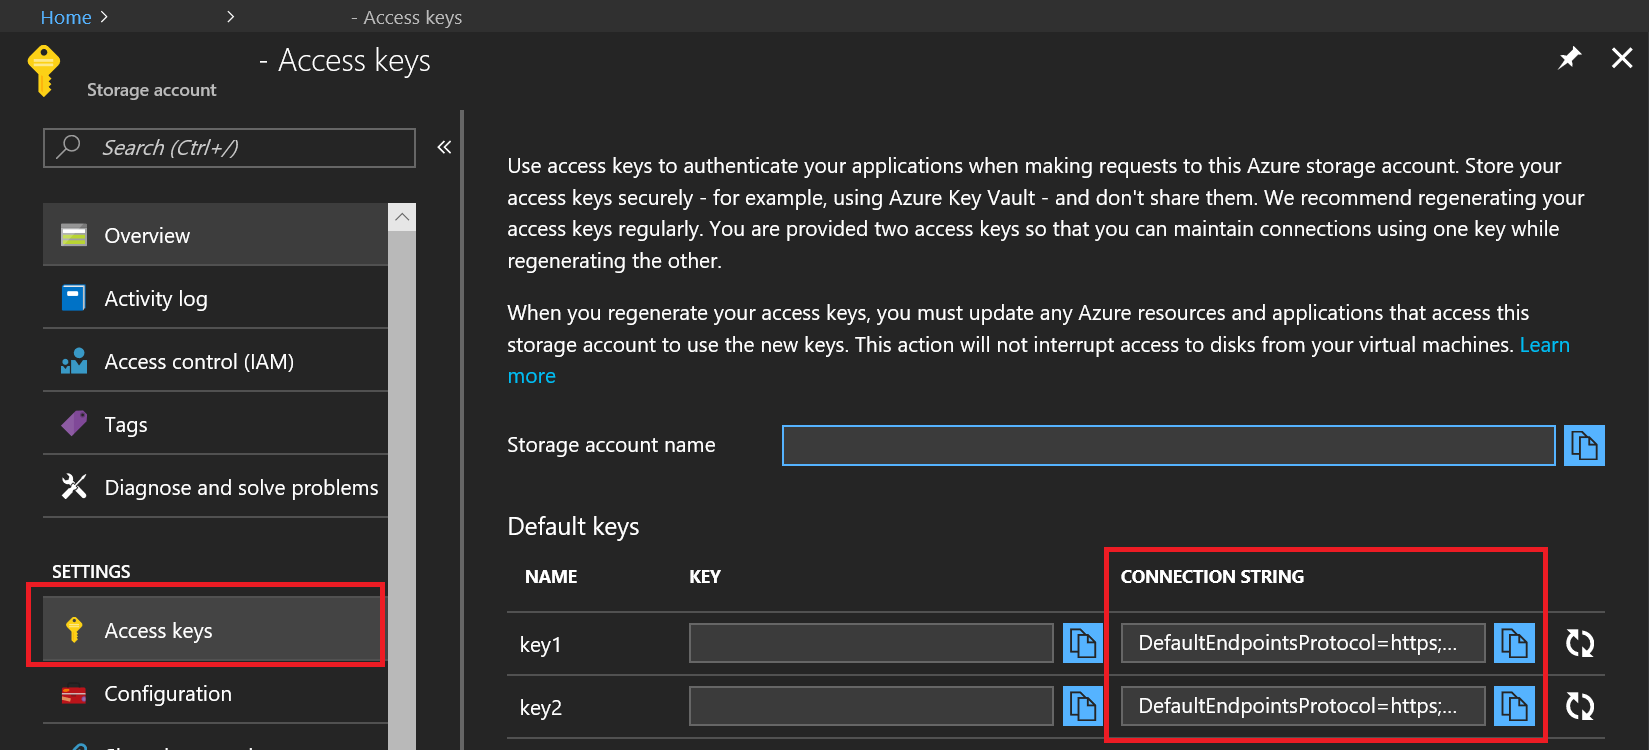
With StorageObject selected, you'll notice that there are blank Connection String entries in the Inspector window. Fill in the these entries with your valid connection string as shown on the Azure portal, but remember to change the endpoint to use http as described above. You can change the names of the other items if you wish, but the defaults should work as-is. You can find your connection strings in the Azure Portal as shown.
Run the project from within the editor by clicking the Play button. Alternatively, you can export to the platform of your choosing and run there.
At this point, you can click the button for any of the four storage types and watch the output window. If things are setup and working, you will see the sample test a standard workflow.
The code for the sample is broken out into four separate scripts, one for each storage type. Take a look at each to learn more about how it works.
Cosmos DB Table API
Cosmos DB is Microsoft's globally distributed, multi-model database. One of the data models available for Cosmos DB is Table API. Applications written for Azure Table storage can migrate to Azure Cosmos DB by using the Table API with no code changes and take advantage of premium capabilities. If you have a Cosmos DB database, you can use the Table Storage client SDK we provide to access it from your Unity game. Check the instructions here on how to find out your connection string.