Facebook authentication with Unity and Azure
Note
This is a Sandbox project. The content in this article is unsupported, and therefore may be out of date or not in a working state. That said, we still think it was awesome enough to include here. Enjoy!

Overview
This article demonstrates how to incorporate Facebook authentication into a Unity project that stores high score and game telemetry data in Azure Easy Tables.
The approach uses the Facebook Unity SDK to allow users to log in to Facebook. It then uses UnityWebRequest to send HTTP requests to an Azure function app that handles authentication and data insertion and retrieval.
Compatibility
This approach should work for any Unity platform supported by the Facebook SDK.
- iOS
- Android
- WebGL
Note
PC builds can be supported by using the Facebook Gameroom build feature of Unity.
Prerequisites
- Unity 5.6.1 or above (free personal version is fine)
- Azure subscription (the free trial or included credits from Visual Studio Dev Essentials are fine)
- Visual Studio 2017 (free Community edition is fine) with Game Development with Unity workload
- Facebook account
Create an Azure Mobile App and configure Easy Tables
An Azure Mobile App is a type of Azure App Service. This example uses the Easy Tables feature of Azure Mobile Apps to simply store data.
Create a new Azure Mobile App
Log in to the Azure portal. If you do not have an Azure subscription, the free trial or included credits from Visual Studio Dev Essentials will more than suffice for completing this walkthrough.
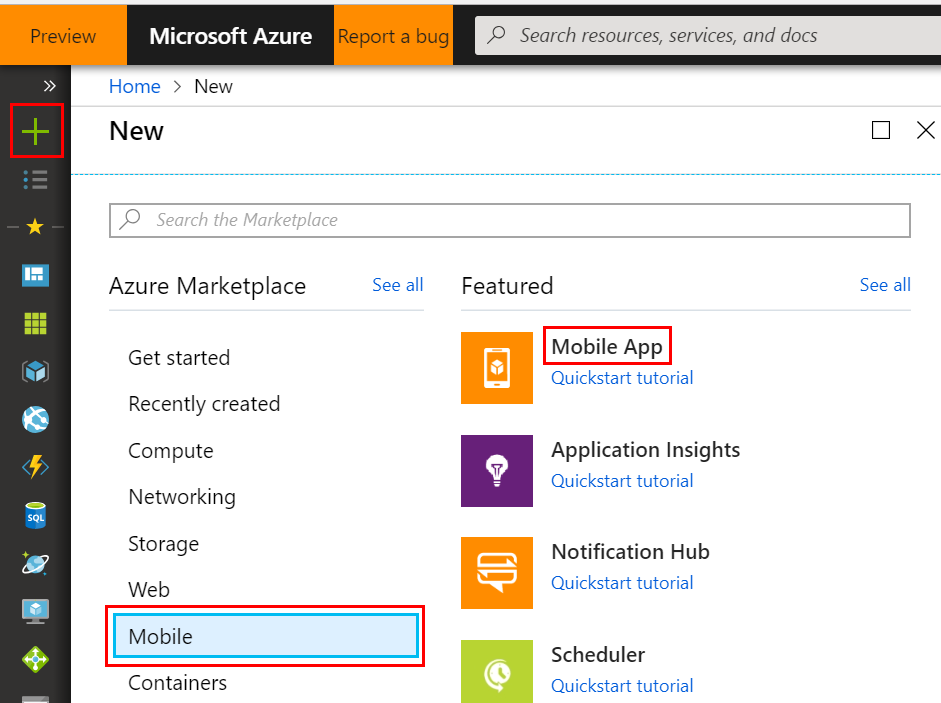
Once inside the portal:
- Select New > Mobile > Mobile App.
Configure the new Mobile App: Setting | Description --- | --- App Name | This will be used to create the URL for connecting to the Azure Mobile App backend. You must choose a unique name, indicated by the green checkmark. Subscription | Choose the subscription the new Mobile App will use for billing. Resource Group | Resource groups allow easier management of related resources. By default Azure creates a new resource group with the same name as the new app. The default setting works well for the walkthrough. App Service Plan/Location | The service plan dictates the computing power, location, and cost of the resources Azure uses to host your new Mobile App. By default Azure will create a new service plan with some default settings. This is the simplest option for this walkthrough. However, you can use this menu to customize a new service plan's pricing tier or geographic location. Additionally, settings for a service plan can be modified after deploying it.
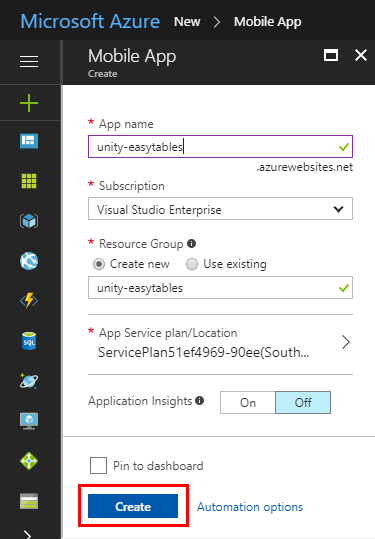
Click Create and give Azure a few minutes to deploy the new resource. You will see a notification in the Azure Portal when deployment has completed.
Add a new data connection
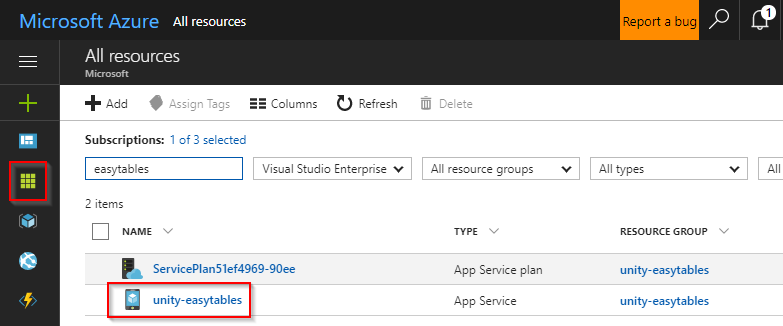
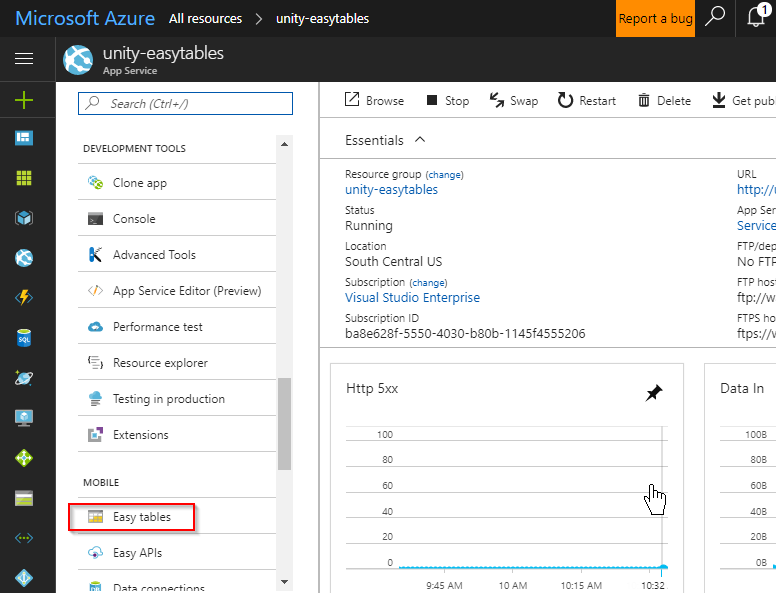
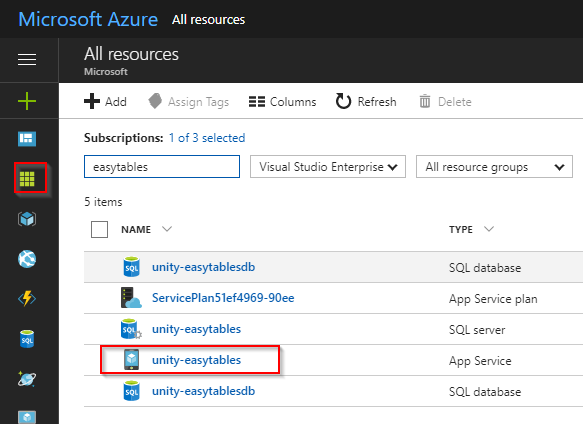
Once deployment has completed, click the All resources button and then select the newly created Mobile App.
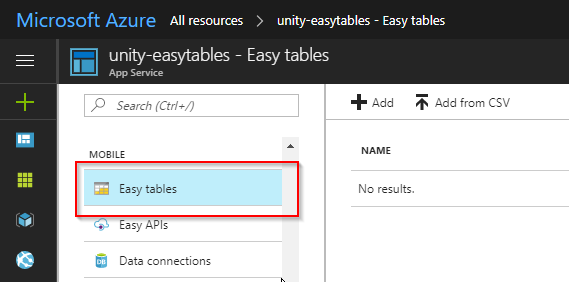
In the newly opened blade, scroll down in the left side-menu and click the Easy Tables button, listed under the MOBILE heading.
Click the blue Need to configure Easy Tables/Easy APIs notice displaying along the top of the Easy Tables blade on the right side of the screen.
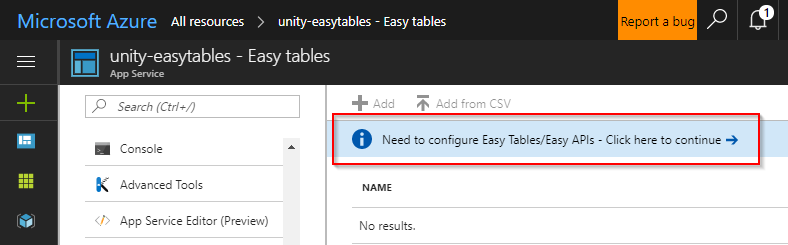
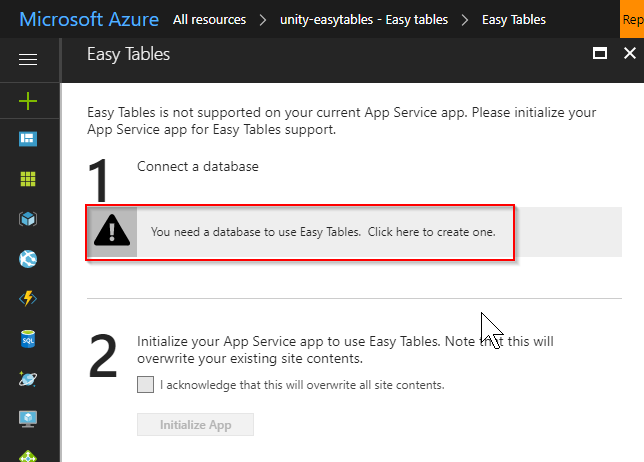
Click the notice that says You need a database to use Easy Tables. Click here to create one.
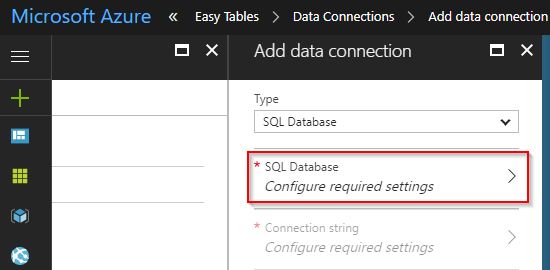
On the Data Connections blade, click the Add button.
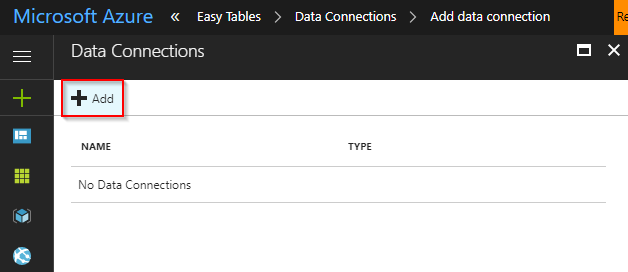
On the Add a data connection blade, select SQL Database.
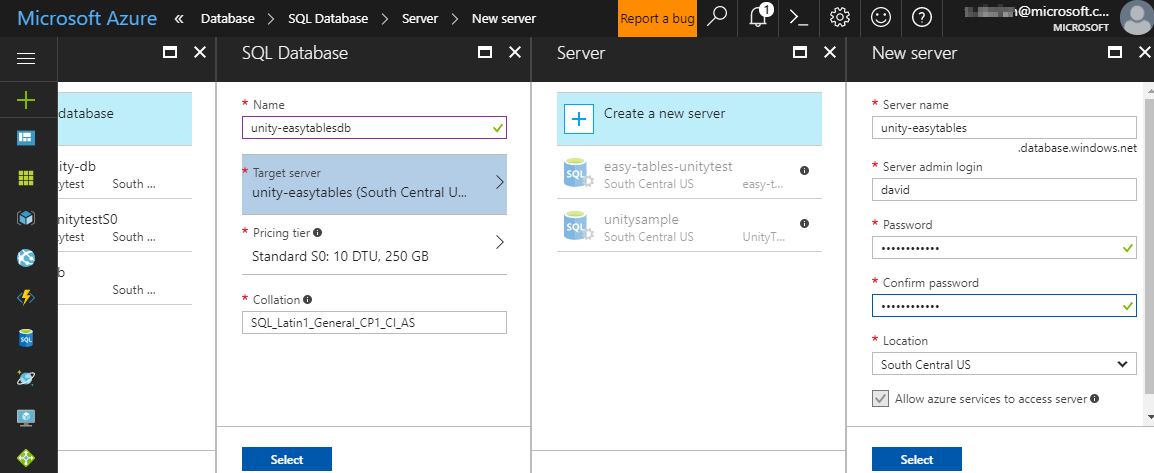
A blade will open for configuring a new SQL database and SQL server:
- Name: Enter a name for the database.
- Target server: Click Target server to open the New server blade.
- Server name: Enter a name for the server.
- Server admin login and Password: Create a username and password for the server admin.
- Location: Choose a nearby location for the server.
- Ensure that the Allow azure services to access server checkbox remains checked.
- Click Select to complete server configuration.
- Pricing tier: Leave the default setting for the walkthrough. This can be modified later.
- Collation: Leave the default setting.
- Click Select to complete configuration of the database.
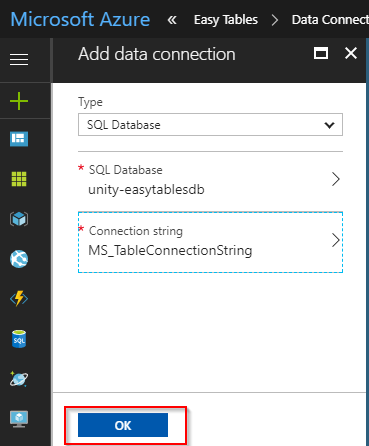
Back at the Add data connection blade, click Connection String. When the Connection string blade appears, leave the default settings and click OK.
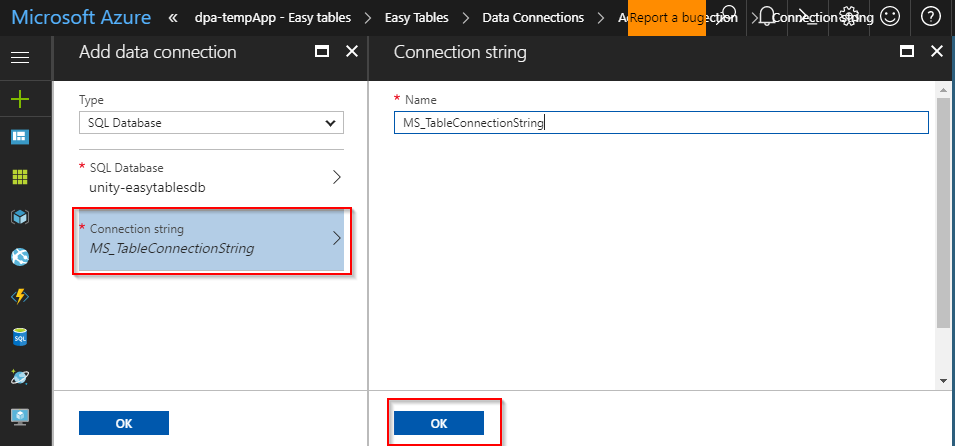
Back at the Add data connection blade, the text MS_TableConnectionString should no longer be in italics. Click OK and give Azure a few minutes to create the new data connection. A notification will arrive when the process is complete.
Complete the Easy Table initialization
Once the new data connection has been created successfully, click the All resources button, and again navigate back to the Mobile App. It is important to complete this step to refresh the Easy Table configuration notice.
Scroll down and select Easy Tables, and once more select the blue Need to configure Easy Tables/Easy APIs notice.
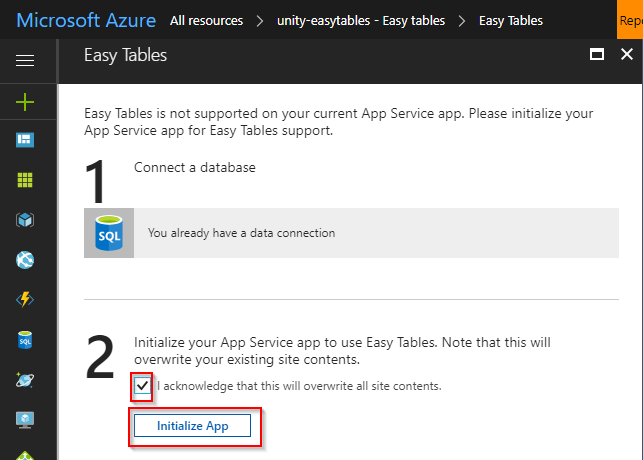
This time the blade that appears should state that "You already have a data connection" below the 1 heading. Under the 2 heading, click the checkbox that says I acknowledge that this will overwrite site contents.
Click Initialize App and wait a few minutes for Azure to complete the initialization process. Note that the button may read "Create TodoItem table" instead of "Initialize App." Either way, click it. A new notification will announce when the process is complete.
Create Easy Tables
Now that you have a Mobile App on Azure with Easy Tables initialized, it's time to build the tables that will keep track of data sent from a Unity game.
Setup the crash heatmap table
In the Azure portal, click All resources and then select the Mobile App that you configured for Easy Tables in the previous steps.
Scroll down to the Mobile heading and select Easy Tables. There should no longer be any notice about initializing your app for Easy Tables.
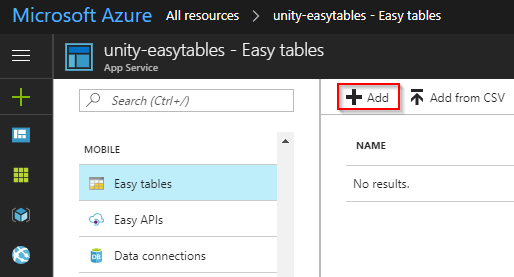
Click the Add button in the Easy Tables blade on the right side of the screen.
Name the table "CrashInfo" and click OK. Leave the rest of the options with their default settings.
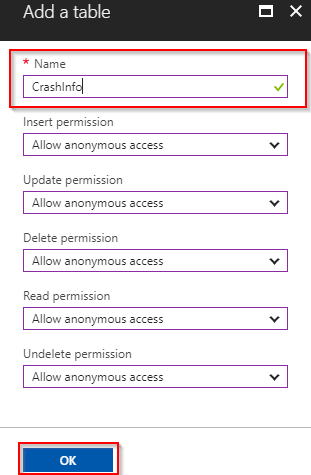
A notification will announce when the new table has been created.
Note
With Easy Tables, the table schema is actually dynamically created as data is added. This means appropriate data columns do not have to be manually set up during this step.
Setup the leaderboard table
Go back to the Easy Tables blade and click Add to add a second table.
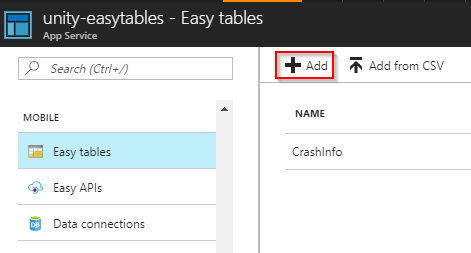
Name the new table "HighScoreInfo" and click OK. Leave the rest of the options at their default settings.
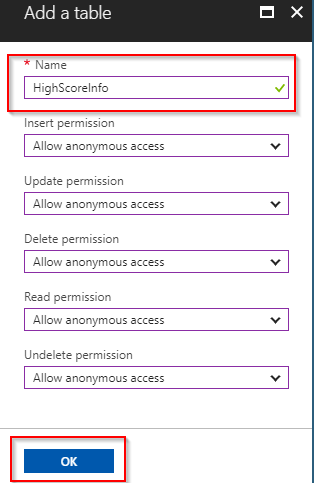
A notification will announce when the new table has been created.
Set up the TestPlayerData table
Go back to the Easy Tables blade and click Add to add a second table.
Name the new table "TestPlayerData" and click OK. Leave the rest of the options at their default settings.
A notification will announce when the new table has been created.
Note
These specific table names are used in the example code, so be careful about changing them.
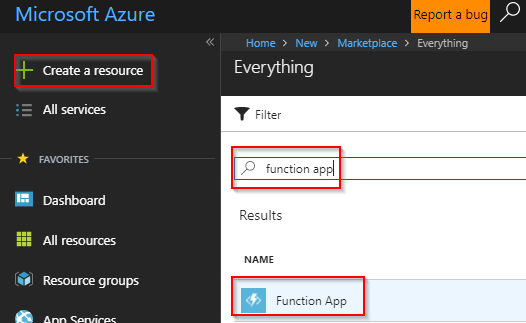
Create an Azure Function App
This example uses an Azure Function App for data insertion and retrieval. Our Unity app will send HTTP requests to an Azure HTTP triggered Function.
- In the Azure portal click Create a resource, type "function app" in the search bar and then click Function App and select Create.
- In the next blade, enter a name for your function app, confirm the rest of the settings (default values will work) and click Create. Wait a moment for the new resource to be created. A notification in the Azure portal will announce when the new Function App is ready.

Create an Insert function
The Unity client will call the Insert function to insert data into our Easy Tables.
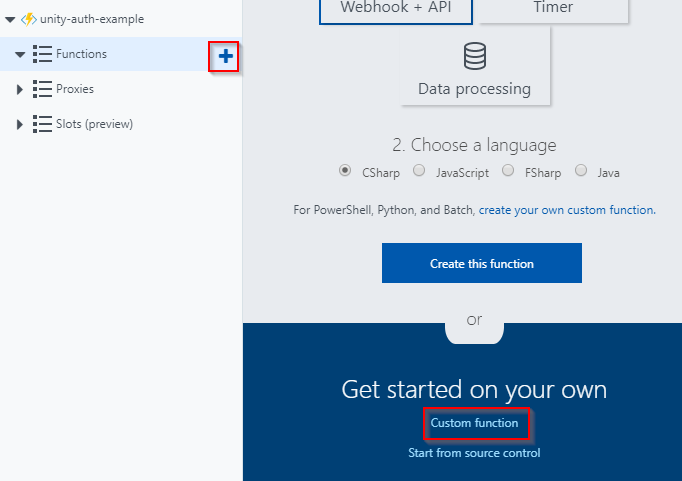
Create the new function
Once the new Function App has been created, select it in the portal.
Hover over the Functions tab and click the + button.
Scroll down on the right side panel and click Custom function under the "Get started on your own" heading.
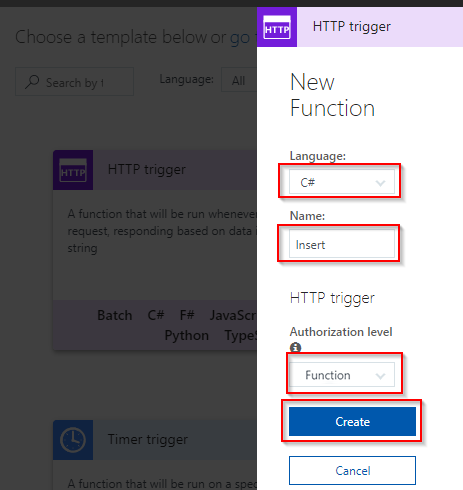
Select HTTP trigger.
Choose C# from the Language: dropdown.
Name the function
Insert.Select Function from the Authorization level dropdown.
Click the Create button.
Add the Azure Mobile Client and Newtonsoft.Json NuGet packages to the Insert function
This example uses the Azure Mobile Client SDK to simplify authentication and data operations.
Note
The code for setting up the Azure functions can be found in the sample's GitHub repository as well.
Once the function has been created, select View files from the right side panel. You may need to extend the window or scroll right to find it.
Click + Add.
Enter project.json as the new file's name and press Enter on the keyboard to create the file.
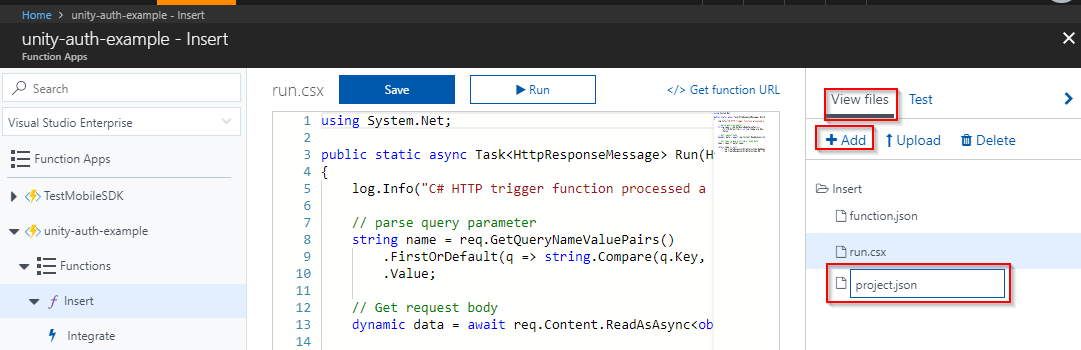
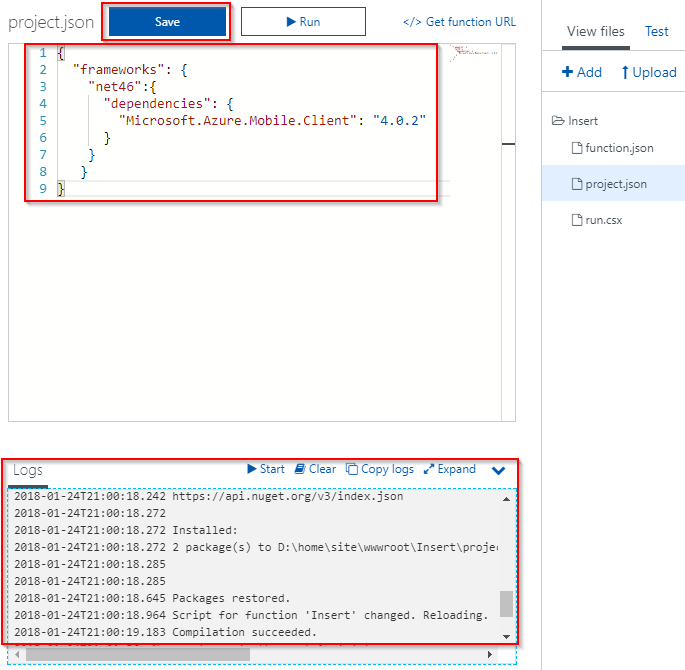
Once the new project.json file is created, select it in the View files list.
Paste the following lines into the empty project.json file:
{
"frameworks": {
  "net46":{
    "dependencies": {
      "Microsoft.Azure.Mobile.Client": "4.0.2"
    }
  }
 }
}
- Click Save. If you observe the log, it should detail that the Microsoft.Azure.Mobile.Client and Newtonsoft.Json packages have been installed and compilation has succeeded.
Add the Insert function body
The Insert function receives Json parameters in an HTTP POST request sent from the Unity client.
The parameters include:
The name of the table to be modified.
The access token for Facebook authentication (the Facebook Unity SDK gets this key after the user logs in).
The data object to add to the table.
This insert function deserializes the JSON parameters, and then logs in and inserts the data into the appropriate table using the Azure Mobile Apps SDK.
Click on run.csx in the View files list to modify the function body.
Clear all of the initial code in the function and replace it with the following, then click Save:
using System.Net;
using Microsoft.WindowsAzure.MobileServices;
using Newtonsoft.Json.Linq;

public static async Task<HttpResponseMessage> Run(HttpRequestMessage req, TraceWriter log)
{
    log.Info("C# HTTP trigger function processed a request.");

    // Update with your Mobile App url!
    MobileServiceClient client = new MobileServiceClient("INSERT_YOUR_MOBILE_APP_URL_HERE");
    dynamic data = await req.Content.ReadAsStringAsync();

    JArray arrayJson;
    dynamic authToken;
    string tableName;
    dynamic objectToInsert;
    try
    {
        // Server expects a json arrary with the format:
        // [{"access_token":"value"},{"tableName":"value"},{instanceJson}]
        arrayJson = JArray.Parse(data);
        authToken = arrayJson[0];
        tableName = arrayJson[1].Value<string>("tableName");
        objectToInsert = arrayJson[2];
    }
    catch (Exception exception)
    {
        return req.CreateErrorResponse(HttpStatusCode.BadRequest, exception);
    }

    // Try to log in. Return Unauthorized response upon failure.
    MobileServiceUser user = null;
    while (user == null)
    {
        try
        {
            // Change MobileServiceAuthenticationProvider.Facebook
            // to MobileServiceAuthenticationProvider.Google if using Google auth.
            user = await client.LoginAsync(MobileServiceAuthenticationProvider.Facebook, authToken);
        }
        catch (InvalidOperationException exception)
        {
            log.Info("Log in failure!");
            return req.CreateErrorResponse(HttpStatusCode.Unauthorized, exception);
        }
    }
    // Try to Insert. Return BadRequest response upon failure.
    try
    {
        JToken insertedObject = await client.GetTable(tableName).InsertAsync(objectToInsert);
        return  req.CreateResponse(HttpStatusCode.OK, insertedObject);
    }
    catch (Exception exception)
    {
        return req.CreateErrorResponse(HttpStatusCode.BadRequest, exception);
    }
}
Important
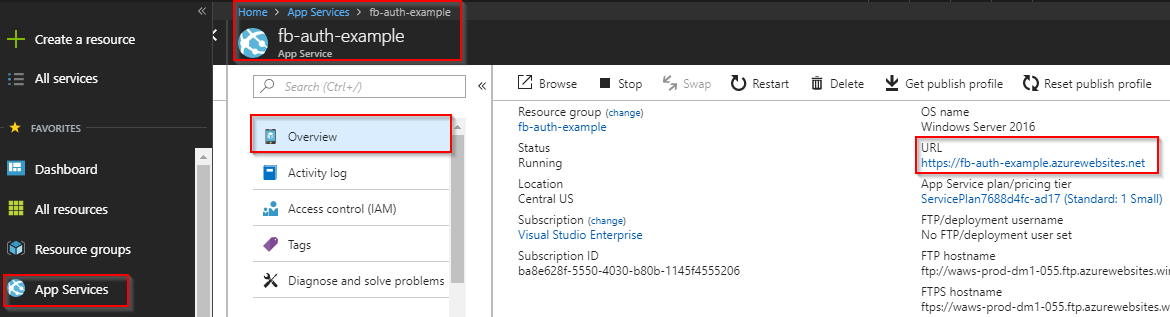
Be sure to replace the string that reads INSERT_YOUR_MOBILE_APP_URL_HERE with the URL to your Azure Mobile App. To find this URL:
- Click App Services from the main left menu of the Azure portal.
- Click the name of your Mobile App from the list.
- Ensure the Overview tab is selected
- Copy the URL from beneath the URL heading.
Note
If you wish to customize this code, using Visual Studio to test and debug Azure functions is highly recommended.
Create a GetAllEntries function
The Unity client will call the GetAllEntries function to get a list of all the entries in a specified table.
Create the new function
Click Function Apps in the Azure portal and select your function app.
Hover the Functions tab and click the + button.
Scroll down on the right side panel and click Custom function under the "Get started on your own" heading.
Select HTTP trigger.
Choose C# from the Language: dropdown.
Name the function
GetAllEntries.Select Function from the Authorization level dropdown.
Click the Create button.
Add the Azure Mobile Client and Newtonsoft.Json packages to the GetAllEntries function
Note
The code for setting up the Azure functions can be found in the sample's GitHub repository as well.
Once the function has been created, select View files from the right side panel. You may need to extend the window or scroll right to find it.
Click + Add.
Enter project.json as the new file's name and press Enter on the keyboard to create the file.
Once the new project.json file is created, select it in the View files list.
Paste the following lines into the empty project.json file:
{
  "frameworks": {
    "net46": {
      "dependencies": {
        "Microsoft.Azure.Mobile.Client": "4.0.2"
      }
    }
  }
}
- Click Save. If you observe the log, it should detail that the Microsoft.Azure.Mobile.Client and Newtonsoft.Json packages have been installed and compilation has succeeded.
Add the GetAllEntries function body
The GetAllEntries function receives JSON parameters in an HTTP POST request sent from the Unity client.
The parameters include:
The access token for Facebook authentication (the Facebook Unity SDK gets this key after the user logs in).
The name of the table from which to get all entries.
This GetAllEntries function deserializes the Json parameters, and then logs in and adds a list of the specified table entries into an HTTP response that is sent back to the Unity client.
Click on run.csx in the View files list to modify the function body.
Clear all of the initial code in the function and replace it with the following, then click Save:
using System.Net;
using Microsoft.WindowsAzure.MobileServices;
using Newtonsoft.Json.Linq;

public static async Task<HttpResponseMessage> Run(HttpRequestMessage req, TraceWriter log)
{
    log.Info("C# HTTP trigger function processed a request.");

    // Update with your Mobile App url!
    MobileServiceClient client = new MobileServiceClient("INSERT_YOUR_MOBILE_APP_URL_HERE");
    dynamic data = await req.Content.ReadAsStringAsync();
    JArray arrayJson;
    dynamic authToken;
    string tableName;
    try
    {
        // Server expects a json arrary with the format:
        // [{"access_token":"value"},{"tableName":"value"}]
        arrayJson = JArray.Parse(data);
        authToken = arrayJson[0];
        tableName = arrayJson[1].Value<string>("tableName");
    }
    catch (Exception exception)
    {
        return req.CreateErrorResponse(HttpStatusCode.BadRequest, exception);
    }

    // Try to log in. Return Unauthorized response upon failure.
    MobileServiceUser user = null;
    while (user == null)
    {
        try
        {
            // Change MobileServiceAuthenticationProvider.Facebook
            // to MobileServiceAuthenticationProvider.Google if using Google auth.
            user = await client.LoginAsync(MobileServiceAuthenticationProvider.Facebook, authToken);
        }
        catch (InvalidOperationException exception)
        {
            log.Info("Log in failure!");
            return req.CreateErrorResponse(HttpStatusCode.Unauthorized, exception);
        }
    }

    // Try to get all entries as a list. Return BadRequest response upon failure.
    try
    {
        var table = client.GetTable(tableName);
        var list = await table.ReadAsync(string.Empty);
        return req.CreateResponse(HttpStatusCode.OK, list);
    }
    catch (Exception exception)
    {
        return req.CreateErrorResponse(HttpStatusCode.BadRequest, exception);
    }
}
Important
Be sure to replace the string that reads INSERT_YOUR_MOBILE_APP_URL_HERE with the URL to your Azure Mobile App.
Facebook setup
Create a new Facebook app
To use Facebook authentication, you must create a new Facebook app.
Go to developers.facebook.com/apps and log in. If you haven't already, you'll need to upgrade your account to a developer account.
Click Add a New App.
Enter a Display Name and Contact Email for the new app.
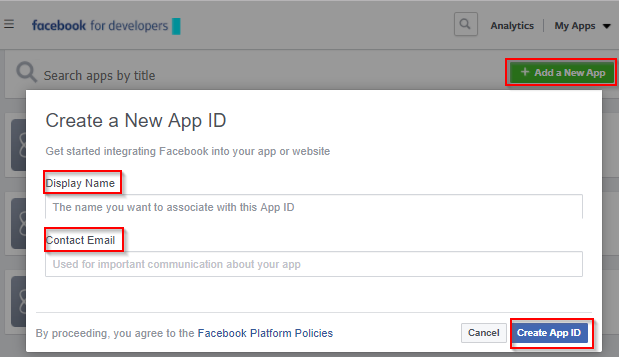
Complete the captcha.
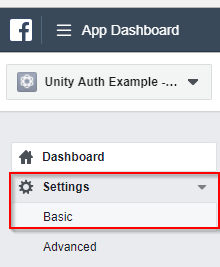
Select Basic Settings from the left side menu. Take note of the App ID and App Secret associated with your new app. You may need to click the Show button and log in to view your app secret. These values will be used later in the example.
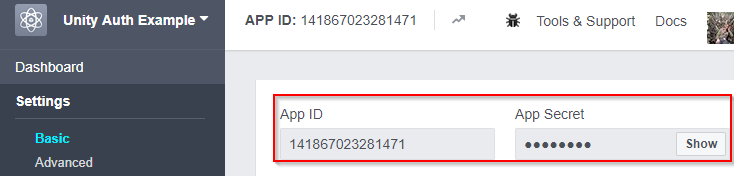
Important
The app secret is an important security credential. Do not share this secret with anyone or distribute it within a client application.
Add the Facebook Login product
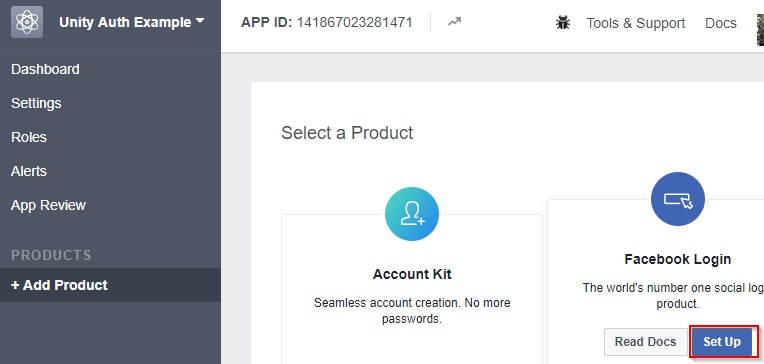
Select Add Product from the left side menu.
Hover the mouse over Facebook Login from the list of products and then click the Set Up button that appears. Facebook will display a page about running a quickstart for various platforms. This is not necessary for this example. Simply clicking the Set Up button is sufficient.
- The Facebook account which was used to register the application is an administrator of the app. At this point, only administrators can sign into this application. To authenticate other Facebook accounts, click App Review on the left side menu and enable Make public to enable general public access using Facebook authentication.
Enable Facebook authentication on Azure
Configure Azure Mobile App authentication settings
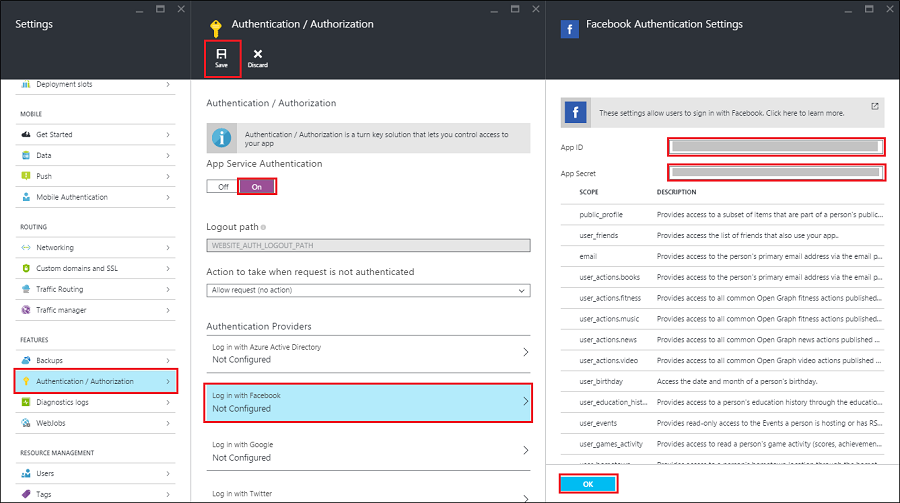
In the Azure portal, navigate to the Mobile App created earlier in the example.
Click Authentication / Authorization in the left side menu.
Click the On button under the label "App Service Authentication."
Click Facebook from the list of authentication providers.
Paste in the App ID and App Secret from the Facebook app you created earlier in the example, then click OK.
Click Save at the top of the Authentication / Authorization settings blade. Azure will present a notification once the settings have successfully saved.
Set permissions for Easy Tables
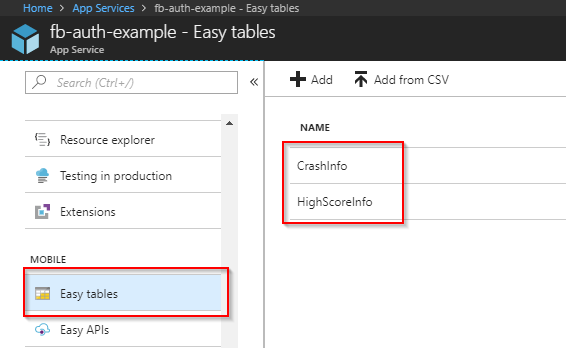
Click Easy Tables in the left side settings menu for your Azure Mobile App.
For each of your tables, click the table name to open the table.
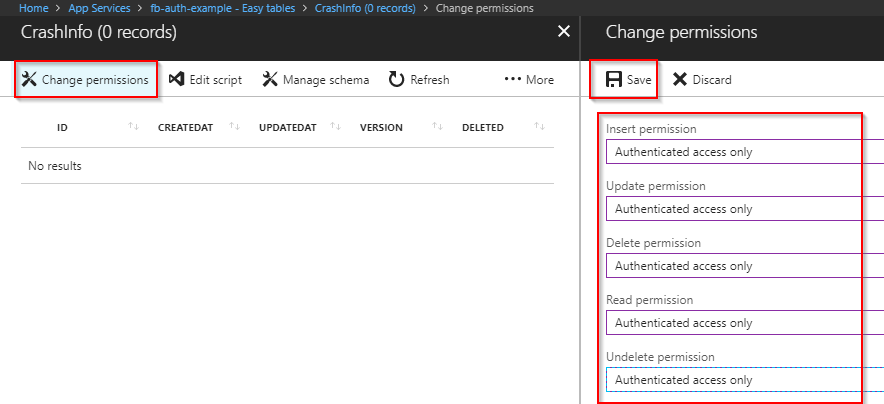
Click Change permissions then change each of the drop downs to Authenticated access only, then click Save.
Download the sample Unity project
Clone or download the project from the AzureSamples-Unity repo on GitHub.
- On the GitHub site, click the Clone or download button to get a copy of the project to work with.
- This project is located within the
MobileAppsRacerFbAuthdirectory.
Configure the Facebook SDK in the Unity project
The sample Unity project already has the Facebook SDK imported. In new Unity projects, you can download the Facebook SDK for Unity and import the .unitypackage file into your project.
Note
There is a bug in the Facebook Unity SDK v7.11.0 that prevents initialization on WebGL. This example was tested with the previous version (v7.10.1).
Open the Unity project contained within the
MobileAppsRacerFbAuthdirectory of the repository.Click Facebook > Edit Settings in the Unity menu.

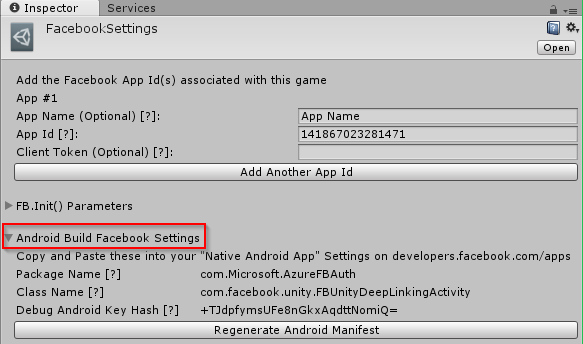
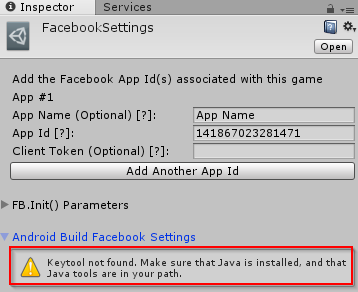
- In the Facebook settings that open in the Unity Inspector, paste in your Facebook App Id.
Set up the Facebook SDK for your chosen platform
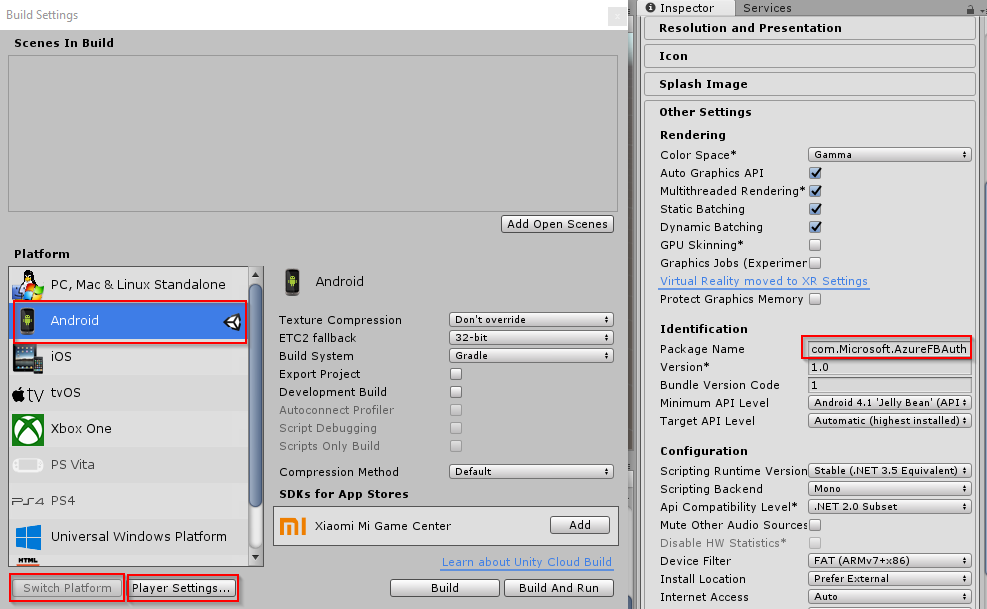
Configure Unity build and player settings
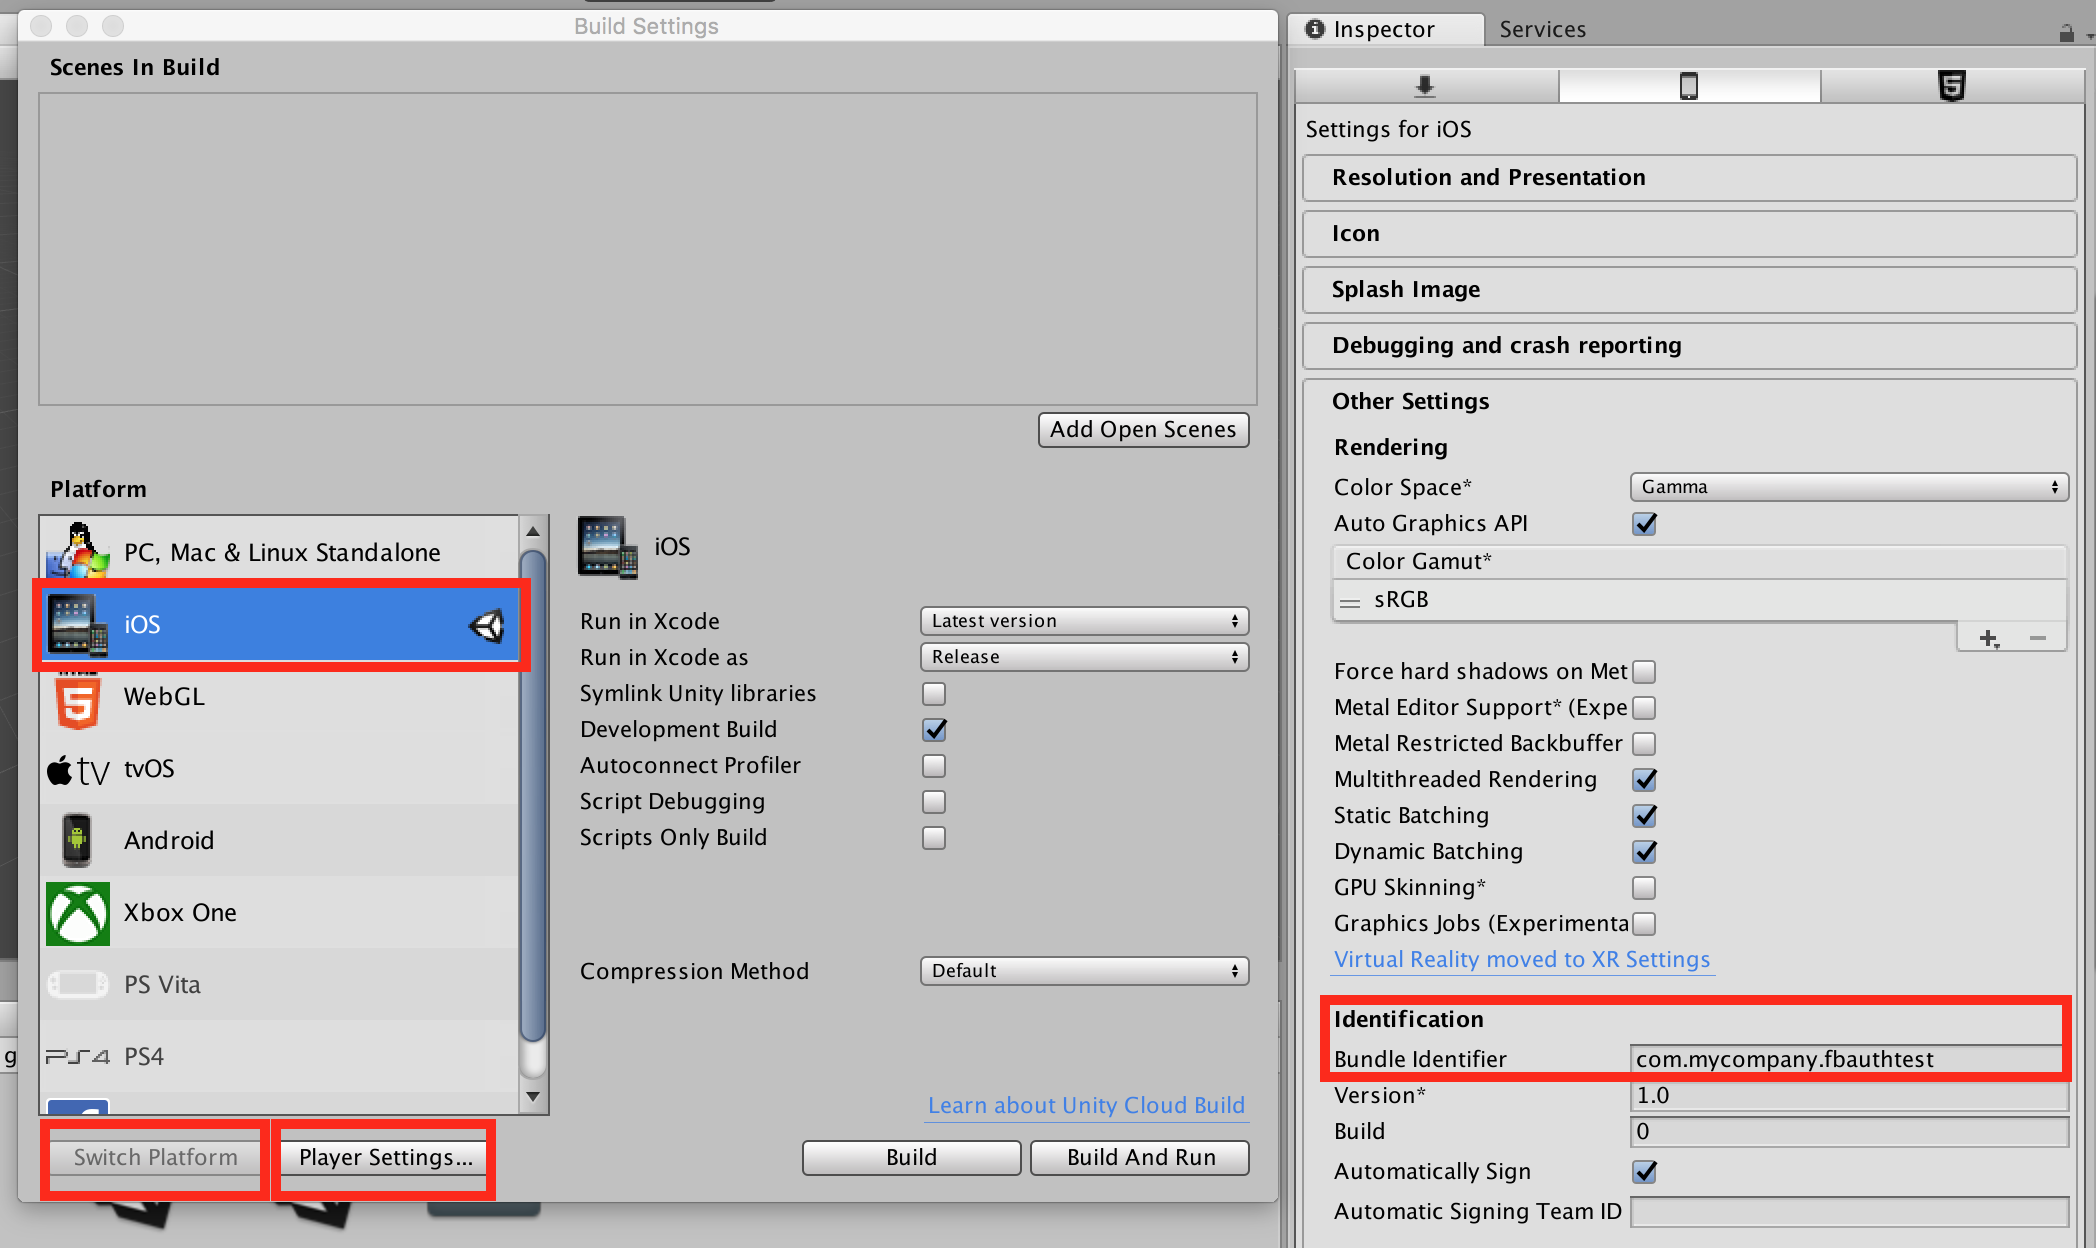
Choose File > Build Settings... from the Unity menu.
Select the iOS platform and click Switch Platform.
Once the platform has been switched to iOS, click Player Settings.
Find the Identification section in the Inspector and enter a valid Bundle Identifier. This should be in the format of
com.CompanyName.ProductName.
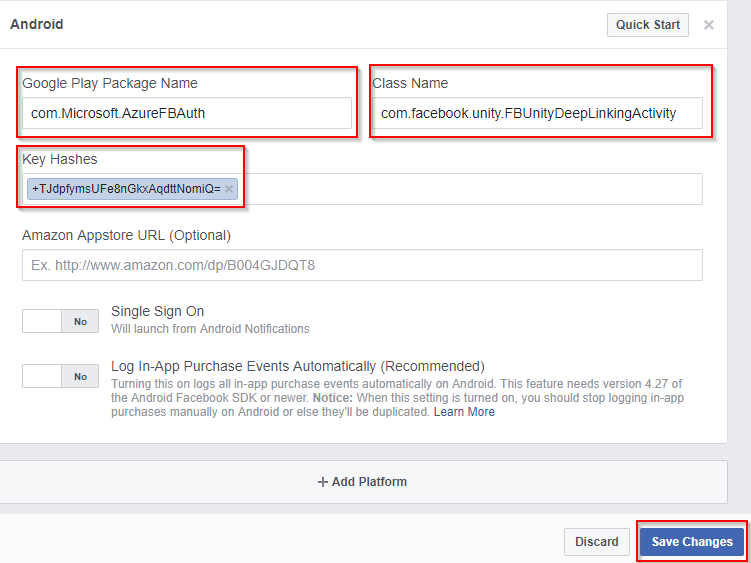
Add the iOS platform information to your Facebook app
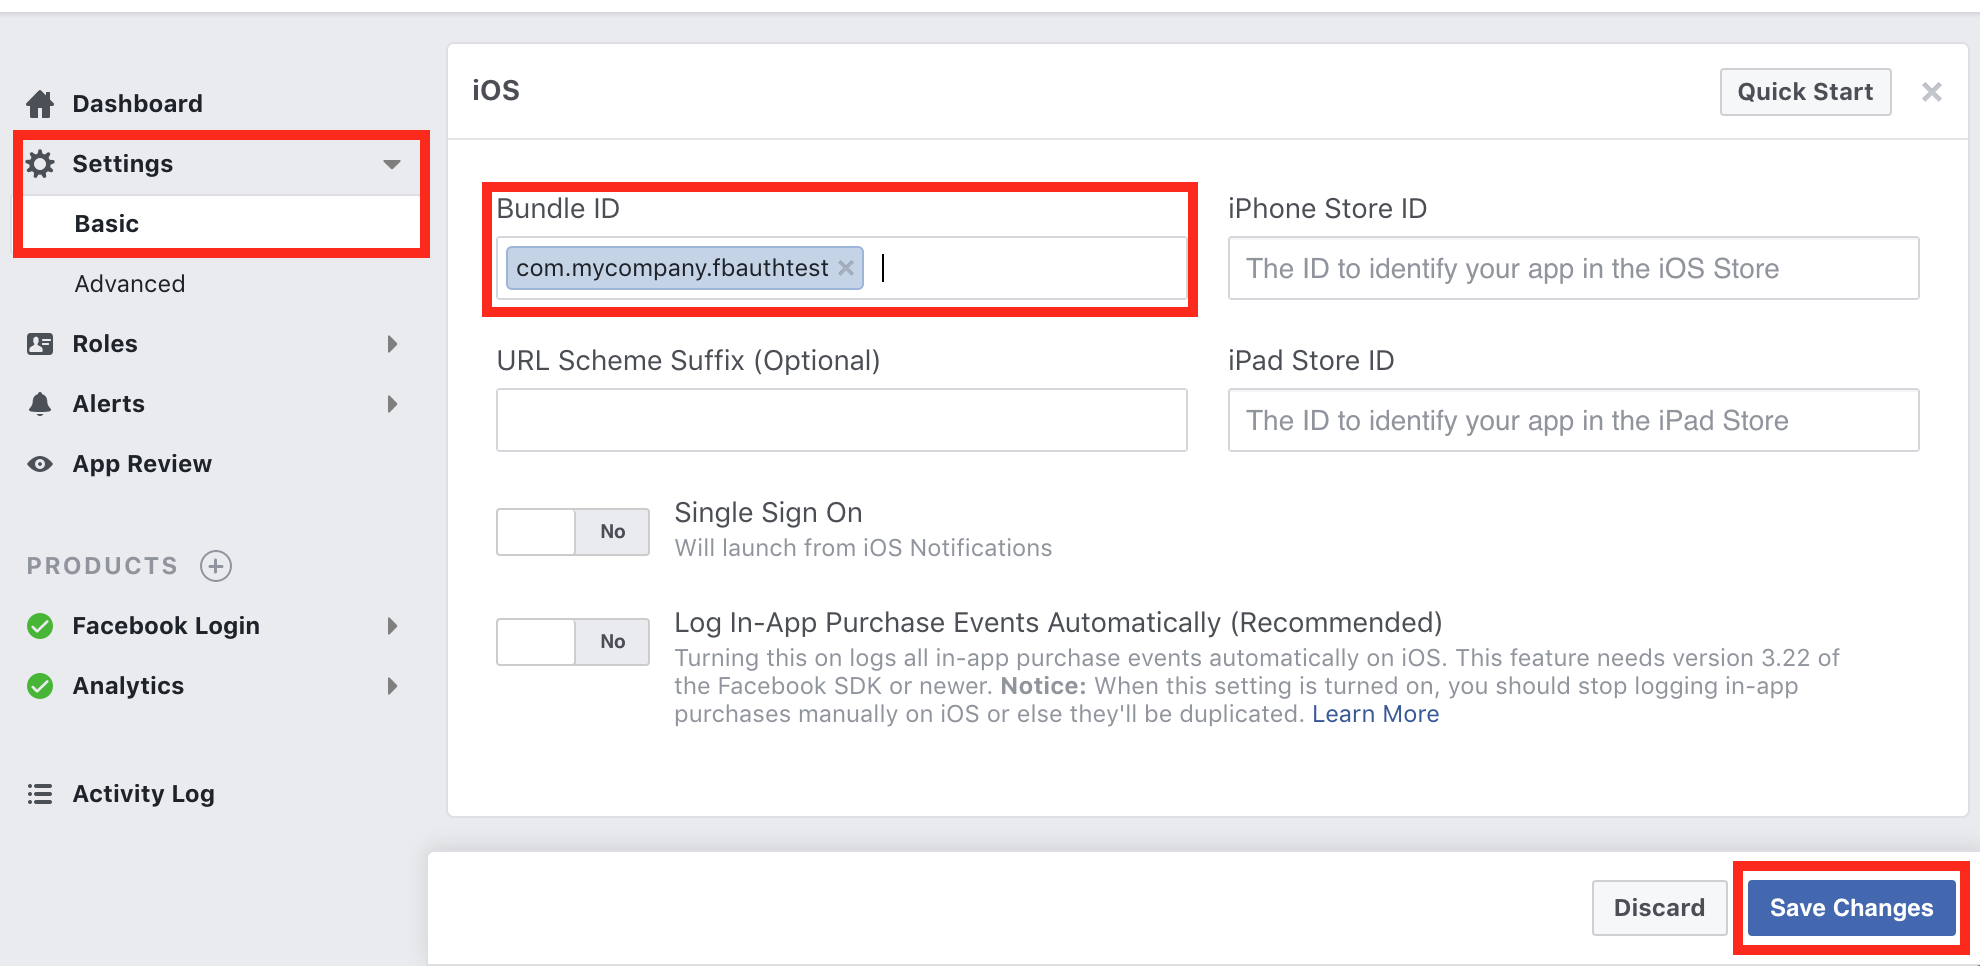
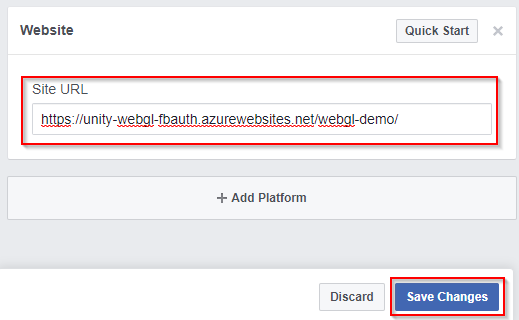
Go to developers.facebook.com/apps and select your app.
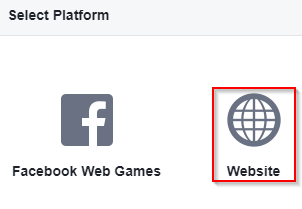
Click Settings. Near the bottom of the Basic settings page, click the Add Platform button.

Select iOS.
Copy and paste the Bundle ID from your Unity project's iOS Player Settings into the corresponding field of your Facebook app's iOS platform settings.
Click Save Changes.


Try the test scene
Note
The Facebook Unity SDK does not support logging in in the Unity editor. To test in the editor, paste a debug access token into the LogInUser() function in FacebookLogin.cs.
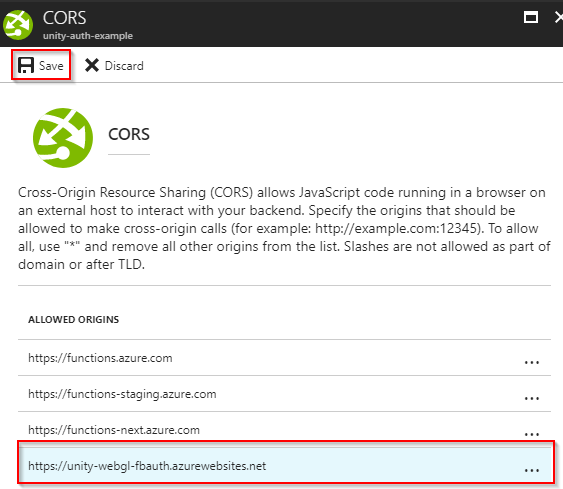
- In the Azure portal, navigate to the Function App you created for this example and copy the URL.
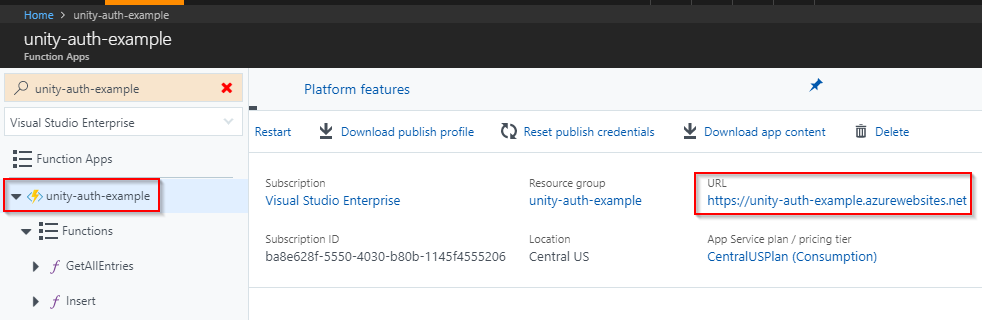
Open the file EasyTableClient.cs and change
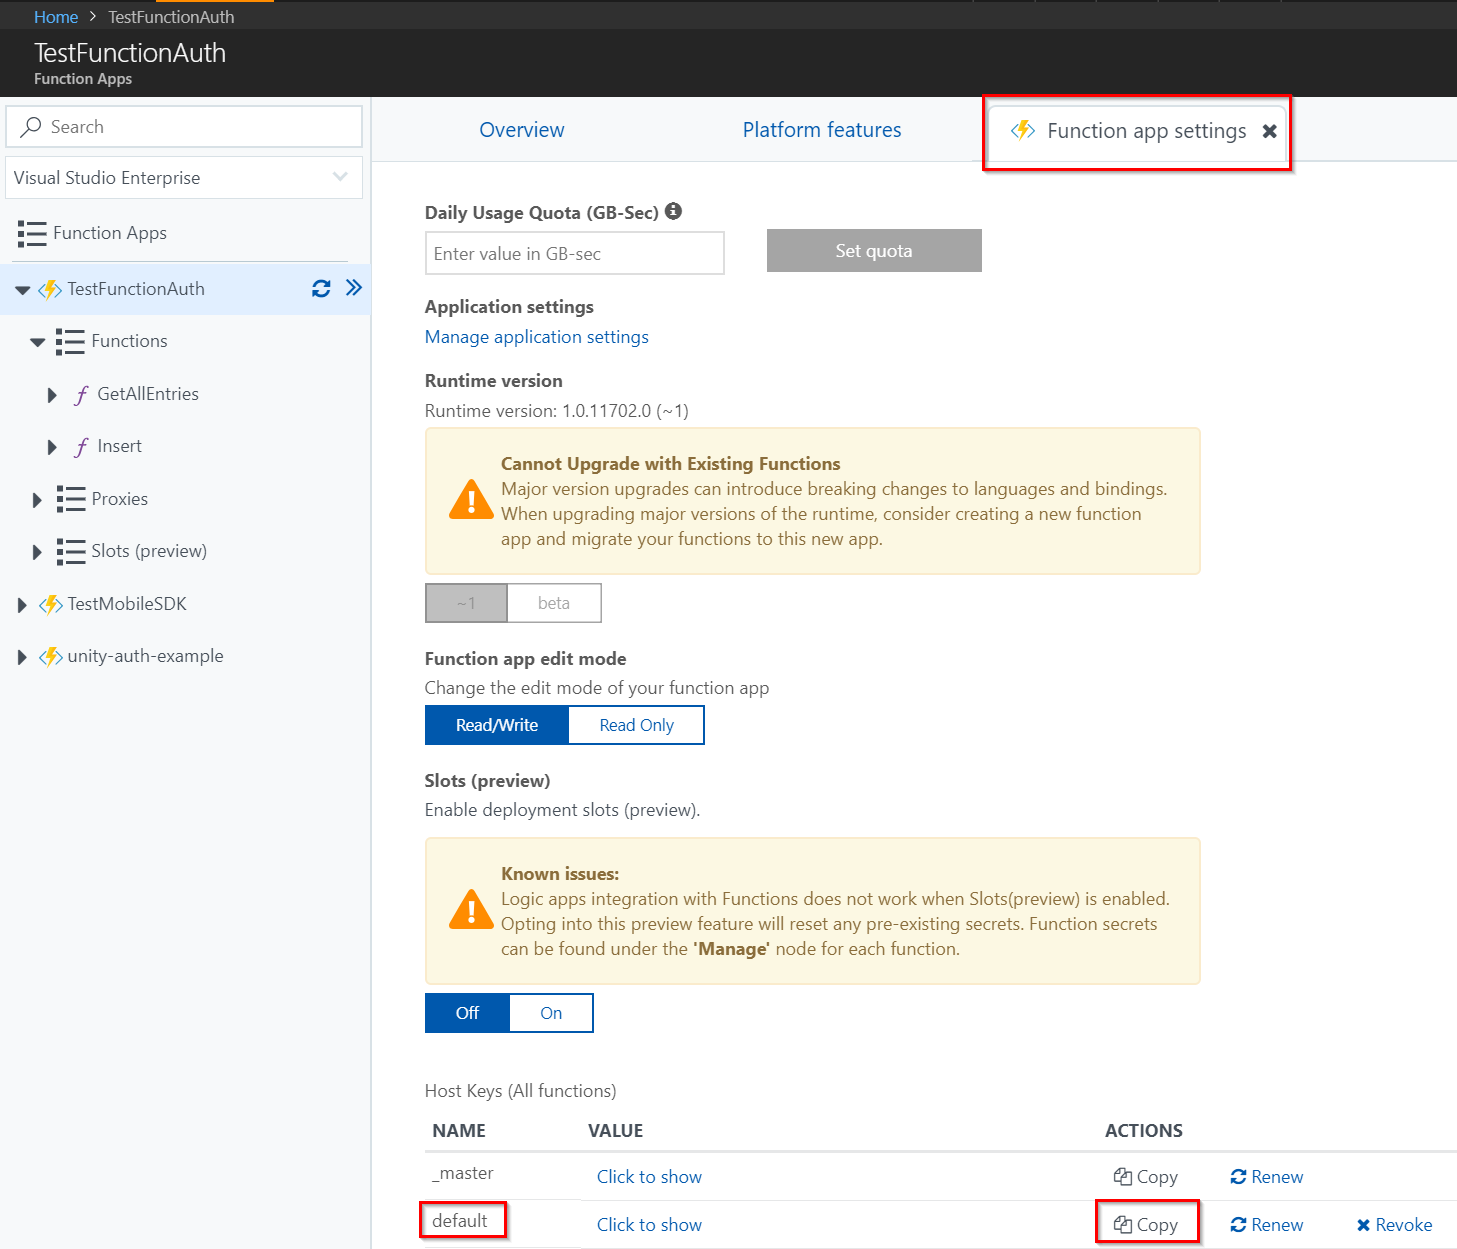
private const string url = "FUNCTION_APP_URL"to match the URL of the function app you created for this sample.Return the Azure portal then navigate to the Function app settings and copy the default Host Key.
Back in EasyTableClient.cs, change
private const string hostKey = "FUNCTION_APP_HOST_KEY"to match the default Host Key of your Function App.
In the Unity menu, choose File > Build Settings... and add the
Assets/AuthSample/Scenes/test scene.unityfile to the index 0 position of the Scenes in Build list.Ensure a platform supported by the Facebook Unity SDK is selected (Android, iOS, WebGL).
For iOS or Android, choose Build and Run. Choose an appropriate path to save the build. For WebGL, click Build and upload the build to a hosting location on the web.
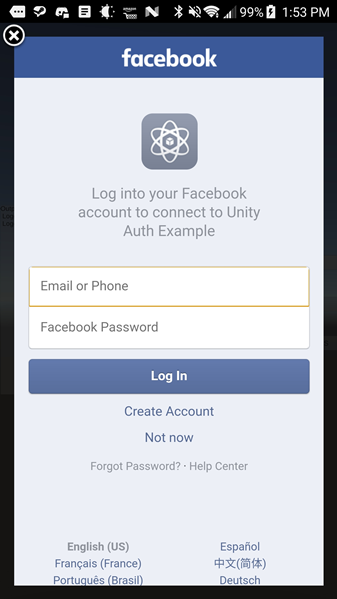
Once the game is running, press the LOGIN button.
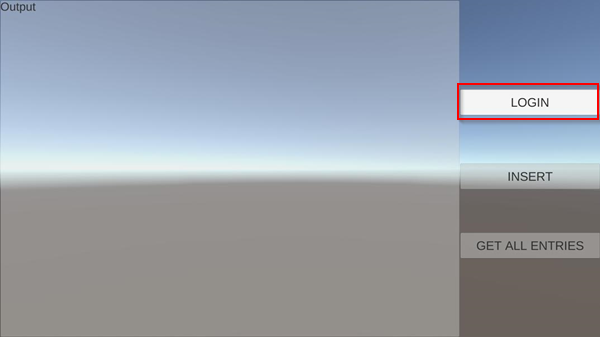
- This should present a Facebook login screen. Complete the Facebook login process.
Press INSERT. This will add test data to the TestPlayerData table on your Azure Mobile App. Observe the Output window to see if the insert operation completed.
Press the GET ALL ENTRIES button. The Output window should print the count of entries in the TestPlayerData table. Verify that the count goes up after each new insert. Additionally, you can navigate to the TestPlayerData table in the Easy Tables section of your Mobile App on the Azure portal and manually inspect the entries.
Note
The App Service will time out after a period of inactivity. It may take a moment to spin back up when it is hit again, so if the first test fails, please try again to ensure the service is in its running state.
Try the sample racing game
In the Unity menu, choose File > Build Settings... and ensure the the scenes inside
Assets/AuthSample/Scenes/to the Scenes in Build section.Ensure that
MenuSceneis in the top, index 0 position in the list of Scenes in Build.

Ensure that a supported / configured platform is selected, make a build and deploy it to the target platform.
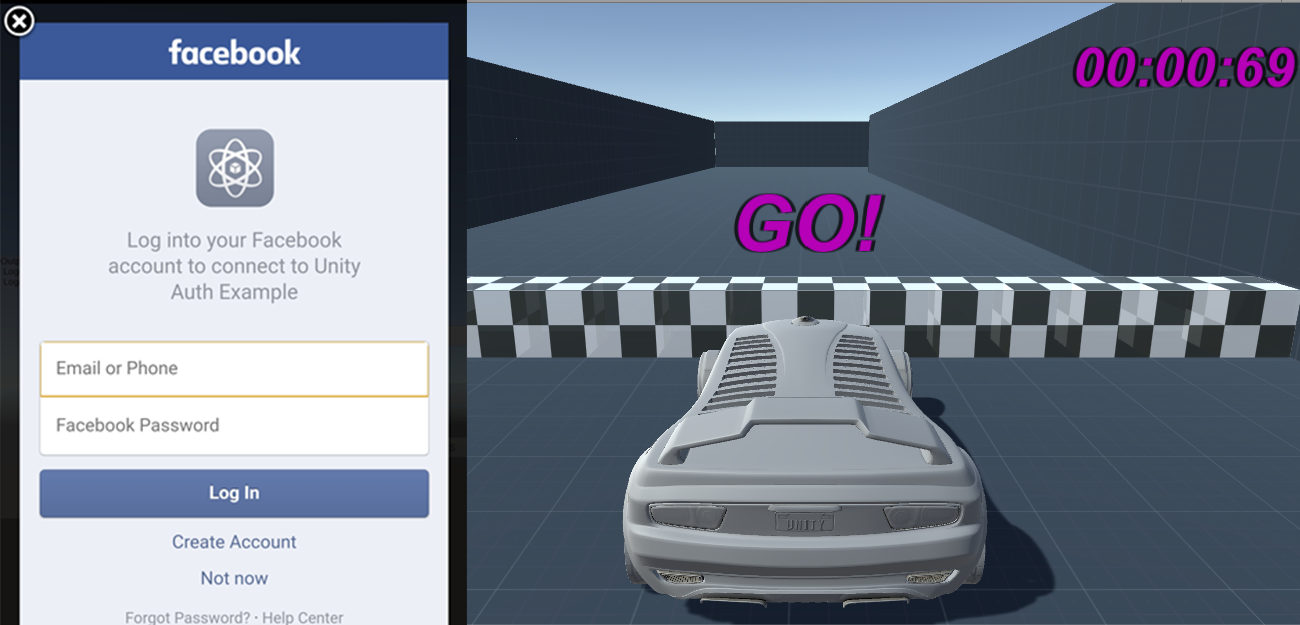
Once the build is running on the target platform, press the Log in button.
This should present a Facebook login screen. Complete the Facebook login process.
Press the Race! button. Before viewing the leaderboard or heatmap, it's best to create some sample data by completing the race at least once.
Complete a lap around the course and cross the checkered finish line.
Once a lap has completed, the High Score dialog should come up since there will be no other scores to compete with. Type in a name and press Submit. The high score, along with data about where the player crashed into the wall during the race are sent to Azure.
Now use the menu to view either the Crash Heatmap or Leaderboard. Each will display data loaded from Azure.