Configure MSMQ for SharePoint workflows
Learn how to configure Microsoft Message Queuing (MSMQ) in SharePoint to support asynchronous event messaging in SharePoint workflows.
Note
SharePoint 2010 workflows have been retired since August 1, 2020 for new tenants and removed from existing tenants on November 1, 2020. If you’re using SharePoint 2010 workflows, we recommend migrating to Power Automate or other supported solutions. For more info, see SharePoint 2010 workflow retirement.
Enabling MSMQ
MSMQ is a Windows Server feature that you can enable on your SharePoint Server computer to allow asynchronous event messaging in SharePoint workflows. To support asynchronous event messaging, you must enable MSMQ on your SharePoint Server computer.
MSMQ is provided as a "Feature" in Windows Server. To enable MSMQ, do the following:
Important: The screen shots included here are from Windows Server 2008 R2. The UI may change for enabling this feature in Windows Server 2012.
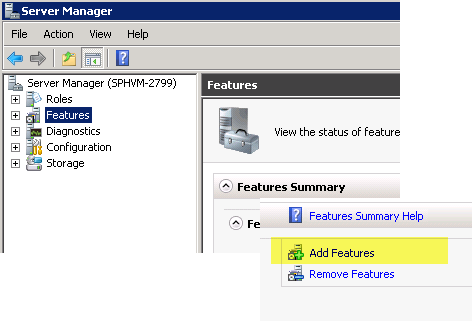
On your SharePoint Server computer, open Server Manager.
Select the Features icon in the left pane, then select Add Features, as depicted in Figure 1.
Figure 1. Adding the Message Queuing feature.
In the Add Features Wizard that appears, select Message Queuing. Accept the default selections and then click Next, then click Install.
You must now restart your computer.
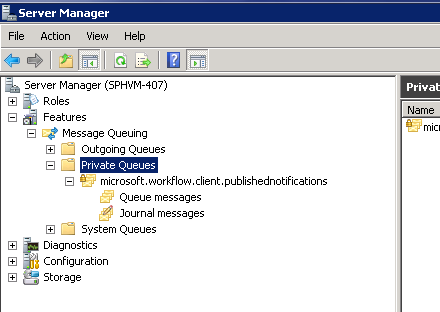
Once restarted, open Server Manager and then open Message Queuing icon in the left pane. Notice that it now contains a Message Queuing folder and subdirectories, as depicted in Figure 2.
Note
In Windows Server 2012 you will not find the queues in Server Manager. Instead, go to Computer Management, then select Services and applications.
Select the subdirectory named Private Queues. This is the directory in which your workflow event messages are stored.
Figure 2. The Message Queuing feature added to Server Manager.
Note
When you first add the Message Queuing feature, the Private Queues folder is empty. However, after a workflow runs that fires an event (or a workflow triggered by a SharePoint content change event runs), the Private Queues folder is populated as shown in Figure 2.
To complete the installation, you must set the SPWorkflowServiceApplicationProxy.AllowQueue property to true using a Windows PowerShell script. In the SharePoint Administration shell, run the following:
$proxy = Get-SPWorkflowServiceApplicationProxy
$proxy.AllowQueue = $true;
$proxy.Update();
Troubleshooting MSMQ
The Windows Developer Center provides extensive documentation of MSMQ. Following are some useful resources:
See also
Feedback
Coming soon: Throughout 2024 we will be phasing out GitHub Issues as the feedback mechanism for content and replacing it with a new feedback system. For more information see: https://aka.ms/ContentUserFeedback.
Submit and view feedback for