Use asynchronous operations in SharePoint Add-ins
Implement asynchronous operations in SharePoint Add-ins by using Microsoft Azure WebJobs.
Applies to: SharePoint 2013 | SharePoint Add-ins | SharePoint Online
The Core.QueueWebJobUsage sample shows you how to create and run asynchronous operations by using provider-hosted add-ins and Azure WebJobs in Office 365.
Use this solution to:
Improve performance of your remote event receivers.
Migrate to SharePoint Online and implement the same timer job functionality that you had in your SharePoint on-premises environment.
Implement long-running operations that you want to run against your SharePoint environment. For example:
AppInstalled events that run longer than the 30-second time-out interval. There are asynchronous processes in add-in event handlers. For more information, see Handle events in SharePoint Add-ins and Create an add-in event receiver in SharePoint Add-ins.
Custom site collection provisioning.
Operations that synchronize data between Office 365 and your on-premises systems.
Operations that perform complex calculations.
The following diagram shows a high-level architecture of the required components, and the processing flow among those components when an asynchronous operation is performed.
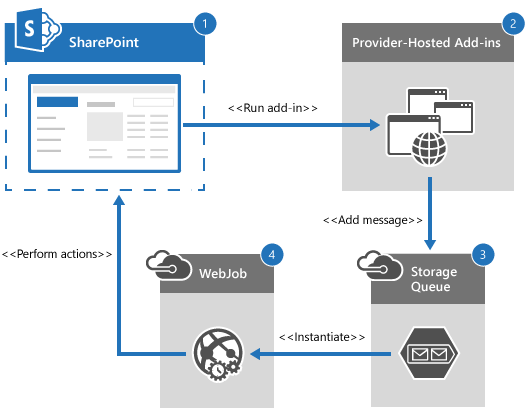
To implement asynchronous operations in your provider-hosted add-in by using Azure WebJobs:
Users run the add-in deployed in SharePoint Online.
The provider-hosted add-in gives input parameters required by the Azure WebJob, and then adds a new message to the Azure Storage queue.
The Azure Storage queue triggers an event in a continuously running Azure WebJob to start processing the new message.
The Azure WebJob runs custom business logic against your SharePoint Online site.
Note
Adding a message to the Azure Storage queue uses a different process from the process that runs the Azure WebJob. Therefore, your add-in can implement asynchronous operations by adding new messages to the queue using one process, and then by using the Azure WebJob to handle those messages in another process.
Before you begin
To get started, download the Core.QueueWebJobUsage sample add-in from the Office 365 Developer patterns and practices project on GitHub, and then create an Azure account, add details to that account, and verify that Azure WebJob is running.
To create an Azure Storage account to access the Azure storage queue:
Sign in to your Microsoft Azure portal.
Choose New > Data Services > Storage > Quick Create.
In URL, enter your domain name. For example, enter contoso.
In LOCATION/AFFINITY GROUP, choose an appropriate location.
In REPLICATION, choose Geo-Redundant.
Choose CREATE STORAGE ACCOUNT.
To add details to your newly created storage account:
When the Azure Storage account is created, choose MANAGE ACCESS KEYS.
In Manage Access Keys, copy the STORAGE ACCOUNT NAME and PRIMARY ACCESS KEY.
Apply the client ID, client secret, and your Azure Storage account information to several of the configuration files.
In Helper Project\Core.QueueWebJobUsage.Console.SendMessage, open Program.cs and enter the URL of your site in the siteUrl box.
In Properties on the Core.QueueWebJobUsage.Job, set Copy Local to True on the Microsoft.SharePoint.Client and Microsoft.SharePoint.Client.Runtime references. Setting Copy Local to True copies the referenced assemblies to Azure so that the Azure WebJob can resolve the references to these assemblies.
Deploy the Azure WebJob. For more information, see Deploy a WebJobs project.
To verify that your Azure WebJob is running:
Sign in to your Azure portal.
Choose web apps, and then choose the Microsoft Azure Websites you entered.
Choose WEBJOBS.
Verify that your Azure WebJob appears in the list, and that SCHEDULE is set to Runs continuously.
Choose CONFIGURE.
In add-in settings, create new add-in settings for ClientId and ClientSecret. Copy the ClientId and ClientSecret key-value pairs from the Core.QueueWebJobUsage.Job\app.config file.
In connection strings, create new connection strings for AzureWebJobsDashboard and AzureWebJobsStorage. Copy the AzureWebJobsDashboard and AzureWebJobsStorage key (name) and value pairs from the Core.QueueWebJobUsage.Job\app.config file, and then set the type to Custom.
Choose Save.
Apply configuration settings
Use the information in the following table to apply configuration settings to the Core.QueueWebJobUsage Visual Studio solution.
| File location | Key to update | Value information to update |
|---|---|---|
| Helper Project\Core.QueueWebJobUsage.Console.SendMessage\app.config | StorageConnectionString | Replace [Your Account name] with the storage account name copied from the Azure portal. |
| Replace [Your Account Key] with the primary access key copied from the Azure portal. | ||
| Core.QueueWebJobUsageWeb\web.config | StorageConnectionString | Replace [YourAccountName] with the storage account name copied from the Azure portal. |
| Replace [YourAccountKey] with the primary access key copied from the Azure portal. | ||
| Core.QueueWebJobUsage.Job\app.config | StorageConnectionString | Replace [YourAccountName] with the storage account name copied from the Azure portal. |
| Replace [YourAccountKey] with the primary access key copied from the Azure portal. | ||
| ClientId | Replace [Your Add-in ID] with the client ID copied from the Core.QueueWebJobUsageWeb\web.config. | |
| ClientSecret | Replace [Your Add-in Secret] with the client secret copied from the Core.QueueWebJobUsageWeb\web.config. | |
| AzureWebJobsDashboard | Replace [YourAccount] with the storage account name copied from the Azure portal. | |
| Replace [YourKey] with the primary access key copied from the Azure portal. | ||
| AzureWebJobsStorage | Replace [YourAccount] with the storage account name copied from the Azure portal. | |
| Replace [YourKey] with the primary access key copied from the Azure portal. |
Note
If the ClientId and the ClientSecret in Core.QueueWebJobUsageWeb gets updated, for example, when you increment the version number in the AppManifest.xml, make sure you update the ClientId and the ClientSecret in the Core.QueueWebJobUsage.Job\app.config.
Using the Core.QueueWebJobUsage add-in
The following table describes all the Visual Studio projects in the Core.QueueWebJobUsage solution.
| Visual Studio project | Description |
|---|---|
| Core.QueueWebJobUsage | Your SharePoint Add-in project. The following permissions are required:
|
| Core.QueueWebJobUsage.Common | Contains the business objects and business logic code — such as the methods to add messages to the storage queue — for this solution. This project is included to share business objects and business logic between different projects. You may not need this in your implementation. |
| Core.QueueWebJobUsage.Job | The Azure WebJob that runs when a new message is added to the Azure Storage queue. This project contains your custom business logic code. |
| Core.QueueWebJobUsageWeb | The provider-hosted add-in that contains the UI for the Core.QueueWebJobUsage project. |
| Helper Project\Core.QueueWebJobUsage.Console.SendMessage | A helper project that can be used to validate the storage account information and queue creation process, and to send messages to the queue for processing without setting up the entire solution described in this article. |
When you run the Core.QueueWebJobUsage code sample, the provider-hosted add-in appears and displays two buttons: Synchronous operation and Asynchronous operation. When you choose Synchronous operation, btnSync_Click in Pages\Default.aspx simulates a long-running synchronous process. In this code sample, btnSync_Click puts the current thread to sleep for 10 seconds, and then creates a document library. When you choose Asynchronous operation, btnAsync_Click in Pages\Default.aspx does the following:
Gets the current user.
Creates a SiteModifyRequest business object that stores the data to include in the message being sent to the Azure Storage queue. In this code sample, the data being sent includes the current user's name and the current site's URL.
Calls SiteManager().AddAsyncOperationRequestToQueue to add the message to the Azure Storage queue.
Note
The code in this article is provided as-is, without warranty of any kind, either express or implied, including any implied warranties of fitness for a particular purpose, merchantability, or non-infringement.
protected void btnAsync_Click(object sender, EventArgs e)
        {

            var spContext = SharePointContextProvider.Current.GetSharePointContext(Context);

            using (var clientContext = spContext.CreateUserClientContextForSPHost())
            {
                // Get the current user.
                var currUser = clientContext.Web.CurrentUser;
                clientContext.Load(currUser);
                clientContext.ExecuteQuery();

                // Create business object, and then add the request to the queue.
                SiteModifyRequest request = new SiteModifyRequest() { RequestorName = currUser.Title, SiteUrl = Page.Request["SPHostUrl"] };
                new SiteManager().AddAsyncOperationRequestToQueue(request,
                                                                  ConfigurationManager.AppSettings["StorageConnectionString"]);

                processViews.ActiveViewIndex = 1;
                lblStatus.Text = "Asynchronous operation to create document library started.";
            }
        }
In Core.QueueWebJobUsage.Common, in SiteManager.cs, AddAsyncOperationRequestToQueue does the following:
Creates a CloudStorageAccount object by using the AccountName and AccountKey configuration information in the Core.QueueWebJobUsageWeb\web.config file.
Creates an Azure Storage queue client by using CloudStorageAccount.CreateCloudQueueClient.
Uses CloudQueueClient.GetQueueReference to get a reference to the Azure Storage queue with name equal to the value of the SiteManager.StorageQueueName constant.
Uses CloudQueue.CreateIfNotExists to create the Azure Storage queue if it does not exist.
Uses CloudQueue.AddMessage to add a new message to the Azure Storage queue. The modifyRequest business object is serialized into a CloudQueueMessage object, which is added to the Azure Storage queue.
public void AddAsyncOperationRequestToQueue(SiteModifyRequest modifyRequest,
                                                    string storageConnectionString)
        {
            CloudStorageAccount storageAccount =
                                CloudStorageAccount.Parse(storageConnectionString);

            // Get queue or create a new one if one does not exist.
            CloudQueueClient queueClient = storageAccount.CreateCloudQueueClient();
            CloudQueue queue = queueClient.GetQueueReference(SiteManager.StorageQueueName);
            queue.CreateIfNotExists();

            // Add a message to queue.
            queue.AddMessage(new CloudQueueMessage(JsonConvert.SerializeObject(modifyRequest)));
        }
After the message is added to the Azure Storage Queue, a continuously running Azure WebJob waits for and then processes the new message. The Azure WebJob is defined in Core.QueueWebJobUsage.Job. When the Azure WebJob runs, Main in Core.QueueWebJobUsage.Job\Program.cs creates a new JobHost, and then calls RunAndBlock. The JobHost coordinates calls to methods marked with the QueueTrigger attribute, and watches for messages on a specific queue. RunAndBlock ensures that the Azure WebJob runs continuously and calls ProcessQueueMessage, which is the method to trigger when a new message is added to the Azure Storage Queue. The Azure WebJobs SDK associates the Main thread with ProcessQueueMessage. For more information, see Create a .NET WebJob in Azure Add-in Service.
static void Main()
        {
            var host = new JobHost();
            // The following code ensures that the WebJob will run continuously.
            host.RunAndBlock();
        }
ProcessQueueMessage processes new messages that are added to the Azure Storage queue by:
Using the QueueTrigger attribute to specify that ProcessQueueMessage should be triggered when a new message is written to the queue with name equal to the value of SiteManager.StorageQueueName.
Writing to the log for the Azure WebJob by using the log variable that was passed as a parameter to ProcessQueueMessage.
Calling SiteManager().PerformSiteModification to perform a long-running business process on the site. In this code sample, the thread is put to sleep for 10 seconds, and then a document library is created.
public static void ProcessQueueMessage(
            [QueueTrigger(SiteManager.StorageQueueName)]
            SiteModifyRequest modifyRequest, TextWriter log)
        {
            log.WriteLine(string.Format("{0} '{1}' {2} '{3}'.",
                            "Received new site modification request with URL",
                            modifyRequest.SiteUrl,
                            "from person named as ",
                            modifyRequest.RequestorName));

            try
            {
                Uri targetSite = new Uri(modifyRequest.SiteUrl);

                // Get the realm for the URL.
                string realm = TokenHelper.GetRealmFromTargetUrl(targetSite);

                // Get the access token for the URL.
                // Requires this add-in to be registered with the tenant.
                string accessToken = TokenHelper.GetAppOnlyAccessToken(
                                                    TokenHelper.SharePointPrincipal,
                                                    targetSite.Authority, realm).AccessToken;

                // Get client context with access token.
                using (var ctx =
                    TokenHelper.GetClientContextWithAccessToken(
                                                    targetSite.ToString(), accessToken))
                {
                    // Call business logic code.
                    new SiteManager().PerformSiteModification(ctx, modifyRequest);
                }
            }
            catch (Exception ex)
            {
                log.WriteLine(string.Format("Site modification to URL {0} failed with following details.", modifyRequest.SiteUrl));
                log.WriteLine(ex.ToString());
                throw;
            }
        }
See also
Feedback
Coming soon: Throughout 2024 we will be phasing out GitHub Issues as the feedback mechanism for content and replacing it with a new feedback system. For more information see: https://aka.ms/ContentUserFeedback.
Submit and view feedback for