Add custom client-side rendering to a SharePoint-hosted SharePoint Add-in
Important
The SharePoint Add-In model in SharePoint Online has been retired as of November 27th 2023, checkout the full retirement announcement to learn more.
Retirement means that the feature will not get any new investments, but it's still supported. End-of-life means that the feature will be discontinued and is no longer available for use.
This is the eighth in a series of articles about the basics of developing SharePoint-hosted SharePoint Add-ins. You should first be familiar with SharePoint Add-ins and the previous articles in this series, which you can find at Get started creating SharePoint-hosted SharePoint Add-ins | Next steps.
Note
If you have been working through this series about SharePoint-hosted add-ins, you have a Visual Studio solution that you can use to continue with this topic. You can also download the repository at SharePoint_SP-hosted_Add-Ins_Tutorials and open the BeforeClientRenderedControl.sln file.
Important
JSLink based customizations (client-side rendering) are not supported in modern experiences. This includes modern lists and libraries, including JSLink support in the list view web parts of the modern pages. Client-side rendering is supported in the classic experiences in SharePoint Online or in on-premises.
You can use a little client-side JavaScript to customize the rendering of web parts, most types of fields (columns), and some other controls, by assigning a JavaScript file to the JSLink property of the control, such as SPField.JSLink. You can also add client-side validation logic in this way. In this article, you customize the rendering of a field in a list of the Employee Orientation SharePoint Add-in by using client-side rendering.
Note
- If the end-user has JavaScript disabled in their browser, SharePoint will fall back to server-side rendering and validation.
- The JSLink property is not supported on Survey or Events lists. A SharePoint calendar is an Events list.
Create and register the JavaScript
In Solution Explorer, right-click the Scripts node, and then select Add > New Item > Web.
Select JavaScript File and name it OrientationStageRendering.js.
Your custom rendering of the field should happen automatically, so use the following code to add an anonymous method to the JavaScript that runs automatically when the file loads:
(function () {

})();
In the body of this method (between the { } characters), add the following code to create JSON (Javascript Object Notation) objects for the rendering override context, the templates in the context, and the templates for the fields.
var customRenderingOverride = {};
customRenderingOverride.Templates = {};
customRenderingOverride.Templates.Fields = {
}
In the body of the Fields template object, add the following JSON.
"OrientationStage": { "View": renderOrientationStage }- The property name
OrientationStageidentifies the field that has customized rendering. - The value of the property is another JSON object.
- The
Viewproperty identifies the page context in which the custom rendering is applied. In this case, the object is telling SharePoint to use the customized rendering on list views. (Other options would be for the Edit, New, and Display forms.) - The value of the property
renderOrientationStageis the name of the custom rendering method that you create in a later step.
- The property name
The last thing that the anonymous method must do is tell SharePoint's template manager about the rendering override. Add the following line to the end of the body of the method.
SPClientTemplates.TemplateManager.RegisterTemplateOverrides(customRenderingOverride);The method should now look like the following.
(function () {
  var customRenderingOverride = {};
  customRenderingOverride.Templates = {};
  customRenderingOverride.Templates.Fields = {
      "OrientationStage": { "View": renderOrientationStage }
  }

  SPClientTemplates.TemplateManager.RegisterTemplateOverrides(customRenderingOverride);
})();
Add the following method to the file. It sets the color of the Orientation Stage column value to red when the value is
Not Startedand to green when the value isCompleted. (Thectxobject is a client context object that is declared by in-the-box SharePoint script.)function renderOrientationStage(ctx) { var orientationStageValue = ctx.CurrentItem[ctx.CurrentFieldSchema.Name]; if (orientationStageValue == "Not Started") { return "<span style='color:red'>" + orientationStageValue + "</span>" } else if (orientationStageValue == "Completed") { return "<span style='color:green'>" + orientationStageValue + "</span>" } else { return orientationStageValue; } }In Solution Explorer, expand Site Columns and then OrientationStage, and then open the elements.xml file.
To tell SharePoint to use your custom JavaScript, add a new attribute JSLink to the Field element, and then assign the following URL as its value:
~site/Scripts/OrientationStageRendering.js.Note
The JSLink property is always a file, not a method. There's no way to tell SharePoint which method to run, and that is why the file contains a method that runs automatically.
The start tag for the Field element will now look like the following.
<Field
      ID="{some_guid_here}"
      Name="OrientationStage"
      Title="OrientationStage"
      DisplayName="Orientation Stage"
      Description="The current orientation stage of the employee."
      Type="Choice"
      Required="TRUE"
      Group="Employee Orientation"
      JSLink="~site/Scripts/OrientationStageRendering.js">
<!-- child elements and end tag omitted -->
Open the Default.aspx page and add the following code as the last child of the asp:Content element that has ContentPlaceHolderID set to PlaceHolderMain.
<p><asp:HyperLink runat="server" NavigateUrl="JavaScript:window.location = _spPageContextInfo.webAbsoluteUrl + '/Lists/NewEmployeesInSeattle/AllItems.aspx';"
      Text="List View Page for New Employees in Seattle" /></p>
Run and test the add-in
Use the F5 key to deploy and run your add-in. Visual Studio makes a temporary installation of the add-in on your test SharePoint site and immediately runs the add-in.
The client-side rendering that you have configured affects the rendering of the field only on the list view page, not in the list view web part that we put on the home page. This is because the web part defaults to server-side rendering. There are ways to reverse this, but they are too advanced for this simple example. So, to see the client-side rendering in action, select the link at the bottom of the page List View Page for New Employees in Seattle.
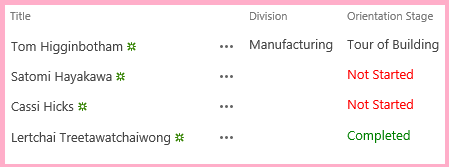
When the list view page opens, set the Orientation Stage value for some items to Not Started and set others to Completed to see the custom color rendering.
Figure 1. List with custom client-side rendering
To end the debugging session, close the browser window or stop debugging in Visual Studio. Each time that you select F5, Visual Studio will retract the previous version of the add-in and install the latest one.
You will work with this add-in and Visual Studio solution in other articles, and it's a good practice to retract the add-in one last time when you are done working with it for a while. Right-click the project in Solution Explorer and select Retract.
Next steps
In the next article in this series, you'll create a custom ribbon button in the host web of a SharePoint Add-in.
Feedback
Coming soon: Throughout 2024 we will be phasing out GitHub Issues as the feedback mechanism for content and replacing it with a new feedback system. For more information see: https://aka.ms/ContentUserFeedback.
Submit and view feedback for