Use @pnp/sp (PnPJS) library with SharePoint Framework web parts
You may choose to use the @pnp/sp library when building your SharePoint Framework (SPFx) web parts. This library provides a fluent API to make building your REST queries intuitive and supports batching and caching. For more information, see the project's homepage, which has links to documentation, samples, and other resources to help you get started.
Note
PnPJS is an open-source solution with active community providing support for it. There is no SLA for the open-source tool support from Microsoft.
You can download the full source for this article from the samples site.
Note
Before following the steps in this article, be sure to set up your SharePoint client-side web part development environment.
Create a new project
Create a new folder for the project by using your console of choice:
md spfx-pnp-js-exampleEnter that folder:
cd spfx-pnp-js-exampleRun the Yeoman generator for SPFx:
yo @microsoft/sharepointEnter the following values when prompted during the setup of the new project:
- spfx-pnp-js-example as the solution name (keep default)
- spfx-pnp-js-example description as the solution description (keep default)
- SharePoint Online only (latest) as the baseline packages version
- N to allow access to unique web APIs
- WebPart as the component to create
- PnPJSExample as the name of the web part
- PnPJSExample description as the description
- React as the framework
Open the project in the code editor of your choosing. The screenshots shown here demonstrate Visual Studio Code. To open the directory within Visual Studio Code, enter the following in the console:
code .
Set up the location of your SharePoint-hosted workbench by modifying the
initialPagevalue in the config/serve.json to point to your tenant/site.
{
  "$schema": "https://developer.microsoft.com/json-schemas/spfx-build/spfx-serve.schema.json",
  "port": 4321,
  "https": true,
  "initialPage": "https://{your tenant name}/sites/dev/_layouts/15/workbench.aspx"
}
Install and set up @pnp/sp
After your project is created, you must install and set up @pnp/sp package. In addition, we'll use the @pnp/logging extension, but that is optional. These steps are common for any project type (React, etc).
npm install @pnp/logging @pnp/sp --save
For SPFx Version 1.14.x or those that aren't supporting typescript v4.x
Note
PnPjs version 3.x is only supported in SPFx v1.14 and higher and NodeJs v12.x and higher.
Update the rush stack compiler to 4.2. This is covered in this great article by Elio, but the steps are listed below.
- Uninstall the existing rush stack compiler (replace the x with the version installed in your package.json file):
npm uninstall @microsoft/rush-stack-compiler-3.x - Install 4.2 version:
npm i @microsoft/rush-stack-compiler-4.2 - Update tsconfig.json to extend the 4.2 config:
"extends": "./node_modules/@microsoft/rush-stack-compiler-4.2/includes/tsconfig-web.json"
- Uninstall the existing rush stack compiler (replace the x with the version installed in your package.json file):
Replace the contents of the gulpfile.js with:
'use strict';

const build = require('@microsoft/sp-build-web');

build.addSuppression(`Warning - [sass] The local CSS class 'ms-Grid' is not camelCase and will not be type-safe.`);

var getTasks = build.rig.getTasks;
build.rig.getTasks = function () {
  var result = getTasks.call(build.rig);

  result.set('serve', result.get('serve-deprecated'));

  return result;
};

// ********* ADDED *******
// disable tslint
build.tslintCmd.enabled = false;
// ********* ADDED *******

build.initialize(require('gulp'));
Update onInit in PnPjsExampleWebPart.ts
Because the @pnp/sp library constructs REST requests, it needs to know the URL to send these requests. When operating within SPFx, we need to rely on the context object supplied by the framework.
There are two ways to ensure that you have correctly set up your requests; we use the onInit method in this example.
Open the src\webparts\spPnPjsExample\SpPnPjsExampleWebPart.ts file, and add an import statement for the PnP project configuration file (more on this file below):
import { getSP } from './pnpjsConfig';In the
onInit()method, update the code to appear as follows. Add the call to initialize our project configuration after thesuper.onInit()call. We do this after thesuper.onInit()to ensure that the framework has a chance to initialize anything required and that we are setting up the library after those steps are completed./** * Initialize the web part. */ public async onInit(): Promise<void> { this._environmentMessage = this._getEnvironmentMessage(); await super.onInit(); //Initialize our _sp object that we can then use in other packages without having to pass around the context. // Check out pnpjsConfig.ts for an example of a project setup file. getSP(this.context); }
Add a project configuration file
Next, let's create a project configuration file for PnPjs. This file allows us to set up the imports we will need for the project as well as initialize an instance of the sp object for use on any of our other components.
Note all the imports for webs, lists, items, and batching. In our component we will be making calls to get items from a library, so we need to include those imports for future reference. In addition, we create a variable that will hold our configured instance of the SharePoint Querable that will be created with the factory instance. If you'll recall from our onInit function above we're calling the exported getSP with the SPFx context passed in as a property. By doing so we're able to establish context with the PnPjs library so that we can subsequently make calls to the SharePoint API. Subsequent calls to getSP without the context will return the object that has already been configured.
This sample also shows how we can add an additional behavior to the instance which enables logging for all the calls. This will use the default logging but we could expand to include our own logging functions.
import { WebPartContext } from "@microsoft/sp-webpart-base";

// import pnp and pnp logging system
import { spfi, SPFI, SPFx } from "@pnp/sp";
import { LogLevel, PnPLogging } from "@pnp/logging";
import "@pnp/sp/webs";
import "@pnp/sp/lists";
import "@pnp/sp/items";
import "@pnp/sp/batching";

var _sp: SPFI | null = null;

export const getSP = (context?: WebPartContext): SPFI => {
  if (context != null) {
    //You must add the @pnp/logging package to include the PnPLogging behavior it is no longer a peer dependency
    // The LogLevel set's at what level a message will be written to the console
    _sp = spfi().using(SPFx(context)).using(PnPLogging(LogLevel.Warning));
  }
  return _sp!;
};
Add an interface file for the data model
Add a new file in the root of the components folder called interfaces.ts. Replace the contents with the following definitions which will be referenced by our component.
// create File item to work with it internally
export interface IFile {
  Id: number;
  Title: string;
  Name: string;
  Size: number;
}

// create PnP JS response interface for File
export interface IResponseFile {
  Length: number;
}

// create PnP JS response interface for Item
export interface IResponseItem {
  Id: number;
  File: IResponseFile;
  FileLeafRef: string;
  Title: string;
}
Update the default component
Finally, we need to do a bit of cleanup to create our base component. First, replace the entire contents of the PnPjsExample.tsx file with the following code.
import * as React from 'react';
import styles from './PnPjsExample.module.scss';
import { IPnPjsExampleProps } from './IPnPjsExampleProps';
// import interfaces
import { IFile, IResponseItem } from "./interfaces";
import { Caching } from "@pnp/queryable";
import { getSP } from "../pnpjsConfig";
import { SPFI, spfi } from "@pnp/sp";
import { Logger, LogLevel } from "@pnp/logging";
import { IItemUpdateResult } from "@pnp/sp/items";
import { Label, PrimaryButton } from '@microsoft/office-ui-fabric-react-bundle';
export interface IAsyncAwaitPnPJsProps {
description: string;
}
export interface IIPnPjsExampleState {
items: IFile[];
errors: string[];
}
export default class PnPjsExample extends React.Component<IPnPjsExampleProps, IIPnPjsExampleState> {
private LOG_SOURCE = "🅿PnPjsExample";
private LIBRARY_NAME = "Documents";
private _sp: SPFI;
constructor(props: IPnPjsExampleProps) {
super(props);
// set initial state
this.state = {
items: [],
errors: []
};
this._sp = getSP();
}
public componentDidMount(): void {
// read all file sizes from Documents library
this._readAllFilesSize();
}
public render(): React.ReactElement<IAsyncAwaitPnPJsProps> {
// calculate total of file sizes
const totalDocs: number = this.state.items.length > 0
? this.state.items.reduce<number>((acc: number, item: IFile) => {
return (acc + Number(item.Size));
}, 0)
: 0;
return (
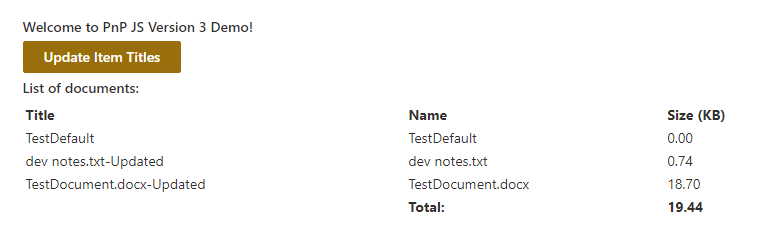
<div className={styles.pnPjsExample}>
<Label>Welcome to PnP JS Version 3 Demo!</Label>
<PrimaryButton onClick={this._updateTitles}>Update Item Titles</PrimaryButton>
<Label>List of documents:</Label>
<table width="100%">
<tr>
<td><strong>Title</strong></td>
<td><strong>Name</strong></td>
<td><strong>Size (KB)</strong></td>
</tr>
{this.state.items.map((item, idx) => {
return (
<tr key={idx}>
<td>{item.Title}</td>
<td>{item.Name}</td>
<td>{(item.Size / 1024).toFixed(2)}</td>
</tr>
);
})}
<tr>
<td></td>
<td><strong>Total:</strong></td>
<td><strong>{(totalDocs / 1024).toFixed(2)}</strong></td>
</tr>
</table>
</div >
);
}
private _readAllFilesSize = async (): Promise<void> => {
try {
// do PnP JS query, some notes:
// - .expand() method will retrive Item.File item but only Length property
// - .get() always returns a promise
// - await resolves promises making your code act synchronous, ergo Promise<IResponseItem[]> becomes IResponse[]
//Extending our sp object to include caching behavior, this modification will add caching to the sp object itself
//this._sp.using(Caching({store:"session"}));
//Creating a new sp object to include caching behavior. This way our original object is unchanged.
const spCache = spfi(this._sp).using(Caching({store:"session"}));
const response: IResponseItem[] = await spCache.web.lists
.getByTitle(this.LIBRARY_NAME)
.items
.select("Id", "Title", "FileLeafRef", "File/Length")
.expand("File/Length")();
// use map to convert IResponseItem[] into our internal object IFile[]
const items: IFile[] = response.map((item: IResponseItem) => {
return {
Id: item.Id,
Title: item.Title || "Unknown",
Size: item.File?.Length || 0,
Name: item.FileLeafRef
};
});
// Add the items to the state
this.setState({ items });
} catch (err) {
Logger.write(`${this.LOG_SOURCE} (_readAllFilesSize) - ${JSON.stringify(err)} - `, LogLevel.Error);
}
}
private _updateTitles = async (): Promise<void> => {
try {
//Will create a batch call that will update the title of each item
// in the library by adding `-Updated` to the end.
const [batchedSP, execute] = this._sp.batched();
//Clone items from the state
const items = JSON.parse(JSON.stringify(this.state.items));
let res: IItemUpdateResult[] = [];
for (let i = 0; i < items.length; i++) {
// you need to use .then syntax here as otherwise the application will stop and await the result
batchedSP.web.lists
.getByTitle(this.LIBRARY_NAME)
.items
.getById(items[i].Id)
.update({ Title: `${items[i].Name}-Updated` })
.then(r => res.push(r));
}
// Executes the batched calls
await execute();
// Results for all batched calls are available
for (let i = 0; i < res.length; i++) {
//If the result is successful update the item
//NOTE: This code is over simplified, you need to make sure the Id's match
const item = await res[i].item.select("Id, Title")<{ Id: number, Title: string }>();
items[i].Name = item.Title;
}
//Update the state which rerenders the component
this.setState({ items });
} catch (err) {
Logger.write(`${this.LOG_SOURCE} (_updateTitles) - ${JSON.stringify(err)} - `, LogLevel.Error);
}
}
}
Run the example
Start the sample, and add the web part to your SharePoint-hosted Workbench (/_layouts/15/workbench.aspx) to see it in action.
gulp serve --nobrowser
You can delete existing items by selecting the trashcan icon, or you can add new items by putting values in both fields and selecting Add.
Next steps
The @pnp/sp library contains a great range of functionality and extensibility. For samples, guidance, and hints about using and configuring the library, see the Developer Guide.
See also
Feedback
Coming soon: Throughout 2024 we will be phasing out GitHub Issues as the feedback mechanism for content and replacing it with a new feedback system. For more information see: https://aka.ms/ContentUserFeedback.
Submit and view feedback for