Step 2 Migrate workflows to Power Automate
Note
This feature is currently in public preview, and subject to change.
After configuring the required endpoints and configuring Power Automate, you're ready to start migrating your SharePoint Server workflows. You choose to either use SPMT or PowerShell.
Note
SPMT will skip a workflow if it has already been successfully migrated. If you want to run a new migration to override the migrated flow, delete it from the destination before starting the migration.
Migrate workflows using SPMT
Start SPMT, and then enter your Microsoft 365 username and password.
Select Start your first migration.
Select SharePoint Server.
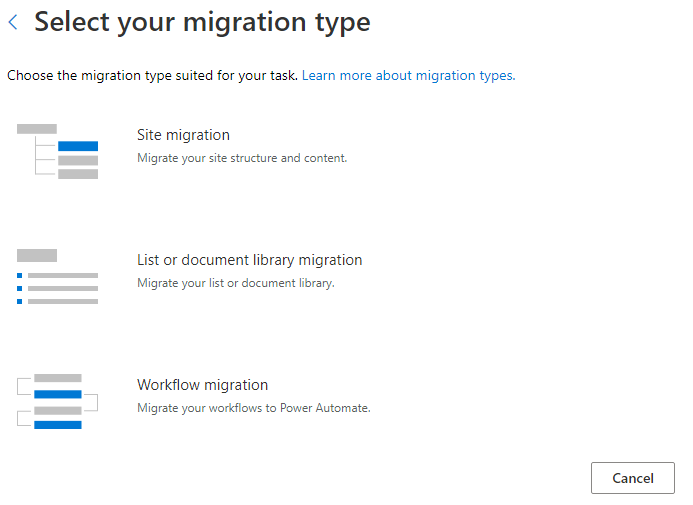
Select the Workflow migration type.
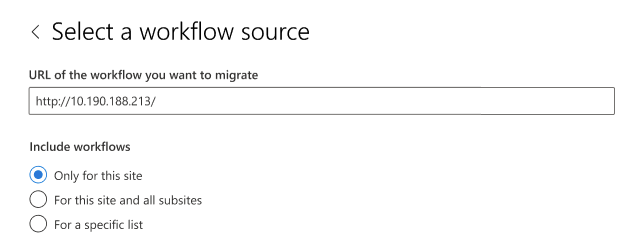
Enter the SharePoint Server site URL where your content is located.
Enter your username and password to the SharePoint Server site; it can be UserID or user email. Select Sign in.
Select which workflows to include in the migration. If you select the option for a specific list, you'll be prompted for the list name.
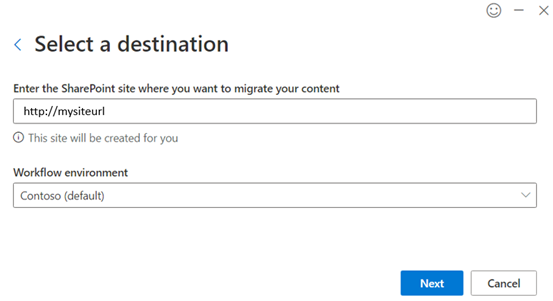
Enter your destination; the SharePoint site and list where you want to migrate your workflow. Select the workflow environment. If the site or the list doesn't currently exist, they'll be created for you. Select Next.
This task is added to the list of migration tasks. If you want to select another set of data files to migrate, select Add a source. Otherwise, select Next to go to the next step.
On the settings page, turn on Only perform scanning to run workflow scanning.
In the Power Automate flow owner box, enter the email address of the new flow owner.
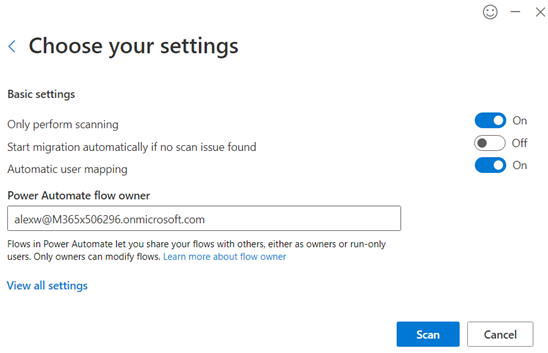
Select View all settings, and choose your option under Handle Unsupported Action. If you select Stop workflow migration and report error, SPMT will report an error on a workflow if it contains unsupported actions. Otherwise the unsupported actions are converted to Compose actions during migration.
Select Scan to start scanning if “Only perform scanning” is selected; or select Migrate to start migration.
Migrate workflows using PowerShell
Alternatively, you can migrate your workflows to Power Automate using PowerShell.
Before you proceed, make sure you've completed the steps in this article: Step 1 - Configure endpoints and Power Automate.
Scan workflows
This command scans workflows of a given site or list and generates a scan report.
Register-SPMTMigration -ScanOnly $true -SPOCredential $targetCredential -UserMappingFile $userMappingFile -MigrationType WORKFLOW -DefaultFlowOwnerEmail  $defaultOwnerName -Force
...
Start-SPMTMigration
Migrate workflows
This command:
- Migrates workflow of a site or list
- Generates a migration package
- Imports the package to Power Automate and
- Generates a migration report.
MigrationType
When MigrationType is WORKFLOW, if the structure hasn't been migrated yet, the command does migrate site or list structure (not content), then migrate its workflows.
DefaultFlowOwnerEmail
Default flow owner is required for OOTB Approval workflow because there isn’t an owner in workflow definition. After migration, only flow owner and Power Automate admin can access the migrated flows. If the given owner email isn't a valid user at destination, migration will fail. The flow owner also needs to have permission to access the destination SPO list.
> Register-SPMTMigration -SPOCredential $targetCredential -UserMappingFile $userMappingFile -MigrationType WORKFLOW -DefaultFlowOwnerEmail $defaultOwnerName -Force
...
Start-SPMTMigration
Sample PowerShell script
Import-Module "$((Resolve-Path .\).Path)\Microsoft.SharePoint.MigrationTool.PowerShell.dll"

clear
Remove-Variable * -ErrorAction SilentlyContinue

$currentFolder = (Resolve-Path .\).Path
$userMappingFile = "$($currentFolder)\Sample-UserMap.csv"
$defaultOwnerName = "please enter flow owner email here"

$targetSite = "please enter destination site URL here"
$targetUserName = "please enter destination site admin user email here"
$targetPassWord = ConvertTo-SecureString -String "please enter destination user password here" -AsPlainText -Force
$targetCredential = New-Object -TypeName System.Management.Automation.PSCredential -ArgumentList $targetUserName, $targetPassWord

Register-SPMTMigration -SPOCredential $targetCredential -UserMappingFile $userMappingFile -IgnoreUpdate -MigrationType WORKFLOW -DefaultFlowOwnerEmail $defaultOwnerName -Force

$sourceSite = "please enter source site URL here"
$sourceUsername = "please enter source site admin username here"
$sourcePassword = ConvertTo-SecureString -String "please enter destination user password here" -AsPlainText -Force
$sourceCredential = New-Object -TypeName System.Management.Automation.PSCredential -ArgumentList $sourceUsername, $sourcePassword
Add-SPMTTask -SharePointSourceCredential $sourcecredential -SharePointSourceSiteUrl $sourceSite -TargetSiteUrl $targetSite `
#-SourceList "please enter source list name here" -TargetList "please enter destination list name here"

Write-Host "Start migration"
$StartTime = [DateTime]::UtcNow

# Let the migration run in background using NoShow mode
Start-SPMTMigration

$migration = Get-SPMTMigration

# open report folder
start $migration.ReportFolderPath
Migrations report and error codes
The migration task generates a report titled WorkflowMigrationReport.csv for migrations, and another WorkflowScanReport.csv for scans. The reports are located in the WF_xxx/Report/TaskReport_xxx/ folder.
Step 3: Activate workflows
Feedback
Coming soon: Throughout 2024 we will be phasing out GitHub Issues as the feedback mechanism for content and replacing it with a new feedback system. For more information see: https://aka.ms/ContentUserFeedback.
Submit and view feedback for