Create calculated columns
Applies to:  SQL Server 2019 and later Analysis Services
Azure Analysis Services
Fabric/Power BI Premium
SQL Server 2019 and later Analysis Services
Azure Analysis Services
Fabric/Power BI Premium
In this lesson, you create data in your model by adding calculated columns. You can create calculated columns (as custom columns) when using Get Data, by using the Power Query Editor, or later in the model designer like you do in this lesson. To learn more, see Calculated columns.
You create five new calculated columns in three different tables. The steps are slightly different for each task showing there are several ways to create columns, rename them, and place them in various locations in a table.
This lesson is also where you first use Data Analysis Expressions (DAX). DAX is a special language for creating highly customizable formula expressions for tabular models. In this tutorial, you use DAX to create calculated columns, measures, and role filters. To learn more, see DAX in tabular models.
Estimated time to complete this lesson: 15 minutes
Prerequisites
This article is part of a tabular modeling tutorial, which should be completed in order. Before performing the tasks in this lesson, you should have completed the previous lesson: Lesson 4: Create relationships.
Create calculated columns
Create a MonthCalendar calculated column in the DimDate table
Click Extensions > Model > Model View > Data View.
Calculated columns can only be created by using the model designer in Data View.
In the model designer, click the DimDate table (tab).
Right-click the CalendarQuarter column header, and then click Insert Column.
A new column named Calculated Column 1 is inserted to the left of the Calendar Quarter column.
In the formula bar above the table, type the following DAX formula: Auto-Complete helps you type the fully qualified names of columns and tables, and lists the functions that are available.
=RIGHT(" " & FORMAT([MonthNumberOfYear],"#0"), 2) & " - " & [EnglishMonthName]Values are then populated for all the rows in the calculated column. If you scroll down through the table, you see rows can have different values for this column, based on the data in each row.
Rename this column to MonthCalendar.

The MonthCalendar calculated column provides a sortable name for Month.
Create a DayOfWeek calculated column in the DimDate table
With the DimDate table still active, click Extensions > Column > Add Column.
In the formula bar, type the following formula:
=RIGHT(" " & FORMAT([DayNumberOfWeek],"#0"), 2) & " - " & [EnglishDayNameOfWeek]When you've finished building the formula, press ENTER. The new column is added to the far right of the table.
Rename the column to DayOfWeek.
Click the column heading, and then drag the column between the EnglishDayNameOfWeek column and the DayNumberOfMonth column.
Tip
Moving columns in your table makes it easier to navigate.
The DayOfWeek calculated column provides a sortable name for the day of week.
Create a ProductSubcategoryName calculated column in the DimProduct table
In the DimProduct table, scroll to the far right of the table. Notice the right-most column is named Add Column, click the column heading to make it active.
In the formula bar, type the following formula:
=RELATED('DimProductSubcategory'[EnglishProductSubcategoryName])Rename the column to ProductSubcategoryName.
The ProductSubcategoryName calculated column is used to create a hierarchy in the DimProduct table, which includes data from the EnglishProductSubcategoryName column in the DimProductSubcategory table. Hierarchies cannot span more than one table. You create hierarchies later in Lesson 9.
Create a ProductCategoryName calculated column in the DimProduct table
With the DimProduct table still active, add a new column.
In the formula bar, type the following formula:
=RELATED('DimProductCategory'[EnglishProductCategoryName])Rename the column to ProductCategoryName.
The ProductCategoryName calculated column is used to create a hierarchy in the DimProduct table, which includes data from the EnglishProductCategoryName column in the DimProductCategory table. Hierarchies cannot span more than one table.
Create a Margin calculated column in the FactInternetSales table
In the model designer, select the FactInternetSales table.
Create a new calculated column between the SalesAmount column and the TaxAmt column.
In the formula bar, type the following formula:
=[SalesAmount]-[TotalProductCost]Rename the column to Margin.
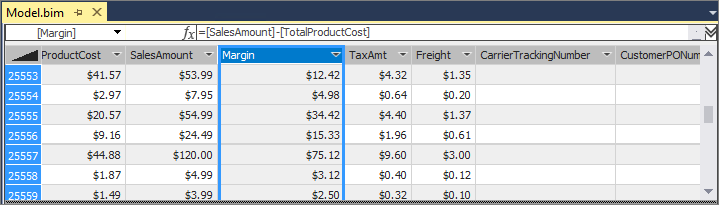
The Margin calculated column is used to analyze profit margins for each sale.
Next step
Feedback
Coming soon: Throughout 2024 we will be phasing out GitHub Issues as the feedback mechanism for content and replacing it with a new feedback system. For more information see: https://aka.ms/ContentUserFeedback.
Submit and view feedback for