Enroll and configure Surface devices with SEMM
With Microsoft Surface Enterprise Management Mode (SEMM), you can securely configure the settings of Surface UEFI on a Surface device and manage those settings on Surface devices in your organization. When a Surface device is managed by SEMM, that device is considered enrolled (sometimes referred to as activated). This article shows you how to create a Surface UEFI configuration package to control the settings of Surface UEFI and enroll a Surface device in SEMM.
For a more high-level overview of SEMM, see Microsoft Surface Enterprise Management Mode.
As an alternative to SEMM, newer Surface devices support remote management of a subset of firmware settings via Microsoft Intune. For more information,see Intune management of Surface UEFI settings.
Note
SEMM is supported on Surface Pro X via the UEFI Manager only. For more information, see Deploying, managing, and servicing Surface Pro X.
Download and install Microsoft Surface UEFI Configurator
The tool used to create SEMM packages is Microsoft Surface UEFI Configurator. You can download Microsoft Surface UEFI Configurator from the Surface Tools for IT page in the Microsoft Download Center. To install, run the Microsoft Surface UEFI Configurator Windows Installer (.msi) file. When the installer completes, find Microsoft Surface UEFI Configurator in the All Apps section of your Start menu.
Note
Microsoft Surface UEFI Configurator is supported only on Windows 10 and Windows 11.
Create a Surface UEFI configuration package
The Surface UEFI configuration package performs both the role of applying a new configuration of Surface UEFI settings to a Surface device managed with SEMM and the role of enrolling Surface devices in SEMM. The creation of a configuration package requires you to have a signing certificate to be used with SEMM to secure the configuration of UEFI settings on each Surface device. For more information about the requirements for the SEMM certificate, see Microsoft Surface Enterprise Management Mode.
To create a Surface UEFI configuration package, follow these steps:
Open Microsoft Surface UEFI Configurator from the Start menu.
Select Start.
Select Configuration Package, as shown in Figure 1.

Figure 1. Select Configuration Package to create a package for SEMM enrollment and configuration
Select Certificate Protection to add your exported certificate file with private key (.pfx), as shown in Figure 2. Browse to the location of your certificate file, select the file, and then select OK.

Figure 2. Add the SEMM certificate and Surface UEFI password to the Surface UEFI configuration package
When prompted to confirm the certificate password, enter and confirm the password for your certificate file, and then select OK.
Select Password Protection to add a password to Surface UEFI. This password is required whenever you boot to UEFI. If this password isn't entered, only the PC information, About, Enterprise management, and Exit pages are displayed. This step is optional.
When prompted, enter and confirm your chosen password for Surface UEFI, and then select OK. Leave the password field blank if you want to clear an existing Surface UEFI password.
If you don't want the Surface UEFI package to apply to a particular device, on the Choose which Surface type you want to target page, select the slider beneath the corresponding device so that it is in the Off position, as shown in Figure 3.
Tip
You must select a device as none are selected by default.


Figure 3. Choose the devices for package compatibility
Select Next.
If you want to deactivate a component on managed Surface devices, on the Choose which components you want to activate or deactivate page, select the slider next to any device or group of devices you wish to deactivate so that the slider is in the Off position. (Shown in Figure 4.) The default configuration for each device is On. Select the Reset button to return all sliders to the default position.

Figure 4. Disable or enable individual Surface components
Select Next.
To enable or disable advanced options in Surface UEFI or the display of Surface UEFI pages, on the Choose the advanced settings for your devices page, select the slider beside the desired setting to configure that option to On or Off (shown in Figure 5). In the UEFI Front Page section, you can use the sliders for Security, Devices, and Boot to control what pages are available to users who boot into Surface UEFI. (For more information about Surface UEFI settings, see Manage Surface UEFI settings.) When finished, select Build.

Figure 5. Control advanced Surface UEFI settings and Surface UEFI pages with SEMM
In the Save As dialog box, specify the Surface UEFI configuration package name, browse to the location where you would like to save the file, and select Save.
When the package is created and saved, the Successful page is displayed.
Note
Record the certificate thumbprint characters displayed on this page, as shown in Figure 6. You will need these characters to confirm enrollment of new Surface devices in SEMM. Click End to complete package creation and close Microsoft Surface UEFI Configurator.

Figure 6. The last two characters of the certificate thumbprint are displayed on the Successful page
After you create a Surface UEFI configuration package, you can enroll or configure Surface devices.
Tip
When a Surface UEFI configuration package is created, a log file is displayed on the desktop with details of the configuration package settings and options.
Enroll a Surface device in SEMM
When the Surface UEFI configuration package is executed, the SEMM certificate and Surface UEFI configuration files are staged in the firmware storage of the Surface device. When the Surface device reboots, Surface UEFI processes these files and begins the process of applying the Surface UEFI configuration or enrolling the Surface device in SEMM, as shown in Figure 7.

Figure 7. The SEMM process for configuration of Surface UEFI or enrollment of a Surface device
Before you enroll a Surface device in SEMM, ensure that you have the last two characters of the certificate thumbprint on hand. You need these characters to confirm the device’s enrollment (see Figure 6).
To enroll a Surface device in SEMM with a Surface UEFI configuration package, follow these steps:
Run the Surface UEFI configuration package .msi file on the Surface device you want to enroll in SEMM. This provisions the Surface UEFI configuration file in the device’s firmware.
Select the I accept the terms in the License Agreement check box to accept the End User License Agreement (EULA), and select Install to begin the installation process.
Select Finish to complete the Surface UEFI configuration package installation and restart the Surface device when you're prompted to do so.
Surface UEFI loads the configuration file and determines that SEMM isn't enabled on the device. Surface UEFI begins the SEMM enrollment process, as follows:
Surface UEFI verifies that the SEMM configuration file contains a SEMM certificate.
Surface UEFI prompts you to enter the last two characters of the certificate thumbprint to confirm enrollment of the Surface device in SEMM, as shown in Figure 8.

Figure 8. SEMM enrollment requires the last two characters of the certificate thumbprint.
Surface UEFI stores the SEMM certificate in firmware and applies the configuration settings that are specified in the Surface UEFI configuration file.
The Surface device is now enrolled in SEMM.
You can verify if a Surface device is successfully enrolled in SEMM by looking for Microsoft Surface Configuration Package in Programs and Features (as shown in Figure 9), or in the events stored in the Microsoft Surface UEFI Configurator log, found under Applications and Services Logs in Event Viewer (as shown in Figure 10).
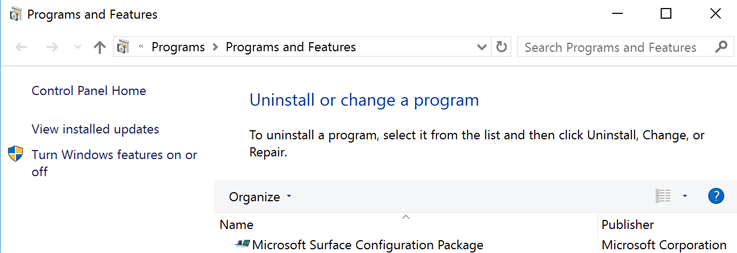
Figure 9. Verify the enrollment of a Surface device in SEMM in Programs and Features.
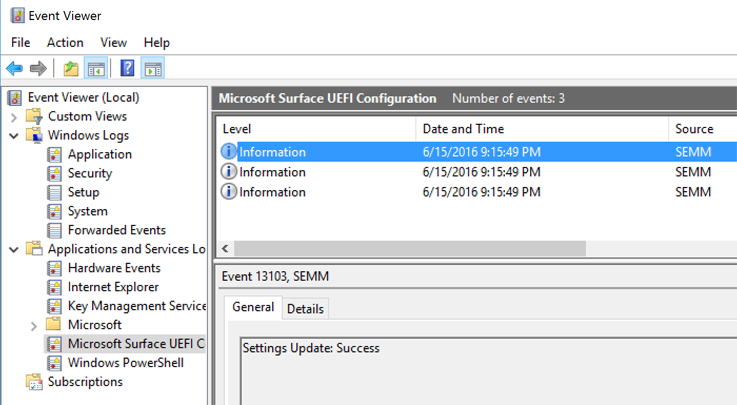
Figure 10. Verify the enrollment of a Surface device in SEMM in Event Viewer.
You can also verify that the device is enrolled in SEMM in Surface UEFI – while the device is enrolled, Surface UEFI contains the Enterprise management page (as shown in Figure 11).
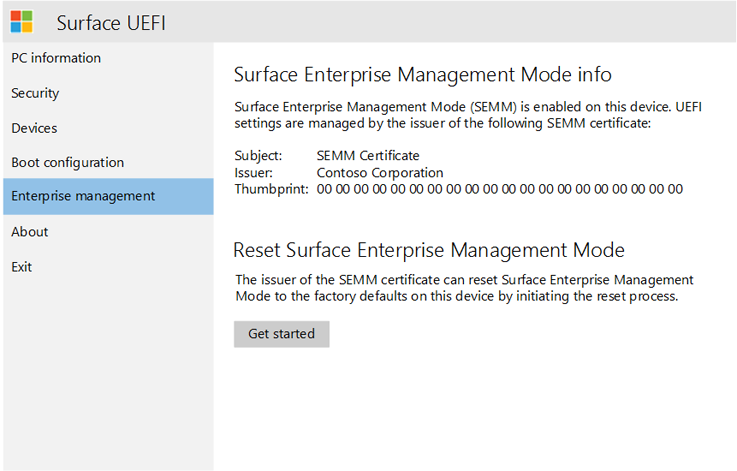
Figure 11. The Surface UEFI Enterprise management page
Configure Surface UEFI settings with SEMM
After a device is enrolled in SEMM, you can run Surface UEFI configuration packages signed with the same SEMM certificate to apply new Surface UEFI settings. These settings are applied automatically the next time the device boots, without any interaction from the user. You can use application deployment solutions like Microsoft Endpoint Configuration Manager to deploy Surface UEFI configuration packages to Surface devices to change or manage the settings in Surface UEFI.
For more information about how to deploy Windows Installer (.msi) files with Configuration Manager, see Deploy and manage applications with Microsoft Endpoint Configuration Manager.
Suppose you secured Surface UEFI with a password. In that case, users without the password who attempt to boot to Surface UEFI only have the PC information, About, Enterprise management, and Exit pages displayed to them.
If you haven't secured Surface UEFI with a password or a user enters the password correctly, settings configured with SEMM are dimmed (unavailable) indicating Some settings are managed by your organization, as shown in Figure 12.
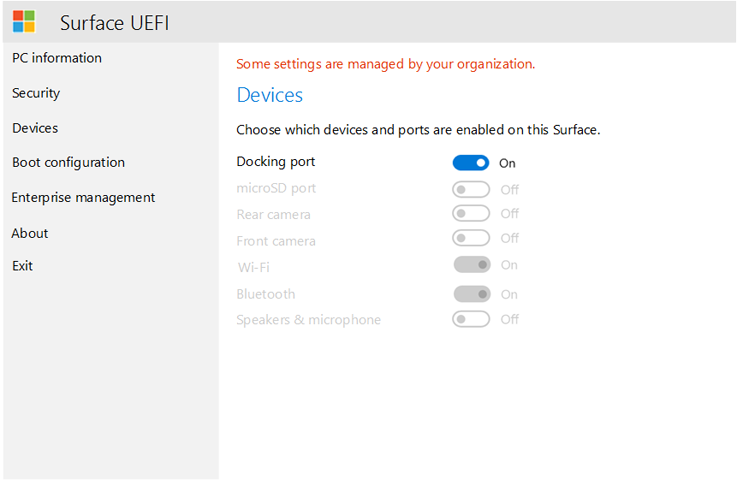
Figure 12. Settings managed by SEMM will be disabled in Surface UEFI.
Feedback
Coming soon: Throughout 2024 we will be phasing out GitHub Issues as the feedback mechanism for content and replacing it with a new feedback system. For more information see: https://aka.ms/ContentUserFeedback.
Submit and view feedback for