Back up the DPM server
Important
This version of Data Protection Manager (DPM) has reached the end of support. We recommend you to upgrade to DPM 2022.
To ensure that data can be recovered if System Center Data Protection Manager (DPM) fails, you'll need a strategy for backing up the DPM server. If it isn't backed up, you'll need to rebuild it manually after a failure, and disk-based recovery points won't be recoverable. You can back up DPM servers using a couple of methods:
Back up the DPM server - You can back up a primary DPM server with a secondary DPM server. The secondary server will protect the primary server database and the data source replicas stored on the primary server. If the primary server fails, the secondary server can continue to protect workloads that are protected by the primary server, until the primary server is available again. If you need to rebuild the primary server, you can restore the databases and replicas to it from the secondary server. You can also restore data to protected computers directly from the secondary server when the primary server isn't available. You can set up two servers, one as primary and another as secondary, or configure each server to act as the primary for the other. You can also configure a chain of DPM servers that protect each other according to the chain order.
Back up the DPM database - You can configure a DPM server to back up its own databases to its tape library, or you can use non-Microsoft software to back up the databases to tape or removable media.
Back up DPM using third-party software - You can back up DPM servers using third-party software that supports DPM and VSS.
Back up with a secondary DPM server
Information on a DPM server can be backed up and protected by another DPM server in any of the following configurations:
Primary to secondary protection - The database and replicas stored on a primary DPM server can be backed up to a secondary DPM server. If the primary server fails, the secondary server continues to back up protected workloads. If the primary server fails, you can do either of the following: Rebuild the primary server and restore its database and replicas from the secondary server. Then move the protected workloads back to the primary server after the rebuild. Select to switch protection to the secondary DPM server. With this setting, you can then restore to the protected computer directly from the secondary server when the need arises. For instructions, see Set up secondary servers.
DPM chaining - A chain of DPM servers provide protection, and each server protects the next one in the chain. For example: DPM1 is protected by DPM2 (DPM1 is the primary and DPM2 is the secondary). DPM2 is protected by DPM3 (DPM2 is the primary and DPM3 is the secondary) For instructions, see Set up chaining.
Cyclic protection - One DPM server is backed up by another DPM server and vice versa. For example, if DPM1 protects DPM2, then DPM2 protects DPM1. This is useful for small environments.
Set up primary and secondary protection
Back up a primary DPM server using a secondary DPM server:
The Primary DPM server has the protection agent already installed. You need to attach this protection agent to the secondary DPM server.
Important
Major and minor versions of the Primary and Secondary DPM servers must match.
Follow these steps to attach the agent:
- In the DPM Administrator Console of the secondary DPM server, on the navigation bar, select Management > Agents. In the Actions pane, select Install.
- On the Select Agent Deployment Method page, select Attach agents > Computer on a trusted domain > Next. The Protection Agent Installation Wizard opens.
- On the Select Computers page, DPM displays a list of available computers. Select the name of the Primary DPM server from the Computer name list > Add > Next.
- On the Enter Credentials page, type the user name and password for a domain account that is a member of the local Administrators group on the Primary DPM server.
- On the Summary page, select Attach.
Add the primary DPM server to an existing protection group, or create a new one. Select to protect the following data sources:
The SQL Server databases configured for the primary server.
All volumes on the primary DPM server (Shares won't be visible separately).
All replicas on the primary DPM server.
At a minimum, you should select the databases, the \Program Files\Microsoft System Center\DPM\DPM\Config folder, and the \Program Files\Microsoft System Center\DPM\Scripting folder.
Note
You can't exclude file names from protection for a replica. In addition, all DPM servers must be running the same version, updates, etc. When setting up synchronization, we recommend you synchronize every 24 hours.
Set up DPM chaining
Before you consider chaining, remember these limitations:
Each DPM server can only be protected once in the chain, so verify that they're not protected by more than one server.
Primary and secondary servers are established by the chain. For example, if server DPM3 is actually protecting server DPM1 because it's acting as the secondary server for DPM2, it can't act directly as a secondary server for DPM1.
If a DPM server is configured to protect its own data source, the chain will be broken. For example, if DPM1 protects its own database or system state, DPM2 can't protect DPM1.
Before you can protect the database of a primary DPM server, you need to start the SQL Server VSS Writer service on the primary server.
Chaining example 1
Scenario 1: Chained protection
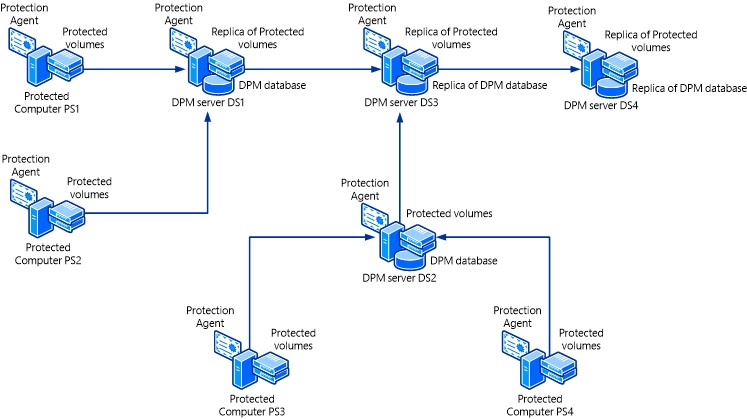
Scenario 1 shows a scenario in which four DPM servers are chained:
| Server | Protecting | Protected by |
|---|---|---|
| DS1 (primary) | PS1, PS2 | DS3 |
| DS2 (primary) | PS3, PS4 | DS3 |
| DS3 (secondary) | DS1, DS2 | DS4 |
| DS4 (secondary) | DS3 | - |
Chaining example 2
Scenario 2: Chained protection
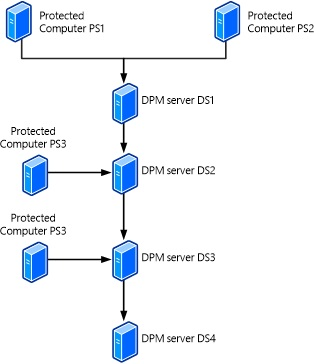
Scenario 2 shows a scenario in which four DPM servers are chained:
| Server | Protecting | Protected by |
|---|---|---|
| DS1 (primary) | PS1, PS2 | DS2 |
| DS2 (primary) | PS3 | DS3 |
| DS2 (secondary) | DS1 | DS3 |
| DS3 (primary) | PS4 | DS4 |
| DS3 (secondary) | DS2 | DS4 |
| DS4 | DS3 | - |
Cyclic protection
If you don't want to use a secondary server, then two DPM servers can protect each other.
Scenario 3: Cyclic protection
Scenario 3 shows a scenario using cyclic protection.
| Server | Protecting | Protected by |
|---|---|---|
| DS1 (primary) | PS1, PS2 | DS2 |
| DS2 (primary) | PS3 | DS3 |
| DS2 (secondary) | DS1, DS3 | DS3 |
| DS3 (primary) | PS4 | DS2 |
| DS3 (secondary) | DS2 | DS2 |

Configure chaining
Set up chaining as follows:
Install the DPM protection agent on the DPM server that you want to protect from the DPM server you want to protect it from.
Configure secondary protection for the data sources protected by the DPM server you're protecting.
Note
In the DPM console, you won't be able to configure protection for data sources that are already protected by the agent. This prevents you from repeatedly protecting data.
- As an example, if you have DPM1 and DPM2, you'd install the DPM protection agent from DPM1 to DPM2 and vice versa. Then configure secondary protection on DPM2 for servers that DPM1 protects and configure secondary protection on DPM1 for servers that DPM2 protects.
Recover the server
If a primary server fails, you can switch protection to the secondary server. After switching, you can perform recovery functions from the secondary server.
Switch protection to the secondary server
Use the following steps:
- On the secondary DPM server, in the Protection area of the DPM Administrator console, go to the Protection work area, right-click the data source for which you want to switch protection.
- Select Switch Disaster Protection from the context menu.
- Run a consistency check.
After switching protection, the replica appears as inconsistent, until the check runs.
Example:
Note
- To switch the protection back to the primary server, do the same steps as above.
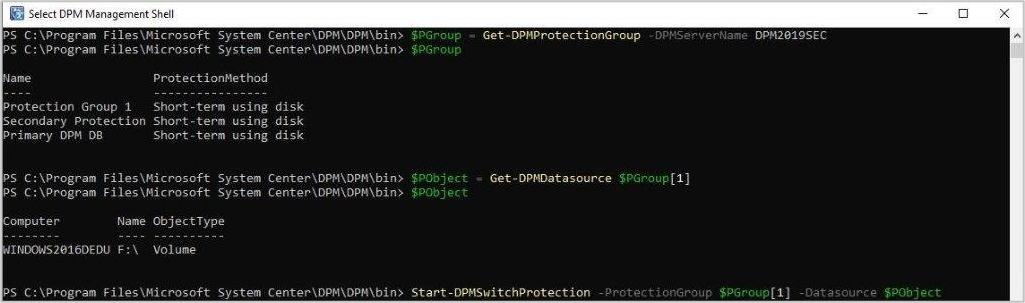
- You can also switch protection to the secondary DPM server by using the Start –DPMSwitchProtection PowerShell cmdlet.
Recover a primary DPM server
When you recover a primary DPM server, you’ll need to re-establish the protection for the computers that were previously protected by the primary DPM server.
Note
- You can’t restore recovery points for data sources protected by the primary DPM server.
- When you recover the database files, ensure that the restore location on the primary DPM server is secure.
Re-establish protection with primary DPM server
On the protected computer, from the command prompt, run the command Setdpmserver.exe <primary DPM server name>.
Open Computer Management and do the following:
- Select Local Users and Groups. Verify that the primary server, in the format of Domain/Name, is a member of the following groups:
- Distribute COM Users
- DPMRADCOMTrustedMachines
- DPMRADmTrustedMachines
- If the primary server isn’t listed in any of the groups, manually add the server in the format of Domain/Name.
- Select Local Users and Groups. Verify that the primary server, in the format of Domain/Name, is a member of the following groups:
If protection fails after completing the above steps, do the following:
- In Administrative Tools, open Component Services. Expand Computers, expand My Computer, and then select DCOM Config.
- In the results pane, right-click DPM RA Service. Select Properties > Security.
- In the Launch and Activation Permissions area, select Edit.
- If the primary server is listed, the Access Control List (ACL) entry might be incorrect. Remove the entry, and then add the primary server with full permissions.
- If the primary server isn't listed, add the primary server with full permissions.
Back up the DPM database
As part of your DPM backup strategy, you'll have to back up the DPM database. The DPM database is named DPMDB. This database contains the DPM configuration together with data about DPM's backups. In case of a disaster, you can rebuild most of the functionality of a DPM server by using a recent backup of the database. Assuming you can restore the database, tape- based backups are accessible, and they maintain all protection group settings and backup schedules. If the DPM storage pool disks weren't affected by the outage, disk-based backups are also usable after a rebuild. You can back up the database by using different methods.
| Database backup method | Advantages | Disadvantages |
|---|---|---|
| Back up to Azure | Easily configured and monitored in DPM. Multiple locations of the backup database files. Cloud storage provides a robust solution for disaster recovery. Very secure storage for the database. Supports 120 online recovery points. |
Only available on DPM 2012 SP1 or later. Requires Azure account and additional DPM configuration. Incurs some cost for Azure storage. - Requires a supported version of Windows Server based system with the Azure agent to gain access to DPM backups stored in the Azure backup vault. This can't be another DPM server. Not an option if the database is hosted locally, and you want to enable secondary protection. A workaround would be to use a remote SQL Server to host the database. Some extra preparation and recovery time is incurred. |
| Back up the database by backing up the DPM storage pool | Simple to configure and monitor. The backup is kept on the DPM storage pool disks and is easy to access locally. DPM scheduled backups support 512 express full backups. If you back up hourly, you'll have 21 days of full protection. |
Not a good option for disaster recovery. It's online and recovery might not work as expected if the DPM server or storage pool disk fails. Not an option if the database is hosted locally, and you want to enable secondary protection. A workaround would be to use a remote SQL Server to host the database. Some preparation and special steps are required to gain access to the recovery points if the DPM service or console isn't running or working. |
| Back up to a secondary DPM server | Easily configured and monitored in DPM. DPM scheduled backups support 512 express full backups. If done hourly, this provides 21 days of short-term protection. If done every 30 minutes, it provides 10 days of protection. The backup is kept on the secondary DPM server storage pool disks, which are locally accessible. Provides a good disaster recovery solution if secondary DPM server is offsite. |
Additional DPM server and storage are required. Both DPM servers must be running the same DPM version and update rollups. |
| Back up to tape | Easily configured and monitored in DPM. DPM scheduled tape backups support retention up to 99 years. Tape backup can be taken offsite for disaster recovery. Tape backup can be restored from any other DPM server that has a tape drive/library attached that uses the same tape media type. Tape can be encrypted for secure storage. |
Not an option if the database is hosted locally, and you want to enable secondary protection. A workaround would be to use a remote SQL Server to host the database. Only one tape backup per day can be scheduled. You need a working DPM server with a tape library to be able to read a DPM backup tape that contains the copy of the database you want to restore. Some preparation and special steps are required to gain access to the tape-based recovery points. |
| Back up with native SQL Server backup to a local disk | Built-in to SQL Server. The backup is kept on a local disk, which is easily accessible. It can be scheduled to run as often as you like. Totally independent of DPM. You can schedule a backup file cleanup. |
Not a good option for disaster recovery unless the backups are copied to a remote location. Requires local storage for backups, which may limit retention and frequency. |
| Back up with native SQL backup and DPM protection to a share protected by DPM | Easily monitored in DPM. Multiple locations of the backup database files. Easily accessible from any Windows machine on the network. Potentially the fastest recovery method. |
Only supports 64 recovery points. Not a good option for site disaster recovery. DPM server or DPM storage pool disk failure may hinder recovery efforts. Not an option if the DPM DB is hosted locally and you want to enable secondary protection. A workaround would be to use a remote SQL Server to host the DPMDB. Some extra preparation is needed to get it configured and tested. Some extra preparation and recovery time is needed should the DPM server itself be down but DPM storage pool disks are fine. |
| Database backup method | Advantages | Disadvantages |
|---|---|---|
| Back up to Azure | Easily configured and monitored in DPM. Multiple locations of the backup database files. Cloud storage provides a robust solution for disaster recovery. Very secure storage for the database. Supports 120 online recovery points. |
Only available on DPM 2012 SP1 or later. Requires Azure account and additional DPM configuration. Incurs some cost for Azure storage. - Requires a supported version of Windows Server-based system with the Azure agent to gain access to DPM backups stored in the Azure backup vault. This can't be another DPM server. Not an option if the database is hosted locally, and you want to enable secondary protection. A workaround would be to use a remote SQL Server to host the database. Some extra preparation and recovery time is incurred. |
| Back up the database by backing up the DPM storage pool | Simple to configure and monitor. The backup is kept on the DPM storage pool disks and is easy to access locally. DPM scheduled backups support 512 express full backups. If you back up hourly, you'll have 21 days of full protection. |
Not a good option for disaster recovery. It's online and recovery might not work as expected if the DPM server or storage pool disk fails. Not an option if the database is hosted locally, and you want to enable secondary protection. A workaround would be to use a remote SQL Server to host the database. Some preparation and special steps are required to gain access to the recovery points if the DPM service or console isn't running or working. |
| Back up to a secondary DPM server | Easily configured and monitored in DPM. DPM scheduled backups support 512 express full backups. If done hourly, this provides 21 days of short-term protection. If done every 30 minutes, it provides 10 days of protection. The backup is kept on the secondary DPM server storage pool disks, which are locally accessible. Provides a good disaster recovery solution if secondary DPM server is offsite. |
Additional DPM server and storage are required. Both DPM servers must be running the same DPM version and update rollups. |
| Back up to tape | Easily configured and monitored in DPM. DPM scheduled tape backups support retention up to 99 years. Tape backup can be taken offsite for disaster recovery. Tape backup can be restored from any other DPM server that has a tape drive/library attached that uses the same tape media type. Tape can be encrypted for secure storage. |
Not an option if the database is hosted locally, and you want to enable secondary protection. A workaround would be to use a remote SQL Server to host the database. Only one tape backup per day can be scheduled. You need a working DPM server with a tape library to be able to read a DPM backup tape that contains the copy of the database you want to restore. Some preparation and special steps are required to gain access to the tape-based recovery points. |
| Back up with native SQL Server backup to a local disk | Built-in to SQL Server. The backup is kept on a local disk, which is easily accessible. It can be scheduled to run as often as you like. Totally independent of DPM. You can schedule a backup file cleanup. |
Not a good option for disaster recovery unless the backups are copied to a remote location. Requires local storage for backups, which may limit retention and frequency. |
| Back up with native SQL backup and DPM protection to a share protected by DPM | Easily monitored in DPM. Multiple locations of the backup database files. Easily accessible from any Windows machine on the network. Potentially the fastest recovery method. |
Only supports 64 recovery points. Not a good option for site disaster recovery. DPM server or DPM storage pool disk failure may hinder recovery efforts. Not an option if the DPM DB is hosted locally, and you want to enable secondary protection. A workaround would be to use a remote SQL Server to host the DPMDB. Some extra preparation is needed to get it configured and tested. Some extra preparation and recovery time is needed should the DPM server itself be down, but DPM storage pool disks are fine. |
If you back up using a DPM protection group, we recommend you use a unique protection group for the database.
As a best practice, if you're backing up to tape, make at least two copies of the backup tapes, and store each of the backup tapes in a different remote location. This added protection guards against physical damage or loss of the backup tape.
If the DPM SQL Server instance isn't running on the DPM server, install the DPM protection agent on the SQL Server computer before you can protect the DPM databases on that server.
Note
For restore purposes, the DPM installation you want to restore with the DPM database must match the version of the DPM database itself. For example, if the database you want to recover is from a DPM 2016 with Update Rollup 4 installation, the DPM server must be running the same version with Update Rollup 4. This means that you might have to uninstall and reinstall DPM with a compatible version before you restore the database. To check the database version, you might have to mount it manually to a temporary database name and then run a SQL query against the database to check the last installed rollup based on the major and minor versions.
To check the DPM database version, follow these steps:
To run the query, open SQL Management Studio, and then connect to the SQL instance that's running the DPM database.
Select the DPM database, and then start a new query.
Paste the following SQL query into the query pane and run it:
Select distinct MajorVersionNumber,MinorVersionNumber ,BuildNumber, FileName FROM dbo.tbl_AM_AgentPatch order byMajorVersionNumber,MinorVersionNumber,BuildNumber
If nothing is returned in the query results, or if the DPM server was upgraded from previous versions but no new update rollup was installed since then, there won't be an entry for the major, minor for a base installation of DPM. To check the DPM versions associated with update rollups, see List of Build Numbers for System Center Data Protection Manager (DPM).
If nothing is returned in the query results, or if the DPM server was upgraded from previous versions but no new update rollup was installed since then, there won't be an entry for the major, minor for a base installation of DPM. To check the DPM versions associated with update rollups, see List of Build Numbers for System Center Data Protection Manager (DPM).
If nothing is returned in the query results, or if the DPM server was upgraded from previous versions but no new update rollup was installed since then, there won't be an entry for the major, minor for a base installation of DPM. To check the DPM versions associated with update rollups, see List of Build Numbers for System Center Data Protection Manager (DPM).
If nothing is returned in the query results, or if the DPM server was upgraded from previous versions but no new update rollup was installed since then, there won't be an entry for the major, minor for a base installation of DPM. To check the DPM versions associated with update rollups, see List of Build Numbers for System Center Data Protection Manager (DPM).
If nothing is returned in the query results, or if the DPM server was upgraded from previous versions but no new update rollup was installed since then, there won't be an entry for the major, minor for a base installation of DPM. To check the DPM versions associated with update rollups, see List of Build Numbers for System Center Data Protection Manager (DPM).
Back up to Azure
Before you start, you'll need to run a script to retrieve the DPM replica volume mount point path so that you know which recovery point contains the DPM backup. Do this after initial replication with Azure Backup. In the script, replace dplsqlservername% with the name of the SQL Server instance hosting the DPM database.
Select ag.NetbiosName as ServerName,ds.DataSourceName,vol.MountPointPath
from tbl_IM_DataSource as ds
join tbl_PRM_LogicalReplica as lr on ds.DataSourceId=lr.DataSourceId
join tbl_AM_Server as ag on ds.ServerId=ag.ServerId
join tbl_SPM_Volume as vol on lr.PhysicalReplicaId=vol.VolumeSetID
and vol.Usage =1
and lr.Validity in (1,2)
where ds.datasourcename like '%dpmdb%'
and servername like '%dpmsqlservername%' --netbios name of server hosting DPMDB
Ensure that you have the passcode that was specified when the Azure Recovery Services Agent was installed and the DPM server was registered in the Azure Backup vault. You'll need this passcode to restore the backup.
Create an Azure Backup vault, and download the Azure Backup Agent installation file and vault credentials. Run the installation file to install the agent on the DPM server and use the vault credentials to register the DPM server in the vault. Learn more.
After the vault is configured, set up a DPM protection group that contains the DPM database, and select to back it up to disk and to Azure.
Recover the DPM database from Azure
You can recover the database from Azure using any DPM server (must be running at least DPM 2012 R2 with update rollup 7) that's registered in the Azure Backup vault as follows:
In the DPM console, select Recovery > Add External DPM.
Provide the vault credentials (download from the Azure Backup vault).
Note
The credentials are only valid for two days.
In Select External DPM for Recovery, select the DPM server for which you want to recover the database, type in the encryption passphrase, and select OK.
Select the recovery point you want to use from the list of available points. Select Clear External DPM to return to the local DPM view.
Back up the DPM database to DPM storage pool
Note
This option is applicable for DPM with Modern Backup Storage.
- In DPM console, select Protection > Create protection group.
- On the Select Protection Group Type page, select Servers.
- On the Select group members page, select DPM database . If you're running SQL Server remotely, select the remote SQL Server installed and select DPM database. If SQL Server is running on the DPM server, expand the DPM server and select DPMDB.
- On the Select Data Protection Method page, select I want short-term protection using disk. Specify the short-term protection policy options.
- After the initial replication of DPM database, run the following SQL script:
select AG.NetbiosName, DS.DatasourceName, V.AccessPath, LR.PhysicalReplicaId from tbl_IM_DataSource DS
join tbl_PRM_LogicalReplica as LR
on DS.DataSourceId = LR.DataSourceId
join tbl_AM_Server as AG
on DS.ServerId=AG.ServerId
join tbl_PRM_ReplicaVolume RV
on RV.ReplicaId = LR.PhysicalReplicaId
join tbl_STM_Volume V
on RV.StorageId = V.StorageId
where datasourcename like N'%dpmdb%' and ds.ProtectedGroupId isn't null
and LR.Validity in (1,2)
and AG.ServerName like N'%<dpmsqlservername>%' -- <dpmsqlservername> is a placeholder, put netbios name of server hosting DPMDB
Recover DPM database
To reconstruct your DPM with the same DB, you need to first recover the DPM database and sync it with the freshly installed DPM.
Use the following steps
- Open an administrative command prompt and run psexec.exe -s powershell.exe to start a PowerShell window in system context.
- Decide the location from where you want to recover the database:
To copy the database from the last backup
- Navigate to replica VHD path <DPMServer FQDN><PhysicalReplicaId><PhysicalReplicaId>
- Mount the disk0.vhdx present in it using the mount-vhd disk0.vhdx command.
- Once the replica VHD is mounted, use mountvol.exe to assign a drive letter to the replica volume using the Physical replica ID from the SQL script output. For example, mountvol X: ?\Volume{}\
To copy the database from a previous recovery point
Navigate to DPMDB container directory <DPMServer FQDN><PhysicalReplicaId>; you'll see multiple directories with some unique GUID identifiers under it corresponding to recovery points taken for DPM DB. Directories other than <PhysicalReplicaId> represent a PIT/recovery point.
Navigate to any PIT vhd path, that is, <DPMServer FQDN><PhysicalReplicaId><PITId>, and mount the disk0.vhdx present in it using the mount-vhd disk0.vhdx command.
Once replica VHD is mounted, use mountvol.exe to assign a drive letter to the replica volume, using the Physical replica ID from the SQL script output. For example, mountvol X: ?\Volume{}\
All of the following text within angular braces in the above steps are placeholders; replace them with appropriate values.
- ReFSVolume - Access path from the SQL script output
- DPMServer FQDN - Fully qualified domain name of DPM server
- PhysicalReplicaId - Physical replica ID from the SQL script output
- PITId - GUID identifier other than physical replica ID in the container directory
Open another administrative command prompt and run psexec.exe -s cmd.exe to start a command prompt in system context.
Change the directory to the X: drive and navigate to the location of the DPM database files.
Copy them to a location that's easy to restore from. Exit the psexec cmd window after copying.
Go to the psexec PowerShell window opened in step 1, navigate to the VHDX path, and dismount the VHDX by using the command dismount-vhd disk0.vhdx.
After reinstalling the DPM server, you can use the restored DPMDB to attach to the DPM server by running DPMSYNC-RESTOREDB command.
Run DPMSYNC-SYNC, once DPMSYNC-RESTOREDB is complete.
Back up the database by backing up the DPM storage pool
Note
This option is applicable for DPM with legacy storage.
Before you start, you'll need to run a script to retrieve the DPM replica volume mount point path so that you know which recovery point contains the DPM backup. Do this after initial replication with Azure Backup. In the script, replace dplsqlservername% with the name of the SQL Server instance hosting the DPM database.
Select ag.NetbiosName as ServerName,ds.DataSourceName,vol.MountPointPath
from tbl_IM_DataSource as ds
join tbl_PRM_LogicalReplica as lr on ds.DataSourceId=lr.DataSourceId
join tbl_AM_Server as ag on ds.ServerId=ag.ServerId
join tbl_SPM_Volume as vol on lr.PhysicalReplicaId=vol.VolumeSetID
and vol.Usage =1
and lr.Validity in (1,2)
where ds.datasourcename like '%dpmdb%'
and servername like '%dpmsqlservername%' --netbios name of server hosting DPMDB
In DPM console, select Protection > Create protection group
On the Select Protection Group Type page, select Servers.
On the Select group members page, select the DPM database. If you're running SQL Server remotely, select the remote SQL Server installed and select DPM database. If SQL Server is running on the DPM server, expand the DPM server item and select DPMDB.
On the Select Data Protection Method page, select I want short-term protection using disk. Specify the short-term protection policy options. We recommend a retention range of two weeks for DPM databases.
Recover the database
If the DPM server is still operational and the storage pool is intact (problems with the DPM service or console), then copy the database from the replica volume or a shadow copy as follows:
Decide from when you want to recover the database.
If you want to copy the database from the last backup taken directly from the DPM replica volume, use mountvol.exe to assign a drive letter to the replica volume using the GUID from the SQL script output. For example: C:\Mountvol X: \\?\Volume{d7a4fd76-a0a8-11e2-8fd3-001c23cb7375}\
If you want to copy the database from a previous recovery point (shadow copy), then you need to list all the shadow copies for the replica using the volume GUID from the SQL script output. This command lists shadow copies for that volume: C:\>Vssadmin list shadows /for=\\?\Volume{d7a4fd76-a0a8-11e2-8fd3-001c23cb7375}\. Remember the creation time and the shadow copy ID you want to recover from.
Then use diskshadow.exe to mount the shadow copy to an unused drive letter X: using the shadow copy ID so that you can copy the database files.
Open an administrative command prompt and run psexec.exe -s cmd.exe to start a command prompt in system context so that you have the permission to navigate to the replica volume (X:) and copy the files.
CD to the X: drive and navigate to the location of the DPM database files. Copy them to a location that's easy to restore from. After the copy is complete, exit the psexec cmd window, and run diskshadow.exe and unexpose the X: volume.
Now you can restore the database files by using SQL Management Studio or by running DPMSYNC-RESTOREDB.
Back up the database to a secondary server
On the secondary DPM server, push the protection agent to the server on which the DPM database is installed - either on the primary DPM server or on a remote SQL Server. After installation, the server will appear in Unprotected server with protection agents and should show status OK when refreshed.
Create a new protection group. In Select group member, choose the server hosting the DPM database. In All SQL Servers, select the database you want to protect. In the Select Data Protection Method page, select to use short-term protection to disk and online if necessary. On the Specify Short-Term Goals page, select how to you want to configure backups to short-term storage. For disk storage, you can have 512 express full backups as often as every 30 minutes. Finish the wizard. Protection will start after the initial recovery point is created
Recover the database
Rebuild the primary server as a DPM server if necessary.
To restore the database, in the DPM console on the secondary server, select Recovery and locate the protected database.
Select the date for the recovery point you want to recover. Recover the database to the original location. After recovering the database, run the DPMSync tool.
Back up the database to tape
You'll need to know the barcode or tape labels of the tapes that contain a copy of the DPM database. The best way to do this is to schedule a Status Report to be mailed on the same day that the DPM database is backed up. The report will include the last backup date/time, the tape label, and the barcode so that you can locate it for recovery. Alternatively, you can use this SQL script to extract the information from the current database so that you can store it separately in case of a disaster.
Select Path,ro.FileSpec,media.Label,media.BarcodeValue,pd.CreationDate,
pd.ExpiryDate,pd.LifeStatus as "1=valid, 2=expired"
from dbo.tbl_MM_MediaMap mm
join dbo.tbl_MM_PhysicalDataset pd on pd.datasetid = mm.datasetid
join dbo.tbl_MM_Media media on media.MediaId = mm.MediaId
join dbo.tbl_RM_RecoverableObjectFileSpec ro on ro.DatasetId = mm.DatasetId
where ro.filespec like '%DPMDB%'
order by CreationDate desc
Create a protection group and on the Select Group Members page, select the SQL Server (if it's running locally, select DPMDB under the DPM server).
Select to do long-term protection with tape and specify the tape details on the Select Library and Tape Details.
Recover the database
The restore process will depend on the tape hardware available and the current state of the DPM server that took the tape-based backup. If you can't restore the tape from the DPM server that did the backup, you'll need to restore it from another DPM server that has the same type of tape drive so that the tape can be read. You might need to rebuild the DPM server if the only tape hardware available was the one attached to the failed DPM server.
If you're using DPM tape encryption, you'll need the same certificate used to encrypt the tape installed on the alternate DPM server.
To recover:
Locate the physical tape that contains the version/date/time of the DPM database you want to restore.
Insert the backup tape into the tape drive or library and perform a detailed inventory in the DPM console -> Management ->Libraries.
Note
If the DPM server you're restoring from is a different DPM server or it's a new installation of DPM on the original server, the tape will be shown as imported (not created by this DPM server).
If necessary, recatalog the imported tape.
On the Recovery tab, locate the database data source. If it was from an imported tape, the recovery point will be under External DPM tapes.
Recover the database (DPMDB) files. You can select to Recover to any instance of the SQL Server or to Copy to a network folder. After the files are restored from tape, continue with recovery steps using SQL Management Studio or DPMSYNC -RESTOREDB.
Back up with native SQL Server backup to a local disk
You can back up the DPM database to a local disk with native SQL Server backup, independent of DPM.
Get an overview of SQL Server backup.
Learn more about backing up SQL Server to the cloud.
Back up with native SQL Server backup to a share protected by DPM
This backup option uses native SQL to back up the DPM database to a share, protects the share with DPM, and uses Windows VSS previous versions to facilitate the restore.
Before you start
If the DPM database is located on a remote SQL Server, install the DPM agent on that server.
On the SQL Server, make a folder on a drive with enough free space to hold a single copy of a backup. For example: C:\DPMBACKUP.
Share the folder. For example, share C:\DPMBACKUP folder as DPMBACKUP.
Copy and paste the OSQL command below into Notepad and save it to a file named C:\DPMBACKUP\bkupdb.cmd. Ensure that there's no .txt extension. Modify the SQL_Instance_name andDPMDB_NAME to match the instance and DPMDB name used by your DPM server.
OSQL -E -S localhost\SQL_INSTANCE_NAME -Q "BACKUP DATABASE DPMDB_NAME TO DISK='C:\DPMBACKUP\dpmdb.bak' WITH FORMAT"Using Notepad, open the ScriptingConfig.xml file located under the ...\DPM\Scripting folder.
On a remote SQL Server: C:\Program Files\Microsoft Data Protection Manager\DPM\Scripting
On a DPM server: C:\Program Files\Microsoft System Center\DPM\DPM\Scripting
Modify ScriptingConfig.xml and change DataSourceName= to be the drive letter that contains the DPMDBBACKUP folder/share. Change the PreBackupScript entry to the full path and name of thebkupdb.cmd saved in step 5.
<?xml version="1.0" encoding="utf-8"?>
<ScriptConfiguration xmlns:xsi="http://www.w3.org/2001/XMLSchema-instance"
xmlns:xsd="http://www.w3.org/2001/XMLSchema"
xmlns="https://schemas.microsoft.com/2003/dls/ScriptingConfig.xsd">
<DatasourceScriptConfig DataSourceName="C:">
<PreBackupScript>C:\DPMDBBACKUP\bkupdb.cmd</PreBackupScript>
<TimeOut>120</TimeOut>
</DatasourceScriptConfig>
</ScriptConfiguration>
Save the changes to ScriptingConfig.xml.
Protect the C:\DPMBACKUP folder or the \\sqlservername\DPMBACKUP share using DPM and wait for the initial replica to be created. There should be a dpmdb.bak in the C:\DPMBACKUPfolder as a result of the pre-backup script running, which was in turn copied to the DPM replica.
If you don't enable self-service recovery, you'll need some additional steps to share out the DPMBACKUP folder on the replica:
In the DPM console > Protection, locate the DPMBACKUP data source and select it. In the details section, select Click to view details on the link to the replica path and copy the path into Notepad. Remove the source path and retain the destination path. The path should look similar to the following: C:\Program Files\Microsoft System Center\DPM\DPM\Volumes\Replica\File System\vol_c9aea05f-31e6-45e5-880c-92ce5fba0a58\454d81a0-0d9d-4e07-9617-d49e3f2aa5de\Full\DPMBACKUP.
Make a share to that path using the share name DPMSERVERNAME-DPMDB. You can use the Net Share command below from an administrative command prompt.
Net Share DPMSERVERNAME-dpmdb="C:\Program Files\Microsoft System Center\DPM\DPM\Volumes\Replica\File System\vol_c9aea05f-31e6-45e5-880c-92ce5fba0a58\454d81a0-0d9d-4e07-9617-d49e3f2aa5de\Full\DPMBACKUP"
Configure the backup
You can back up the DPM database as you would any other SQL Server database using SQL Server native backup.
Get an overview of SQL Server backup.
Learn more about backing up SQL Server to the cloud.
Recover the database
Connect to the \\DPMServer\DPMSERVERNAME-dpmdb share using Explorer from any Windows computer.
Right-click the dpmdb.bak file to view properties. On the Previous Versions tab, there are all the backups that you can select and copy. There's also the very last backup still located in the C:\DPMBACKUP folder, which is also easily accessible.
If you need to move a SAN attached DPM storage pool disk to another server to be able to read from the replica volume or to reinstall Windows to read locally attached disks, you'll need to know the DPM Replica volume Mount point path or Volume GUID beforehand so you know what volume holds the database backup. You can use the SQL script below to extract that information anytime after initial protection but before the need to restore. Replace the %dpmsqlservername% with the name of the SQL Server hosting the database.
Select ag.NetbiosName as
ServerName,ds.DataSourceName,vol.MountPointPath,vol.GuidName
from tbl_IM_DataSource as ds
join tbl_PRM_LogicalReplica as lr on ds.DataSourceId=lr.DataSourceId
join tbl_AM_Server as ag on ds.ServerId=ag.ServerId
join tbl_SPM_Volume as vol on lr.PhysicalReplicaId=vol.VolumeSetID
and vol.Usage =1
and lr.Validity in (1,2)
where ds.datasourcename like '%C:\%' -- volume drive letter for DPMBACKUP
and servername like '%dpmsqlservername%' --netbios name of server hosting DPMDB
If you need to recover after moving DPM storage pool disks or a DPM server rebuild:
You have the volume GUID, so should that volume need to be mounted on another Windows server or after a DPM server rebuild, use mountvol.exe to assign it a drive letter using the volume GUID from the SQL script output: C:\Mountvol X: \\?\Volume{d7a4fd76-a0a8-11e2-8fd3-001c23cb7375}\.
Reshare the DPMBACKUP folder on the replica volume using the drive letter and portion of the replica path representing the folder structure.
net share SERVERNAME-DPMDB="X:\454d81a0-0d9d-4e07-9617-d49e3f2aa5de\Full\DPMBACKUP"Connect to the \\SERVERNAME\DPMSERVERNAME-dpmdb share using Explorer from any Windows computer
Right-click the dpmdb.bak file to view the Properties. On the Previous Versions tab, there are all the backups that you can select and copy.
DPM disaster recovery management: Backup DPM DB
One of the ways to reconstruct your DPM server with the same DB is by backing up the DPM DB to local disks.
DPM database contains the DPM configuration together with data about DPM's backups. In case of a disaster, you can rebuild the functionality of your DPM server by using a recent backup of the database to a local disk. If your DPM server crashes or becomes unoperational and you still have your storage pool containing your backups intact, you can reconfigure the DPM server with the same DPM DB.
Ensure that:
- DPM DB is backed up on to local disks.
- Storage pool is intact and available.
Note
The Fully Qualified Domain Name (FQDN) of the DPM server during recovery needs to be same as the original DPM server.
Back up DPM database
In DPM console, select Protection > Create protection group.
On the Select Protection Group Type page, select Servers.
On the Select group members page, select DPM database . If you're running SQL Server remotely, select the remote SQL Server installed and select DPM database. If SQL Server is running on the DPM server, expand the DPM server and select DPMDB.
On the Select Data Protection Method page, select I want short-term protection using disk. Specify the short-term protection policy options.
After initial replication of DPM database, run the following SQL script:
select AG.NetbiosName, DS.DatasourceName, V.AccessPath, LR.PhysicalReplicaId from tbl_IM_DataSource DS
join tbl_PRM_LogicalReplica as LR
on DS.DataSourceId = LR.DataSourceId
join tbl_AM_Server as AG
on DS.ServerId=AG.ServerId
join tbl_PRM_ReplicaVolume RV
on RV.ReplicaId = LR.PhysicalReplicaId
join tbl_STM_Volume V
on RV.StorageId = V.StorageId
where datasourcename like N'%dpmdb%' and ds.ProtectedGroupId is not null
and LR.Validity in (1,2)
and AG.ServerName like N'%<dpmsqlservername>%' -- <dpmsqlservername> is a placeholder, put netbios name of server hosting DPMDB
Recover DPM database
To reconstruct your DPM with the same DB, you need to first recover the DPM database and sync it with the freshly installed DPM.
Use the following steps:
- Open an administrative command prompt and run psexec.exe -s powershell.exe to start a PowerShell window in system context.
- Decide from where you want to recover the database:
To copy the database from the last backup
- Navigate to replica VHD path, that is, <ReFSVolume><DPMServer FQDN><PhysicalReplicaId><PhysicalReplicaId>
- Mount the disk0.vhdx present in it using mount-vhd disk0.vhdx
- Once replica VHD is mounted, use mountvol.exe to assign a drive letter to the replica volume using the Physical replica ID from the SQL script output. For example, mountvol X: \?\Volume{<PhysicalReplicaId>}\
To copy the database from a previous recovery point
Navigate to DPMDB container directory, that is, <ReFSVolume><DPMServer FQDN><PhysicalReplicaId>, you'll see multiple directories with some unique GUID identifiers under it corresponding to recovery points taken for DPM DB. Directories other than <PhysicalReplicaId> represent a PIT/recovery point.
Navigate to any PIT vhd path, that is, <ReFSVolume><DPMServer FQDN><PhysicalReplicaId><PITId> and mount the disk0.vhdx present in it using mount-vhd disk0.vhdx.
Once replica VHD is mounted, use mountvol.exe to assign a drive letter to the replica volume using the Physical replica ID from the SQL script output. For example, mountvol X: \?\Volume{<PhysicalReplicaId>}\
All of the following text within angular braces in the above steps are placeholders; replace them with appropriate values.
- ReFSVolume - Access path from the SQL script output
- DPMServer FQDN - Fully qualified domain name of DPM server
- PhysicalReplicaId - Physical replica ID from the SQL script output
- PITId - GUID identifier other than physical replica ID in the container directory.
Open another administrative command prompt and run psexec.exe -s cmd.exe to start a command prompt in system context.
Change directory to the X: drive and navigate to the location of the DPM database files.
Copy them to a location that's easy to restore from. Exit the psexec cmd window after copying.
Go to the psexec PowerShell window opened in step 1, navigate to the VHDX path, and dismount the VHDX by using the command dismount-vhd disk0.vhdx.
After reinstalling the DPM server, you can use the restored DPMDB to attach to the DPM server by running DPMSYNC-RESTOREDB.
Run DPMSYNC-SYNC once DPMSYNC-RESTOREDB is complete.
Using DPMSync
DpmSync is a command-line tool that enables you to synchronize the DPM database with the state of the disks in the storage pool and with the installed protection agents. DpmSync restores the DPM database, synchronizes the DPM database with the replicas in the storage pool, restores the Report database, and reallocates missing replicas.
Parameters
| Parameter | Description |
|---|---|
| -RestoreDb | Restores a DPM database from a specified location. |
| -Sync | Synchronizes restored databases. You must run DpmSync –Sync after you restore the databases. After you run DpmSync –Sync, some replicas may still be marked as missing. |
| -DbLoc location | Identifies the location of backup of DPM database. |
| -InstanceName server\instance |
Instance to which DPMDB must be restored. |
| -ReallocateReplica | Reallocates all missing replica volumes without synchronization. |
| -DataCopied | Indicates that you have completed loading data into the newly allocated replica volumes. This is applicable for client computers only. |
Example 1: To restore the DPM database from local backup media on the DPM
server.
Run the following command:
DpmSync –RestoreDb -DbLoc G:\DPM\Backups\2005\November\DPMDB.bak
After you restore the DPM database, to synchronize the databases, run the following command:
DpmSync -Sync
After you restore and synchronize the DPM database and before you restore the replica, run the following command to reallocate disk space for the replica:
DpmSync -ReallocateReplica
Example 2: To restore the DPM database from a remote database.
Run the following command on the remote computer:
DpmSync –RestoreDb -DbLoc G:\DPM\Backups\2005\November\DPMDB.bak –InstanceName contoso\ms$dpm
After you restore the DPM database, to synchronize the databases, run the following command on the DPM Server:
DpmSync -Sync
After you restore and synchronize the DPM database and before you restore the replica, run the following command on the DPM Server to reallocate disk space for the replica:
DpmSync -ReallocateReplica
Feedback
Coming soon: Throughout 2024 we will be phasing out GitHub Issues as the feedback mechanism for content and replacing it with a new feedback system. For more information see: https://aka.ms/ContentUserFeedback.
Submit and view feedback for