Creating and managing groups
Important
This version of Operations Manager has reached the end of support. We recommend you to upgrade to Operations Manager 2022.
In System Center Operations Manager, groups are logical collections of objects, such as Windows-based computers, hard disks, or instances of Microsoft SQL Server. You can create a group by using the Create Group Wizard. You can explicitly assign membership to a group, or you can create rules that will generate a dynamic group membership.
2019 UR4 and later includes new column for Management Pack Display Name in the Authoring pane > Create Group wizard.
Some of the purposes of using groups are:
To scope overrides to a specific subset of computers.
To scope alert notifications or product connector subscriptions for a specific set of computers.
To scope user consoles, so the user role only sees the servers they're responsible for.
To scope a set of computers that need to go into a scheduled maintenance mode.
To scope application views only to computers that host a given application.
To create a rollup health state view of an otherwise unrelated set of computers.
To create a set of computers for a report.
Using the Operations console in the Authoring workspace, you can only create instance groups. To create a computer group, you must use the Authoring console or work directly in the XML of a management pack. The following image shows the display of groups in the Operations console.

Computer groups only contain computers. Instance groups can contain all object types, such as an instance of a health service or an instance of a SQL database. Both computer groups and instance groups can contain other computer and instance groups. Another way to view the difference between the group types is:
An instance group is populated with objects that match your criteria.
A computer group is populated by computers that host objects that match your criteria.
To create a group based on a hosting relationship, such as all computers that are running SQL Server, you must use the Visual Studio Authoring Extensions for Operations Manager or work directly in the XML of a management pack.
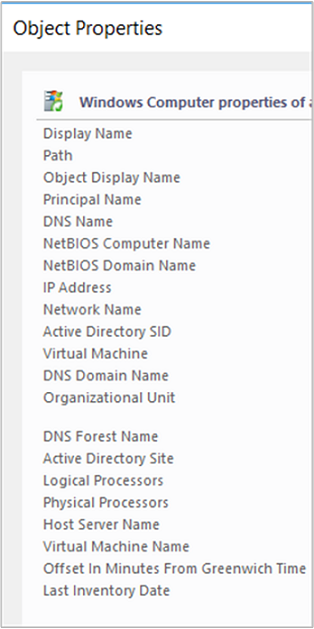
The most common objects you'll place in your groups are Windows Computer objects. The most common way to dynamically assign computers to the groups is by using a property of the Windows Computer class. For example, Organizational Unit is a property of the Windows Computer class, so you can create a group that makes all computers in a specific organizational unit members of the same group. The following image shows the properties of an object in the Windows Computer class, which you can view in the details pane of the Monitoring workspace by selecting the Windows Computers state view.
You can assign both explicit and dynamic members in the same group definition, and you can exclude explicit members. For examples of group queries and formulas, see Operations Manager Group Examples.
To create a group in Operations Manager
Sign in to the computer with an account that's a member of the Operations Manager Administrators role.
In the Operations console, select Authoring.
Right-click Groups, and select Create a new Group to start the Create Group Wizard.
On the Enter a name and description for the new group page, do the following:
Enter the Name for the group.
Optionally, enter the Description for the group. A description of the group membership makes it easier to select the right group for views, overrides, and so forth.
Select a destination management pack from the list, or select New to create a management pack with the Create a Management Pack Wizard.
Select Next.
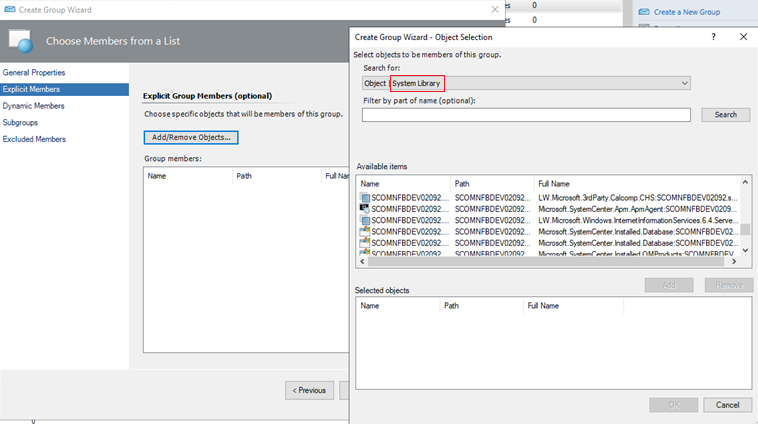
On the Explicit Members - Choose Members from a List page, you can add explicit objects to the group or select Next to continue to the Dynamic Members configuration. To add explicit group members, select Add/Remove Objects and then perform the following steps:
In the Search for list, select an object type, such as Windows Computer.
Optionally, in the Filter by part of the name box, enter all or part of the object name, and select Search.
In the Available items box, select the desired objects, select Add, and select Next.
On the Dynamic Members - Create a Membership Formula page, you can add a dynamic membership formula to the group or select Next to continue to the Subgroups page. To add a dynamic membership formula, select Create/Edit rules and then perform the following steps:
Warning
This procedure tells you how to create a query for Windows computers based on NetBIOS computer name.
In the Query Builder dialog, leave the default Windows Computer and select Add.
In the Property list, select NetBIOS computer name.
In the Operator list, select Contains.
Set Value to part of the name of the computers you want in the group, such as NY or MKTG.
Note
Select Insert to add an Expression or group expressions with OR or AND operators. Repeat the preceding steps to add additional object types to the rule.
Select OK, review the Query formula, and select Next.
On the Choose Optional Subgroups page, either select Next to not add groups to the group, or select Add/Remove Subgroups to add groups, for example.
In the Group Selection dialog, in Filter by part of name, you can optionally enter part or the all of the group's names, and select Search.
In the Available items text box, select the desired groups, select Add, select OK, and select Next.
On the Excluded Members - Specify Exclude List page, select Finish to not exclude objects from the group, or select Exclude Objects, and then perform the following steps:
In the Object Exclusion dialog, from the Search for list, select an object type, such as Windows Computer.
Optionally, in the Filter by part of the name box, enter all or part of the object name, and select Search.
In the Available items text box, select the objects you want to exclude, select Add, select OK, and select Finish.
Note
It can take approximately one minute to populate the membership of a group.
To view members, state, and diagram of a group
In the Authoring workspace, select Groups.
In the results pane, select the group you want to view.
In the Tasks pane, select:
View Group Members to view a list of all members of the group with the health state of each member.
View Group State to view a state view of the group.
View Diagram to view a diagram of the group.
Next steps
To understand the differences between classes and groups in Operations Manage and how workflows apply to each, review Using Classes and Groups for Overrides in Operations Manager.
Before making changes to the monitoring settings defined in an Operations Manager management pack, review How to Override a Rule or Monitor to understand how to configure the change.
Feedback
Coming soon: Throughout 2024 we will be phasing out GitHub Issues as the feedback mechanism for content and replacing it with a new feedback system. For more information see: https://aka.ms/ContentUserFeedback.
Submit and view feedback for