Configure encrypted networks in SDN using VMM
Important
This version of Virtual Machine Manager (VMM) has reached the end of support. We recommend you to upgrade to VMM 2022.
This article explains how to encrypt the VM networks in software defined network (SDN) using System Center - Virtual Machine Manager (VMM).
Today, network traffic can be encrypted by the guest OS or an application using technologies like IPSec and TLS. However, these technologies are difficult to implement because of their inherent complexity and challenges related to interoperability between systems because of the nature of implementation.
Using the encrypted networks feature in VMM, end-to-end encryption can be easily configured on the VM networks by using the Network Controller (NC). This encryption prevents traffic between two VMs on the same VM network and same subnet from being read and manipulated.
VMM 1801 and later supports this feature.
The control of encryption is at the subnet level and encryption can be enabled/disabled for each subnet of the VM network.
This feature is managed through the SDN Network Controller (NC). If you don't already have a Software Defined Network (SDN) infrastructure with an NC, for more information, see deploy SDN.
Note
This feature currently provides protection from third-party and network admins and doesn’t offer any protection against fabric admins. Protection against fabric admins is in the pipeline and will be available soon.
Before you start
Ensure the following prerequisites are met:
- At least two hosts for tenant VMs to validate the encryption.
- HNV-based VM network with encryption enabled and a certificate, which can be created and distributed by fabric administrator.
Note
The certificate, along with its private key, must be stored in the local certificate store of all the hosts where the VMs (of that network) reside.
Procedure - configure encrypted networks
Use the following steps:
Create a certificate and then place the certificate in the local certificate store of all the hosts where you plan to place the tenant VMs for this validation.
You can either create a self-signed certificate or get a certificate from a CA. For information on how to generate self-signed certificates and place them in the appropriate locations of each host you'll be using, see Configure Encryption for a Virtual Subnet.
Note
Make a note of the "Thumbprint" of the certificate that you generate. In the article above in step 2, you don't have to perform the actions detailed in "Creating a Certificate Credential" and "Configuring a Virtual Network for Encryption". You will configure those settings using VMM in the following steps.
Set up an HNV provider network for tenant VM connectivity, which will be managed by the NC. Learn more.
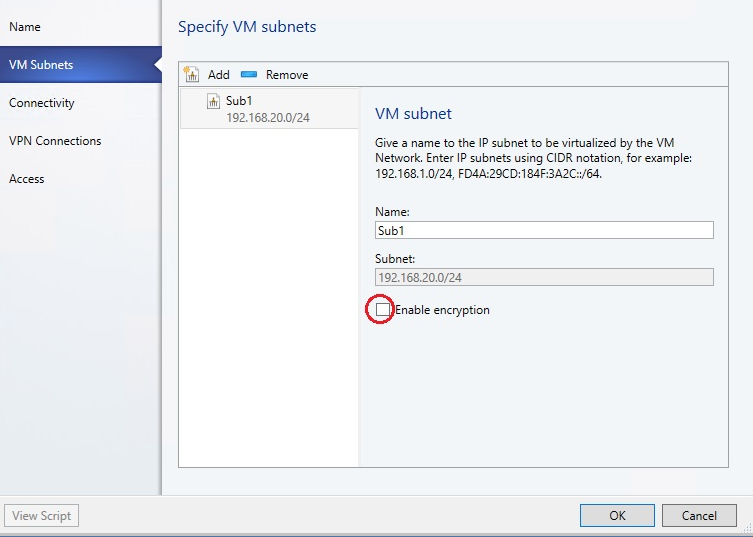
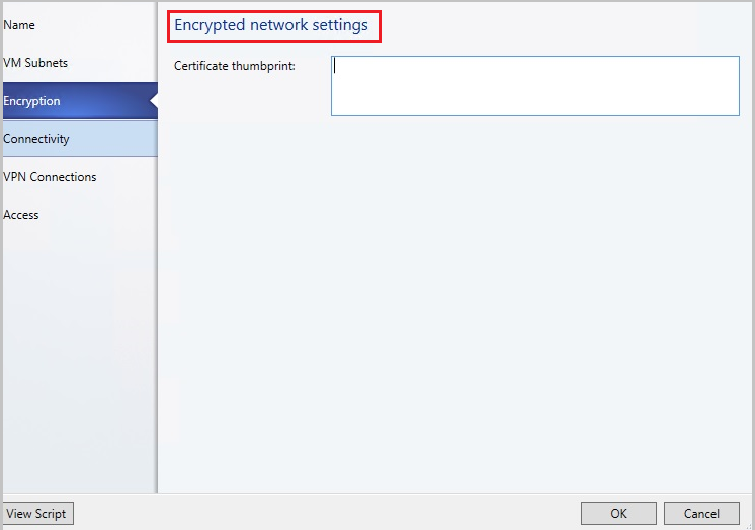
Create a tenant VM Network and a subnet. While creating the subnet, select Enable Encryption under VM Subnets. Learn more.
In the next step, paste the thumbprint of the certificate that you created.
Create two VMs on two separate physical hosts and connect them to the above subnet. Learn more.
Attach any packet sniffing application on the two network interfaces of the two hosts where the tenant VMs are placed.
Send traffic, ping, HTTP, or any other packets between the two hosts, and check the packets in the packet sniffing application. The packets shouldn't have any discernible plain text like the parameters of an HTTP request.
Feedback
Coming soon: Throughout 2024 we will be phasing out GitHub Issues as the feedback mechanism for content and replacing it with a new feedback system. For more information see: https://aka.ms/ContentUserFeedback.
Submit and view feedback for