Quickstart: Docker in Visual Studio
With Visual Studio, you can easily build, debug, and run containerized .NET, ASP.NET, and ASP.NET Core apps and publish them to Azure Container Registry, Docker Hub, Azure App Service, or your own Container Registry. In this article, we'll publish an ASP.NET Core app to Azure Container Registry.
Prerequisites
- Docker Desktop
- Visual Studio 2019 with the Web Development, Azure Tools workload, and/or .NET Core cross-platform development workload installed
- .NET Core Development Tools for development with .NET Core
- To publish to Azure Container Registry, an Azure subscription. Sign up for a free trial.
Installation and setup
For Docker installation, first review the information at Docker Desktop for Windows: What to know before you install. Next, install Docker Desktop.
Add a project to a Docker container
Create a new project using the ASP.NET Core Web App template or if you want to use the .NET Framework instead of .NET Core, choose ASP.NET Web Application (.NET Framework).
On the Create new web application screen, make sure the Enable Docker Support checkbox is selected.

The screenshot shows .NET Core; if you're using .NET Framework, it looks a bit different.
Select the type of container you want (Windows or Linux) and click Create.
Dockerfile overview
A Dockerfile, the recipe for creating a final Docker image, is created in the project. Refer to Dockerfile reference for an understanding of the commands within it.:
FROM mcr.microsoft.com/dotnet/core/aspnet:3.1 AS base
WORKDIR /app
EXPOSE 80
EXPOSE 443

FROM mcr.microsoft.com/dotnet/core/sdk:3.1 AS build
WORKDIR /src
COPY ["WebApplication1/WebApplication1.csproj", "WebApplication1/"]
RUN dotnet restore "WebApplication1/WebApplication1.csproj"
COPY . .
WORKDIR "/src/WebApplication1"
RUN dotnet build "WebApplication1.csproj" -c Release -o /app/build

FROM build AS publish
RUN dotnet publish "WebApplication1.csproj" -c Release -o /app/publish

FROM base AS final
WORKDIR /app
COPY --from=publish /app/publish .
ENTRYPOINT ["dotnet", "WebApplication1.dll"]
The preceding Dockerfile is based on the microsoft/aspnetcore image, and includes instructions for modifying the base image by building your project and adding it to the container. If you're using the .NET Framework, the base image will be different.
When the new project dialog's Configure for HTTPS checkbox is checked, the Dockerfile exposes two ports. One port is used for HTTP traffic; the other port is used for HTTPS. If the checkbox isn't checked, a single port (80) is exposed for HTTP traffic.
Debug
Select Docker from the debug dropdown list in the toolbar, and start debugging the app. You might see a message with a prompt about trusting a certificate; choose to trust the certificate to continue.
The Container Tools option in the Output window shows what actions are taking place. The first time, it might take a while to download the base image, but it's much faster on subsequent runs.
Note
If you need to change ports for debugging, you can do that in the launchSettings.json file. See Container Launch Settings.
Containers window
If you have Visual Studio 2019 version 16.4 or later, you can use the Containers window to view running containers on your machine, as well as images that you have available.
Open the Containers window by using the search box in the IDE (press Ctrl+Q to use it), type in container, and choose the Containers window from the list.
You can mount the Containers window in a convenient place, such as below the editor, by moving it around and following the window placement guides.
In the window, find your container and step through each tab to view the environment variables, port mappings, logs, and the filesystem.
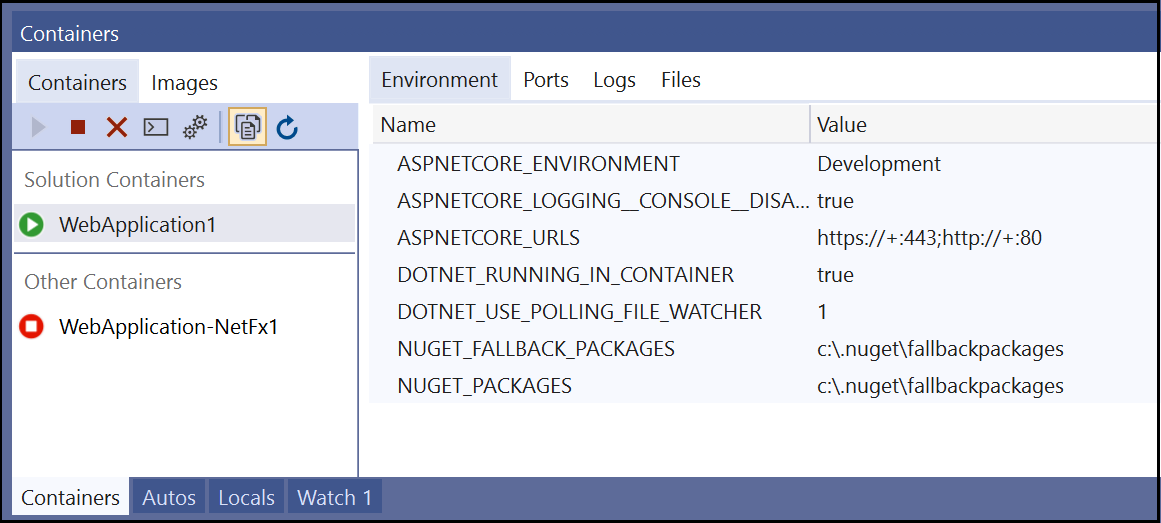
For more information, see Use the Containers window.
Publish Docker images
Once the develop and debug cycle of the app is completed, you can create a production image of the app.
Change the configuration dropdown list to Release and build the app.
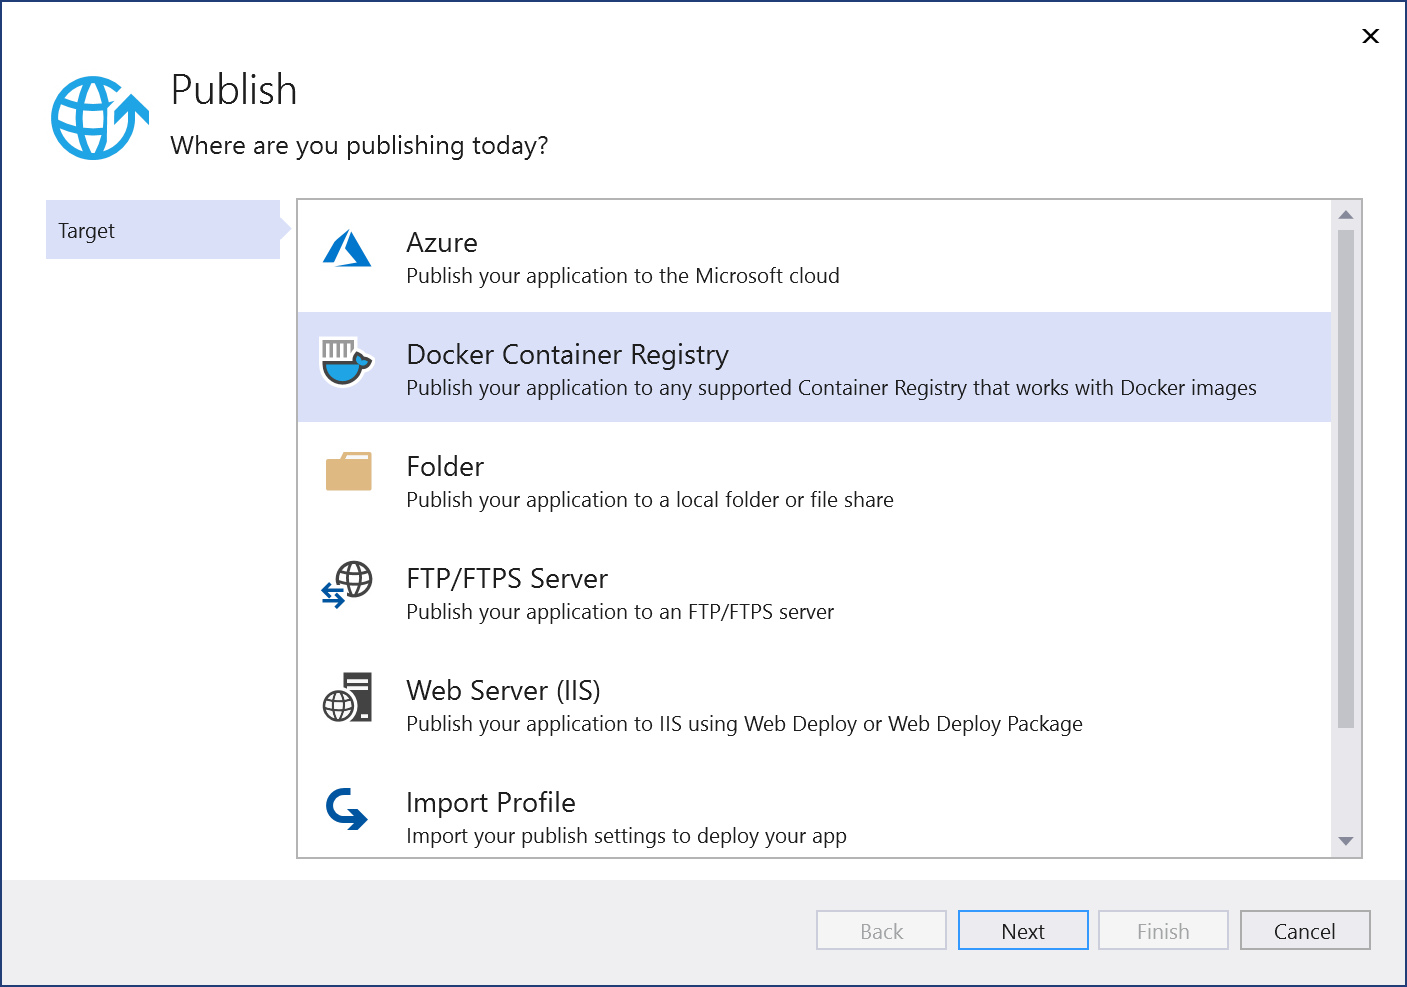
Right-click your project in Solution Explorer and choose Publish.
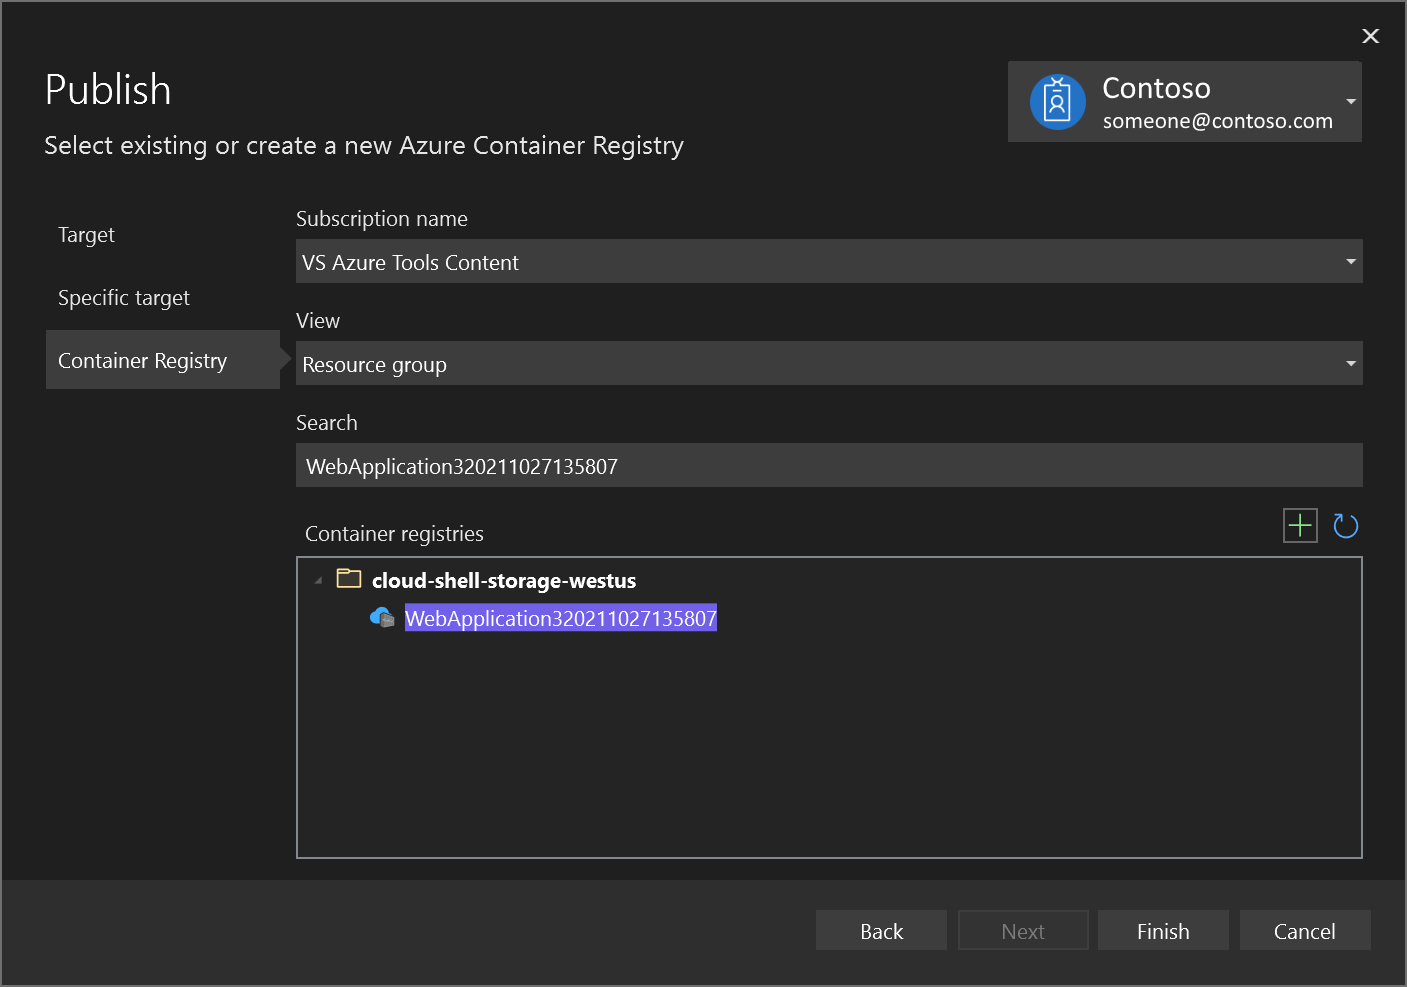
On the Publish dialog, select the Docker Container Registry tab.
Choose Create New Azure Container Registry.
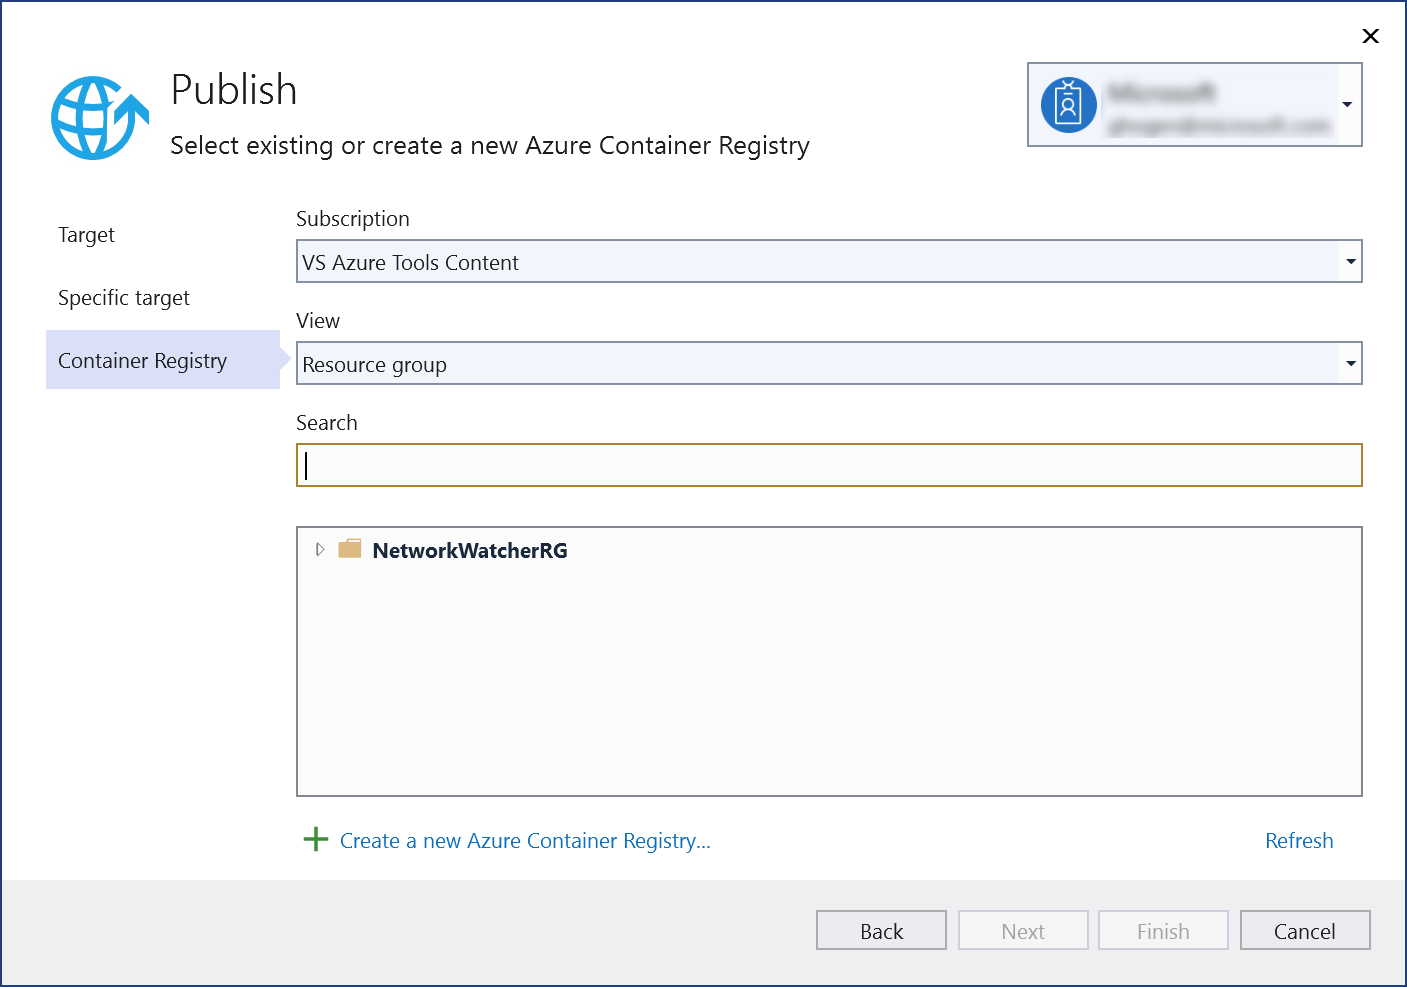
Fill in your desired values in the Create a new Azure Container Registry.
Setting Suggested value Description DNS Prefix Globally unique name Name that uniquely identifies your container registry. Subscription Choose your subscription The Azure subscription to use. Resource Group myResourceGroup Name of the resource group in which to create your container registry. Choose New to create a new resource group. SKU Standard Service tier of the container registry Registry Location A location close to you Choose a Location in a region near you or near other services that will use your container registry. 
Click Create. The Publish dialog now shows the created registry.
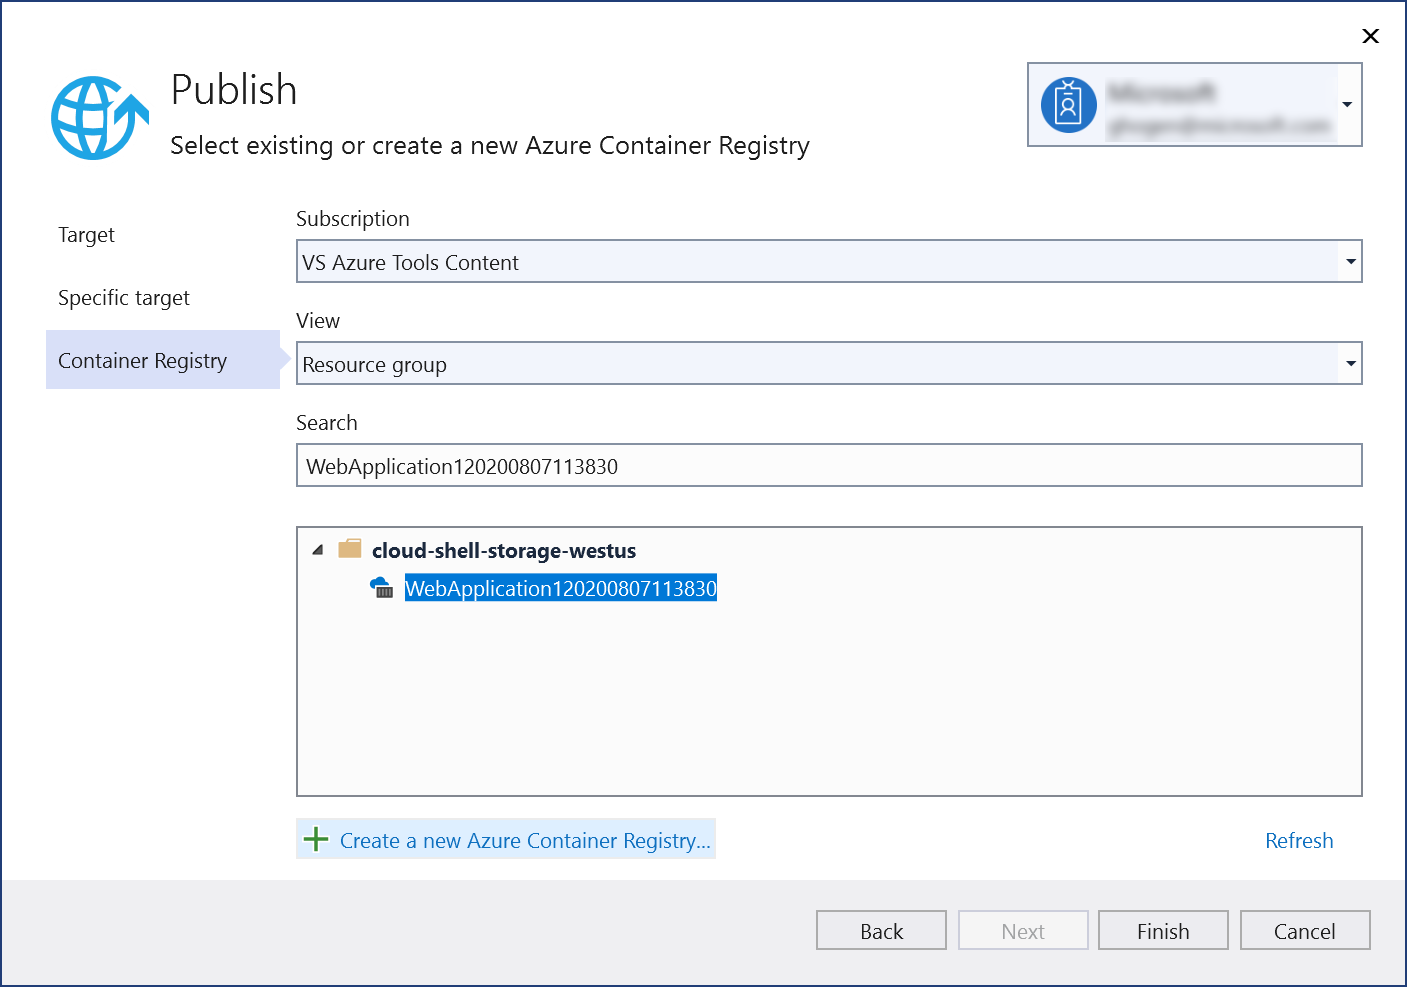
Choose Finish to complete the process of publishing your container image to the newly created registry in Azure.

Next Steps
You can now pull the container from the registry to any host capable of running Docker images, for example Azure Container Instances.
With Visual Studio, you can easily build, debug, and run containerized .NET, ASP.NET, and ASP.NET Core apps and publish them to Azure Container Registry, Docker Hub, Azure App Service, or your own Container Registry. In this article, you publish an ASP.NET Core app to Azure Container Registry.
Prerequisites
- Docker Desktop
- Visual Studio 2022 with the Web Development, Azure Tools workload, and/or .NET desktop development workload installed
- To publish to Azure Container Registry, an Azure subscription. Sign up for a free trial.
Installation and setup
For Docker installation, first review the information at Docker Desktop for Windows: What to know before you install. Next, install Docker Desktop.
Add a project to a Docker container
Before you create the Visual Studio project, make sure Docker Desktop is running the type of containers (Windows or Linux) that you intend to use in your Visual Studio project.
To change the container type used by Docker Desktop, right-click the Docker icon (whale) in the Taskbar and choose either Switch to Linux containers or Switch to Windows containers.
Warning
If you switch the container type after you create the Visual Studio project, the Docker image files might fail to load.
Create a new project using the ASP.NET Core Web App template or if you want to use the .NET Framework instead of .NET Core, choose ASP.NET Web Application (.NET Framework).
On the Create new web application screen, make sure the Enable Docker Support checkbox is selected.
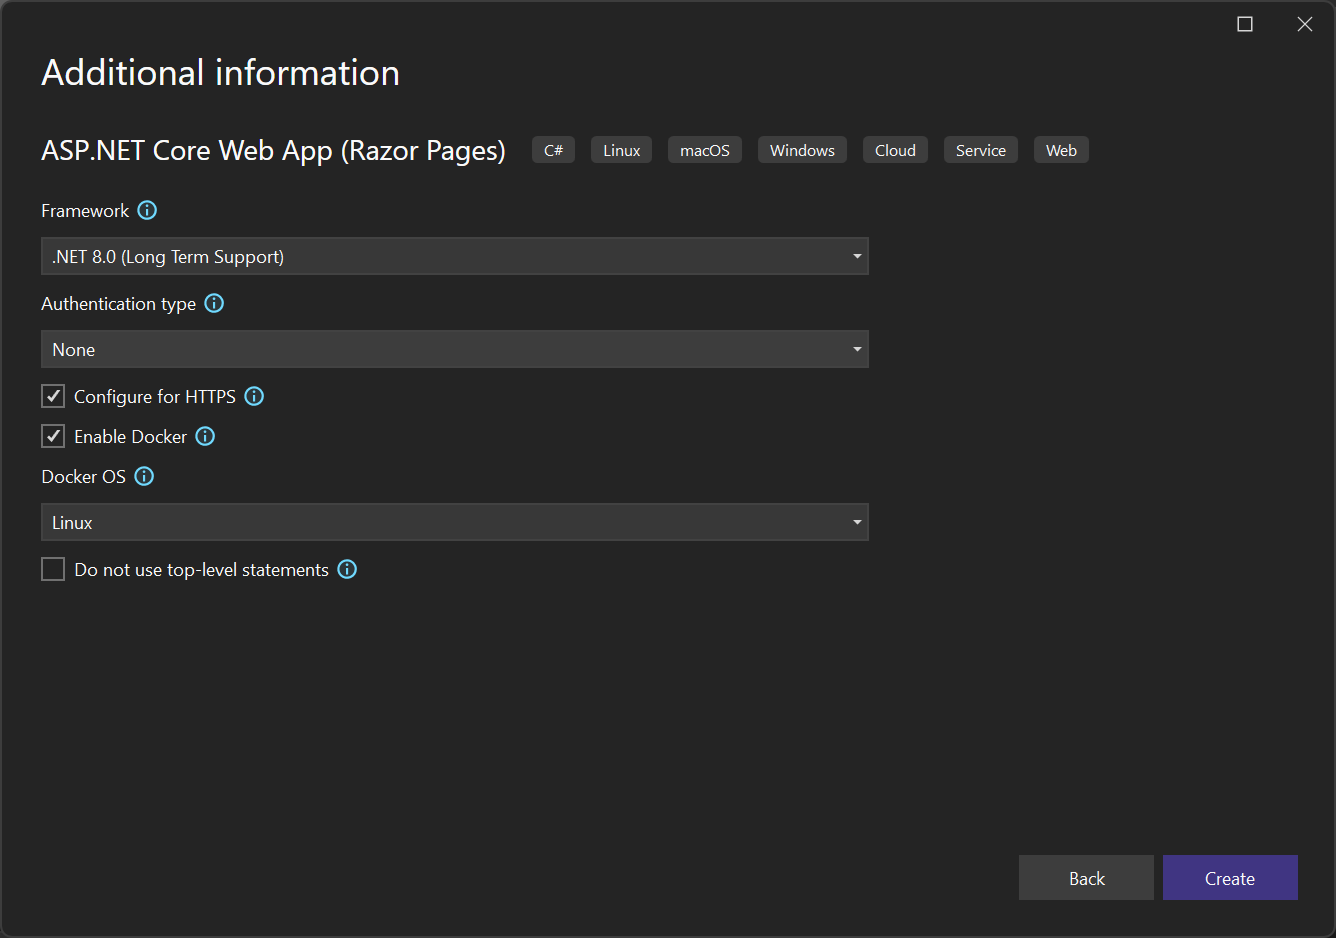
The screenshot shows the latest release with .NET 8.0. If you're using .NET Framework, the dialog looks a bit different.
Select the type of container you want (Windows or Linux) and select Create.
Dockerfile overview
Visual Studio creates a Dockerfile in your project, which provides the recipe for how to create a final Docker image. For more information, see the Dockerfile reference for details about the commands used in the Dockerfile.
#See https://aka.ms/customizecontainer to learn how to customize your debug container and how Visual Studio uses this Dockerfile to build your images for faster debugging.

#Depending on the operating system of the host machines(s) that will build or run the containers, the image specified in the FROM statement may need to be changed.
#For more information, please see https://aka.ms/containercompat

FROM mcr.microsoft.com/dotnet/aspnet:8.0-nanoserver-1809 AS base
WORKDIR /app
EXPOSE 8080
EXPOSE 8081

FROM mcr.microsoft.com/dotnet/sdk:8.0-nanoserver-1809 AS build
ARG BUILD_CONFIGURATION=Release
WORKDIR /src
COPY ["MyWepApp/MyWebApp.csproj", "MyWebApp/"]
RUN dotnet restore "./MyWebApp/./MyWebApp.csproj"
COPY . .
WORKDIR "/src/MyWebApp"
RUN dotnet build "./MyWebApp.csproj" -c %BUILD_CONFIGURATION% -o /app/build

FROM build AS publish
ARG BUILD_CONFIGURATION=Release
RUN dotnet publish "./MyWebApp.csproj" -c %BUILD_CONFIGURATION% -o /app/publish /p:UseAppHost=false

FROM base AS final
WORKDIR /app
COPY --from=publish /app/publish .
ENTRYPOINT ["dotnet", "MyWebApp.dll"]
The preceding Dockerfile is based on the Microsoft Container Registry (MCR) .NET 8 image and includes instructions for modifying the base image by building the project named MyWebApp and adding it to the container. If you're using the .NET Framework, the base image is different.
When the new project dialog's Configure for HTTPS checkbox is checked, the Dockerfile exposes two ports. One port is used for HTTP traffic; the other port is used for HTTPS. If the checkbox isn't checked, a single port (80) is exposed for HTTP traffic.
With Visual Studio 2022 version 17.7 or later, you can target .NET 8. In that case, you have the benefit of being able to run your app more securely, as a normal user, rather than with elevated permissions. The default Dockerfile generated by Visual Studio for .NET 8 projects is configured to run as a normal user. To enable this behavior on an existing project, add the line USER app to the Dockerfile in the base image. Also, because port 80 is restricted for normal users, expose ports 8080 and 8081 instead of 80 and 443. Port 8080 is used for HTTP traffic, and port 8081 is used for HTTPS. To run as a normal user, the container must use a .NET 8 base image, and the app must run as a .NET 8 app. When configured correctly, your Dockerfile should contain code as in the following example:
FROM mcr.microsoft.com/dotnet/aspnet:8.0-preview AS base
USER app
WORKDIR /app
EXPOSE 8080
EXPOSE 8081
Debug
Select Docker from the debug dropdown list in the toolbar, and start debugging the app. You might see a message with a prompt about trusting a certificate; choose to trust the certificate to continue.
The Container Tools option in the Output window shows what actions are taking place. The first time, it might take a while to download the base image, but it's faster on subsequent runs.
After the build completes, the browser opens and displays your app's home page. In the browser address bar, you can see the localhost URL and port number for debugging.
Note
If you need to change ports for debugging, you can do that in the launchSettings.json file. See Container Launch Settings.
Containers window
You can use the Containers window to view running containers on your machine and other images you have available.
Open the Containers window by using the search box in the IDE (press Ctrl+Q to use it), type in container, and choose the Containers window from the list.
You can mount the Containers window in a convenient place, such as below the editor, by moving it around and following the window placement guides.
In the window, find your container and step through each tab to view the environment variables, port mappings, logs, and the filesystem.
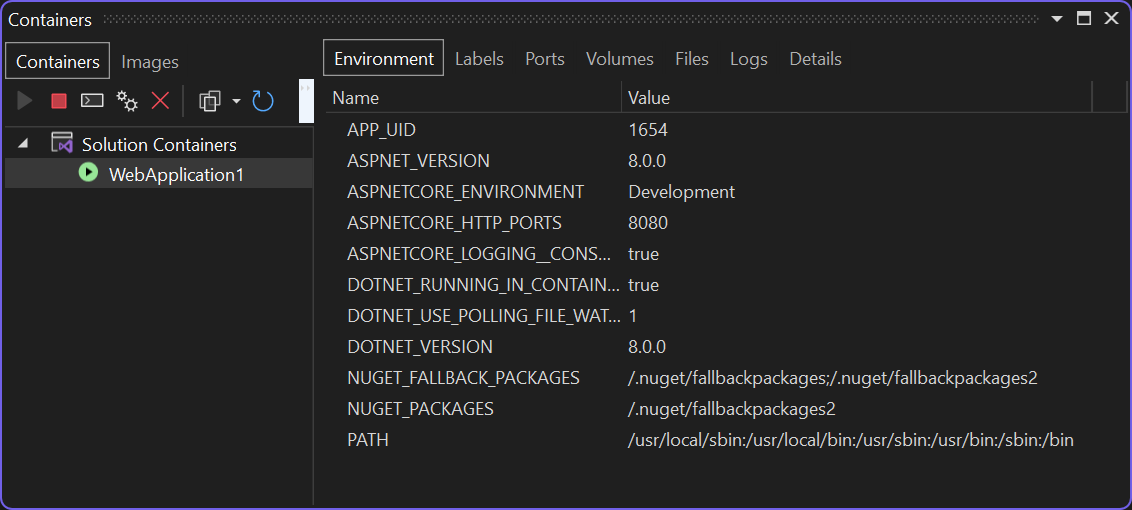
For more information, see Use the Containers window.
Publish Docker images
Once the develop and debug cycle of the app is completed, you can create a production image of the app.
Change the configuration dropdown list to Release and build the app.
Right-click your project in Solution Explorer and choose Publish.
On the Publish dialog, select the Docker Container Registry tab.

Choose Create New Azure Container Registry.
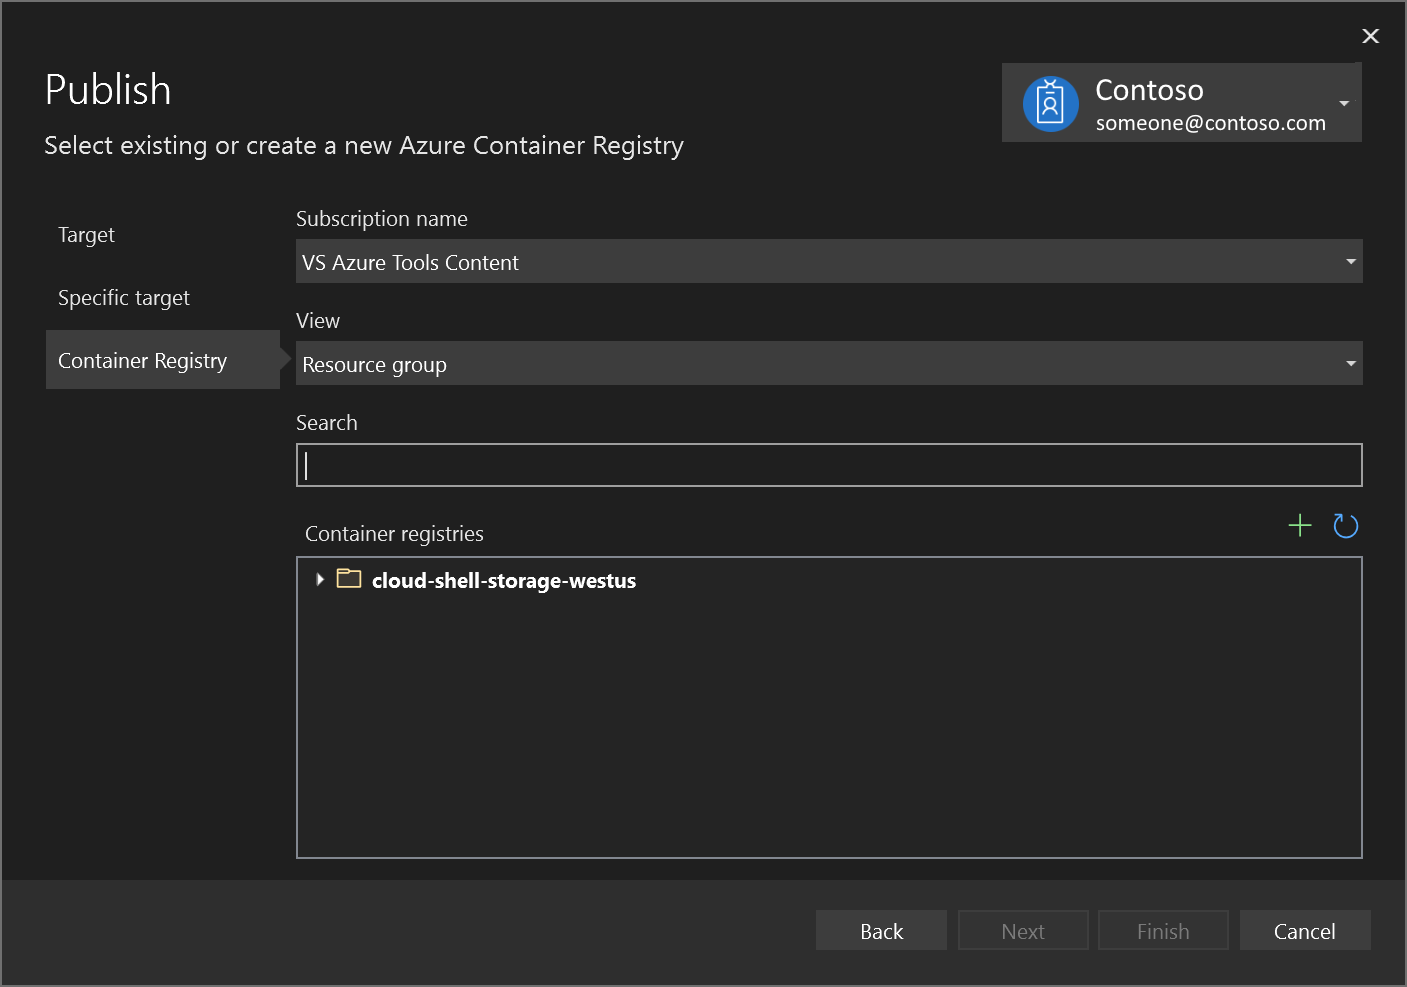
Fill in your desired values in the Create a new Azure Container Registry.
Setting Suggested value Description DNS Prefix Globally unique name Name that uniquely identifies your container registry. Subscription Choose your subscription The Azure subscription to use. Resource Group myResourceGroup Name of the resource group in which to create your container registry. Choose New to create a new resource group. SKU Standard Service tier of the container registry Registry Location A location close to you Choose a Location in a region near you or near other services that can use your container registry. 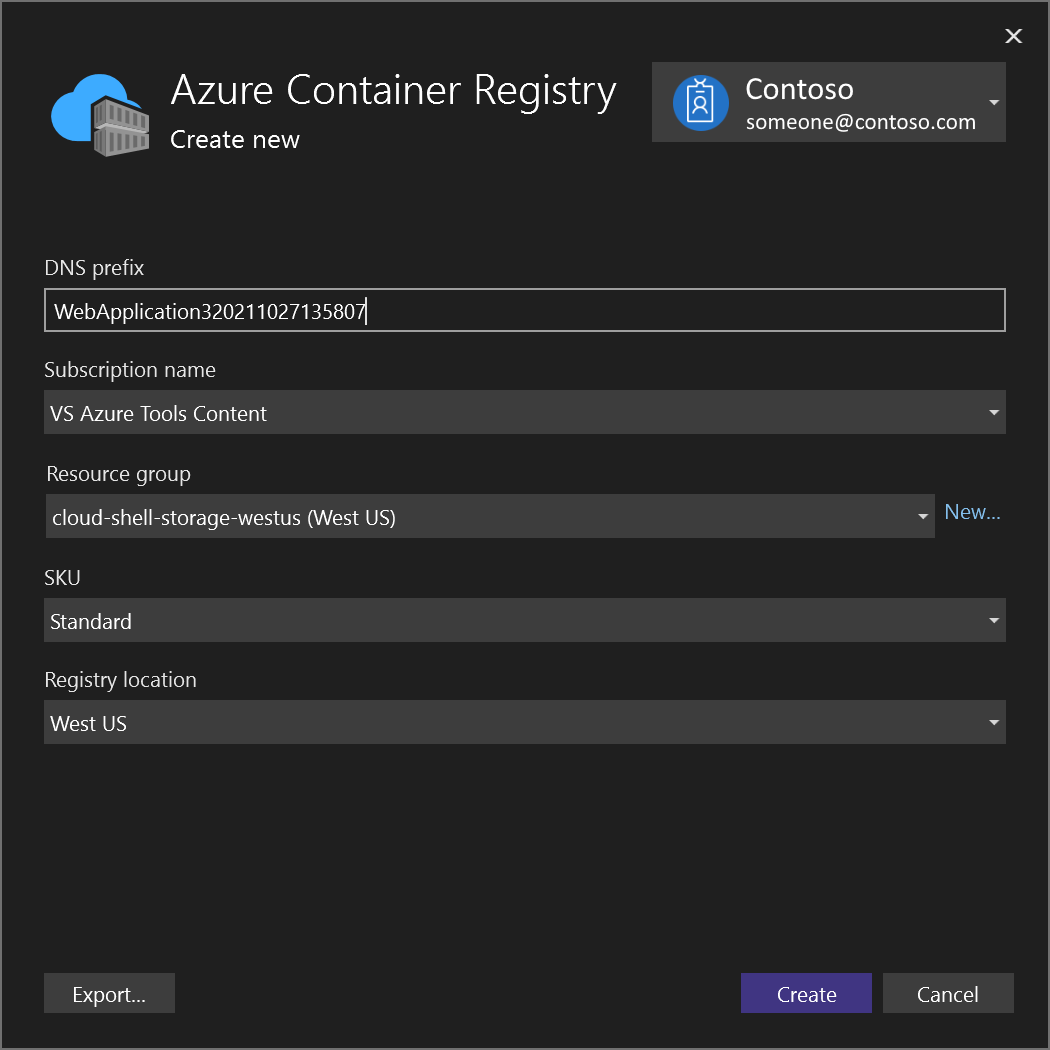
Select Create. The Publish dialog now shows the created registry.
Choose Finish to complete the process of publishing your container image to the newly created registry in Azure.


Next steps
You can now pull the container from the registry to any host capable of running Docker images, for example Azure Container Instances.
Additional resources
Feedback
Coming soon: Throughout 2024 we will be phasing out GitHub Issues as the feedback mechanism for content and replacing it with a new feedback system. For more information see: https://aka.ms/ContentUserFeedback.
Submit and view feedback for