Android tips and workarounds
This document covers tips, tricks, and known workarounds for problems with the Cordova Android platform.
Resolve Android build and deployment errors
Try these steps if you have trouble building and deploying to Android emulators or devices. In some cases, you may see an error about a failure to install the APK on the device or a failure to run the Android Debug Bridge (ADB.exe).
Note
For instructions to run for the first time on specific emulators or an Android device, see Run your app on Android.
Before taking any other steps, try running your app against other platforms or emulators to make sure the issue is Android-specific.
For example, we suggest you test on Windows:
Open the configuration designer (config.xml), the Windows tab, select your OS version, and then try running against Windows-x64 or Windows-x86 and select Local Machine.
If you see the same error on other platforms, the issue is likely not Android-specific, see Resolve build and deployment errors for more general help.
If you are running on an Android device, make sure that Developer Mode is enabled on the device. Try the instructions here to enable developer mode.
After you enable developer mode, go to Developer options on the device and enable Android debugging (USB Debugging). In USB settings, also make sure you are connecting as a Media device.
If you are running on a device and the app is already installed, uninstall the app and try again.
Verify that the Android SDK can connect to your device or emulator. To do this, take these steps.
Start an emulator or connect a device.
Open a command line and go to the folder where abd.exe is installed. For example, this might be C:\Program Files (x86)\Android\android-sdk\platform-tools\adb.exe
Type the command
adb devicesand you should see a connected device.
If you don't see the device, restart your device or emulator and use a different USB port. (Sometimes, front USB ports are low power ports. Avoid using a USB extension cable.) Recheck using
adb devices.For additional ADB commands, see this article.
Make sure that you have the required SDK components installed.
Run the SDK Manager as an Administrator if you are having trouble installing components.
If there appears to be a problem with the Android SDK, you may need to re-install it. Before re-installing, delete the /User/username/.android and the /User/username/.gradle folder to make sure you get a fresh copy of the SDK. After installing the SDK, try again.
Resolve issues with the HAXM driver
The HAXM driver is used to improve the performance of the Google Android Emulator. Conflicts with other technology that uses virtualization, such as Hyper-V, Avast, and Windows 10 Device Guard may prevent the HAXM driver from installing or working correctly. You cannot run the HAXM driver on a virtual machine. If you want to install the HAXM driver, see this article.
The issue may appear as an HAXM installation error or as an error indicating that you need to enable VT-x in the BIOS.
To fix the issue:
For Windows 10 only, check to see if Device Guard is running by starting the System Information app (type System info in search).
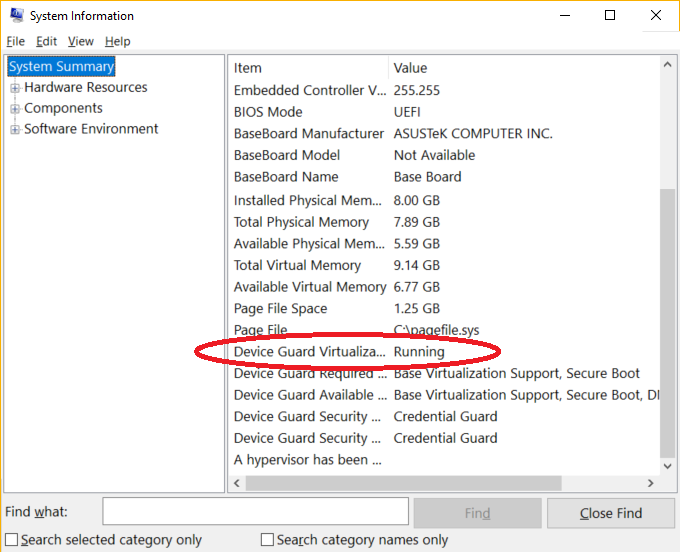
HAXM is not compatible with Device Guard. If DeviceGuard is enabled, then you may be running on a domain-joined machine and DeviceGuard has been configured by the owning organization. We recommend you try to use a non-domain machine with HAXM instead.
If you need to disable Device Guard, see this article.
Disable Hyper-V.
If Hyper-V is enabled, disable it, reboot, and retry HAXM. You can disable Hyper-V from the Control Panel. To do this, go to Programs, look under Programs and Features, and click Turn Windows features on or off. Uncheck Hyper-V Hypervisor.
Or, use the following Powershell cmdlet to disable Hyper-V.
Disable-WindowsOptionalFeature -Online -FeatureName Microsoft-Hyper-V-HypervisorEnable VT-x and SLAT in the BIOS (in the BIOS, the name may be Virtualization Technology or something similar)
If VT-x is disabled, enable it, reboot, and retry HAXM. For help to identify whether VT-x is enabled on your machine, use the processor identification utility.
Note
The processor utility may mistakenly report that VT-x is not supported after switching between Hyper-V and HAXM.
Check whether you have some antivirus software (like Avast) or other software using hardware-assisted virtualization and disable or uninstall the software. Reboot and retry HAXM.
For Avast, first try to disable it by going to Avast settings and deselecting (unchecking) these options:
Enable hardware-assisted virtualization
Enable avast self-defense module
Then reboot and try again.
If you have resolved the preceding issues and HAXM is still not working, try the following steps in order:
- Uninstall the HAXM driver (you can do this using the intelhaxm-android.exe in /android-sdk/extras/intel/Hardware Accelerated Execution Manager).
- Check Android SDK Manager to see if there is an updated version of the HAXM driver. If there is, download it.
- Re-install the HAXM driver using intelhaxm-android.exe, and try again.
Could not create Java Virtual Machine error
When building for Android, you may encounter a set of errors in the Errors List like the following:
Error		Could not create the Java Virtual Machine.
Error		A fatal exception has occurred. Program will exit.
Error		C:\cordova\BlankCordovaApp2\BlankCordovaApp2\platforms\android\cordova\build.bat: Command failed with exit code 1
The problem is that the Ant or Gradle build systems are running out of heap memory when you try to compile your app. To resolve this problem, you can increase the heap of the JVM by setting the following environment variable and restarting Visual Studio:
_JAVA_OPTIONS=-Xmx512M
More specifically, following the instructions from this article:
- Close Visual Studio, if you do not close it - you will need to restart it at the end.
- Open the Control Panel.
- Go to System and Security.
- Go to System.
- Go to Advanced systems settings.
- Go to Environment Variables... (on the Advanced tab).
- Under System Variables, click New
- Variable Name: _JAVA_OPTIONS.
- Variable Value: -Xmx512M.
- Click OK to close the dialog.
- Click OK to close Environment Variables.
- Click OK to close System Properties.
- Now open Visual Studio.
If this does not resolve the issue, you can upgrade to a 64-bit version of the JDK from here and update the JAVA_HOME environment variable to the new install location.