Save data to a database (multiple tables) in .NET Framework applications
Note
Datasets and related classes are legacy .NET Framework technologies from the early 2000s that enable applications to work with data in memory while the applications are disconnected from the database. They are especially useful for applications that enable users to modify data and persist the changes back to the database. Although datasets have proven to be a very successful technology, we recommend that new .NET applications use Entity Framework Core. Entity Framework provides a more natural way to work with tabular data as object models, and it has a simpler programming interface.
One of the most common scenarios in application development is to display data on a form in a Windows application, edit the data, and send the updated data back to the database. This walkthrough creates a form that displays data from two related tables and shows how to edit records and save changes back to the database. This example uses the Customers and Orders tables from the Northwind sample database.
You can save data in your application back to the database by calling the Update method of a TableAdapter. When you drag tables from the Data Sources window onto a form, the code that's required to save data is automatically added. Any additional tables that are added to a form require the manual addition of this code. This walkthrough shows how to add code to save updates from more than one table.
Tasks illustrated in this walkthrough include:
Creating and configuring a data source in your application with the Data Source Configuration Wizard.
Setting the controls of the items in the Data Sources window. For more information, see Set the control to be created when dragging from the Data Sources window.
Creating data-bound controls by dragging items from the Data Sources window onto your form.
Modifying a few records in each table in the dataset.
Modifying the code to send the updated data in the dataset back to the database.
Prerequisites
To complete this tutorial, you need the .NET desktop development and Data storage and processing workloads installed in Visual Studio. To install them, open Visual Studio Installer and choose Modify (or More > Modify) next to the version of Visual Studio you want to modify. See Modify Visual Studio.
This walkthrough uses SQL Server Express LocalDB and the Northwind sample database.
If you don't have SQL Server Express LocalDB, install it either from the SQL Server Express download page, or through the Visual Studio Installer. In the Visual Studio Installer, you can install SQL Server Express LocalDB as part of the Data storage and processing workload, or as an individual component.
Install the Northwind sample database by following these steps:
In Visual Studio, open the SQL Server Object Explorer window. (SQL Server Object Explorer is installed as part of the Data storage and processing workload in the Visual Studio Installer.) Expand the SQL Server node. Right-click on your LocalDB instance and select New Query.
A query editor window opens.
Copy the Northwind Transact-SQL script to your clipboard. This T-SQL script creates the Northwind database from scratch and populates it with data.
Paste the T-SQL script into the query editor, and then choose the Execute button.
After a short time, the query finishes running and the Northwind database is created.
Create the Windows Forms application
Create a new Windows Forms App project for either C# or Visual Basic. Name the project UpdateMultipleTablesWalkthrough.
Create the data source
This step creates a data source from the Northwind database using the Data Source Configuration Wizard. You must have access to the Northwind sample database to create the connection. For information about setting up the Northwind sample database, see How to: Install sample databases.
On the Data menu, select Show Data Sources.
The Data Sources window opens.
In the Data Sources window, select Add New Data Source to start the Data Source Configuration Wizard.
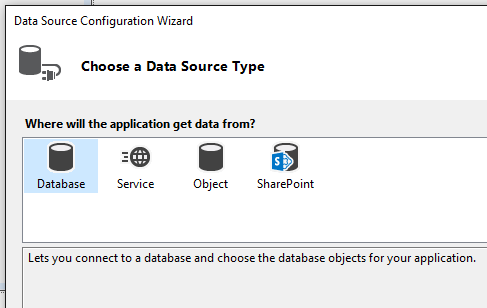
On the Choose a Data Source Type screen, select Database, and then select Next.
On the Choose your Data Connection screen, do one of the following:
If a data connection to the Northwind sample database is available in the dropdown list, select it.
-or-
Select New Connection to open the Add/Modify Connection dialog box.
If your database requires a password, select the option to include sensitive data, and then select Next.
On the Save connection string to the Application Configuration file, select Next.
On the Choose your Database Objects screen, expand the Tables node.
Select the Customers and Orders tables, and then select Finish.
The NorthwindDataSet is added to your project, and the tables appear in the Data Sources window.
Set the controls to be created
For this walkthrough, the data in the Customers table is in a Details layout where data is displayed in individual controls. The data from the Orders table is in a Grid layout that's displayed in a DataGridView control.
To set the drop type for the items in the Data Sources window
In the Data Sources window, expand the Customers node.
On the Customers node, select Details from the control list to change the control of the Customers table to individual controls. For more information, see Set the control to be created when dragging from the Data Sources window.
Create the data-bound form
You can create the data-bound controls by dragging items from the Data Sources window onto your form.
Drag the main Customers node from the Data Sources window onto Form1.
Data-bound controls with descriptive labels appear on the form, along with a tool strip (BindingNavigator) for navigating records. A NorthwindDataSet,
CustomersTableAdapter, BindingSource, and BindingNavigator appear in the component tray.Drag the related Orders node from the Data Sources window onto Form1.
Note
The related Orders node is located below the Fax column and is a child node of the Customers node.
A DataGridView control and a tool strip (BindingNavigator) for navigating records appear on the form. An
OrdersTableAdapterand BindingSource appear in the component tray.
Add code to update the database
You can update the database by calling the Update methods of the Customers and Orders TableAdapters. By default, an event handler for the Save button of theBindingNavigator is added to the form's code to send updates to the database. This procedure modifies the code to send updates in the correct order.This eliminates the possibility of raising referential integrity errors. The code also implements error handling by wrapping the update call in a try-catch block. You can modify the code to suit the needs of your application.
Note
For clarity, this walkthrough does not use a transaction. However, if you're updating two or more related tables, include all the update logic within a transaction. A transaction is a process that assures that all related changes to a database are successful before any changes are committed. For more information, see Transactions and Concurrency.
To add update logic to the application
Select the Save button on the BindingNavigator. This opens the Code Editor to the
bindingNavigatorSaveItem_Clickevent handler.Replace the code in the event handler to call the
Updatemethods of the related TableAdapters. The following code first creates three temporary data tables to hold the updated information for each DataRowState (Deleted, Added, and Modified). The updates are run in the correct order. The code should look like the following:this.Validate(); this.ordersBindingSource.EndEdit(); this.customersBindingSource.EndEdit(); NorthwindDataSet.OrdersDataTable deletedOrders = (NorthwindDataSet.OrdersDataTable) northwindDataSet.Orders.GetChanges(DataRowState.Deleted); NorthwindDataSet.OrdersDataTable newOrders = (NorthwindDataSet.OrdersDataTable) northwindDataSet.Orders.GetChanges(DataRowState.Added); NorthwindDataSet.OrdersDataTable modifiedOrders = (NorthwindDataSet.OrdersDataTable) northwindDataSet.Orders.GetChanges(DataRowState.Modified); try { // Remove all deleted orders from the Orders table. if (deletedOrders != null) { ordersTableAdapter.Update(deletedOrders); } // Update the Customers table. customersTableAdapter.Update(northwindDataSet.Customers); // Add new orders to the Orders table. if (newOrders != null) { ordersTableAdapter.Update(newOrders); } // Update all modified Orders. if (modifiedOrders != null) { ordersTableAdapter.Update(modifiedOrders); } northwindDataSet.AcceptChanges(); } catch (System.Exception ex) { MessageBox.Show("Update failed"); } finally { if (deletedOrders != null) { deletedOrders.Dispose(); } if (newOrders != null) { newOrders.Dispose(); } if (modifiedOrders != null) { modifiedOrders.Dispose(); } }
Test the application
Press F5.
Make some changes to the data of one or more records in each table.
Select the Save button.
Check the values in the database to verify that the changes were saved.
Related content
Feedback
Coming soon: Throughout 2024 we will be phasing out GitHub Issues as the feedback mechanism for content and replacing it with a new feedback system. For more information see: https://aka.ms/ContentUserFeedback.
Submit and view feedback for