Tutorial: Create a math quiz WinForms app
In this series of four tutorials, you'll build a math quiz. The quiz contains four random math problems that a quiz taker tries to answer within a specified time.
The Visual Studio integrated development environment (IDE) provides the tools that you need to create the app. To learn more about this IDE, see Welcome to the Visual Studio IDE.
In this first tutorial, you learn how to:
- Create a Visual Studio project that uses Windows Forms.
- Add labels, a button, and other controls to a form.
- Set properties for the controls.
- Save and run your project.
Prerequisites
You need Visual Studio to complete this tutorial. Visit the Visual Studio downloads page for a free version.
Create your Windows Forms project
When you create a math quiz, the first step is to create a Windows Forms App project.
Open Visual Studio.
On the start window, select Create a new project.

In the Create a new project window, search for Windows Forms. Then select Desktop from the Project type list.
Select the Windows Forms App (.NET Framework) template for either C# or Visual Basic, and then select Next.

Note
If you don't see the Windows Forms App (.NET Framework) template, you can install it from the Create a new project window. In the Not finding what you're looking for? message, select Install more tools and features.

Next, in Visual Studio Installer, select .NET desktop development.
Select Modify in Visual Studio Installer. You might be prompted to save your work. Next, select Continue to install the workload.
In the Configure your new project window, name your project MathQuiz, and then select Create.
Open Visual Studio.
On the start window, select Create a new project.

In the Create a new project window, search for Windows Forms. Then select Desktop from the Project type list.
Select the Windows Forms App (.NET Framework) template for either C# or Visual Basic, and then select Next.
Note
If you don't see the Windows Forms App (.NET Framework) template, you can install it from the Create a new project window. In the Not finding what you're looking for? message, select Install more tools and features.
Next, in Visual Studio Installer, select .NET desktop development.
Select Modify in Visual Studio Installer. You might be prompted to save your work. Next, select Continue to install the workload.
In the Configure your new project window, name your project MathQuiz, and then select Create.
Visual Studio creates a solution for your app. A solution is a container for all the projects and files that your app needs.
Set form properties
After you select your template and name your file, Visual Studio opens a form for you. This section shows you how to change some form properties.
In your project, select Windows Forms Designer. The designer tab is labeled Form1.cs [Design] for C# or Form1.vb [Design] for Visual Basic.
Select the form, Form1.
The Properties window now displays properties for the form. This window is usually in the lower right corner of Visual Studio. If you don't see Properties, select View > Properties Window.
Find the Text property in the Properties window. Depending on how the list is sorted, you might need to scroll down. Enter the value Math Quiz for the Text value, and then select Enter.
Your form now has the text "Math Quiz" in its title bar.
Note
You can display properties by category or alphabetically. Use the buttons on the Properties window to switch back and forth.
Change the size of the form to 500 pixels wide by 400 pixels tall.
You can resize the form by dragging its edges or drag handle until the correct size appears as the Size value in the Properties window. The drag handle is a small white square in the lower-right corner of the form. You can also resize the form by changing the values of the Size property.
Change the value of the FormBorderStyle property to Fixed3D, and set the MaximizeBox property to False.
These values prevent quiz takers from resizing the form.
Create the time remaining box
The math quiz contains a box in the upper-right corner. That box shows the number of seconds that remain in the quiz. This section shows you how to use a label for that box. You'll add code for the countdown timer in a later tutorial in this series.
On the left side of the Visual Studio IDE, select the Toolbox tab. If you don't see the toolbox, select View > Toolbox from the menu bar or Ctrl+Alt+X.
Select the Label control in the Toolbox, and then drag it onto the form.
In the Properties box, set the following properties for the label:
- Set the (Name) to timeLabel.
- Change AutoSize to False so that you can resize the box.
- Change the BorderStyle to FixedSingle to draw a line around the box.
- Set the Size to 200, 30.
- Select the Text property, and then select the Backspace key to clear the Text value.
- Select the plus sign (+) next to the Font property, and then set the Size to 15.75.
Move the label to the upper-right corner of the form. When blue spacer lines appear, use them to position the control on the form.
Add another Label control from the Toolbox, and then set its font size to 15.75.
Set this label's Text property to Time Left.
Move the label so that it lines up to the left of the timeLabel label.

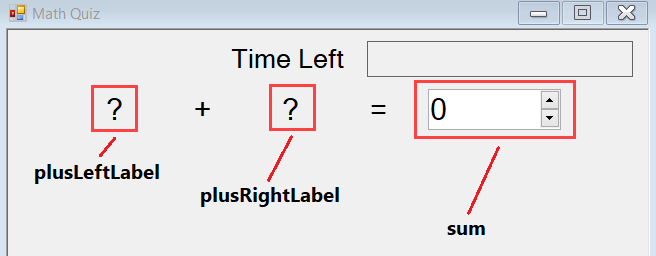
Add controls for the addition problem
The first part of the quiz is an addition problem. This section shows you how to use labels to display that problem.
Add a Label control from the Toolbox to the form.
In the Properties box, set the following properties for the label:
- Set the Text to ? (question mark).
- Set AutoSize to False.
- Set the Size to 60, 50.
- Set the font size to 18.
- Set TextAlign to MiddleCenter.
- Set the Location to 50, 75 to position the control on the form.
- Set the (Name) to plusLeftLabel.
In the form, select the plusLeftLabel label that you created. Copy the label by selecting either Edit > Copy or Ctrl+C.
Paste the label into the form three times by selecting either Edit > Paste or Ctrl+V three times.
Arrange the three new labels so that they are in a row to the right of the plusLeftLabel label.
Set the second label's Text property to + (plus sign).
Set the third label's (Name) property to plusRightLabel.
Set the fourth label's Text property to = (equals sign).
Add a NumericUpDown control from the Toolbox to the form. You'll learn more about this kind of control later.
In the Properties box, set the following properties for the NumericUpDown control:
- Set the font size to 18.
- Set the width to 100.
- Set the (Name) to sum.
Line up the NumericUpDown control with the Label controls for the addition problem.
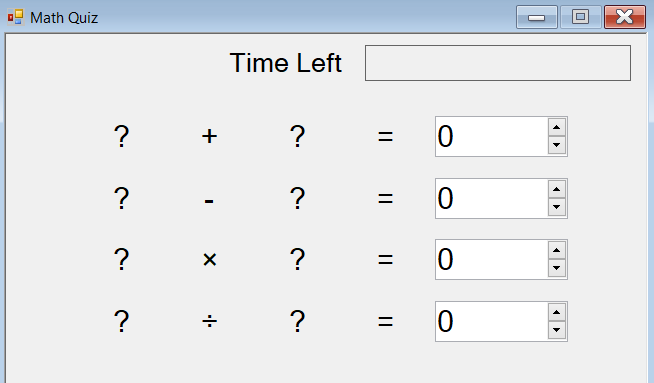
Add controls for the subtraction, multiplication, and division problems
Next, add labels to the form for the remaining math problems.
Copy the four Label controls and the NumericUpDown control that you created for the addition problem. Paste them into the form.
Move the new controls to line up below the addition controls.
In the Properties box, set the following properties for the new controls:
- Set the (Name) of the first question-mark label to minusLeftLabel.
- Set the Text of the second label to - (minus sign).
- Set the (Name) of the second question-mark label to minusRightLabel.
- Set the (Name) of the NumericUpDown control to difference.
Copy the addition controls, and paste them two more times into the form.
For the third row:
- Set the (Name) of the first question-mark label to timesLeftLabel.
- Set the Text of the second label to × (multiplication sign). You can copy the multiplication sign from this tutorial and paste it onto the form.
- Set the (Name) of the second question-mark label to timesRightLabel.
- Set the (Name) of the NumericUpDown control to product.
For the fourth row:
- Set the (Name) of the first question-mark label to dividedLeftLabel.
- Set the Text of the second label to ÷ (division sign). You can copy the division sign from this tutorial and paste it onto the form.
- Set the (Name) of the second question-mark label to dividedRightLabel.
- Set the (Name) of the NumericUpDown control to quotient.
Add a start button and set the tab-index order
This section shows you how to add a start button. You'll also specify the tabbing order of the controls. This ordering determines how the quiz taker moves from one control to the next by using the Tab key.
Add a Button control from the Toolbox to the form.
In the Properties box, set the following properties of the Button:
- Set the (Name) to startButton.
- Set the Text to Start the quiz.
- Set the font size to 14.
- Set AutoSize to True, which causes the button to automatically resize to fit the text.
- Set the TabIndex to 0. This value makes the start button the first control to receive the focus.
Center the button near the bottom of the form.

In the Properties box, set the TabIndex property of each NumericUpDown control:
- Set the TabIndex of the sum NumericUpDown control to 1.
- Set the TabIndex of the difference NumericUpDown control to 2.
- Set the TabIndex of the product NumericUpDown control to 3.
- Set the TabIndex of the quotient NumericUpDown control to 4.
Run your app
The math problems don't work yet on your quiz. But you can still run your app to check whether the TabIndex values function as you expect.
Use one of the following methods to save your app:
- Select Ctrl+Shift+S.
- On the menu bar, select File > Save All.
- On the toolbar, select the Save All button.
Use one of the following methods to run your app:
- Select F5.
- On the menu bar, select Debug > Start Debugging.
- On the toolbar, select the Start button.
Select the Tab key a few times to see how the focus moves from one control to the next.
Next steps
Advance to the next tutorial to add random math problems and an event handler to your math quiz.
Feedback
Coming soon: Throughout 2024 we will be phasing out GitHub Issues as the feedback mechanism for content and replacing it with a new feedback system. For more information see: https://aka.ms/ContentUserFeedback.
Submit and view feedback for