Find in Files
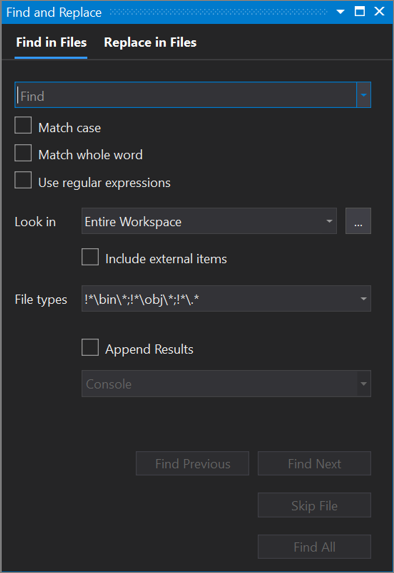
Find in Files allows you to search a specified set of files. The matches Visual Studio finds are listed in the Find Results window in the IDE. How the results appear depends on the options you choose on the Find in Files tab of the Find and Replace dialog box.

Important
If you are using Visual Studio 2019 version 16.6 or earlier, the Find and Replace dialog box might not look like it appears here. Switch to the Visual Studio 2017 version of this page for descriptions that'll match what you see on your screen.
How to display Find in Files
Use the following steps to open the Find and Replace dialog box, or press Ctrl+Shift+F.
Press Ctrl+Q and enter "find" in the search box at the top of the screen.
Choose Find in files from the list of results.
or
On the menu bar, select Edit > Find and Replace.
Choose Find in Files from the fly-out menu.
To cancel a Find operation, press Ctrl+Break.
Note
The Find and Replace tool does not search directories with the Hidden or System attribute.
Search box
To search for a new text string or expression, specify it in the Search box. To search for any of the 20 strings that you searched for most recently, open the drop-down list and select the string.
You can select or clear the following option(s):
Match case - Use this option to make sure that your search is case-sensitive.
Match whole word - Use this option to make sure that your search returns only whole word matches.
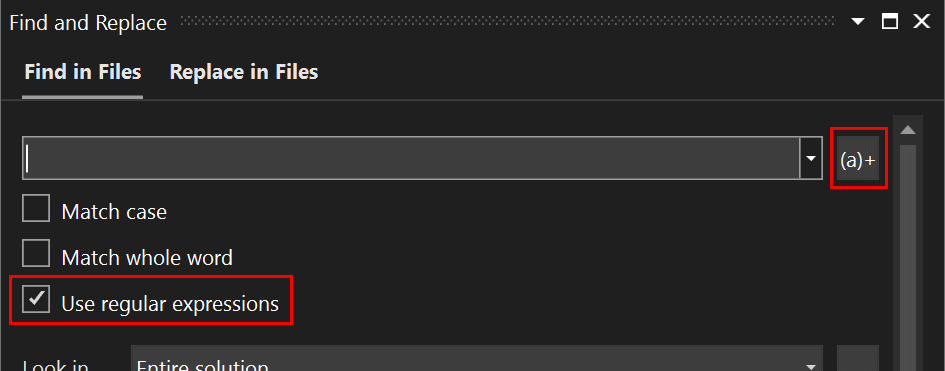
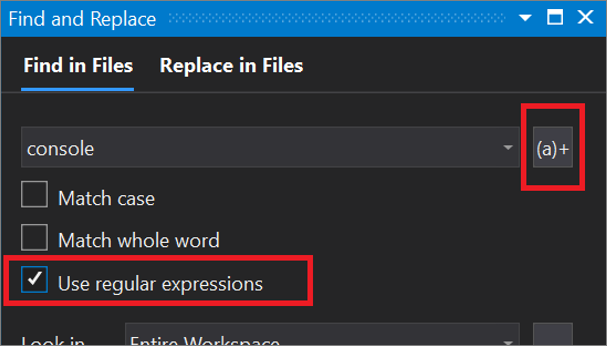
Use regular expressions - Use this option to use special notations that define patterns of text to match in the Search box (or in the Replace text box). For a list of these notations, see Using regular expressions in Visual Studio.
Important
The Expression Builder button appears next to the Search box only if you've selected the Use regular expressions checkbox.
Look in
The option you choose from the Look in drop-down list determines whether Find in Files searches the entire workspace, the entire solution, the current project, the current directory, all open documents, or the current document.
You can also use the adjacent Browse (...) button to locate where you want to search. Even better, if you've already specified a directory, this button will append the new directory instead of replacing it. For instance, if your "Look in" value was ".\Code", you could click the Browse (...) button and navigate to a folder named "Shared Code". The Browse (...) box would now show ".\Code;.\Shared Code" and when the Find command is executed, it will search both of those folders.
To refine your search, you can select or clear the following option(s):
- Include external items - Use this option to include referenced files from outside a C++ project, that is, files like "windows.h" that are included by your code files, but aren't part of a solution. This option only applies to C++ projects.
- Include miscellaneous files - Use this option to include miscellaneous files, which are files that you've opened but aren't part of a solution. See Miscellaneous files.
File types
The File types option indicates the types of files to search through in the Look in directories. Select any item in the list to enter a preconfigured search string that will find files of those particular types.

You can search for multiple file types by separating them with a semicolon (;). You can also exclude folders and files by prefixing any path or file type with an exclamation mark (!).
Append results
Use this option to append the results from the current search to previous search results.
Search box
To search for a new text string or expression, specify it in the Search box. To search for any of the 20 strings that you searched for most recently, open the drop-down list and select the string.
You can select or clear the following option(s):
Match case - Use this option to make sure that your search is case-sensitive.
Match whole word - Use this option to make sure that your search returns only whole word matches.
Use regular expressions - Use this option to use special notations that define patterns of text to match in the Search box (or in the Replace text box). For a list of these notations, see Using regular expressions in Visual Studio.
Important
The Expression Builder button appears next to the Search box only if you've selected the Use regular expressions checkbox.
Look in
The option you choose from the Look in drop-down list determines whether Find in Files searches the entire workspace, the entire solution, the current project, the current directory, all open documents, or the current document.
You can also use the adjacent Browse (...) button to locate where you want to search. Even better, if you've already specified a directory, this button will append the new directory instead of replacing it. For instance, if your "Look in" value was ".\Code", you could click the Browse (...) button and navigate to a folder named "Shared Code". The Browse (...) box would now show ".\Code;.\Shared Code" and when the Find command is executed, it will search both of those folders.
To refine your search, you can select or clear the following option(s):
- Include external items - Use this option to include external items, such as files like "windows.h" that you might reference but aren't part of a solution.
- Include miscellaneous files - Use this option to include miscellaneous files, such as files that you've opened but aren't part of a solution.
File types
The File types option indicates the types of files to search through in the Look in directories. Select any item in the list to enter a preconfigured search string that will find files of those particular types.

You can search for multiple file types by separating them with a semicolon (;). You can also can exclude folders and files by prefixing any path or file type with an exclamation mark (!).
Append results
Use this option to append the results from the current search to previous search results.
Search results
When you perform a search for all results, results appear as they become available.
Note
Visual Studio begins building an index after your code context is loaded, such as when opening a new project, changing branches, or otherwise changing the file list. If you search while Visual Studio is still indexing your source files, you might see a warning that results are incomplete.
Keep results
You can keep the results from one search while you're performing other searches. This makes it easy to compare results and see them side-by-side.

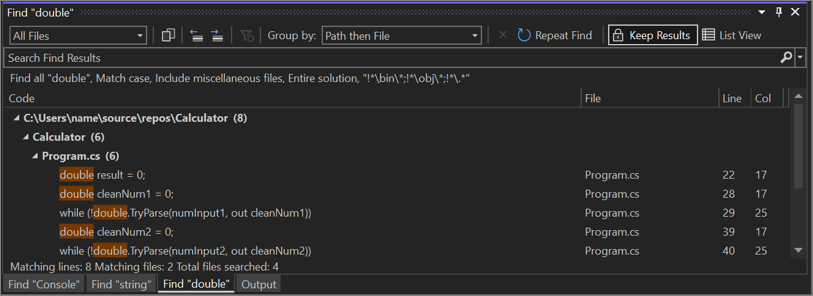
To keep several search results, select the Keep Results button after each search. Then, when you search for something else, the results are shown in a new tab. You can keep the results of up to five searches. If you've already got five search results showing, the next search will reuse the oldest search result tab.
In Visual Studio 2022 and later, you can set Visual Studio to always keep results. Go to Tools > Options > General > Find and Replace, and select the checkbox for Keep search results by default.
Related content
Feedback
Coming soon: Throughout 2024 we will be phasing out GitHub Issues as the feedback mechanism for content and replacing it with a new feedback system. For more information see: https://aka.ms/ContentUserFeedback.
Submit and view feedback for