Tutorial: Work with the Django web framework in Visual Studio
This article is the first Step in a five part tutorial series that demonstrates how to work with Django in Visual Studio. Django is a high-level Python framework designed for rapid, secure, and scalable web development. Visual Studio provides project templates that you can use to streamline the creation of Django-based web applications. This tutorial series explores the Django framework in the context of the Visual Studio project templates.
In Step 1 of the tutorial, you learn how to:
- Create a Django web app project by using the Blank Django Web Project template
- Examine the boilerplate code and run the app
- Create a Git repository for the Django web app
- Work with Git source code controls
- Create a virtual environment for the Django web app
Prerequisites
Visual Studio 2022 on Windows with the following options selected in the Visual Studio Installer:
On the Workloads tab, select the Python development option. For more information, see Install Python support in Visual Studio.
On the Individual components tab under Code tools, select the Git for Windows option.
Visual Studio 2017 or later on Windows with the following options selected in the Visual Studio Installer:
On the Workloads tab, select the Python development option. For more information, see Install Python support in Visual Studio.
On the Individual components tab under Code tools, select the Git for Windows and GitHub Extension for Visual Studio options.
Django project templates in Visual Studio are included with all earlier versions of Python Tools for Visual Studio. The template details might differ from the descriptions in this tutorial series, especially for earlier versions of the Django web framework.
Visual Studio for Mac isn't currently supported. For more information, see What's happening to Visual Studio for Mac? Visual Studio Code on Windows, Mac, and Linux works well with Python through available extensions.
Visual Studio projects and Django projects
In Django terminology, a Django project has several site-level configuration files along with one or more "apps." To create a full web application, you can deploy these apps to a web host. A Django project can contain multiple apps, and the same app can be in multiple Django projects.
A Visual Studio project can contain the Django project along with multiple apps. In this tutorial series, the term "project" refers to the Visual Studio project. When the content refers to the "Django project" portion of the web application, it's referring to a "Django project" specifically.
Create Visual Studio project and solution
In Step 1 of this tutorial series, you create a single Visual Studio solution to contain multiple Django projects. Each project contains a single Django app. You create the projects by using different Django project templates included with Visual Studio. By keeping the projects in the same solution, you can easily switch back and forth between different files for comparison.
When you work with Django from the command line, you usually start a project by running the django-admin startproject <project_name> command. In Visual Studio, the Blank Django Web Project template provides the same structure within a Visual Studio project and solution.
Follow this procedure to create the solution and project:
In Visual Studio, select File > New > Project and search for "Django." Then, select the Blank Django Web Project template and select Next.

Configure your new project and solution:
Set the Name of the Visual Studio project to BasicProject. This name is also used for the Django project.
Specify the Location for Visual Studio to save the solution and project.
Clear the Place solution and project in the same directory option.
Set the Solution name to LearningDjango. The solution serves as the container for multiple projects in this tutorial series.
Select Create.
After a moment, Visual Studio displays the prompt Python package specification file "requirements.txt" was detected in project "BasicProject".:

The dialog indicates that the selected template includes a requirements.txt file that you can use to create a virtual environment for the project.
Select the X at the right to close the prompt. Later in this tutorial, you create the virtual environment and ensure source control excludes the environment. (The environment can always be created later from the requirements.txt file.)


In Visual Studio, select File > New > Project and search for "Django." Then, select the Blank Django Web Project template. (The template is also found in the dialog under Python > Web in the list on the left.)

At the bottom of the dialog, configure your new project and solution:
Set the Name of the Visual Studio project to BasicProject. This name is also used for the Django project.
Specify the Location for Visual Studio to save the solution and project.
Set the Solution name to LearningDjango. The solution serves as the container for multiple projects in this tutorial series.
Select the Create directory for solution option (default).
Select the Create new Git repository option. Visual Studio creates a local Git repository when it creates the solution.
If you don't see this option, run the Visual Studio Installer. On the Individual components tab under Code tools, add the Git for Windows and GitHub Extension for Visual Studio options.
Select OK.
After a moment, Visual Studio displays the prompt This project requires external packages:
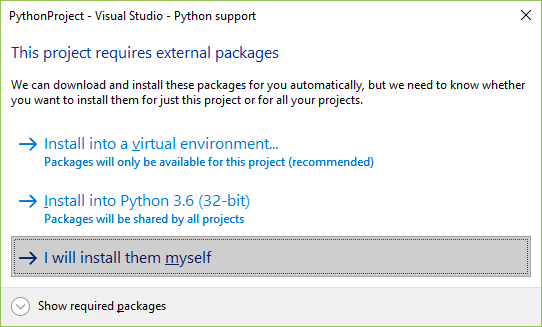
The dialog indicates that the selected template includes a requirements.txt file that references the latest Django 1.x package. You can select Show required packages to see the exact dependencies.
Select the option I will install them myself to close the dialog. Later in this tutorial, you create the virtual environment and ensure source control excludes the environment. (The environment can always be created later from the requirements.txt file.)


Examine Git controls
In the next procedure, you familiarize yourself with Visual Studio support for Git source control.
Important
In Visual Studio 2019 and later, the Git version control experience is on by default. If you'd like to learn more about how it compares with Team Explorer, see the Side-by-side comparison of Git and Team Explorer page.
If you prefer to continue to use Team Explorer in earlier versions of Visual Studio, go to Tools > Options > Environment > Preview Features and toggle the New Git user experience checkbox.
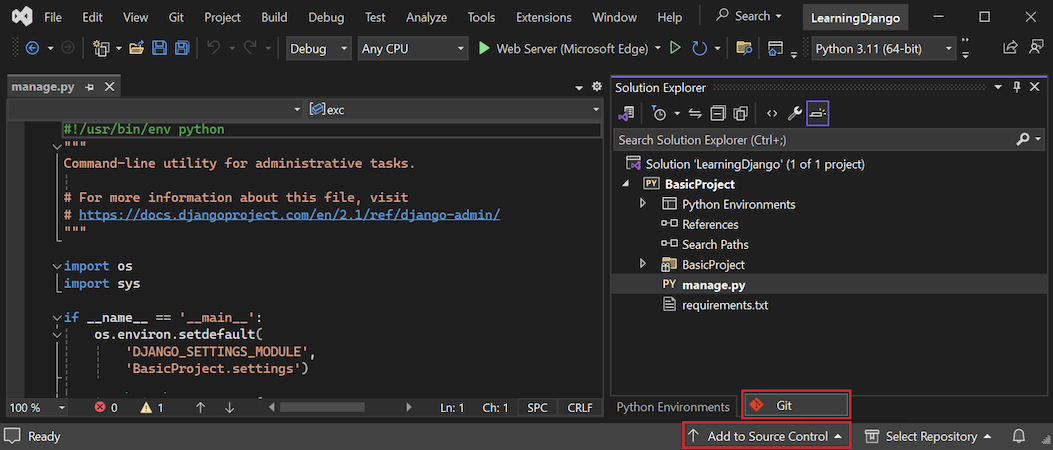
To commit the project to your local source control, select Add to Source Control at the bottom right in the Visual Studio main window and then select Git:
The Create Git repository window opens, where you can create and push a new repository.
After you create a repository, the Git controls bar appears at the bottom right in the Visual Studio main window:

From left to right, the Git controls bar shows the number of outgoing/incoming commits (arrows #/#), the number of uncommitted changes (pencil #), the current branch name, and the current repository name. Git controls are also available on the Git menu on the main toolbar.
On the Git controls bar, select the changes (pencil #) to open the Git Changes window. You can also select View > Git changes (Ctrl+O, Ctrl+G):

This window shows details about any uncommitted changes, including stashed changes. Because your newly created project is already committed to source control automatically, you don't see any pending changes.
On the Git controls bar, select the commits (arrows #/#) and then select View All Commits:
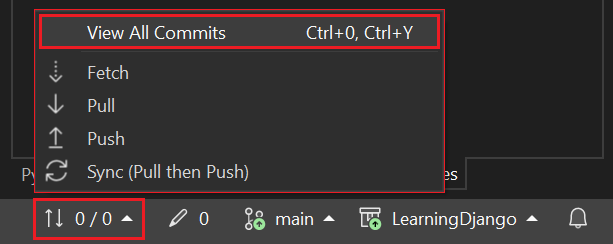
The Git repository window opens. You can also select View > Git repository (Ctrl+O, Ctrl+R):

This window shows details for the current repository in the left pane and the current branch with outgoing/incoming commits in the right pane.
To see the differences view for the file, select a commit in the middle pane. The previous version displays on the left side and the revised version shows on the right side. The details also contain the change author, the change committer, and commit message.


Because you selected the Create new Git repository option in the New Project dialog, the project is already committed to local source control as soon as the creation process is complete. In this procedure, you familiarize yourself with Visual Studio's Git controls and the Team Explorer window in which you work with source control.
Examine the Git controls on the bottom corner of the Visual Studio main window. From left to right, these controls show unpushed commits (arrow #), uncommitted changes (pencil #), the name of the repository, and the current branch:

Note
If you don't select the Create new Git repository in the New Project dialog, the Git controls show only an Add to source control command that creates a local repository.

Select the changes (pencil #), and Visual Studio opens the Team Explorer window on the Changes page. Because the newly created project is already committed to source control automatically, you don't see any pending changes.

On the Visual Studio status bar, select the commits (arrow #) to open the Synchronization page in Team Explorer. Because you have only a local repository, the page provides easy options to publish the repository to different remote repositories.

You can select whichever service you want for your own projects. This tutorial shows the use of GitHub, where the completed sample code for the tutorial is maintained in the Microsoft/python-sample-vs-learning-djangorepository.
When you select any of the Publish controls, Team Explorer prompts you for more information. For example, when you publish the sample for this tutorial, the repository itself is created first, where the Push to Remote Repository option is used with the repository's URL.

If you don't have an existing repository, the Publish to GitHub and Push to Azure DevOps options let you create one directly from within Visual Studio.


Tip
To quickly navigate within Team Explorer, select the Changes or Push header to see a popup menu of available pages.
As you work through this tutorial series, get into the habit of periodically using the Git controls in Visual Studio to commit and push changes. The tutorial Steps remind you at the appropriate points.
Use source control from beginning
There are several advantages to using source control from the beginning of a project. When you use source control from the start of a project, especially if you also use a remote repository, you gain regular offsite backup of your project. Unlike maintaining a project just on a local file system, source control also provides a complete change history and the easy ability to revert a single file or the whole project to a previous state. The change history helps determine the cause of regressions (test failures).
Source control is essential if multiple people are working on a project, because it manages overwrites and provides conflict resolution. Source control is fundamentally a form of automation, sets you up well for automating builds, testing, and release management. It's the first step in using Azure DevOps for a project, and because the barriers to entry are so low, there's really no reason to not use source control from the beginning.
For more information on source control as automation, see The Source of Truth: The Role of Repositories in DevOps, an article in MSDN Magazine written for mobile apps that applies also to web apps.
Prevent Visual Studio from auto-committing projects
Follow these steps to prevent Visual Studio from auto-committing a new project:
Select Tools > Options > Source Control > Git Global Settings.
Clear the Commit changes after merge by default option and select OK.
Open the Settings page in Team Explorer, and select Git > Global settings.
Clear the Commit changes after merge by default option and select Update.
Create virtual environment and exclude source control
After you configure source control for your project, you can create the virtual environment with the necessary Django packages that the project requires. You can then use the Git Changes window to exclude the environment's folder from source control.
In Solution Explorer, right-click the Python Environments node and select Add Environment.

In the Add environment dialog, select Create to accept the default values. (You can change the name of the virtual environment if you want, which changes the name of its subfolder, but
envis a standard convention.)
If Visual Studio prompts for administrator privileges, provide your consent. Wait several minutes while Visual Studio downloads and installs packages. For Django and its dependencies, the process can require expanding close to 1,000 files in over 100 subfolders. You can view the progress in the Visual Studio Output window.
On the Git controls bar, select the uncommitted changes (which now shows 99+) to open the Git Changes window:
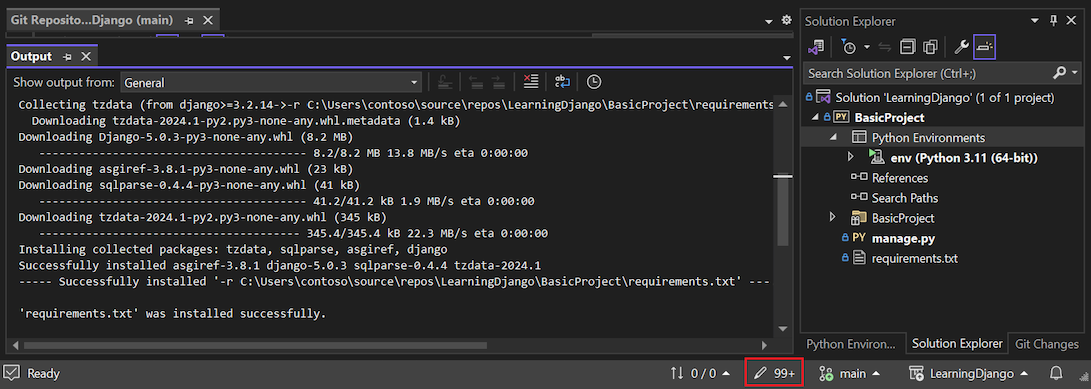
Creation of the virtual environment brings in thousands of changes, but you don't need to include them in source control. You or anyone else who clones the project can always recreate the environment by using the requirements.txt file.
To exclude the virtual environment from source control, in the Git Changes window, right-click the env folder and select Ignore these local items:

After you exclude the virtual environment, the only remaining changes are to the project file (.py) and the .gitignore file, which contains an added entry for the virtual environment folder.
To see the differences view for the .gitignore file, in the Git Changes window, double-click the file.
In the Git Changes window, enter a commit message, such as "Initial project changes":
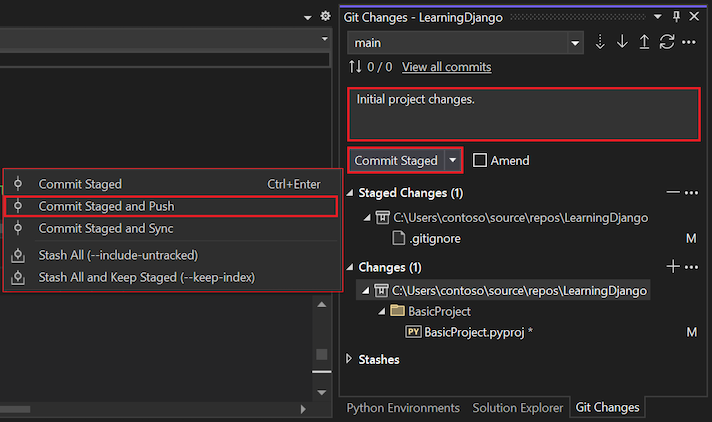
In the Commit dropdown menu, select Commit Staged and Push.


You can open the Git Repository window and confirm the staged commits show in the Local History for the current branch.
After you configure source control for your project, you can create the virtual environment with the necessary Django packages that the project requires. You can then use Team Explorer to exclude the environment's folder from source control.
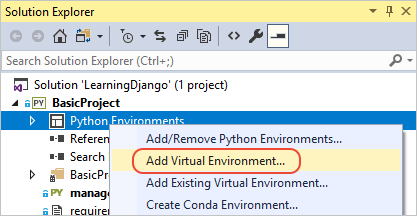
In Solution Explorer, right-click the Python Environments node and select Add Virtual Environment:
The Add Virtual Environment dialog opens and shows the message, We found a requirements.txt file. The message indicates that Visual Studio uses the file to configure the virtual environment:
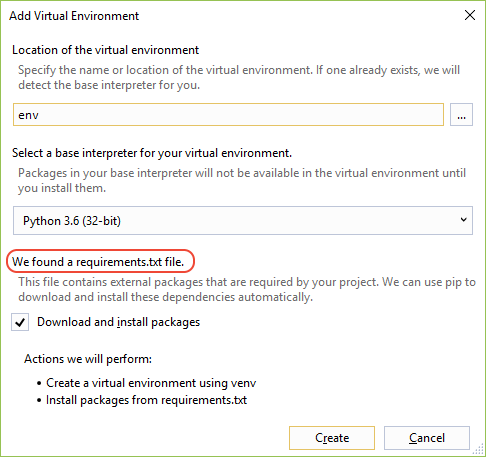
Select Create to accept the defaults. (You can change the name of the virtual environment if you want, which changes the name of its subfolder, but
envis a standard convention.)If Visual Studio prompts for administrator privileges, provide your consent. Wait several minutes while Visual Studio downloads and installs packages. For Django and its dependencies, the process can require expanding close to 1,000 files in over 100 subfolders. You can view the progress in the Visual Studio Output window.
On the Git controls bar, select the uncommitted changes (which now shows 99+) to open the Git Changes page in Team Explorer:
Creation of the virtual environment brings in thousands of changes, but you don't need to include them in source control. You or anyone else who clones the project can always recreate the environment by using the requirements.txt file.
To exclude the virtual environment from source control, in the Changes page, right-click the env folder and select Ignore these local items:

After you exclude the virtual environment, the only remaining changes are to the project file (.py) and the .gitignore file, which contains an added entry for the virtual environment folder.
To see the differences view for the .gitignore file, double-click the file.
Enter a commit message, select Commit All, then push the commits to your remote repository if you like.


Understand purpose of virtual environments
A virtual environment is a great way to isolate your application's exact dependencies. This method of isolation avoids conflicts within a global Python environment, and aids both testing and collaboration. Over time, as you develop an app, you invariably bring in many helpful Python packages. By keeping packages in a project-specific virtual environment, you can easily update the project's requirements.txt file that describes that environment, which is included in source control. When you copy the project to other computers, including build servers, deployment servers, and other development computers, it's easy to recreate the environment. You can recreate the environment by using only the requirements.txt file, which is why the environment doesn't need to be in source control. For more information, see Use virtual environments.
Remove virtual environment under source control
You can remove a virtual environment after it's under source control. Follow these steps:
Edit your .gitignore file to exclude the folder:
Open the file by selecting File > Open > File.
You can also open the file from Team Explorer. On the Settings page, select Repository Settings. Go to the Ignore & Attributes Files section and select the Edit link next to .gitignore.
Locate the section at the end that has the comment
# Python Tools for Visual Studio (PTVS).After that section, add a new line for the virtual environment folder, such as
/BasicProject/env.
Open a command window and go to the folder (such as BasicProject) that has the virtual environment folder, such as env.
Run the
git rm -r envcommand to remove the virtual environment that's currently under source control.Commit your changes with the
git commit -m 'Remove venv'command, or commit them from the Changes page of Team Explorer.
Examine boilerplate code
In this section, you examine the boilerplate code in the Project file (.py) that Visual Studio creates based on your template selection.
Note
The boilerplate code is the same whether you create the project in Visual Studio from the Django template, or generate the project by using the CLI command django-admin startproject <project_name>.
Open Solution Explorer to view your solution and project files. The initial project contains only two files, manage.py and requirements.txt:

The requirements.txt file specifies the Django package dependencies. The presence of this file is what invites you to create a virtual environment when first creating the project.
The manage.py file is the Django command-line administrative utility that Visual Studio automatically sets as the project startup file. You run the utility on the command line by using
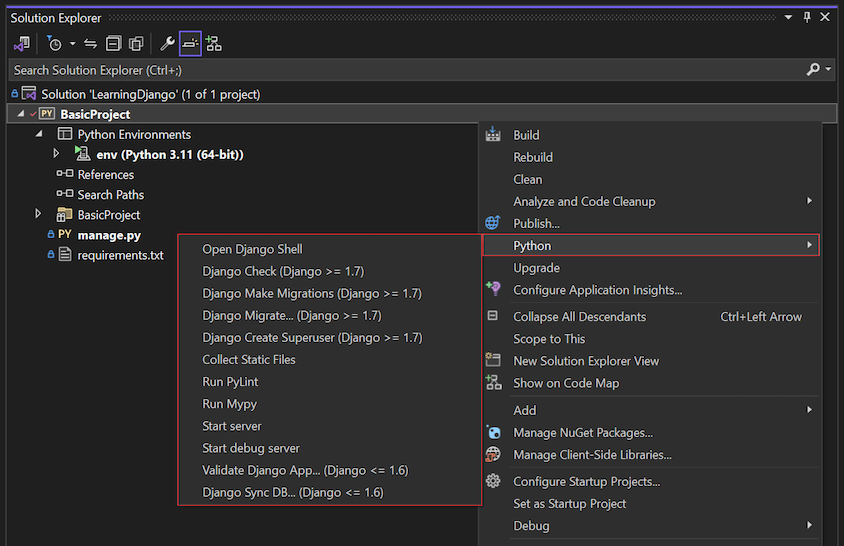
python manage.py <command> [options]command.For common Django tasks, Visual Studio provides convenient menu commands. Right-click the project in Solution Explorer and select Python to see the list of commands. You use several of these commands in this tutorial series.
In addition to the two files, the project also has a subfolder with the same name as the project. This folder contains the basic Django project files:


- __init__.py: An empty file that tells Python that this folder is a Python package.
- settings.py: The settings for the Django project, which you modify when you develop a web app.
- urls.py: A table of contents for the Django project, which you modify as you develop your web app.
- wsgi.py: An entry point for WSGI-compatible web servers to serve your project. You usually leave this file as-is because it provides the hooks for production web servers.


Generate requirements after package install
Visual Studio can generate a requirements.txt file from a virtual environment after you install other packages.
- In Solution Explorer, expand the Python Environments node, right-click your virtual environment, and select Generate requirements.txt.
It's a good practice to use this command periodically as you modify the environment. Commit changes to your requirements.txt file to source control along with any other code changes that depend on that environment. If you set up continuous integration on a build server, you should generate the file and commit changes whenever you modify the environment.
Run the project
Now you're ready to run your project in Visual Studio by following this procedure:
In Visual Studio, select Debug > Start Debugging (F5) or select Web Server on the main toolbar (the browser you see might vary):

Either command runs the server by using the command
manage.py runserver <port>, which starts the built-in web server in Django.The code starts the application by using the specified port within the Django development server.
If Visual Studio posts the message Failed to start debugger and indicates no startup file is found, right-click the manage.py file in Solution Explorer and select Set as Startup File.
When the server starts, a console window opens to display the server log. Visual Studio automatically opens a browser to
http://localhost:<port>. Because your Django project has no apps, Django shows only a default page to confirm the current code is working as expected.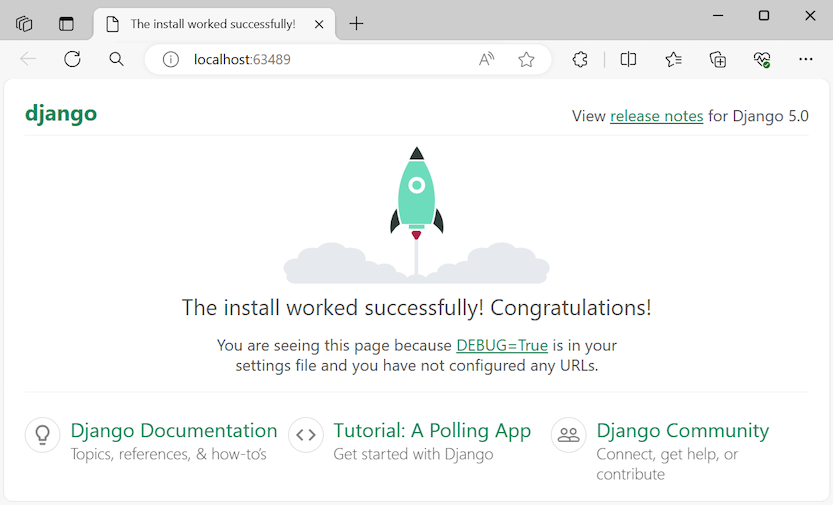
When you're done, close the console window, which stops the Django development server. You can also select Debug > Stop Debugging.


Use Django web server and framework
Django has a built-in web server that you can use for development purposes. When you run your Django web app locally, you use the built-in Django web development server. An example of this scenario is when you debug your Django web app in Visual Studio.
When you deploy your Django web app to a web host, you use the web server on the host rather than the built-in Django web server. The wsgi.py module in the Django project takes care of hooking into the production servers.
Compare Debug commands with project Python commands,
There's a difference between using the Debug menu commands and the server commands listed on the project's Python submenu.
In addition to the Debug menu commands and toolbar buttons, you can also launch the server by using the Python > Start server or Python > Start debug server commands on the project's context menu.

In addition to the Debug menu commands and toolbar buttons, you can also launch the server by using the Python > Run server or Python > Run debug server commands on the project's context menu.
Both commands open a console window in which you see the local URL (localhost:port) for the running server. However, you must manually open a browser with that URL, and running the debug server doesn't automatically start the Visual Studio debugger. You can attach a debugger to the running process later, if you want by using the Debug > Attach to Process command.
Next step
Feedback
Coming soon: Throughout 2024 we will be phasing out GitHub Issues as the feedback mechanism for content and replacing it with a new feedback system. For more information see: https://aka.ms/ContentUserFeedback.
Submit and view feedback for