Customize the workflow (Inheritance process)
Azure DevOps Services | Azure DevOps Server 2022 - Azure DevOps Server 2019
Each work item type is associated with a workflow that supports tracking the status of work as it moves from creation to completion. To support your business and team processes, you can add custom states to most work item types (WITs). For example, you may want to insert a Triaged state for bugs, or a Design state for features or user stories.
Here, the Bug WIT has been customized to support a Triaged state. The state and reason fields appear on the work item form in the header area.

This article addresses the supported workflow customization options and how to customize a workflow. Specifically, you'll learn about:
- Supported workflow customization scenarios
- Impact to team boards when you customize a workflow
- End-to-end workflow customization steps
- How to add or remove a custom workflow state
- How to hide or unhide an inherited workflow state
- How to view a graphic depiction of the state model
For documentation on the workflow for build and release DevOps tasks, see Use Azure Pipelines.
Important
This article applies to Azure DevOps Services and Azure DevOps Server 2019 and later versions. To customize any project defined on a collection for TFS 2018 or earlier, see On-premises XML process model.
Important
You can only use the Inheritance process model for projects defined on a project collection configured to support the Inheritance process model. If your on-premises collection is configured to use the On-premises XML process model, you can only use that process model to customize the work tracking experience. To learn more, see Customize work tracking, Choose the process model for your project collection.
To customize any project defined on a collection for TFS 2018 or earlier, see On-premises XML process model.
Supported customizations
You can customize the workflow of any work item type (WIT) by hiding inherited states or adding custom states. Inherited states differ based on the system process —Agile, Basic, Scrum, or CMMI, —you chose from which to create your custom process.
Each default workflow for each WIT defines between two and four States and specifies the following workflow operations:
- Forward and backward transitions between each state
- Default reasons for each state transition
For example, the Basic process, Issue WIT is characterized by the three States—To Do, Doing, and Done—and transitions shown in the following image.

State types
Supported customizations
![]() Inherited states
Inherited states
Custom states
Workflow states must conform to the following rules
- You must define at least one state for either the Proposed or In Progress State categories
Note
Before adding a workflow state, review Workflow states and state categories to learn how workflow states map to state categories.
- You must define at least two workflow States
- You can define a maximum of 32 workflow States per work item type
Unsupported workflow customizations
- You can't modify an inherited state (you can't change its name, color, or category), but you can hide it
- You can only have one state in the Completed state category. If you add a custom state to the Completed category, any other state is removed or hidden
- You can't change the name of a custom state
- You can't specify a Reason for a state, instead, default reasons are defined such as Moved to state Triaged, Moved out of state Triaged
- You can't change the location of the State and Reason fields on the form
- You can't customize state category names
- You can't modify an inherited state (you can't change its name, color, or category), but you can hide it
- You can only have one state in the Completed state category. The system disallows adding any custom state to this category
- You can't change the name of a custom state
- You can't change the order of states, states are listed in their natural sequence based on their state category within the drop-down list of a work item form
- You can't specify a Reason for a state, instead, default reasons are defined such as Moved to state Triaged, Moved out of state Triaged
- You can't change the location of the State and Reason fields on the form
- You can't restrict transitions, all transitions are defined from any state to another state.
State drop-down menu sequence
The State drop-down menu lists States within the sequence you order them within each state category. For newly added work items, the first State in the Proposed category is assigned as the default State.
The following image illustrates the State sequence defined for User Story and its corresponding drop-down menu.


Within each category, you can move custom states up or down.
Impact to teams with workflow changes
Teams may need to update their Kanban board configuration when the following customizations are made:
- You add a custom State
- You change the category of a custom State
- You add a custom or inherited work item type to a backlog level (Customize your backlogs or boards)
States that you add to the task WIT adds columns to the Taskboard. If you track bugs along with tasks, then states you add to the bug WIT also add columns to the Taskboard. You don't have to add the same states to each of these WITs, however, you may want to do so in order to update the status in the same way and to minimize the number of columns that get added.
Prerequisites
Prior to customizing a process, we recommend that you review Configure and customize Azure Boards, which provides guidance on how to customize Azure Boards to meet your business needs. For a description of the different backlogs and boards, see Tasks supported by Backlogs, Boards, Taskboards, and Plans.
- You must have an organization created in Azure DevOps Services. If you haven't created one yet, do that now.
- To create, edit, and manage processes, you must be a member of the Project Collection Administrators group, or have the corresponding collection-level permissions Create process, Delete process, Edit process, or Delete a field from organization set to Allow. See Set permissions and access for work tracking, Customize an inherited process.
- You must have selected the Inheritance process model for the project collection where the project is created. To learn more, see Choose the process model for your project collection.
- To create, edit, and manage processes, you must be a member of the Project Collection Administrators group, or have the corresponding permissions Create process, Delete process, Edit process, or Delete a field from organization set to Allow. See Set permissions and access for work tracking, Customize an inherited process.
Open Settings>Process
You create, manage, and make customizations to processes from Organization settings>Process.
Choose the
 Azure DevOps logo to open Projects. Then choose Organization settings.
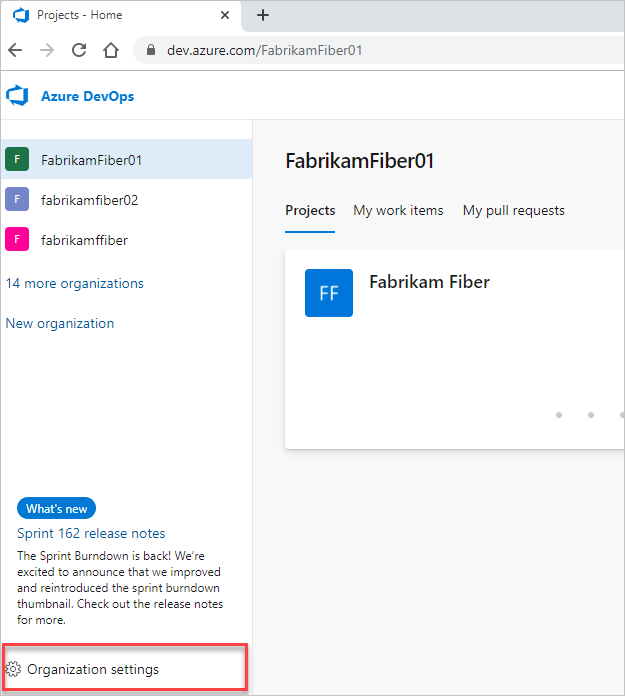
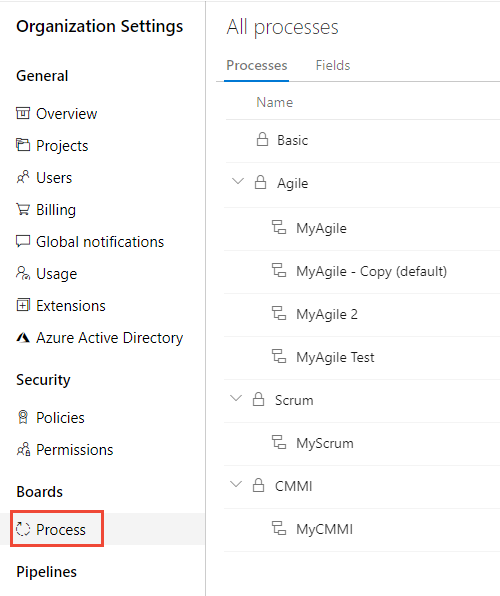
Then, choose Process.
Important
If you don't see Process, then you're working from TFS-2018 or earlier version. The Process page isn't supported. You must use the features supported for the On-premises XML process model.
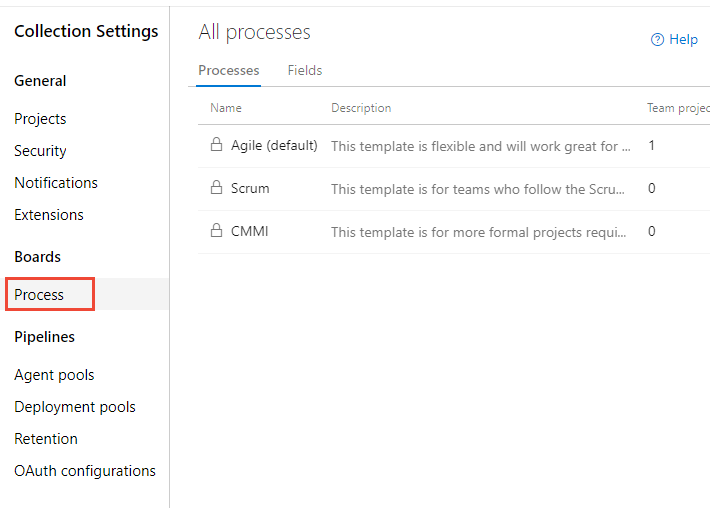
You create, manage, and make customizations to processes from Collection Settings>Process.
Choose the
Azure DevOps logo to open Projects. Choose the project collection whose processes you want to customize, and then choose Collection Settings.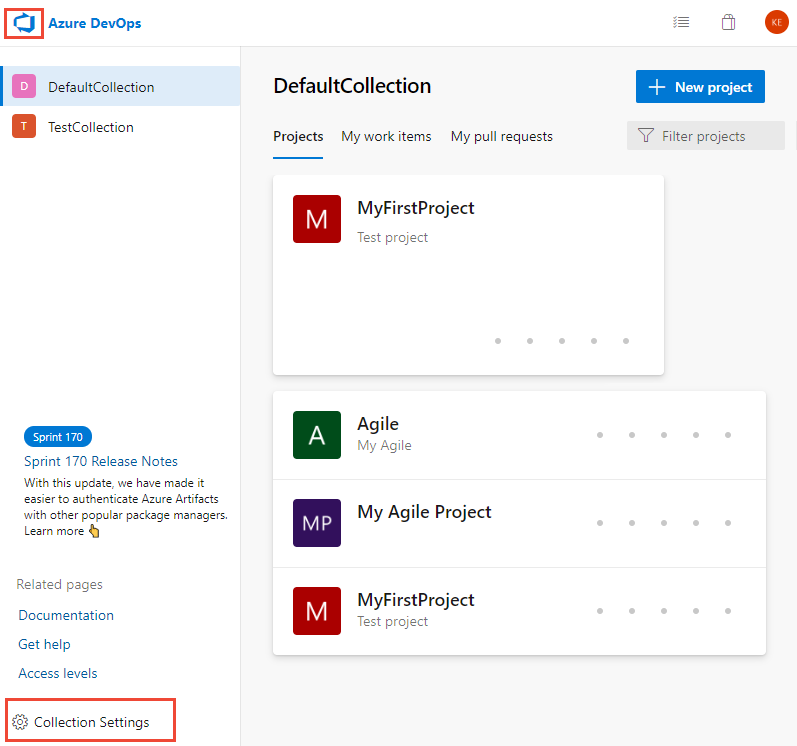
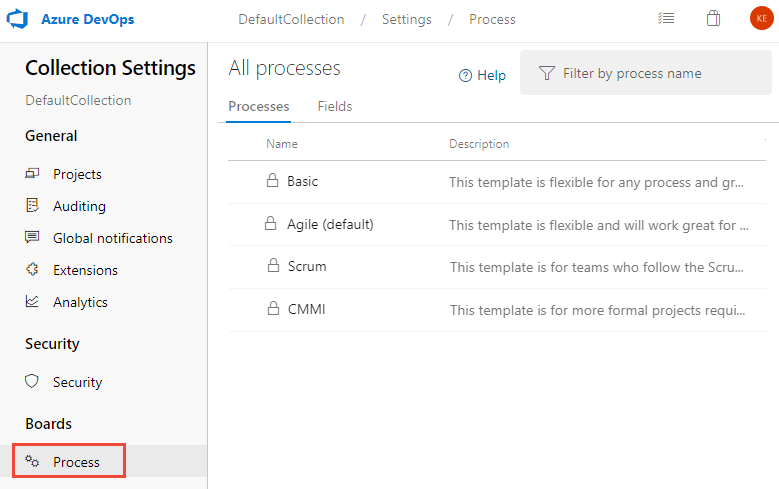
Then, choose Process.
You create, manage, and make customizations to processes from Admin settings>Process.
Choose the
Azure DevOps logo to open Projects. Then choose Admin settings.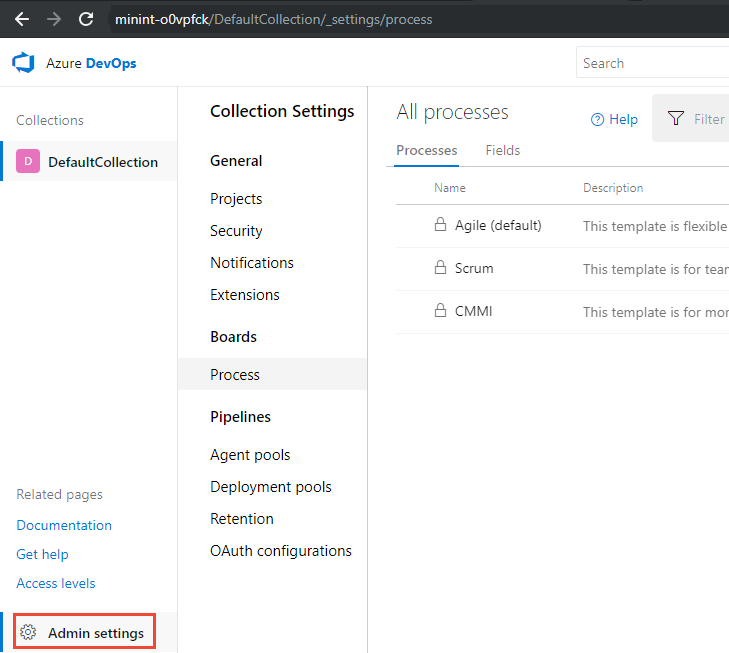
Then, choose Process.
Note
As you customize an inherited process, all projects that use that process are updated automatically to reflect the customizations. For this reason, we recommend that you create a test process and test project when you have a number of customizations to make in order to test the customizations prior to rolling them out to your organization. To learn more, see Create and manage inherited processes.
Add a workflow state
States you add appear in the drop-down menu for the States field shown in work item forms and the query editor. A transition to and from the State you add is created to every other State. Also, default reasons are defined, such as Moved to state Triaged, Moved out of state Triaged.
From the Work Item Types page, choose the work item type you want to modify, choose States, and then choose New State.

If the New state option is disabled, you don't have the necessary permissions to edit the process. See Set permissions and access for work tracking, Customize an inherited process.
Enter the name of the State, choose its category and color, and then click Save. The color you specify appears throughout the product including on the work item form and when the State field appears on a backlog, boards, query results, and more.

Note
Any workflow state you add to the In Progress or Resolved state categories will cause the Activated By/Activated Date and Resolved By/Resolved Date fields to update with workflow state changes in and out of these categories. To learn more, see Query by assignment or workflow changes, Activated By/Date and Resolved By/Date fields.
(Optional) To change the sequence of the State within the drop-down menu, choose the
 context menu icon and choose Move up or Move down.
When you've finished adding states for the WIT, verify your changes by refreshing your browser and open a work item of the type you customized.
Here we show the State drop-down menu with Triaged selected.

Remember, when you add a State to a WIT, which is associated with a backlog level, each team that uses the Kanban board needs to update their column settings.
Edit a state
You can edit the category or the color of a custom state. However, you can't change the name of the custom state.
Choose Edit from the … context menu for the state you want to modify.

Modify the category or color, and then choose Save.
If you change the category, teams that use the Kanban board need to update their column settings.
Hide or remove a custom state
When you hide or remove a state:
- The state no longer appears in the State drop-down menu for the WIT
- No changes occur to the work item history
- Existing work items maintain their state value, but are in an invalid state. If you want to make a change to the work item, you must first update the state values. You may want to create a query and do a bulk update to move the affected work items into a valid state. If you add the state back to the work item type, the work items revert to a valid state.
Hide or unhide an inherited state
You can hide an inherited state that your team doesn't use in its workflow process. However, you must have at least one state defined for each category.
Open the … context menu for the state you want to hide and choose the Hide option.
Here we hide the Resolved state for the Bug WIT.

Note
If you hide the state of a WIT tracked on a Kanban board, each team that uses the Kanban board needs to update their column settings.
To unhide, open the … context menu and choose the Unhide option.
Remove a custom state
Open the … context menu for the state you want to remove, and choose Remove. You can only remove a custom state.
From the Remove State dialog, click Remove.

View the State workflow model
You can view the State workflow model by installing the State Model Visualization Marketplace extension. This extension adds a new hub under Boards labeled State Visualizer. On that page you can choose a work item type and view the workflow state model.
Note
The State Model Visualization extension is not a supported feature of Azure Boards and therefore not supported by the product team. For questions, suggestions, or issues you have when using the extension, visit the extension page.
For example, the following image shows the Bug workflow that has been customized to have a Triaged state. This view illustrates the default transitions of the workflow model. All states can transition from one state to another.

You can zoom in and zoom out of the view. Also, you can move the state nodes around to gain a better view of the state model.
Related articles
Note
You can review changes made to an inherited process through the audit log. To learn more, see Access, export, and filter audit logs.
Feedback
Coming soon: Throughout 2024 we will be phasing out GitHub Issues as the feedback mechanism for content and replacing it with a new feedback system. For more information see: https://aka.ms/ContentUserFeedback.
Submit and view feedback for