Print support app association
Follow the guidance in this article to set up and associate a print support app with a printer.
Important
Starting with the release of Windows 11 SDK (22000.1), Print Support Apps (PSA) are the recommended method of developing UWP apps for printers. To develop a Print Support App for your print device, download and install the Windows 11 SDK (22000.1).
This article discusses the following tasks:
Find a Hardware Id or a Compatible Id for your printer
Prepare a psa.inf extension INF file
Install the psa.inf extension INF file on a Windows 11 PC
PSA association override for enterprise and business customers
Use PSA with Universal Print
Set up printers and find the Hardware Id or Compatible Id
A print support app (PSA) is associated with a printer queue, using a Hardware Id or a Compatible Id.
To find the Hardware Id and Compatible Id for your printer, follow these steps:
Connect the IPP printer to the Windows 11 PC.
In the Windows 11 Settings app, select Bluetooth & devices.
On the Bluetooth & devices page, select Printers & scanners.
Select the IPP printer.
On the IPP printer page, select Hardware properties.
In the printer hardware properties dialog, select the Settings tab.
Click Devices and Printers Folder.
Right-click on the IPP printer and select Properties from the context menu.
On the Hardware tab, select Microsoft IPP Class Driver in the list of Device Functions and then click the Properties button.
In the Microsoft IPP Class Driver Properties dialog, select the Details tab.
In the Property drop-down list, select Hardware Ids (or Compatible Id).
Copy the Hardware Id string (it starts with "PSA_") in the Value list. You need this for extension INF, or alternatively, the Compatible Id (which doesn't start with "PSA_").
Prepare the PSA extension INF file
A PSA is associated with a printer by using an extension INF file.
The following steps create and test an extension INF file:
Copy the psa.inf sample extension INF shown below as a starting point for your INF file.
Update PrinterHardwareId in psa.inf file with your Hardware Id or Compatible Id.
Update the PackageFamilyName and AUMID (AppUserModeId) for your PSA application.
Create a catalog file.
Sign the psa.cat file sample extension INF.
psa.inf sample extension INF file
[Version]
Signature = "$WINDOWS NT$"
Class = Extension
ClassGuid = {e2f84ce7-8efa-411c-aa69-97454ca4cb57}
Provider = %ManufacturerName%
ExtensionId = {D4D9196A-105B-4B76-B693-84BD33A7A703}
CatalogFile = psa.cat
DriverVer = 05/19/2020,16.35.13.542
PnpLockdown = 1

[Manufacturer]
%ManufacturerName% = Microsoft, NTamd64.6.3

[Microsoft.NTamd64.6.3]
%Device.ExtensionDesc% = PSA-Install, %PrinterHardwareId%
%Device.ExtensionDesc% = PSA-Install, %PrinterHardwareId2%
%Device.ExtensionDesc% = PSA-Install, %PrinterHardwareId3%

[PSA-Install.NT]
AddProperty = Add-PSA-Property

[PSA-Install.NT.Software]
AddSoftware = %SoftwareName%,, Microsoft-PSA-SoftwareInstall

[Microsoft-PSA-SoftwareInstall]
SoftwareType = %MicrosoftStoreType%
SoftwareID = pfn://%PackageFamilyName%

[Add-PSA-Property]
{A925764B-88E0-426D-AFC5-B39768BE59EB}, 1, 0x12,, %AUMID%

[Strings]
ManufacturerName = "Microsoft"
SoftwareName = "Microsoft Print Support App"
Device.ExtensionDesc = "Print Support App Extension"
MicrosoftStoreType = 2
PackageFamilyName = "dd5de805-d9bb-4785-88e9-399cbff2130e_ph1m9x8skttmg"
AUMID = "dd5de805-d9bb-4785-88e9-399cbff2130e_ph1m9x8skttmg!App"
PrinterHardwareId = "PSA_CanoniP110_seriesD84F"
PrinterHardwareId2 = "PSA_XeroxAltaLink_B8055C036"
PrinterHardwareId3 = "PSA_BrotherMFC-J775DWF678"
Test install extension INF on Windows 11
Import your root certificate to the trusted store, if you used a self-signed certificate to sign the .cat file.
Open an elevated command prompt and run the following command:
pnputil.exe /add-driver psa.inf
PSA association override for enterprise and business customers
For consumer and home users, PSA is downloaded from the Microsoft Store and installed based on the printer's hardware Id or compatible Id. This feature is supported for enterprise and business customers as well, if they choose to use the PSA from their printer manufacturer. Association is controlled by the extension INF published on Windows Update by printer manufacturers.
Enterprise and business customers may need to override extension INF association, if they choose to use a business logic PSA (for example, a line of business app). They need to deploy and associate a custom PSA that has built-in business logic. Examples of the business logic are managing print quota and cost, or print policy (no color or no single side printing).
A registry key can be used to override a PSA association from an extension INF. This registry key method can be used for enterprise customers with Windows Print Server (Point and Print) and Universal Print.
Here's a ranking of how PSA is associated:
Printer manufacturers' custom v3/v4 driver is downloaded from Windows Update (no PSA is used)
Registry key is used to associate PSA
Extension INF is used to associate PSA
IPP printing without PSA
We recommend that enterprise customers use Microsoft Endpoint Manager to distribute the registry key. They can use Endpoint Manager to deploy a custom PSA as well.
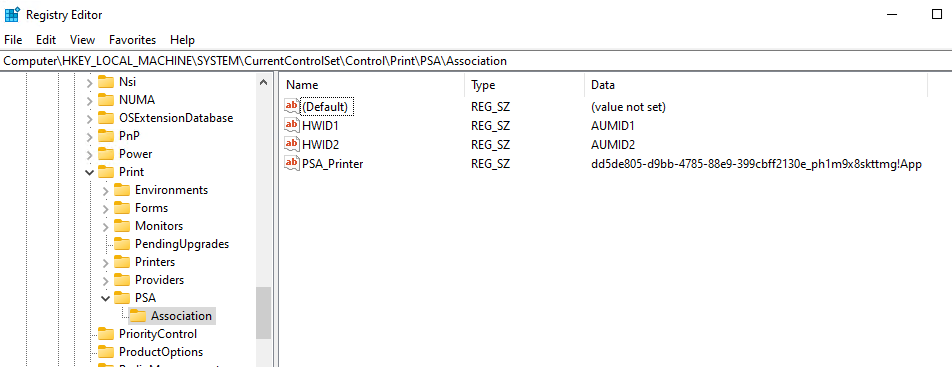
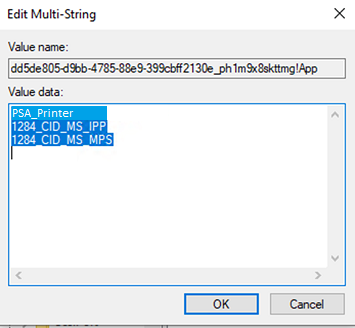
The registry key is defined as follows:
| Key item | Value |
|---|---|
| Registry key path | HKEY_LOCAL_MACHINE\SYSTEM\CurrentControlSet\Control\Print\PSA\Association |
| Name | Hardware Id or Compatible Id |
| Type | REG_SZ |
| Value | PSA AUMID, for example, "dd5de805-d9bb-4785-88e9-399cbff2130e_ph1m9x8skttmg!App" |
The PSA key in Registry Editor:
The Value name and Value data in the Edit Multi-String dialog:
Using PSA with Universal Print
You can associate PSA with printers that natively support Universal Print.
Important
Printers using Universal Print Connector are not supported by Microsoft for use with PSA. However, in some instances, printers using Universal Print Connector may be supported by the original equipment manufacturer ("OEM") that provides the PSA and printer hardware. Please check with your OEM. The OEM, and not Microsoft, will be responsible for issues related to this OEM enablement and support.
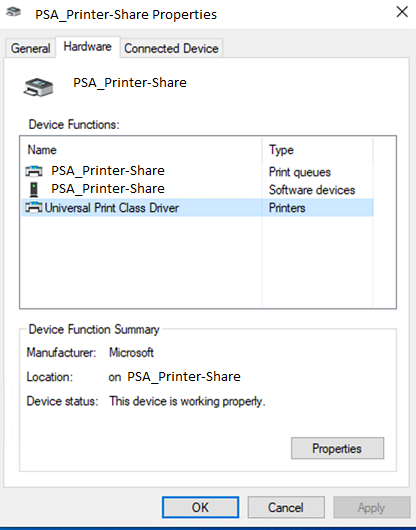
You can find the Hardware Id of a Universal Print printer in the Windows 11 Settings app, similar to a local IPP printer:
In the Windows 11 Settings app, select Bluetooth & devices.
On the Bluetooth & devices page, select Printers & scanners.
Select the Universal Print printer.
On the Universal Print printer page, select Hardware properties.
In the printer hardware properties dialog, select the Settings tab.
Click Devices and Printers Folder.
Right-click on your printer and select Properties from the context menu.
On the Hardware tab, select Universal Print Class Driver in the list of Device Functions and then click the Properties button.
In the properties dialog, select the Details tab.
In the Property drop-down list, select Hardware Ids.
The Hardware Id is the printer-device-id IPP attribute from the printer.
Related articles
Print support app design guide
Windows.Graphics.Printing.PrintSupport
Feedback
Coming soon: Throughout 2024 we will be phasing out GitHub Issues as the feedback mechanism for content and replacing it with a new feedback system. For more information see: https://aka.ms/ContentUserFeedback.
Submit and view feedback for