Create Windows Universal OEM Packages
The Windows Universal OEM packaging standard is supported on Windows IoT Core, version 1709.
This new packaging schema is built to be compatible with more types of devices in the future. If you've built packages for IoT Core devices using the legacy packaging standard (pkg.xml), and you'd like to use them on IoT devices, you can convert them to the new packaging standard.
Packages
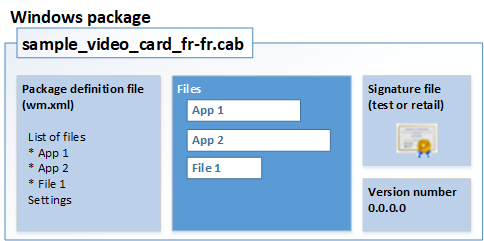
Packages are the logical building blocks used to create IoT Core images.
- Everything you add is packaged. Every driver, library, registry setting, system file, and customization that you add to the device is included in a package. The contents and location of each item are listed in a package definition file (*.wm.xml).
- Packages can be updated by trusted partners. Every package on your device is signed by you or a trusted partner. This allows OEMs, ODMs, developers, and Microsoft work together to help deliver security and feature updates to your devices without stomping on each other's work.
- Packages are versioned. This helps make updates easier and makes system restores more reliable.
Packages fall into three main categories:
- OS kit packages contain the core Windows operating system
- SoC vendor prebuilt packages contain drivers and firmware that support the chipset
- OEM packages contain device-specific drivers and customizations
Learn about how to combine these packages into images for devices.
Start by creating a new empty package
Install Windows ADK for Windows 10, version 1709, as well as the other tools and test certificates described in Get the tools needed to customize Windows IoT Core and Lab 1a: Create a basic image.
Use a text editor to create a new package definition file (also called a Windows Manifest file) based on the following template. Save the file using the wm.xml extension.
<?xml version='1.0' encoding='utf-8' standalone='yes'?>
<identity
  xmlns="urn:Microsoft.CompPlat/ManifestSchema.v1.00"
  xmlns:xsd="http://www.w3.org/2001/XMLSchema"
  xmlns:xsi="http://www.w3.org/2001/XMLSchema-instance"
  name="MediaService"
  namespace="Media"
  owner="OEM"
  >
</identity>
Create the empty package file (*.cab). The filename created is based on the owner, namespace, and name from the file.
c:\oemsample>pkggen myPackage.wm.xml /universalbsp

Directory of c:\oemsample

04/03/2017  05:56 PM    <DIR>          .
04/03/2017  05:56 PM    <DIR>          ..
04/03/2017  05:43 PM               333 myPackage.wm.xml
04/03/2017  05:56 PM             8,239 OEM-Media-MediaService.cab
Add content to a package
The contents of a package are organized as a list of XML elements in the package definition file.
The following example demonstrates how to add some files and registry settings to a package. This example defines a variable (_RELEASEDIR) that can be updated each time you generate the package.
<?xml version='1.0' encoding='utf-8' standalone='yes'?>
<identity
    xmlns="urn:Microsoft.CompPlat/ManifestSchema.v1.00"
    xmlns:xsd="http://www.w3.org/2001/XMLSchema"
    xmlns:xsi="http://www.w3.org/2001/XMLSchema-instance"
    name="MediaService"
    namespace="Media"
    owner="OEM"
    >
  <files>
    <file source="$(_RELEASEDIR)\MediaService.dll"/>
  </files>
  <regKeys>
    <regKey keyName="$(hklm.software)\OEMName\MediaService">
      <regValue
          name="StringValue"
          type="REG_SZ"
          value="MediaService"
          />
      <regValue
          name="DWordValue"
          type="REG_DWORD"
          value="0x00000020"
          />
    </regKey>
  </regKeys>
</identity>
Run the pkggen.exe tool
PkgGen.exe [project] /universalbsp ...
  [project]··········· Full path to input file : .wm.xml, .pkg.xml, .man
                       Values:<Free Text> Default=NULL

  [universalbsp]······ Convert wm.xml BSP package to cab
                       Values:<true | false> Default=False

  [variables]········· Additional variables used in the project file,syntax:<name>=<value>;<name>=<value>;....
                       Values:<Free Text> Default=NULL

  [cpu]··············· CPU type. Values: (x86|arm|arm64|amd64)
                       Values:<Free Text> Default="arm"

  [languages]········· Supported language identifier list, separated by ';'
                       Values:<Free Text> Default=NULL

  [version]··········· Version string in the form of <major>.<minor>.<qfe>.<build>
                       Values:<Free Text> Default="1.0.0.0"

  [output]············ Output directory for the CAB(s).
                       Values:<Free Text> Default="CurrentDir"
Example:
c:\oemsample>pkggen myPackage.wm.xml /universalbsp /variables:"_RELEASEDIR=c:\release"
Add a driver component
In the package definition file, use the driver element to inject drivers. We recommend using relative paths, as it's typically the simplest way to describe the INF source path.
  <drivers>
    <driver>
      <inf source="$(_RELEASEDIR)\Media.inf"/>
    </driver>
  </drivers>
If the default file import path is not equal to the INF source path, you can use the defaultImportPath attribute. In the following example, the INF is in the current directory, but the files to be imported are relative to $(_RELEASEDIR).
  <drivers>
    <driver defaultImportPath="$(_RELEASEDIR)">
      <inf source="Media.inf"/>
    </driver>
  </drivers>
If files to be imported are not relative to how they are defined in the INF, file overrides can be applied. This is not recommended, but is available for special cases.
  <drivers>
    <driver>
      <inf source="Media.inf"/>
      <files>
         <file name="mdr.sys" source="$(_RELEASEDIR)\path1\mdr.sys" />
         <file name="mdr.dll" source="$(_RELEASEDIR)\path2\mdr.dll" />
      </files>
    </driver>
  </drivers>
Add a service component
In the package definition file, use the service element (and its child elements and attributes) to define and package a system service.
   <service
      dependOnService="AudioSrv;AccountProvSvc"
      description="@%SystemRoot%\system32\MediaService.dll,-201"
      displayName="@%SystemRoot%\system32\MediaService.dll,-200"
      errorControl="normal"
      imagePath="%SystemRoot%\system32\svchost.exe -k netsvcs"
      name="MediaService"
      objectName="LocalSystem"
      requiredPrivileges="SeChangeNotifyPrivilege,SeCreateGlobalPrivilege"
      sidType="unrestricted"
      start="delayedAuto"
      startAfterInstall="none"
      type="win32UserShareProcess"
      >
Build and Filter WOW Packages
To build Guest or WOW packages (32 bit packages to run on 64 bit devices) add the buildWow="true" attribute to myPackage.wm.wml
<identity
    xmlns="urn:Microsoft.CompPlat/ManifestSchema.v1.00"
    xmlns:xsd="http://www.w3.org/2001/XMLSchema"
    xmlns:xsi="http://www.w3.org/2001/XMLSchema-instance"
    name="MediaService"
    namespace="Media"
    owner="OEM"
    buildWow="true"
    >
Running PkgGen.exe with now generate one WOW package for each host package.
04/05/2017  07:59 AM            11,870 OEM-Media-MediaService.cab
04/05/2017  07:59 AM            10,021 OEM-Media-MediaService_Wow_arm64.arm.cab
Typically, the 64 bit device will get its Host 64 bit package and either its Guest 32 bit or WOW package, both generated from myPackage.wm.xml. To avoid resource conflicts between the two packages, use build filters:
  <regKeys buildFilter="not build.isWow and build.arch = arm" >
    <regKey keyName="$(hklm.software)\OEMName\MediaService">
      <regValue
          name="StringValue"
          type="REG_SZ"
          value="MediaService"
          />
    </regKey>
In this case, the registry keys are exclusive to the Host 32 bit Arm package. The CPU switch is used to set build.arch, and build.isWow is set by PkgGen to false when building the 32 bit Host Package, then true when building the 32 bit Guest or WOW package.
[cpu]··············· CPU type. Values: (x86|arm|arm64|amd64)
                     Values:<Free Text> Default="arm"
Converting Windows Universal OEM Packages
If you've created packages using the pkg.xml packaging model, and you want to use them on Windows IoT Core, version 1709, you'll need to either recreate your packages, or convert them using the pkggen.exe tool.
After you convert the packages, you may need to modify the wm.xml file to make sure that it follows the schema.
IoT Core Add-ons v4.x support the new Windows Universal OEM Packages standard (wm.xml). This new packaging schema is built to be compatible with more types of devices in the future.
Convert your package files
To convert your existing packages created in the legacy phone packaging format (pkg.xml) to the new wm.xml format:
pkggen.exe "filename.pkg.xml" /convert:pkg2wm
Or, from the IoTCoreShell prompt, convert using either convertpkg or buildpkg. The output wm.xml files are saved to the same folder.
convertpkg.cmd MyPackage.pkg.xml
buildpkg.cmd MyPackage.pkg.xml
Review and test the wm.xml packages with buildpkg.
buildpkg.cmd MyPackage.wm.xml
After you’ve converted the files to wm.xml format, it’s safe to delete the pkg.xml files.
Regenerate your app packages
Use the newAppxPkg with the same component name. This regenerates the customizations.xml file. The version number of the appx is retained as the version number for ppkg.
newAppxPkg "C:\DefaultApp\IoTCoreDefaultApp_1.2.0.0_ARM_Debug_Test\IoTCoreDefaultApp_1.2.0.0_ARM_Debug_Test.appx" fga Appx.MyUWPApp
Learn more: Add apps.
Adding files: watch out for zero-sized files, relative paths
Zero-sized files are not supported in wm.xml. To work around this, add an empty space in the file, making it non-zero size file.
Paths: When you’re adding files that are in the current directory, you’ll need to explicitly add the .\ prefix to the file name.
<BinaryPartition ImageSource=".\uefi.mbn" />
Learn more: Add files
Update your provisioning package customization.xml file
In ADK version 1709, you’ll need to update the customizations.xml file:
In your product\prov folder, manually move Common/ApplicationManagement to Common/Policies/ApplicationManagement
    <Customizations>
      <Common>
        <Policies>
          <ApplicationManagement>
            <AllowAppStoreAutoUpdate>Allowed</AllowAppStoreAutoUpdate>
            <AllowAllTrustedApps>Yes</AllowAllTrustedApps>
          </ApplicationManagement>
Provisioning packages (PPKG) now support four-part versioning similar to the package versioning. So with this change, version 1.19 > 1.2. Previous versions used character-based sorting, so version 1.19 was considered earlier than 1.2.
Learn more: Add provisioning files