Troubleshooting
This is an article that contains common troubleshooting issues that people have come across.
Tip
To find something specific, use Ctrl+F to find a word or phrase.
Identifying SKU
GetProductInfo API identifies the IoT Core SKU/Edition information.
Edition/Product ID will be baked into the image.
PRODUCT_IOTUAP:
0x0000007B = Windows 10 IoT Core
You can find more information about edition IDs here.
Mapping hardware vkeys on Windows 10 IoT Core
Switch to reporting as a HID keyboard and sending VKs instead of consumer controls.
Minimizing memory allocation
If you want to minimize OS controlled memory and processing for display, make sure that the OS is clear and that no display is attached. Make sure the Intel INF settings are not faking a display when none is attached and configure any outputs to be external DisplayPort. This should result in DWM running but acting as if the monitor is idle.
Retrieving lots and getting crash dumps
For UWP apps specifically:
- Get your app store-signed and you'll receive telemetry through the app portal on Dev Center. You will receive cal stacks, but not full dumps.
- You can use WerRegisterAppLocalDump to get your app to dump logs and then you can have the app upload them to wherever you like.
- Additionally, you can instrument even further with VSAppCenter or HockeyApp.
For system issues (NTServices, OS stability or driver):
- We are working on a Partner Telemetry Insights portal to enable customers to receive call stacks and info on crashing services, OS components, and drivers.
- You can have a custom script or exe to harvest dmp files from the device.
- You can use Azure IoT DM to configure ETW tracing on the device as required and capture logs.
- You can build a custom exe to call into wevtapi.dll and record the last shutdown reason.
Running SLEEPSTUDY
If you run into the error 0x080004005 while trying to run SLEEPSTUDY in Windows 10 IoT Core, you will need to do the following to generate a SLEEPSTUDY report:
- From SSH/PowerShell, run this command on IoT COre;
powercfg / sleepstudy / xml - This will generate a "sleepstudy-report.xml".
- Copy the generated sleepstudy-report.xml report to a desktop machine and run "powercfg/sleepstudy/transformxml sleepstudy-report.xml"
- The final sleepstudy-report.html will be generated.
Servicing apps and dealing with NTServices
Fast app iterations can be done with the App Store or using Azure Blob. With the app store, you do not have to pay for the CDN and egrees. There is also worldwide CDN coverage for free with the store. It is a good rule of thumb to get a Store ID and Store Update ready when shipping for a fast app update.
Setting Bluetooth Class of Device to "not a PC"
For good interop and Bluetooth compatibility, it’s important that the Bluetooth stack indicates a proper class of device (COD). The various values are defined by the standard are here. By default, Windows reads the form factor data from the SmBios enclosure type value (See table 17 on page 38) and derives the Major Device Class and Minor Device Class fields of the CoD from that. If a platform wants to override the default COD assigned via the enclosure type, it can do so by setting the “COD Major” and “COD Type” values documented here.
Setting the computer name
IoT has a built-in Win32 tool called “SetComputerName”. This can be called to change the computername. A reboot is required to change the name. Unfortunately, this utility must be called from the administrator context and UWP apps run in the DefaultAccount user context. One way to workaround this is to run a batch file from a manually triggered scheduled task that calls SetComputerName. The batch file, will need to read the desired computername from a text file that your main UWP app will save the name into. For example, the UWP app could could save a file to the public documents folder and the batch file would read it from there. The UWP app would then need to use the process launcher (to trigger the scheduled task to run (e.g. schtasks /run /TN “SetMyComputerNameTask”) Read processlauncher docs here Read schTasks docs here
ASUS Tinkerboard and Rockchip support
While the ASUS Tinkerboard and Rockchip are not officially supported by us, there are cases where Rockchip has worked with other third parties to get SoC working on Windows 10 IoT Core.
Issue when connecting an MBM device when roaming
There are two things to consider when enabling roaming:
The profile.xml configures roaming and sets the behavior to automatically establish a connection to the cellular network. To set a profile for roaming, please refer to this article.
  <!-- applicability to any combination of home carrier, partner MOs and non-partner MOs, except for HomeAndNonPartner -->
  <xs:simpleType name="roamApplicabilityType">
    <xs:restriction base="xs:token">
       <xs:enumeration value="NonPartnerOnly"/>
       <xs:enumeration value="PartnerOnly"/>
       <xs:enumeration value="HomeOnly"/>
       <xs:enumeration value="HomeAndPartner"/>
       <xs:enumeration value="PartnerAndNonpartner"/>
       <xs:enumeration value="AllRoaming"/>
    </xs:restriction>
  </xs:simpleType>

  <xs:simpleType name="roamControlType">
    <xs:restriction base="xs:token">
       <xs:enumeration value="AllRoamAllowed"/>
       <xs:enumeration value="PartnerRoamAllowed"/>
       <xs:enumeration value="NoRoamAllowed"/>
    </xs:restriction>
  </xs:simpleType>
To set a profile for automatic connection, select "auto":
<!-- Connection Mode, default is "manual" -->
    <xs:element name="ConnectionMode" minOccurs="0">
      <xs:simpleType>
        <xs:restriction base="xs:string">
          <!-- manual connect always -->
          <xs:enumeration value="manual" />
          <!-- auto connect always -->
          <xs:enumeration value="auto" />
          <!-- auto connect when not roaming -->
          <xs:enumeration value="auto-home"/>
        </xs:restriction>
      </xs:simpleType>
    </xs:element>
Another factor is that the per-interface roaming policy must be satisfied. By default, that policy is set to FALSE ("home carrier only"). This can be queried and changed in command line via
netsh mbn get/set dataroamcontrol.Example:
    netsh mbn show dataroamcontrol int=*
    netsh mbn set dataroamcontrol interface=Cellular profileset=all state=all
    netsh mbn set dataroamcontrol help
You may get error 0x139f (ERROR_INVALID_STATE) in the case when the device is roaming but the roaming policy disallows data roaming - error on a connect request sent to wwansvc.
Raspberry Pi 3B+ booting issues
Note
This release for the Raspberry Pi 3B+ is an unsupported technical preview. Limited validation and enablement has been completed. For a better evaluation experience and for any commercial products, please use the Raspberry Pi 3B or other devices with supported Intel, Qualcomm, or NXP SoCs. For troubleshooting issues with the Raspberry Pi 3B+, please see our Troubleshooting Guide, here.
The Raspberry Pi 3 Model B+ is the latest product in the Raspberry Pi 3 range, boasting a 64-bit quad core processor running at 1.4GHz, dual-band 2.4GHz and 5GHz wireless LAN, Bluetooth 4.2/BLE, faster Ethernet, and PoE capability via a separate PoE HA.
Recently, many customers who are interested in Windows 10 IoT Core encountered a problem where the device could not boot normally after flashing Windows 10 IoT Core, but the Raspbian works fine on it. The following are some suggestions on how to troubleshoot the boot problem.
There are some known issues in this Insider Preview image. Please note that:
- This image is only meant for the Raspberry Pi 3B+ and will not boot on the Raspberry Pi 2.
- F5 driver deployment from Visual Studio does not work on Windows 10 IoT Core.
- Onboard Wi-Fi and Bluetooth do not work on the Raspberry Pi 3B+.
- Ft5406 touch screen driver is disabled on the Raspberry Pi 3B+.
- SD card activity LED is disabled.
There are only two requirements when choosing which SD cards to use with Windows 10 IoT Core. You need to use a class 10 SD card and make sure the card has enough space - at least 8 GB of space. There are a couple of SD cards that have been verified by Microsoft to be compatible with Windows 10 IoT Core:
- Samsung EVO 32 GB class 10 Micros SDHC card
- SanDisk Ultra Micro SDHC, 16 GB card
Generally, you need to check if the SD card is fake or if it is damaged or corrupt. The SD card is equally prone to corruption due to a variety of factors such as power shortage or improper removal. It is important to safeguard your memory card from damage.
To flash your image to an SD card, you can use the Windows 10 IoT Core Dashboard. You will need to choose "Custom" in the OS Build field, then select the FFU file to flash.
Check to see if there are any hardware failure in the device. There are two LEDs on the Raspberry Pi 3B+ board, same as the 3B. One is for PWR, while the other is for ACT. The number of blinks the ACT light makes will determine whether or not your board is booting. The SD card activity LED will not flash during some portions of booting on the Raspberry Pi 3B+.
When the device is booting and the device shows the waiting page, please wait patiently. Generally, this will last up to a minute. But sometimes, due to the SD card read-write speed, it may take longer.
If the device can't boot normally with Windows 10 IoT Core, you can try to flash a Linux OS (such as Raspbian) to the SD card to narrow down whether the issue is caused by hardware.
If you find that you're getting a "rainbow screen", please check to make sure that you flashed the 3B+ release version, available here. You can verify your process with a community-submitted 3B+ flashing tutorial here.
Serial Port communication on Windows 10 IoT Core for Raspberry Pi
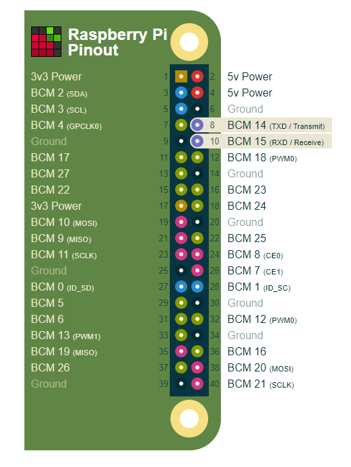
On the Raspberry Pi, hardware UART and USB UART adapters both are usable for your application with serial communication. By default, the UART transmit and receive pins are pins 8 and 10 on the GPIO header.
You can read this article to learn more about how to initialize UART0 and perform a write followed by a read.
In addition, Radio Frequency Communication (RFCOMM) is the underlying serial communications for classic Bluetooth. Refer to this GitHub sample to learn about running UWP apps on Windows 10 IoT Core to connect over an IoT device with Bluetooth Serial.
If you encounter that the device cannot read/write data through the serial port, follow the steps below to troubleshoot:
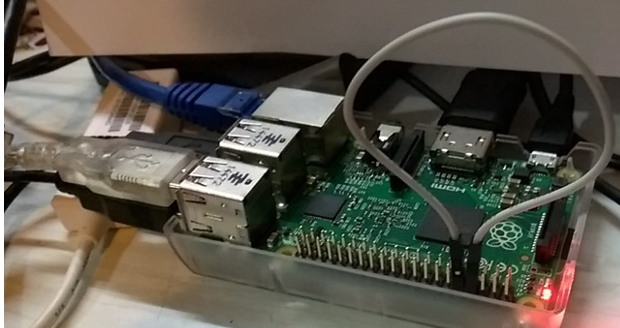
Connect the TX to RX with Jumper - shown below - then run the sample code to check if the app can read/write data. If this does not work, the IC on the board may be broken.
Make sure the BaudRate, Handshaking, and StopBits are configured correctly. If the serial port to be tested has a complete RS232 interface (e.g. DB9), use a DB plug with the RxTx crossover wires connected with the typical handshaking crossovers. Some RS232 ports (or USB adapters) require signals such as Carrier Detect (DCD) and DCE Ready (DSR) to be asserted before they function properly.
If you want to use USB UART adapters on Windows 10 IoT Core, the following are supported:
- CP2102 USB 2.0
- TTL Module Serial Converter
- FTDI
- Generic usbser.sys
You can also use the devcon.exe stack and devcon.exe status cmdlet to check the expected drivers stack and drivers status on Windows 10 IoT Core.
USB\VID_10C4&PID_EA60\0001
    Name: Silicon Labs CP210x USB to UART Bridge
    Setup Class: {4d36e978-e325-11ce-bfc1-08002be10318} Ports
    Controlling service:
        silabser
Mincomm is another helpful tool to troubleshoot serial port issues. This tool can enumerate ports, give you their friendly name and Device ID, open ports, configure settings (i.e. baud rate, stop bits, etc.) and send and receive data.
Sirep Test service
Even though the Sirep Test service is not enabled by default in retail images, in case you still want to disable the Sirep service on startup, you can login and disable Sirep from autostart.
You can use the following PowerShell commands to do so, as shown below:
administrator@MINWINPC C:\Data\Users\administrator>sc stop TestSirepSvc

SERVICE_NAME: TestSirepSvc
       TYPE               : 20  WIN32_SHARE_PROCESS
        STATE              : 3  STOP_PENDING
                                (STOPPABLE, NOT_PAUSABLE, ACCEPTS_PRESHUTDOWN)
        WIN32_EXIT_CODE    : 0  (0x0)
        SERVICE_EXIT_CODE  : 0  (0x0)
        CHECKPOINT         : 0x4
        WAIT_HINT          : 0x1770

administrator@MINWINPC C:\Data\Users\administrator>sc query TestSirepSvc

SERVICE_NAME: TestSirepSvc
        TYPE               : 20  WIN32_SHARE_PROCESS
        STATE              : 1  STOPPED
        WIN32_EXIT_CODE    : 0  (0x0)
        SERVICE_EXIT_CODE  : 0  (0x0)
        CHECKPOINT         : 0x0
        WAIT_HINT          : 0x0

administrator@MINWINPC C:\Data\Users\administrator>sc config TestSirepSvc start=disabled
[SC] ChangeServiceConfig SUCCESS
Tablet mode
"Tablet Mode" is a concept that only exists on Desktop shell and doesn’t apply to IoT Core.
If the device has supported hardware (either through I2C or USB HID touch), touch should function automatically using the inbox class drivers. You can read more about this here.
Yubikey support
Windows 10 IoT Core does not have smart card support. However, smart cards are usually devices used for user identity and not device identity because they are secured with PINs and, in the case of the Yubikey, a button to press. This does not harmonize with an IoT device. If you're looking for an alternative, a TPM 2.0 on the device may serve better than a Yubikey or smart card. We have full certificate support for TPMs and they are meant to store devices as well as user certificates and Azure IoT access credentials (Limpets).