Managed debugging with Unity
Follow these steps to attach a managed debugger to your Unity IL2CPP UWP build for HoloLens and HoloLens 2.
You'll need to be on a network that supports multicast.
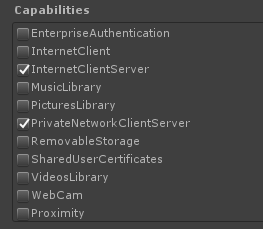
Go to UWP Publishing Settings Capabilities (File -> Build Settings -> Player Settings, find 'Publishing Settings' section), and check InternetClientServer and PrivateNetworkClientServer:
Configure the Unity UWP build settings:
- Development Build
- Script Debugging
- Wait for Managed Debugger (optional)

Build in Unity.
Build and deploy from the Visual Studio solution to your device. You should build with the Debug or Release configurations. The Master configuration disables the Unity profiler and can prevent optimal debugging. Optionally, verify Internet (Client & Server) and Private Networks (Client & Server) in the capabilities list in Package.appxmanifest in the solution.
Make sure your device is connected to the same network as your PC and start the app on your device.
Make sure the device is not connected to your PC via USB.
Double-click one of your scripts in Unity and go to the Visual Studio solution that opens to view and edit.
Debug -> Attach Unity Debugger.

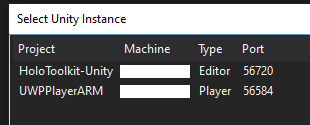
Select your device in the list and click "OK" to attach.
See also
Feedback
Coming soon: Throughout 2024 we will be phasing out GitHub Issues as the feedback mechanism for content and replacing it with a new feedback system. For more information see: https://aka.ms/ContentUserFeedback.
Submit and view feedback for