How to add near interactivity — MRTK2
Near interactions come in the form of touches and grabs. Touch and grab events are raised as pointer events by the PokePointer and SpherePointer, respectively.
Three key steps are required to listen for touch and/or grab input events on a particular GameObject.
- Ensure the relevant pointer is registered in the main MRTK Configuration Profile.
- Ensure the desired GameObject has the appropriate grab or touch script component and
Unity Collider. - Implement an input handler interface on an attached script to the desired GameObject to listen for the grab or touch events.
Add grab interactions
Ensure a SpherePointer is registered in the MRTK Pointer profile.
The default MRTK profile and the default HoloLens 2 profile already contain a SpherePointer. One can confirm a SpherePointer will be created by selecting the MRTK Configuration Profile and navigating to Input > Pointers > Pointer Options. The default
GrabPointerprefab (Assets/MRTK/SDK/Features/UX/Prefabs/Pointers) should be listed with a Controller Type of Articulated Hand. A custom prefab can be utilized as long as it implements theSpherePointerclass.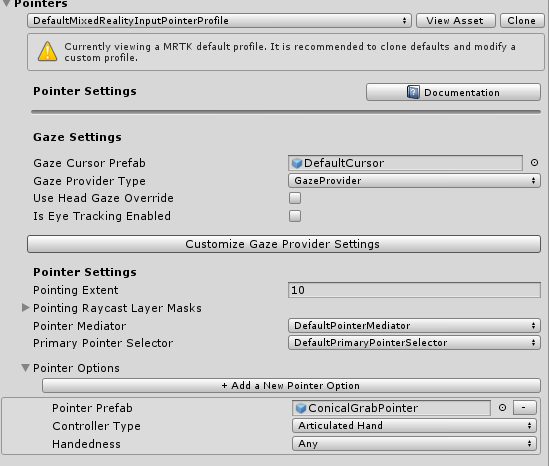
The default grab pointer queries for nearby objects in a cone around the grab point to match the default HoloLens 2 interface.

On the GameObject that should be grabbable, add a
NearInteractionGrabbable, as well as a collider.Make sure the layer of the GameObject is on a grabbable layer. By default, all layers except Spatial Awareness and Ignore Raycasts are grabbable. See which layers are grabbable by inspecting the Grab Layer Masks in your GrabPointer prefab.
On the GameObject or one of its ancestors, add a script component that implements the
IMixedRealityPointerHandlerinterface. Any ancestor of the object with theNearInteractionGrabbablewill be able to receive pointer events, as well.
Grab code example
Below is a script that will print if an event is a touch or grab. In the relevant IMixedRealityPointerHandler interface function, one can look at the type of pointer that triggers that event via the MixedRealityPointerEventData. If the pointer is a SpherePointer, the interaction is a grab.
public class PrintPointerEvents : MonoBehaviour, IMixedRealityPointerHandler
{
    public void OnPointerDown(MixedRealityPointerEventData eventData)
    {
        if (eventData.Pointer is SpherePointer)
        {
            Debug.Log($"Grab start from {eventData.Pointer.PointerName}");
        }
        if (eventData.Pointer is PokePointer)
        {
            Debug.Log($"Touch start from {eventData.Pointer.PointerName}");
        }
    }

    public void OnPointerClicked(MixedRealityPointerEventData eventData) {}
    public void OnPointerDragged(MixedRealityPointerEventData eventData) {}
    public void OnPointerUp(MixedRealityPointerEventData eventData) {}
}
Add touch interactions
The process for adding touch interactions on UnityUI elements is different than for vanilla 3D GameObjects. You can skip to the following section, Unity UI, for enabling Unity UI components.
For both types of UX elements though, ensure a PokePointer is registered in the MRTK Pointer profile.
The default MRTK profile and the default HoloLens 2 profile already contain a PokePointer. One can confirm a PokePointer will be created by selecting the MRTK Configuration Profile and navigate to Input > Pointers > Pointer Options. The default PokePointer (Assets/MRTK/SDK/Features/UX/Prefabs/Pointers) prefab should be listed with a Controller Type of Articulated Hand. A custom prefab can be utilized as long as it implements the PokePointer class.

3D GameObjects
There are two different ways of adding touch interactions to 3D GameObjects, depending on if your 3d object should only have a single touchable plane, or of if it should be touchable based on its entire collider. The first way is typically on objects with BoxColliders, where it is desired to only have a single face of the collider react to touch events. The other is for objects that need to be touchable from any direction based on their collider.
Single face touch
This is useful to enable situations where only a single face needs to be touchable. This option assumes that the game object has a BoxCollider. it's possible to use this with non-BoxCollider objects, in which case the 'Bounds' and 'Local Center' properties much be manually set to configure the touchable plane (i.e. Bounds should be set to a non-zero-zero value).
On the GameObject that should be touchable, add a BoxCollider and a
NearInteractionTouchablecomponent.Set Events to Receive to Touch if using the
IMixedRealityTouchHandlerinterface in your component script below.Click Fix bounds and Fix center
On that object or one of its ancestors, add a script component that implements the
IMixedRealityTouchHandlerinterface. Any ancestor of the object with theNearInteractionTouchablewill be able to receive pointer events, as well.
Note
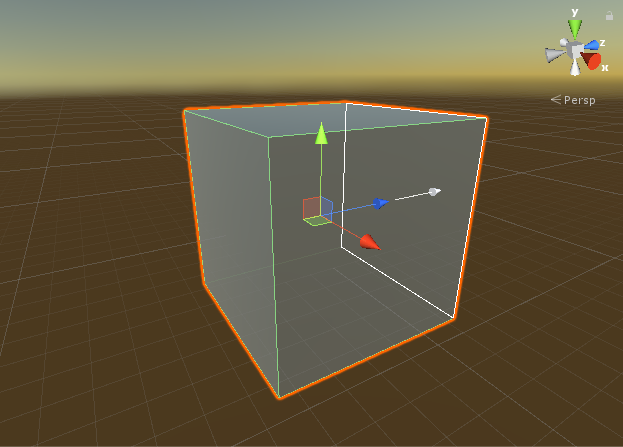
In the editor scene view with the NearInteractionTouchable GameObject selected, notice a white outline square and arrow. The arrow points to the "front" of the touchable. The collidable will only be touchable from that direction. To make a collider touchable from all directions, see the section on arbitrary collider touch.
Arbitrary collider touch
This is useful to enable situations where the game object needs to be touchable along its entire collider face. For example, this can be used to enable touch interactions for an object with a SphereCollider, where the entire collider needs to be touchable.
On the GameObject that should be touchable, add a collider and a
NearInteractionTouchableVolumecomponent.- Set Events to Receive to Touch if using the
IMixedRealityTouchHandlerinterface in your component script below.
- Set Events to Receive to Touch if using the
On that object or one of its ancestors, add a script component that implements the
IMixedRealityTouchHandlerinterface. Any ancestor of the object with theNearInteractionTouchablewill be able to receive pointer events, as well.
Unity UI
Add/ensure there is a UnityUI canvas in the scene.
On the GameObject that should be touchable, add a
NearInteractionTouchableUnityUIcomponent.- Set Events to Receive to Touch if using the
IMixedRealityTouchHandlerinterface in your component script below.
- Set Events to Receive to Touch if using the
On that object or one of its ancestors, add a script component that implements the
IMixedRealityTouchHandlerinterface. Any ancestor of the object with theNearInteractionTouchableUnityUIwill be able to receive pointer events as well.
Important
Objects may not behave as expected if they are located on overlapping canvas objects. To ensure consistent behavior, never overlap canvas objects in your scene.
Important
On the NearInteractionTouchable script component, for the property Events to Receive there are two options: Pointer and Touch. Set Events to Receive to Pointer if using the IMixedRealityPointerHandler interface and set to Touch if using the IMixedRealityTouchHandler interface in your component script that responds/handles the input events.
Touch code example
The code below demonstrates a MonoBehaviour that can be attached to a GameObject with a NearInteractionTouchable variant component and respond to touch input events.
public class TouchEventsExample : MonoBehaviour, IMixedRealityTouchHandler
{
    public void OnTouchStarted(HandTrackingInputEventData eventData)
    {
        string ptrName = eventData.Pointer.PointerName;
        Debug.Log($"Touch started from {ptrName}");
    }
    public void OnTouchCompleted(HandTrackingInputEventData eventData) {}
    public void OnTouchUpdated(HandTrackingInputEventData eventData) { }
}
Near interaction script examples
Touch events
This example creates a cube, makes it touchable, and changes color on touch.
public static void MakeChangeColorOnTouch(GameObject target)
{
    // Add and configure the touchable
    var touchable = target.AddComponent<NearInteractionTouchableVolume>();
    touchable.EventsToReceive = TouchableEventType.Pointer;

    var material = target.GetComponent<Renderer>().material;
    // Change color on pointer down and up
    var pointerHandler = target.AddComponent<PointerHandler>();
    pointerHandler.OnPointerDown.AddListener((e) => material.color = Color.green);
    pointerHandler.OnPointerUp.AddListener((e) => material.color = Color.magenta);
}
Grab events
The below example shows how to make a GameObject draggable. Assumes that the game object has a collider on it.
public static void MakeNearDraggable(GameObject target)
{
    // Instantiate and add grabbable
    target.AddComponent<NearInteractionGrabbable>();

    // Add ability to drag by re-parenting to pointer object on pointer down
    var pointerHandler = target.AddComponent<PointerHandler>();
    pointerHandler.OnPointerDown.AddListener((e) =>
    {
        if (e.Pointer is SpherePointer)
        {
            target.transform.parent = ((SpherePointer)(e.Pointer)).transform;
        }
    });
    pointerHandler.OnPointerUp.AddListener((e) =>
    {
        if (e.Pointer is SpherePointer)
        {
            target.transform.parent = null;
        }
    });
}
Useful APIs
NearInteractionGrabbableNearInteractionTouchableNearInteractionTouchableUnityUINearInteractionTouchableVolumeIMixedRealityTouchHandlerIMixedRealityPointerHandler
See also
Feedback
Coming soon: Throughout 2024 we will be phasing out GitHub Issues as the feedback mechanism for content and replacing it with a new feedback system. For more information see: https://aka.ms/ContentUserFeedback.
Submit and view feedback for