Implementing device relay for Android
The Device Relay functionality of Project Rome consists of a set of APIs that support two main features: remote launching (also known as commanding) and app services.
Remote Launching APIs support scenarios where a process on a remote device is started from a local device. For example, a user might be listening to the radio on their phone in the car, but when they get home they use their phone to transfer playback to their Xbox which is hooked up to the home stereo.
App Services APIs allow an application to establish a persistent pipeline between two devices through which messages containing any arbitrary content can be sent. For example, a photo sharing app running on a mobile device could establish a connection with the user's PC in order to retrieve photos.
The features of Project Rome are supported by an underlying platform called the Connected Devices Platform. This guide provides the necessary steps to get started using the Connected Devices Platform, and then explains how to use the platform to implement Device Relay related features.
This steps below will reference code from the Project Rome Android sample app.
For all Connected Devices features, you will need an Android app development IDE and an Android device with one of the supported architectures (armeabi-v7a, arm64-v8a, x86, or x86_64) or an emulator. The system must be running Android 4.4.2 or later.
Preliminary setup for the Connected Devices Platform and Notifications
Before implementing remote connectivity, there are a few steps you'll need to take to give your Android app the capability to connect to remote devices as well as send and receive notifications.
Register your app
Microsoft Account (MSA) or Azure Active Directory (AAD) authentication is required for almost all features of the Project Rome SDK (the exception being the nearby sharing APIs). If you do not already have an MSA and wish to use one, register on account.microsoft.com.
Note
Azure Active Directory (AAD) accounts are not supported with the Device Relay APIs.
Using your chosen authentication method, you must register your app with Microsoft by following the instructions on the Application Registration Portal. If you do not have a Microsoft developer account, you will need to create one.
When you register an app using an MSA, you should receive a client ID string. Save this for later. This will allow your app to access Microsoft's Connected Devices Platform resources. If you're using AAD, see Azure Active Directory Authentication Libraries for instructions on getting the client ID string.
Add the SDK
Insert the following repository references into the build.gradle file at the root of your project.
allprojects {
    repositories {
        jcenter()
    }
}
Then, insert the following dependency into the build.gradle file that is in your project folder.
dependencies {
    ...
    implementation 'com.microsoft.connecteddevices:connecteddevices-sdk:+'
}
In your project's AndroidManifest.xml file, add the following permissions inside the <manifest> element (if they are not already present). This gives your app permission to connect to the Internet and to enable Bluetooth discovery on your device.
Note that the Bluetooth-related permissions are only necessary for using Bluetooth discovery; they are not needed for the other features in the Connected Devices Platform. Additionally, ACCESS_COARSE_LOCATION is only required on Android SDKs 21 and later. On Android SDKs 23 and later, the developer must also prompt the user to grant location access at runtime.
<uses-permission android:name="android.permission.INTERNET" />
<uses-permission android:name="android.permission.BLUETOOTH" />
<uses-permission android:name="android.permission.BLUETOOTH_ADMIN" />
<uses-permission android:name="android.permission.ACCESS_COARSE_LOCATION" />
<uses-permission android:name="android.permission.ACCESS_NETWORK_STATE" />
Next, go to the activity class(es) where you would like the Connected Devices functionality to live. Import the the following packages.
import com.microsoft.connecteddevices;
import com.microsoft.connecteddevices.remotesystems;
import com.microsoft.connecteddevices.remotesystems.commanding;
Set up authentication and account management
The Connected Devices Platform requires a valid OAuth token to be used in the registration process. You may use your preferred method of generating and managing the OAuth tokens. However, to help developers get started using the platform, we've included an authentication provider as a part of the Android sample app that generates and manages refresh tokens for your convenience.
If you wish to implement the ConnectedDevicesAccountManager interface yourself, take note of the following information:
If you're using an MSA, you will need to include the following scopes in your sign-in request: "wl.offline_access", "ccs.ReadWrite", "dds.read", "dds.register", "wns.connect", "asimovrome.telemetry", and "https://activity.windows.com/UserActivity.ReadWrite.CreatedByApp".
If you're using an AAD account, you'll need to request the following audiences: "https://cdpcs.access.microsoft.com", "https://cs.dds.microsoft.com", "https://wns.windows.com/", and "https://activity.microsoft.com".
Note
Azure Active Directory (AAD) accounts are not supported with the Device Relay APIs.
Whether you use the provided ConnectedDevicesAccountManager implementation or not, if you are using AAD you'll need to specify the following permissions in your app's registration on the Azure portal (portal.azure.com > Azure Active Directory > App registrations):
- Microsoft Activity Feed Service
- Deliver and modify user notifications for this app
- Read and write app activity to users' activity feed
- Windows Notification Service
- Connect your device to Windows Notification Service
- Microsoft Device Directory Service
- See your list of devices
- Be added to your list of devices and apps
- Microsoft Command Service
- Communicate with user devices
- Read user devices
Register your app for push notifications
Register your application with Google for Firebase Cloud Messaging support. Be sure to make note of the sender ID and server key that you receive; you'll need them later.
Once registered, you must associate push notification functionality with the Connected Devices Platform in your app.
mNotificationRegistration = new ConnectedDevicesNotificationRegistration();
mNotificationRegistration.setType(ConnectedDevicesNotificationType.FCM);
mNotificationRegistration.setToken(token);
mNotificationRegistration.setAppId(Secrets.FCM_SENDER_ID);
mNotificationRegistration.setAppDisplayName("SampleApp");
Register your app in Microsoft Windows Dev Center for cross-device experiences
Important
This step is only required if you want to use Project Rome features to access data from or make requests of non-Windows devices. If you only target Windows devices, you do not need to complete this step.
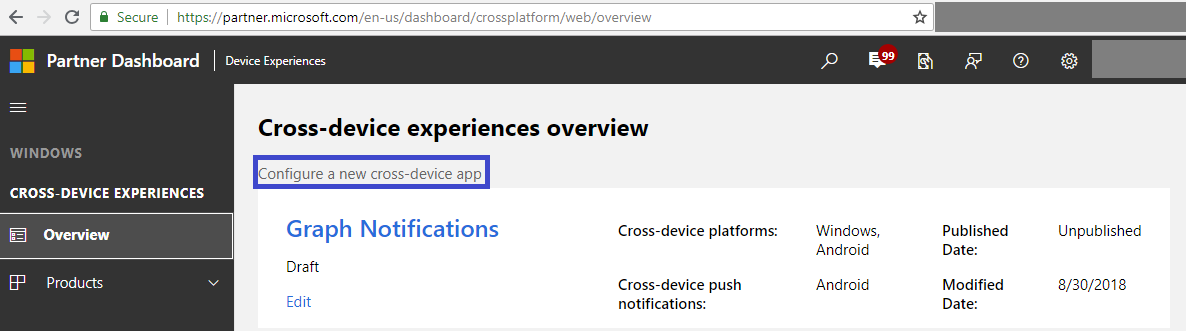
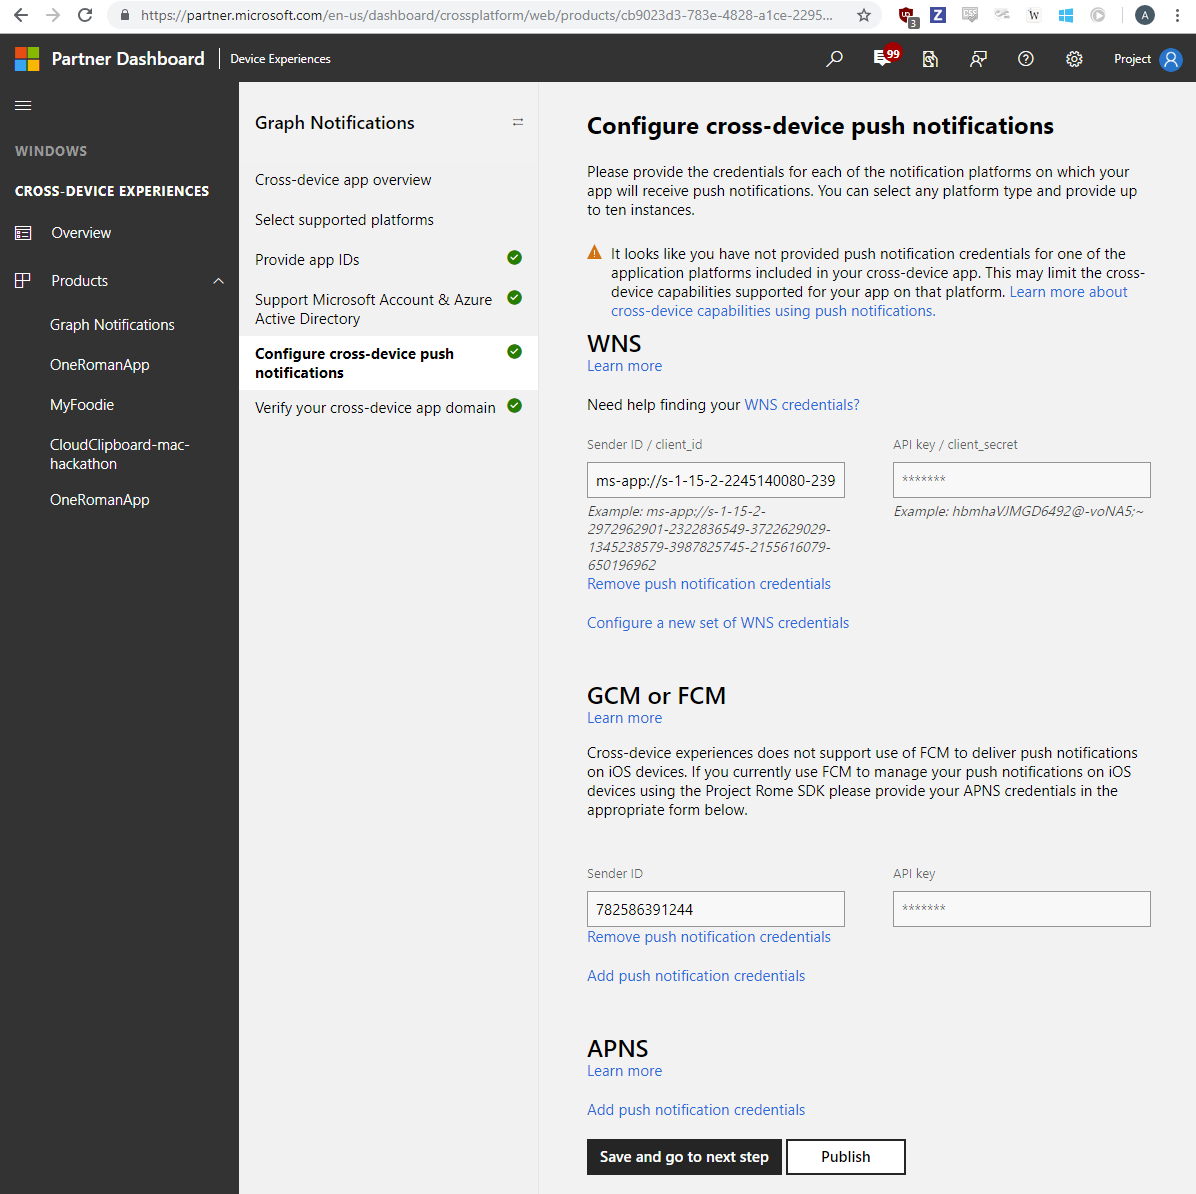
Go to Dev Center Dashboard, navigate to Cross-Device Experiences from the left side navigation pane, and select configuring a new cross-device app, shown as below.
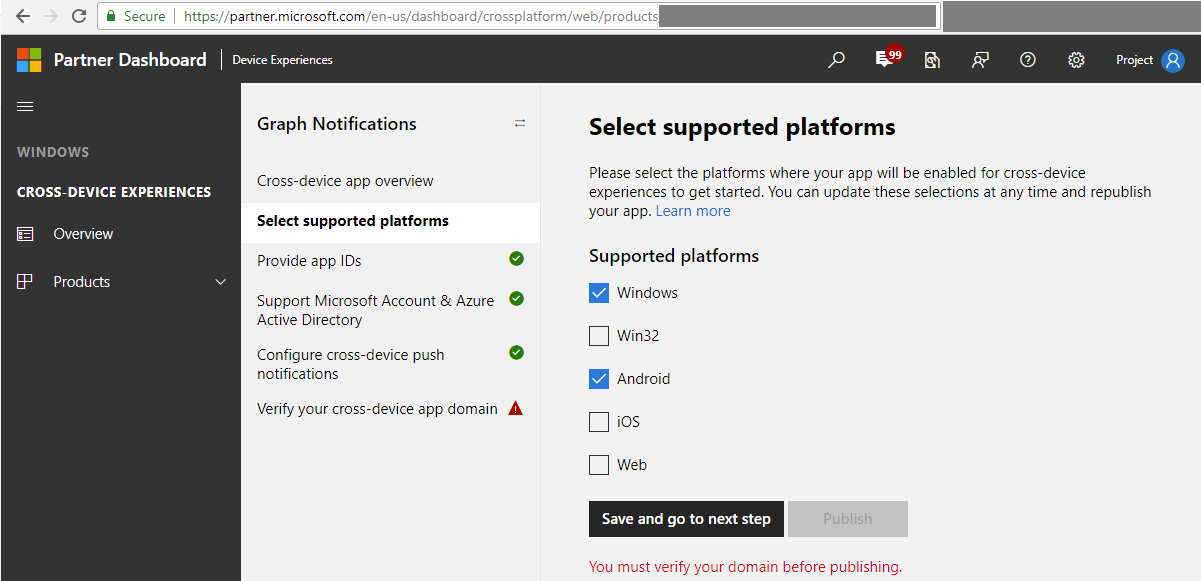
The Dev Center on-boarding process requires the following steps:
Select supported platforms – select the platforms where your app will have a presence and be enabled for cross-device experiences. In the case of Graph Notifications integration, you can select from Windows, Android, and/or iOS.
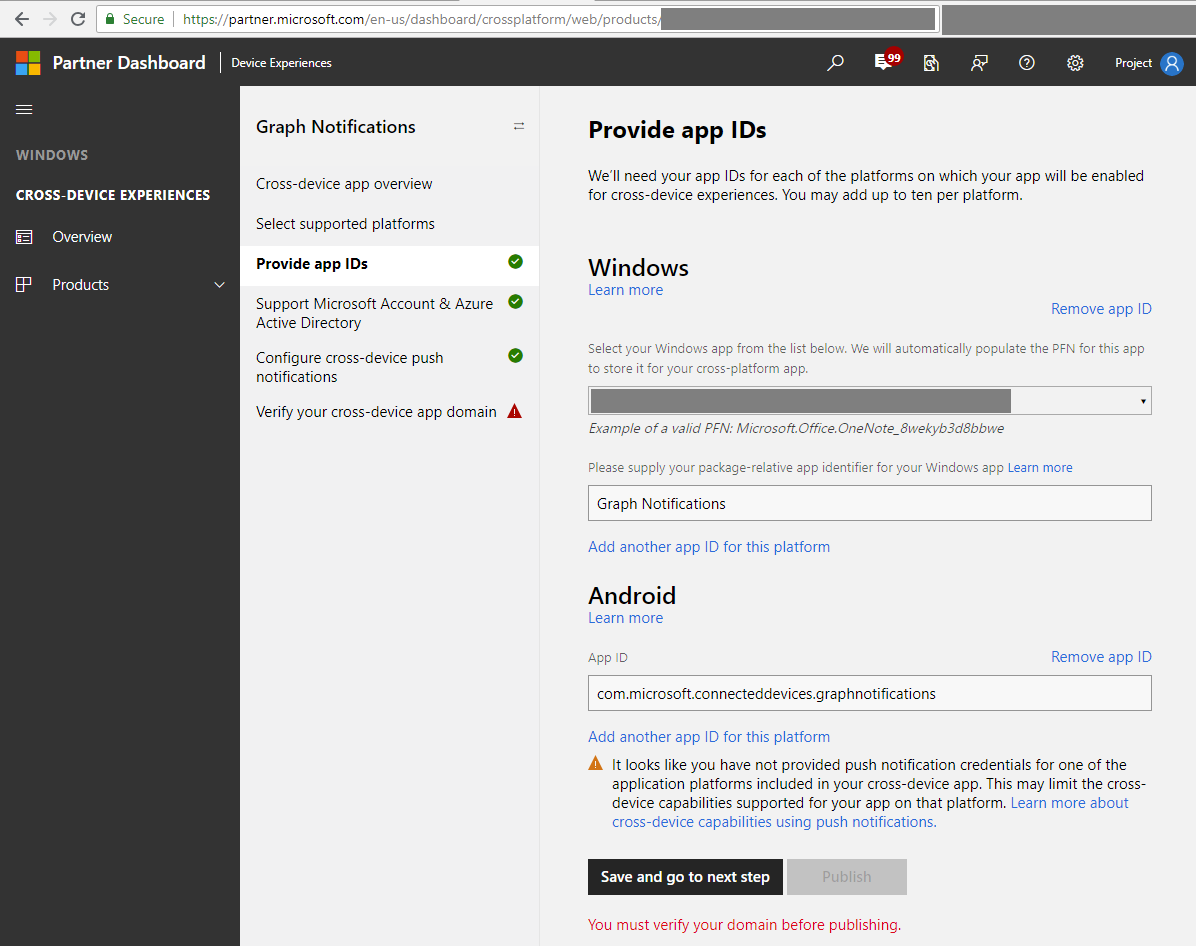
Provide app IDs – provide app IDs for each of the platform where your app has a presence. For Android apps, this is the Package Name you assigned to your app when you created the project. The Package Name can be found in your Firebase console under Project Overview -> General. You may add different IDs (up to ten) per platform – this is in case you have multiple version of the same app, or even different apps, that want to be able to receive the same notifications sent by your app server targeted at the same user.
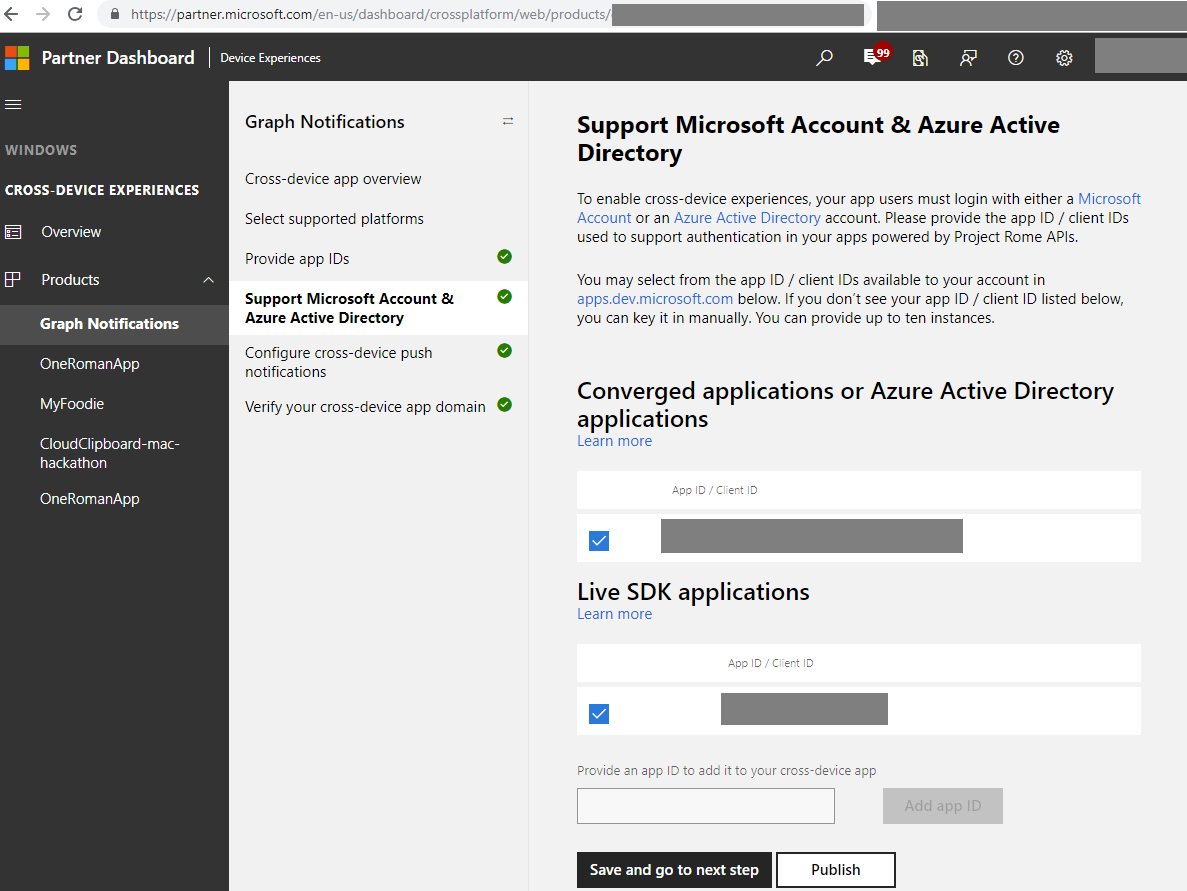
Provide or select the app IDs from MSA and/or AAD app registrations. These client IDs corresponding to MSA or AAD app registration were obtained in the previous MSA/AAD app registration steps from above.
Graph Notifications and other Connected Devices Platform capabilities leverage each of the native notification platforms on major platforms to send notifications down to the app client endpoints, namely, WNS (for Windows UWP), FCM (for Android) and APNS (for iOS). Provide your credentials for these notification platforms to enable Graph Notifications to deliver the notifications for your app server, when you publish user-targeted notifications. For Android, enabling the Cloud Messaging service is a prerequisite to using Microsoft Graph Notifications. Also, note that the required Sender ID corresponds to the Firebase Cloud Messaging Sender ID, and the API key corresponds to the Legacy Server Key. Both can be found in Firebase Console -> Project -> Settings, under the Cloud Messaging tab, as shown in the screenshot.
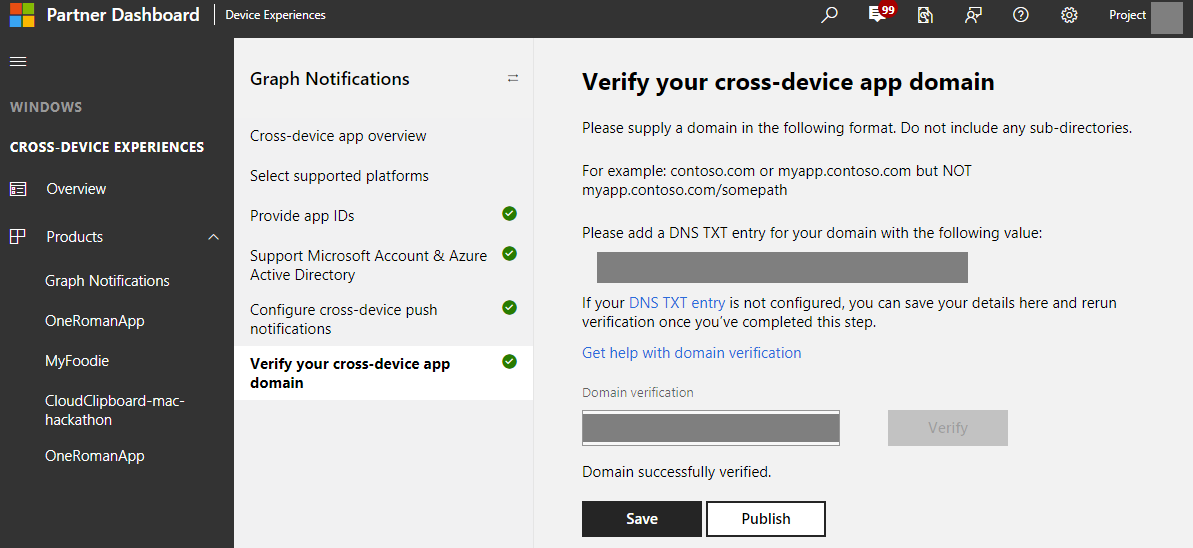
The last step is to verify your cross-device app domain, which serves as a verification process to prove that your app has the ownership of this domain which acts like a cross-device app identity for the app you registered.
Using the platform
Create the platform
To get started simply instantiate the platform.
ConnectedDevicesPlatform sPlatform = new ConnectedDevicesPlatform(context);
Subscribe to ConnectedDevicesAccountManager events to handle the user account
The platform requires an authenticated user to access the platform. You'll need to subscribe to ConnectedDevicesAccountManager events to ensure a valid account is being used.
 ConnectedDevicesPlatform sPlatform.getAccountManager().accessTokenRequested().subscribe((accountManager, args) -> {

    // Get access token
}
 ConnectedDevicesPlatform sPlatform.getAccountManager().accessTokenInvalidated().subscribe((accountManager, args) -> {

    // Refresh and renew existing access token
}
Subscribe to ConnectedDevicesNotificationRegistrationManager events
Similarly, the platform uses notifications to deliver commands between devices. Therefore, you must subscribe to the ConnectedDevicesNotificationRegistrationManager events to ensure the cloud registration states are valid for the account being used. Verify the the state using ConnectedDevicesNotificationRegistrationState
ConnectedDevicesPlatform sPlatform.getNotificationRegistrationManager().notificationRegistrationStateChanged().subscribe((notificationRegistrationManager, args) -> {

     // Check state using ConnectedDevicesNotificationRegistrationState enum

}
Start the platform
Now that the platform is initialized and event handlers are in place, you are ready to start discovering remote system devices.
ConnectedDevicesPlatform sPlatform.start();
Retrieve user accounts known to the app
It is important to ensure that the list of user accounts known to the app are properly synchronized with the ConnectedDevicesAccountManager.
Use ConnectedDevicesAccountManager.addAccountAsync to add a new user account.
 public synchronized AsyncOperation<ConnectedDevicesAddAccountResult> addAccountToAccountManagerAsync(ConnectedDevicesAccount account) {
        return ConnectedDevicesPlatform sPlatform.getAccountManager().addAccountAsync(account);
    }
To remove an invalid account you can use ConnectedDevicesAccountManager.removeAccountAsync
 public synchronized AsyncOperation<ConnectedDevicesAddAccountResult> removeAccountToAccountManagerAsync(ConnectedDevicesAccount account) {
        return ConnectedDevicesPlatform sPlatform.getAccountManager().removeAccountAsync(account);
    }
Discover remote devices and apps
A RemoteSystemWatcher instance will handle the core functionality of this section. Declare it in the class which is to discover remote systems.
private RemoteSystemWatcher mWatcher = null;
Before you create a watcher and start discovering devices, you may wish to add discovery filters to determine which kinds of devices your app will target. These can be determined by user input or hard-coded into the app, depending on your use case.
private void onStartWatcherClicked() {
    // RemoteSystemWatcher cannot be started unless the platform is
    // initialized and the user is logged in. It may be helpful to use
    // methods like these to track the state of the application.
    // See the sample app for their implementations.
    if (!getMainActivity().isSignedIn()) {
        return;
    }
    if (!getMainActivity().isPlatformInitialized()) {
        return;
    }

    // create and populate a list of filters. The filter choices below are arbitrary.
    ArrayList<RemoteSystemFilter> filters = new ArrayList<>();

    /*  RemoteSystemDiscoveryType filters can be used to filter the types of Remote Systems you discover.
    Possible values:
        ANY(0),
        PROXIMAL(1),
        CLOUD(2),
        SPATIALLY_PROXIMAL(3)
    */
    filters.add(new RemoteSystemDiscoveryTypeFilter(RemoteSystemDiscoveryType.ANY));

    /*  RemoteSystemStatusType filters can be used to filter the status of Remote Systems you discover.
    Possible values:
        ANY(0),
        AVAILABLE(1)
    */
    filters.add(new RemoteSystemStatusTypeFilter(RemoteSystemStatusType.AVAILABLE));


    /*  RemoteSystemKindFilter can filter the types of devices you want to discover.
    Possible values are members of the RemoteSystemKinds class.
    */
    String[] kinds = new String[] { RemoteSystemKinds.Phone(), RemoteSystemKinds.Tablet() };

    RemoteSystemKindFilter kindFilter = new RemoteSystemKindFilter(kinds);
    filters.add(kindFilter);

    /*  RemoteSystemAuthorizationKind determines the category of user whose system(s) you want to discover.
    Possible values:
        SAME_USER(0),
        ANONYMOUS(1)
    */
    filters.add(new RemoteSystemAuthorizationKindFilter(RemoteSystemAuthorizationKind.SAME_USER));
    // ...
At this point, the app can initialize the watcher object which determine how your app will parse and interact with devices that are discovered.
    // ...

    // Create a RemoteSystemWatcher
    mWatcher = new RemoteSystemWatcher(filters.toArray(new RemoteSystemFilter[filters.size()]));
    }

    // ...
It is recommended that your app maintain a set of discovered devices (represented by RemoteSystem instances) and display information about available devices and their apps (such as display name and device type) on the UI.
The following class stubs can be used as event listeners for the watcher instance.
private class RemoteSystemAddedListener implements EventListener<RemoteSystemWatcher, RemoteSystem> {
    @Override
    public void onEvent(RemoteSystemWatcher remoteSystemWatcher, RemoteSystem remoteSystem) {
        // add instance "remoteSystem" to program memory. See sample for full implementation.
    }
}

private class RemoteSystemUpdatedListener implements EventListener<RemoteSystemWatcher, RemoteSystem> {
    @Override
    public void onEvent(RemoteSystemWatcher remoteSystemWatcher, RemoteSystem remoteSystem) {
        // update instance "remoteSystem" in program memory. See sample for full implementation.
    }
}

private class RemoteSystemRemovedListener implements EventListener<RemoteSystemWatcher, RemoteSystem> {
    @Override
    public void onEvent(RemoteSystemWatcher remoteSystemWatcher, RemoteSystem remoteSystem) {
        // remove instance "remoteSystem" from program memory. See sample for full implementation.
    }
}

private class RemoteSystemWatcherErrorOccurredListener implements EventListener<RemoteSystemWatcher, RemoteSystemWatcherError> {
    @Override
    public void onEvent(RemoteSystemWatcher remoteSystemWatcher, RemoteSystemWatcherError remoteSystemWatcherError) {
        // handle the error
    }
}
Once mWatcher.start is called, it will begin watching for remote system activity and will raise events when devices are discovered, updated, or removed from the set of discovered devices. It will scan continuously in the background, so it is recommended that you stop the watcher when you no longer need it to avoid unnecessary network communication and battery drain.
// if you call this from the activity's onPause method, you ensure that
// it will stop when the activity exits the foreground.
public void stopWatcher() {
    if (mWatcher == null) {
        return;
    }
    mWatcher.stop();
}
Example use case: implementing remote launching and remote app services
At this point in your code, you should have a working list of RemoteSystem objects that refer to available devices. What you do with these devices will depend on the function of your app. The main types of interaction are remote launching and remote app services. They are explained in the following sections.
A) Remote launching
The following code shows how to select one of these devices (ideally this is done through a UI control) and then use RemoteLauncher to launch an app on it by passing an app-compatible URI.
It's important to note that a remote launch can target a remote device (in which case the host device will launch the given URI with its default app for that URI scheme) or a specific remote application on that device.
As the previous section demonstrated, discovery happens at the device level first (a RemoteSystem represents a device), but you can call the getApplications method on a RemoteSystem instance to get an array of RemoteSystemApp objects, which represent apps on the remote device that have been registered to use the Connected Devices Platform (just as you registered your own app in the preliminary steps above). Both RemoteSystem and RemoteSystemApp can be used to construct a RemoteSystemConnectionRequest, which is what is needed to launch a URI.
// this could be a RemoteSystemApp instead. Either way, it
// must be defined somewhere in the application before the launch operation
// is called.
private RemoteSystem target;

// ...

/**
* Responsible for calling into the Rome API to launch the given URI and provides
* the logic to handle the RemoteLaunchUriStatus response.
* @param uri URI to launch
* @param target The target for the launch URI request
*/
private void launchUri(final String uri, final RemoteSystem target, final long messageId)
{
    RemoteLauncher remoteLauncher = new RemoteLauncher();

    AsyncOperation<RemoteLaunchUriStatus> resultOperation = remoteLauncher.launchUriAsync(new RemoteSystemConnectionRequest(target), uri);
    // ...
Use the returned AsyncOperation to handle the result of the launch attempt.
    // ...
    resultOperation.whenCompleteAsync(new AsyncOperation.ResultBiConsumer<RemoteLaunchUriStatus, Throwable>() {
        @Override
        public void accept(RemoteLaunchUriStatus status, Throwable throwable) throws Throwable {
            if (throwable != null) {
                // handle the exception, referencing "throwable"
            } else {
                if (status == RemoteLaunchUriStatus.SUCCESS) {
                    // report the success case
                } else {
                    // report the non-success case, referencing "status"
                }
            }
        }
    });
}
Depending on the URI that is sent, you can launch an app in a specific state or configuration on a remote device. This allows for the ability to continue a user task, like watching a movie, on a different device without interruption.
Depending on your use case, you may need to cover the cases in which no apps on the targeted system can handle the URI, or multiple apps can handle it. The RemoteLauncher class and RemoteLauncherOptions class describe how to do this.
B) Remote app services
Your Android app can use the Connected Devices Portal interact with app services on other devices. This provides many ways to communicate with other devices—all without needing to bring an app to the foreground of the host device.
Set up the app service on the target device
This guide will use the Roman Test App for Windows as its target app service. Therefore, the code below will cause an Android app to look for that specific app service on the given remote system. If you wish to test this scenario,download the Roman Test App on a Windows device and make sure you are signed in with the same MSA that you used in the preliminary steps above.
For instructions on how to write your own UWP app service, see Create and consume an app service (UWP). You will need to make a few changes in order to make the service compatible with Connected Devices. See the UWP guide for remote app services for instructions on how to do this.
Open an app service connection on the client device
Your Android app must acquire a reference to a remote device or application. Like the launch section, this scenario requires the use of a RemoteSystemConnectionRequest, which can be constructed from either a RemoteSystem or a RemoteSystemApp representing an available app on the system.
// this could be a RemoteSystemApp instead. Either way, it
// must be defined somewhere in the application before the app service
// connection is opened.
private RemoteSystem target = null;
Additionally, your app will need to identify its targeted app service using two strings: the app service name and package identifier. These are found in the source code of the app service provider (see Create and consume an app service (UWP) for details on how to get this strings for Windows app services). Together these strings construct the AppServiceDescription, which is fed into an AppServiceConnection instance.
// this is defined below
private AppServiceConnection connection = null;


/**
* Creates an AppService connection with the current identifier and service name and opens the
* app service connection.
*/
private void onNewConnectionButtonClicked()
{
    connection = new AppServiceConnection();

    // these hard-coded strings must be defined elsewhere in the app
    connection.setAppServiceDescription(new AppServiceDescription(mAppServiceName, mPackageIdentifier));

    // this method is defined below
    openAppServiceConnection();
}
/**
* Establish an app service connection.
* Opens the given AppService connection using the connection request. Once the connection is
* opened, it adds the listeners for request-received and close. Catches all exceptions
* to show behavior of API surface exceptions.
*/
private void openAppServiceConnection()
{
    // optionally report outbound request
    // ...

    RemoteSystemConnectionRequest connectionRequest = new RemoteSystemConnectionRequest(target));

    /* Will asynchronously open the app service connection using the given connection request
    * When this is done, we log the traffic in the UI for visibility to the user (for sample purposes)
    * We can check the status of the connection to determine whether or not it was successful, and show
    * some UI if it wasn't (in this case it is part of the list item).
    */
    connection.openRemoteAsync(connectionRequest)
        .thenAcceptAsync(new AsyncOperation.ResultConsumer<AppServiceConnectionStatus>() {
            @Override
            public void accept(AppServiceConnectionStatus appServiceConnectionStatus) throws Throwable {
                // optionally report inbound response
                // ...

                if (appServiceConnectionStatus != AppServiceConnectionStatus.SUCCESS) {
                    // report the error, referencing "appServiceConnectionStatus"
                    return;
                }
            }
        })
        .exceptionally(new AsyncOperation.ResultFunction<Throwable, Void>() {
            @Override
            public Void apply(Throwable throwable) throws Throwable {
                // report the exception
                return null;
            }
        });
}
Create a message to send to the app service
Declare a variable to store the message to send. On Android, the messages that you send to remote app services will be of the Map type.
private Map<String, Object> mMessagePayload = null;
Note
When your app communicates with app services on other platforms, the Connected Devices Platform translates the Map into the matching construct on the receiving platform. For example, a Map sent from this app to a Windows app service gets translated into a ValueSet object (of the .NET Framework), which can then be interpreted by the app service. Information passed in the other direction undergoes the reverse translation.
The following method composes a message that can be interpreted by the Roman Test App's app service for Windows.
/**
* Send the current message payload through all selected AppService connections on a non-UI
* thread as to not block user interaction, a result of the delay between API calls.
*/
private void onMessageButtonClicked()
{
    mMessagePayload = new HashMap<>();
    // Add the required fields of RomanApp on Windows
    DateFormat df = new SimpleDateFormat(DATE_FORMAT);
    mMessagePayload.put("Type", "ping");
    mMessagePayload.put("CreationDate", df.format(new Date()));
    mMessagePayload.put("TargetId", "check if this field needs to be included");

    // this method is defined below.
    sendMessage(connection, mMessagePayload);
}
Important
The Maps that are passed between apps and services in the remote app services scenario must adhere to the following format: Keys must be Strings, and the values may be: Strings, boxed numeric types (integers or floating points), boxed booleans, android.graphics.Point, android.graphics.Rect, java.util.Date, java.util.UUID, homogeneous arrays of any of these types, or other Map objects that meet this specification.
Send message to the app service
Once the app service connection is established and the message is created, sending it to the app service is simple and can be done from anywhere in the app that has a reference to the app service connection instance and the message.
// When assigning message IDs, use an incremental counter
private AtomicInteger mMessageIdAppServices = new AtomicInteger(0);

// ...

/**
* Send a message using the app service connection
* Send the given Map object through the given AppServiceConnection. Uses an internal messageId
* for logging purposes.
* @param connection AppServiceConnection to send the Map payload
* @param message Payload to be translated to a ValueSet
*/
private void sendMessage(final AppServiceConnection connection, Map<String, Object> message)
{
    final long messageId = mMessageIdAppServices.incrementAndGet();

    connection.sendMessageAsync(message)
        .thenAcceptAsync(new AsyncOperation.ResultConsumer<AppServiceResponse>() {
            @Override
            public void accept(AppServiceResponse appServiceResponse) throws Throwable {
                // optionally report an inbound response

                // this method is defined below
                handleAppServiceResponse(appServiceResponse, messageId);
            }
        })
        .exceptionally(new AsyncOperation.ResultFunction<Throwable, Void>() {
            @Override
            public Void apply(Throwable throwable) throws Throwable {
                // report the exception, referencing "throwable"

                return null;
            }
        });

    // optionally log the outbound message request here, referencing
    // connection.getAppServiceDescription().getName() as the recipient.
}
The app service's response will be received and interpreted by the following method.
private void handleAppServiceResponse(AppServiceResponse appServiceResponse, long messageId)
{
    AppServiceResponseStatus status = appServiceResponse.getStatus();
    if (status == AppServiceResponseStatus.SUCCESS)
    {
        // the message was delivered successfully; interpret the response.
        Map<String, Object> response;
        response = appServiceResponse.getMessage();

        // in the Roman App case, the response contains the date it was created.
        String dateStr = (String)response.get("CreationDate");
        DateFormat df = new SimpleDateFormat(DATE_FORMAT, Locale.getDefault());

        // in this very simple use case, we compare the dates to get the total
        // transit time of the message response.
        try {
            Date startDate = df.parse(dateStr);
            Date nowDate = new Date();
            long diff = nowDate.getTime() - startDate.getTime();
            // do something with "diff"
        } catch (ParseException e) { e.printStackTrace(); }
    }
}
In the Roman App case, the response contains the date it was created, so in this very simple use case, we can compare the dates to get the total transit time of the message response.
This concludes a single message exchange with a remote app service.
Finish app service communication
When your app is finished interacting with the target device's app service, close the connection between the two devices.
// Close the given AppService connection
private void closeAppServiceConnection()
{
    connection.close();
}
Related topics
Feedback
Coming soon: Throughout 2024 we will be phasing out GitHub Issues as the feedback mechanism for content and replacing it with a new feedback system. For more information see: https://aka.ms/ContentUserFeedback.
Submit and view feedback for