Incorporación de notificaciones push a la aplicación iOS
Información general
En este tutorial, se agregan notificaciones push al proyecto de inicio rápido de iOS para que, cada vez que se envíe una notificación de inserción al dispositivo, se inserte un registro.
Si no usa el proyecto de servidor de inicio rápido descargado, necesitará el paquete de extensión de notificaciones push. Para más información, consulte la guía Trabajar con el SDK del servidor back-end de .NET para Azure Mobile Apps.
El simulador de iOS no admite notificaciones de inserción. Necesita un dispositivo de iOS físico y una suscripción de Apple Developer Program.
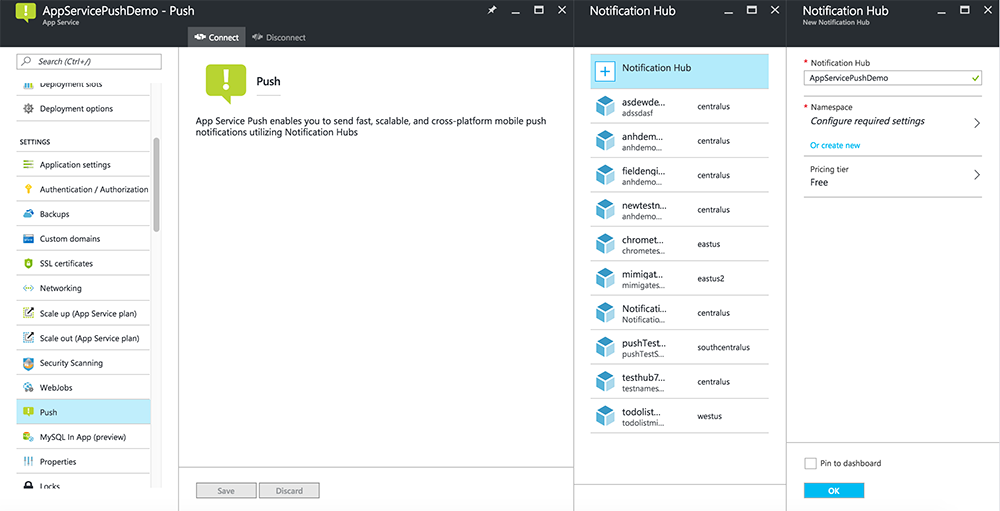
Configurar el Centro de notificaciones
La característica Mobile Apps de Azure App Service usa Azure Notification Hubs para enviar notificaciones push; por lo tanto, necesita un centro de notificaciones para su aplicación móvil.
En Azure Portal, vaya a App Services y seleccione el back-end de la aplicación. En Configuración, seleccione Insertar.
Seleccione Conectar para agregar un recurso de Centro de notificaciones a la aplicación. Puede crear un centro o conectarse a uno existente.
Ya ha conectado un centro de notificaciones al proyecto de back-end de Mobile Apps. Más adelante configure este centro de notificaciones para que se conecte a un sistema de notificación de plataforma (PNS) que envíe notificaciones push a los dispositivos.
Registro de aplicaciones para notificaciones push
- Registre un identificador de aplicación para la aplicación. Cree un identificador de aplicación explícito (no un identificador de aplicación con caracteres comodín) y, en El identificador de lote, use el identificador de lote exacto que se encuentra en el proyecto de inicio rápido de Xcode. También es crucial seleccionar la opción Notificaciones push.
- Después, para preparar la configuración de notificaciones push, cree un certificado SSL para "Desarrollo" o "Distribución".
Configuración de Azure para enviar notificaciones push
- En el equipo Mac, inicie Acceso a llaves. En la barra de navegación izquierda, en Categoría, abra Mis certificados. Busque el certificado SSL que descargó en la sección anterior y muestre su contenido. Seleccione solo el certificado (no seleccione la clave privada). A continuación, expórtelo.
- En Azure Portal, seleccione Examinar todo>App Services. A continuación, seleccione el back-end de Mobile Apps.
- En Configuración, seleccione App Service Push. A continuación, seleccione el nombre del centro de notificaciones.
- Vaya a Apple Push Notification ServicesUpload Certificate (Cargar certificado de Apple Push Notification Services>). Cargue el archivo .p12, seleccionando el modo correcto (en función de si el certificado SSL de cliente anterior es de producción o espacio aislado). Guarde los cambios.
El servicio ahora está configurado para trabajar con las notificaciones push en iOS.
Actualizar el back-end para enviar notificaciones de inserción
Back-end de .NET (C#):
En Visual Studio, haga clic con el botón derecho en el proyecto de servidor, haga clic en Administrar paquetes de NuGet, busque
Microsoft.Azure.NotificationHubsy, por último, haga clic en Instalar. Esto instala la biblioteca de Notification Hubs para enviar notificaciones desde el back-end.En el proyecto de Visual Studio del back-end, abra Controllers>TodoItemController.cs. Al principio del archivo, agregue la siguiente instrucción
using:using Microsoft.Azure.Mobile.Server.Config; using Microsoft.Azure.NotificationHubs;Reemplace el método
PostTodoItemcon el código siguiente:public async Task<IHttpActionResult> PostTodoItem(TodoItem item) { TodoItem current = await InsertAsync(item); // Get the settings for the server project. HttpConfiguration config = this.Configuration; MobileAppSettingsDictionary settings = this.Configuration.GetMobileAppSettingsProvider().GetMobileAppSettings(); // Get the Notification Hubs credentials for the Mobile App. string notificationHubName = settings.NotificationHubName; string notificationHubConnection = settings .Connections[MobileAppSettingsKeys.NotificationHubConnectionString].ConnectionString; // Create a new Notification Hub client. NotificationHubClient hub = NotificationHubClient .CreateClientFromConnectionString(notificationHubConnection, notificationHubName); // iOS payload var appleNotificationPayload = "{\"aps\":{\"alert\":\"" + item.Text + "\"}}"; try { // Send the push notification and log the results. var result = await hub.SendAppleNativeNotificationAsync(appleNotificationPayload); // Write the success result to the logs. config.Services.GetTraceWriter().Info(result.State.ToString()); } catch (System.Exception ex) { // Write the failure result to the logs. config.Services.GetTraceWriter() .Error(ex.Message, null, "Push.SendAsync Error"); } return CreatedAtRoute("Tables", new { id = current.Id }, current); }Vuelva a publicar el proyecto de servidor.
Node.js back-end:
Configure el proyecto de back-end.
Reemplace el script de la tabla todoitem.js por el código siguiente:
var azureMobileApps = require('azure-mobile-apps'),
    promises = require('azure-mobile-apps/src/utilities/promises'),
    logger = require('azure-mobile-apps/src/logger');

var table = azureMobileApps.table();

// When adding record, send a push notification via APNS
table.insert(function (context) {
    // For details of the Notification Hubs JavaScript SDK,
    // see https://aka.ms/nodejshubs
    logger.info('Running TodoItem.insert');

    // Create a payload that contains the new item Text.
    var payload = "{\"aps\":{\"alert\":\"" + context.item.text + "\"}}";

    // Execute the insert; Push as a post-execute action when results are returned as a Promise.
    return context.execute()
        .then(function (results) {
            // Only do the push if configured
            if (context.push) {
                context.push.apns.send(null, payload, function (error) {
                    if (error) {
                        logger.error('Error while sending push notification: ', error);
                    } else {
                        logger.info('Push notification sent successfully!');
                    }
                });
            }
            return results;
        })
        .catch(function (error) {
            logger.error('Error while running context.execute: ', error);
        });
});

module.exports = table;
Cuando edite el archivo en el equipo local, vuelva a publicar el proyecto de servidor.
Agregar notificaciones push a la aplicación
Objective-C:
En QSAppDelegate.m, importe el SDK de iOS y QSTodoService.h:
#import <MicrosoftAzureMobile/MicrosoftAzureMobile.h>
#import "QSTodoService.h"
En
didFinishLaunchingWithOptions, en QSAppDelegate.m, inserte las líneas siguientes justo antes dereturn YES;:UIUserNotificationSettings* notificationSettings = [UIUserNotificationSettings settingsForTypes:UIUserNotificationTypeAlert | UIUserNotificationTypeBadge | UIUserNotificationTypeSound categories:nil]; [[UIApplication sharedApplication] registerUserNotificationSettings:notificationSettings]; [[UIApplication sharedApplication] registerForRemoteNotifications];En QSAppDelegate.m, agregue los siguientes métodos de controlador. Ahora su aplicación está actualizada para que sea compatible con las notificaciones push.
// Registration with APNs is successful
- (void)application:(UIApplication *)application
didRegisterForRemoteNotificationsWithDeviceToken:(NSData *)deviceToken {

    QSTodoService *todoService = [QSTodoService defaultService];
    MSClient *client = todoService.client;

    [client.push registerDeviceToken:deviceToken completion:^(NSError *error) {
        if (error != nil) {
            NSLog(@"Error registering for notifications: %@", error);
        }
    }];
}

// Handle any failure to register
- (void)application:(UIApplication *)application didFailToRegisterForRemoteNotificationsWithError:
(NSError *)error {
    NSLog(@"Failed to register for remote notifications: %@", error);
}

// Use userInfo in the payload to display an alert.
- (void)application:(UIApplication *)application
        didReceiveRemoteNotification:(NSDictionary *)userInfo {
    NSLog(@"%@", userInfo);

    NSDictionary *apsPayload = userInfo[@"aps"];
    NSString *alertString = apsPayload[@"alert"];

    // Create alert with notification content.
    UIAlertController *alertController = [UIAlertController
                                    alertControllerWithTitle:@"Notification"
                                    message:alertString
                                    preferredStyle:UIAlertControllerStyleAlert];

    UIAlertAction *cancelAction = [UIAlertAction
                                    actionWithTitle:NSLocalizedString(@"Cancel", @"Cancel")
                                    style:UIAlertActionStyleCancel
                                    handler:^(UIAlertAction *action)
                                    {
                                        NSLog(@"Cancel");
                                    }];

    UIAlertAction *okAction = [UIAlertAction
                                actionWithTitle:NSLocalizedString(@"OK", @"OK")
                                style:UIAlertActionStyleDefault
                                handler:^(UIAlertAction *action)
                                {
                                    NSLog(@"OK");
                                }];

    [alertController addAction:cancelAction];
    [alertController addAction:okAction];

    // Get current view controller.
    UIViewController *currentViewController = [[[[UIApplication sharedApplication] delegate] window] rootViewController];
    while (currentViewController.presentedViewController)
    {
        currentViewController = currentViewController.presentedViewController;
    }

    // Display alert.
    [currentViewController presentViewController:alertController animated:YES completion:nil];

}
SWIFT:
Agregue el archivo ClientManager.swift con el siguiente contenido. Reemplace %AppUrl% por la dirección URL del back-end de la aplicación móvil de Azure.
class ClientManager {
    static let sharedClient = MSClient(applicationURLString: "%AppUrl%")
}
En ToDoTableViewController.swift, reemplace la línea
let clientque inicializa unMSClientpor esta línea:let client = ClientManager.sharedClientEn AppDelegate.swift, reemplace el cuerpo de
func applicationde la siguiente manera:func application(application: UIApplication, didFinishLaunchingWithOptions launchOptions: [NSObject: AnyObject]?) -> Bool { application.registerUserNotificationSettings( UIUserNotificationSettings(forTypes: [.Alert, .Badge, .Sound], categories: nil)) application.registerForRemoteNotifications() return true }En AppDelegate.swift, agregue los métodos de controlador siguientes. Ahora su aplicación está actualizada para que sea compatible con las notificaciones push.
func application(application: UIApplication,
    didRegisterForRemoteNotificationsWithDeviceToken deviceToken: NSData) {
    ClientManager.sharedClient.push?.registerDeviceToken(deviceToken) { error in
        print("Error registering for notifications: ", error?.description)
    }
}

func application(application: UIApplication,
    didFailToRegisterForRemoteNotificationsWithError error: NSError) {
    print("Failed to register for remote notifications: ", error.description)
}

func application(application: UIApplication,
    didReceiveRemoteNotification userInfo: [NSObject: AnyObject]) {

    print(userInfo)

    let apsNotification = userInfo["aps"] as? NSDictionary
    let apsString       = apsNotification?["alert"] as? String

    let alert = UIAlertController(title: "Alert", message: apsString, preferredStyle: .Alert)
    let okAction = UIAlertAction(title: "OK", style: .Default) { _ in
        print("OK")
    }
    let cancelAction = UIAlertAction(title: "Cancel", style: .Default) { _ in
        print("Cancel")
    }

    alert.addAction(okAction)
    alert.addAction(cancelAction)

    var currentViewController = self.window?.rootViewController
    while currentViewController?.presentedViewController != nil {
        currentViewController = currentViewController?.presentedViewController
    }

    currentViewController?.presentViewController(alert, animated: true) {}

}
Probar notificaciones de inserción
- En Xcode, presione Ejecutar e inicie la aplicación en un dispositivo iOS (tenga en cuenta que las notificaciones push no funcionan en los simuladores). Haga clic en Aceptar para aceptar notificaciones push; esta solicitud se produce la primera vez que se ejecuta la aplicación.
- En la aplicación, agregue un nuevo elemento y haga clic en +.
- Compruebe que se ha recibido la notificación y, a continuación, haga clic en Aceptar para descartarla. Ya ha completado correctamente este tutorial.
Más
- : las plantillas proporcionan flexibilidad para enviar inserciones multiplataforma e inserciones localizadas. Uso de la biblioteca de cliente de iOS para Azure Mobile Apps muestra cómo registrar plantillas.