Integración con una aplicación cliente mediante el SDK de Voz
Importante
Comandos personalizados se retirará el 30 de abril de 2026. Desde el 30 de octubre de 2023 no se puede crear nuevas aplicaciones de Comandos personalizados en Speech Studio. En relación con este cambio, LUIS se retirará el 1 de octubre de 2025. Desde el 1 de abril de 2023, no se pueden crear nuevos recursos de LUIS.
En este artículo, obtendrá información sobre cómo enviar solicitudes a una aplicación de Comandos personalizados publicada desde el SDK de Voz, que se ejecuta en una aplicación de UWP. Para establecer una conexión con la aplicación de Comandos personalizados, se necesita lo siguiente:
- Publicación de una aplicación de comandos personalizados y obtención de un identificador de aplicación (id. de aplicación)
- Creación de una aplicación cliente para la Plataforma universal de Windows (UWP) con el SDK de Voz para que pueda comunicarse con su aplicación de comandos personalizados
Requisitos previos
Se requiere una aplicación de comandos personalizados para completar este artículo. Pruebe un inicio rápido para crear una aplicación de comandos personalizados:
También necesita lo siguiente:
- Visual Studio 2019 o cualquier versión posterior. Esta guía se basa en Visual Studio 2019.
- Una clave y región de recursos de Voz de Azure AI: creación de un recurso de Voz en Azure Portal. Para más información, consulte Crear un recurso multiservicio.
- Habilitar el dispositivo para el desarrollo
Paso 1: Publicación de la aplicación de comandos personalizados
Abra la aplicación de Comandos personalizados creada anteriormente.
Vaya a Configuración, seleccione Recurso de LUIS.
Si Recurso de predicción no está asignado, seleccione una clave de predicción de consultas o cree una.
La clave de predicción de consultas siempre es necesaria para poder publicar una aplicación. Para más información sobre los recursos de LUIS, vea Creación de recursos de LUIS.
Vuelva a la aplicación de Comandos que está editando y seleccione Publicar.
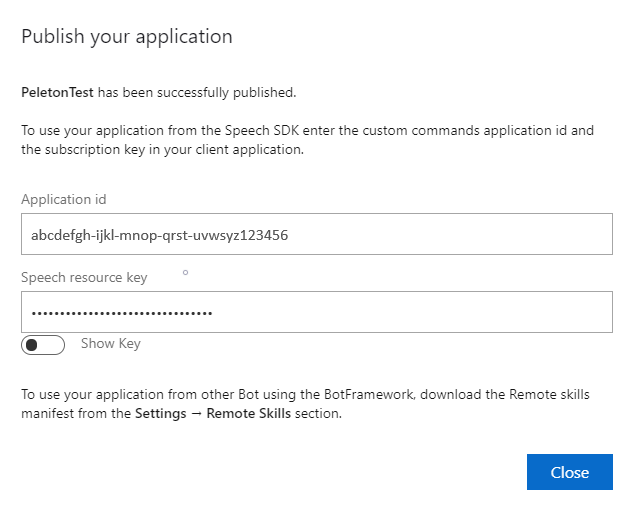
Copie el identificador de aplicación de la notificación "publicar" para su uso posterior.
Copie la clave de recurso de voz para su uso posterior.
Paso 2: Creación de un proyecto de Visual Studio
Cree un proyecto de Visual Studio para el desarrollo de UWP e instale el SDK de voz.
Paso 3: Incorporación de código de ejemplo
En este paso, se agrega el código XAML que define la interfaz de usuario de la aplicación y el código subyacente en C# de la implementación.
Código XAML
Cree la interfaz de usuario de la aplicación; para ello, agregue el código XAML.
En el Explorador de soluciones, abra
MainPage.xaml.En la vista XAML del diseñador, reemplace todo el contenido por el siguiente fragmento de código:
<Page
    x:Class="helloworld.MainPage"
    xmlns="http://schemas.microsoft.com/winfx/2006/xaml/presentation"
    xmlns:x="http://schemas.microsoft.com/winfx/2006/xaml"
    xmlns:local="using:helloworld"
    xmlns:d="http://schemas.microsoft.com/expression/blend/2008"
    xmlns:mc="http://schemas.openxmlformats.org/markup-compatibility/2006"
    mc:Ignorable="d"
    Background="{ThemeResource ApplicationPageBackgroundThemeBrush}">

    <Grid>
        <StackPanel Orientation="Vertical" HorizontalAlignment="Center"
                    Margin="20,50,0,0" VerticalAlignment="Center" Width="800">
            <Button x:Name="EnableMicrophoneButton" Content="Enable Microphone"
                    Margin="0,10,10,0" Click="EnableMicrophone_ButtonClicked"
                    Height="35"/>
            <Button x:Name="ListenButton" Content="Talk"
                    Margin="0,10,10,0" Click="ListenButton_ButtonClicked"
                    Height="35"/>
            <StackPanel x:Name="StatusPanel" Orientation="Vertical"
                        RelativePanel.AlignBottomWithPanel="True"
                        RelativePanel.AlignRightWithPanel="True"
                        RelativePanel.AlignLeftWithPanel="True">
                <TextBlock x:Name="StatusLabel" Margin="0,10,10,0"
                           TextWrapping="Wrap" Text="Status:" FontSize="20"/>
                <Border x:Name="StatusBorder" Margin="0,0,0,0">
                    <ScrollViewer VerticalScrollMode="Auto"
                                  VerticalScrollBarVisibility="Auto" MaxHeight="200">
                        <!-- Use LiveSetting to enable screen readers to announce
                             the status update. -->
                        <TextBlock
                            x:Name="StatusBlock" FontWeight="Bold"
                            AutomationProperties.LiveSetting="Assertive"
                            MaxWidth="{Binding ElementName=Splitter, Path=ActualWidth}"
                            Margin="10,10,10,20" TextWrapping="Wrap"  />
                    </ScrollViewer>
                </Border>
            </StackPanel>
        </StackPanel>
        <MediaElement x:Name="mediaElement"/>
    </Grid>
</Page>
La vista Diseño se actualiza para mostrar la interfaz de usuario de la aplicación.
Código subyacente de C#
Agregue el código fuente subyacente para que la aplicación funcione según lo previsto. El código fuente subyacente incluye:
- Instrucciones
usingnecesarias para los espacios de nombresSpeechySpeech.Dialog. - Una implementación sencilla para garantizar el acceso al micrófono, conectado a un controlador de botón.
- Asistentes básicos de la interfaz de usuario para presentar mensajes y errores en la aplicación.
- Un punto de aterrizaje para la ruta de acceso del código de inicialización.
- Asistente para reproducir texto en voz (sin compatibilidad con streaming).
- Un controlador de botón vacío para empezar a escuchar.
Agregue el código fuente subyacente como se muestra a continuación:
En Explorador de soluciones, abra el archivo de código fuente subyacente
MainPage.xaml.cs(agrupado enMainPage.xaml).Reemplace el contenido del archivo por el siguiente código:
using Microsoft.CognitiveServices.Speech;
using Microsoft.CognitiveServices.Speech.Audio;
using Microsoft.CognitiveServices.Speech.Dialog;
using System;
using System.IO;
using System.Text;
using Windows.UI.Xaml;
using Windows.UI.Xaml.Controls;
using Windows.UI.Xaml.Media;

namespace helloworld
{
    public sealed partial class MainPage : Page
    {
        private DialogServiceConnector connector;

        private enum NotifyType
        {
            StatusMessage,
            ErrorMessage
        };

        public MainPage()
        {
            this.InitializeComponent();
        }

        private async void EnableMicrophone_ButtonClicked(
            object sender, RoutedEventArgs e)
        {
            bool isMicAvailable = true;
            try
            {
                var mediaCapture = new Windows.Media.Capture.MediaCapture();
                var settings =
                    new Windows.Media.Capture.MediaCaptureInitializationSettings();
                settings.StreamingCaptureMode =
                    Windows.Media.Capture.StreamingCaptureMode.Audio;
                await mediaCapture.InitializeAsync(settings);
            }
            catch (Exception)
            {
                isMicAvailable = false;
            }
            if (!isMicAvailable)
            {
                await Windows.System.Launcher.LaunchUriAsync(
                    new Uri("ms-settings:privacy-microphone"));
            }
            else
            {
                NotifyUser("Microphone was enabled", NotifyType.StatusMessage);
            }
        }

        private void NotifyUser(
            string strMessage, NotifyType type = NotifyType.StatusMessage)
        {
            // If called from the UI thread, then update immediately.
            // Otherwise, schedule a task on the UI thread to perform the update.
            if (Dispatcher.HasThreadAccess)
            {
                UpdateStatus(strMessage, type);
            }
            else
            {
                var task = Dispatcher.RunAsync(
                    Windows.UI.Core.CoreDispatcherPriority.Normal,
                    () => UpdateStatus(strMessage, type));
            }
        }

        private void UpdateStatus(string strMessage, NotifyType type)
        {
            switch (type)
            {
                case NotifyType.StatusMessage:
                    StatusBorder.Background = new SolidColorBrush(
                        Windows.UI.Colors.Green);
                    break;
                case NotifyType.ErrorMessage:
                    StatusBorder.Background = new SolidColorBrush(
                        Windows.UI.Colors.Red);
                    break;
            }
            StatusBlock.Text += string.IsNullOrEmpty(StatusBlock.Text)
                ? strMessage : "\n" + strMessage;

            if (!string.IsNullOrEmpty(StatusBlock.Text))
            {
                StatusBorder.Visibility = Visibility.Visible;
                StatusPanel.Visibility = Visibility.Visible;
            }
            else
            {
                StatusBorder.Visibility = Visibility.Collapsed;
                StatusPanel.Visibility = Visibility.Collapsed;
            }
            // Raise an event if necessary to enable a screen reader
            // to announce the status update.
            var peer = Windows.UI.Xaml.Automation.Peers.FrameworkElementAutomationPeer.FromElement(StatusBlock);
            if (peer != null)
            {
                peer.RaiseAutomationEvent(
                    Windows.UI.Xaml.Automation.Peers.AutomationEvents.LiveRegionChanged);
            }
        }

        // Waits for and accumulates all audio associated with a given
        // PullAudioOutputStream and then plays it to the MediaElement. Long spoken
        // audio will create extra latency and a streaming playback solution
        // (that plays audio while it continues to be received) should be used --
        // see the samples for examples of this.
        private void SynchronouslyPlayActivityAudio(
            PullAudioOutputStream activityAudio)
        {
            var playbackStreamWithHeader = new MemoryStream();
            playbackStreamWithHeader.Write(Encoding.ASCII.GetBytes("RIFF"), 0, 4); // ChunkID
            playbackStreamWithHeader.Write(BitConverter.GetBytes(UInt32.MaxValue), 0, 4); // ChunkSize: max
            playbackStreamWithHeader.Write(Encoding.ASCII.GetBytes("WAVE"), 0, 4); // Format
            playbackStreamWithHeader.Write(Encoding.ASCII.GetBytes("fmt "), 0, 4); // Subchunk1ID
            playbackStreamWithHeader.Write(BitConverter.GetBytes(16), 0, 4); // Subchunk1Size: PCM
            playbackStreamWithHeader.Write(BitConverter.GetBytes(1), 0, 2); // AudioFormat: PCM
            playbackStreamWithHeader.Write(BitConverter.GetBytes(1), 0, 2); // NumChannels: mono
            playbackStreamWithHeader.Write(BitConverter.GetBytes(16000), 0, 4); // SampleRate: 16kHz
            playbackStreamWithHeader.Write(BitConverter.GetBytes(32000), 0, 4); // ByteRate
            playbackStreamWithHeader.Write(BitConverter.GetBytes(2), 0, 2); // BlockAlign
            playbackStreamWithHeader.Write(BitConverter.GetBytes(16), 0, 2); // BitsPerSample: 16-bit
            playbackStreamWithHeader.Write(Encoding.ASCII.GetBytes("data"), 0, 4); // Subchunk2ID
            playbackStreamWithHeader.Write(BitConverter.GetBytes(UInt32.MaxValue), 0, 4); // Subchunk2Size

            byte[] pullBuffer = new byte[2056];

            uint lastRead = 0;
            do
            {
                lastRead = activityAudio.Read(pullBuffer);
                playbackStreamWithHeader.Write(pullBuffer, 0, (int)lastRead);
            }
            while (lastRead == pullBuffer.Length);

            var task = Dispatcher.RunAsync(
                Windows.UI.Core.CoreDispatcherPriority.Normal, () =>
            {
                mediaElement.SetSource(
                    playbackStreamWithHeader.AsRandomAccessStream(), "audio/wav");
                mediaElement.Play();
            });
        }

        private void InitializeDialogServiceConnector()
        {
            // New code will go here
        }

        private async void ListenButton_ButtonClicked(
            object sender, RoutedEventArgs e)
        {
            // New code will go here
        }
    }
}
Nota
Si ve el error: "El tipo "Object" está definido en un ensamblado al que no se hace referencia.
- Haga clic con el botón derecho en la solución.
- Elija Administrar paquetes NuGet para la solución y seleccione Actualizaciones.
- Si ve Microsoft.NETCore.UniversalWindowsPlatform en la lista de actualizaciones, actualice Microsoft.NETCore.UniversalWindowsPlatform a la versión más reciente.
Agregue el siguiente código al cuerpo del método
InitializeDialogServiceConnector.// This code creates the `DialogServiceConnector` with your resource information. // create a DialogServiceConfig by providing a Custom Commands application id and Speech resource key // The RecoLanguage property is optional (default en-US); note that only en-US is supported in Preview const string speechCommandsApplicationId = "YourApplicationId"; // Your application id const string speechSubscriptionKey = "YourSpeechSubscriptionKey"; // Your Speech resource key const string region = "YourServiceRegion"; // The Speech resource region. var speechCommandsConfig = CustomCommandsConfig.FromSubscription(speechCommandsApplicationId, speechSubscriptionKey, region); speechCommandsConfig.SetProperty(PropertyId.SpeechServiceConnection_RecoLanguage, "en-us"); connector = new DialogServiceConnector(speechCommandsConfig);Reemplace las cadenas
YourApplicationId,YourSpeechSubscriptionKeyyYourServiceRegionpor sus propios valores para la aplicación, la clave de voz y la región.Anexe el siguiente fragmento de código al final del cuerpo del método
InitializeDialogServiceConnector.// // This code sets up handlers for events relied on by `DialogServiceConnector` to communicate its activities, // speech recognition results, and other information. // // ActivityReceived is the main way your client will receive messages, audio, and events connector.ActivityReceived += (sender, activityReceivedEventArgs) => { NotifyUser( $"Activity received, hasAudio={activityReceivedEventArgs.HasAudio} activity={activityReceivedEventArgs.Activity}"); if (activityReceivedEventArgs.HasAudio) { SynchronouslyPlayActivityAudio(activityReceivedEventArgs.Audio); } }; // Canceled will be signaled when a turn is aborted or experiences an error condition connector.Canceled += (sender, canceledEventArgs) => { NotifyUser($"Canceled, reason={canceledEventArgs.Reason}"); if (canceledEventArgs.Reason == CancellationReason.Error) { NotifyUser( $"Error: code={canceledEventArgs.ErrorCode}, details={canceledEventArgs.ErrorDetails}"); } }; // Recognizing (not 'Recognized') will provide the intermediate recognized text // while an audio stream is being processed connector.Recognizing += (sender, recognitionEventArgs) => { NotifyUser($"Recognizing! in-progress text={recognitionEventArgs.Result.Text}"); }; // Recognized (not 'Recognizing') will provide the final recognized text // once audio capture is completed connector.Recognized += (sender, recognitionEventArgs) => { NotifyUser($"Final speech to text result: '{recognitionEventArgs.Result.Text}'"); }; // SessionStarted will notify when audio begins flowing to the service for a turn connector.SessionStarted += (sender, sessionEventArgs) => { NotifyUser($"Now Listening! Session started, id={sessionEventArgs.SessionId}"); }; // SessionStopped will notify when a turn is complete and // it's safe to begin listening again connector.SessionStopped += (sender, sessionEventArgs) => { NotifyUser($"Listening complete. Session ended, id={sessionEventArgs.SessionId}"); };Agregue el siguiente fragmento de código al cuerpo del método
ListenButton_ButtonClickedde la claseMainPage.// This code sets up `DialogServiceConnector` to listen, since you already established the configuration and // registered the event handlers. if (connector == null) { InitializeDialogServiceConnector(); // Optional step to speed up first interaction: if not called, // connection happens automatically on first use var connectTask = connector.ConnectAsync(); } try { // Start sending audio await connector.ListenOnceAsync(); } catch (Exception ex) { NotifyUser($"Exception: {ex.ToString()}", NotifyType.ErrorMessage); }En la barra de menús, elija Archivo>Guardar todo para guardar los cambios.
Prueba
En la barra de menús, elija Compilar>Compilar solución para compilar la aplicación. El código se debería compilar sin errores ahora.
Elija Depurar>Iniciar depuración o presione F5 para iniciar la aplicación. Aparece la ventana HelloWorld.
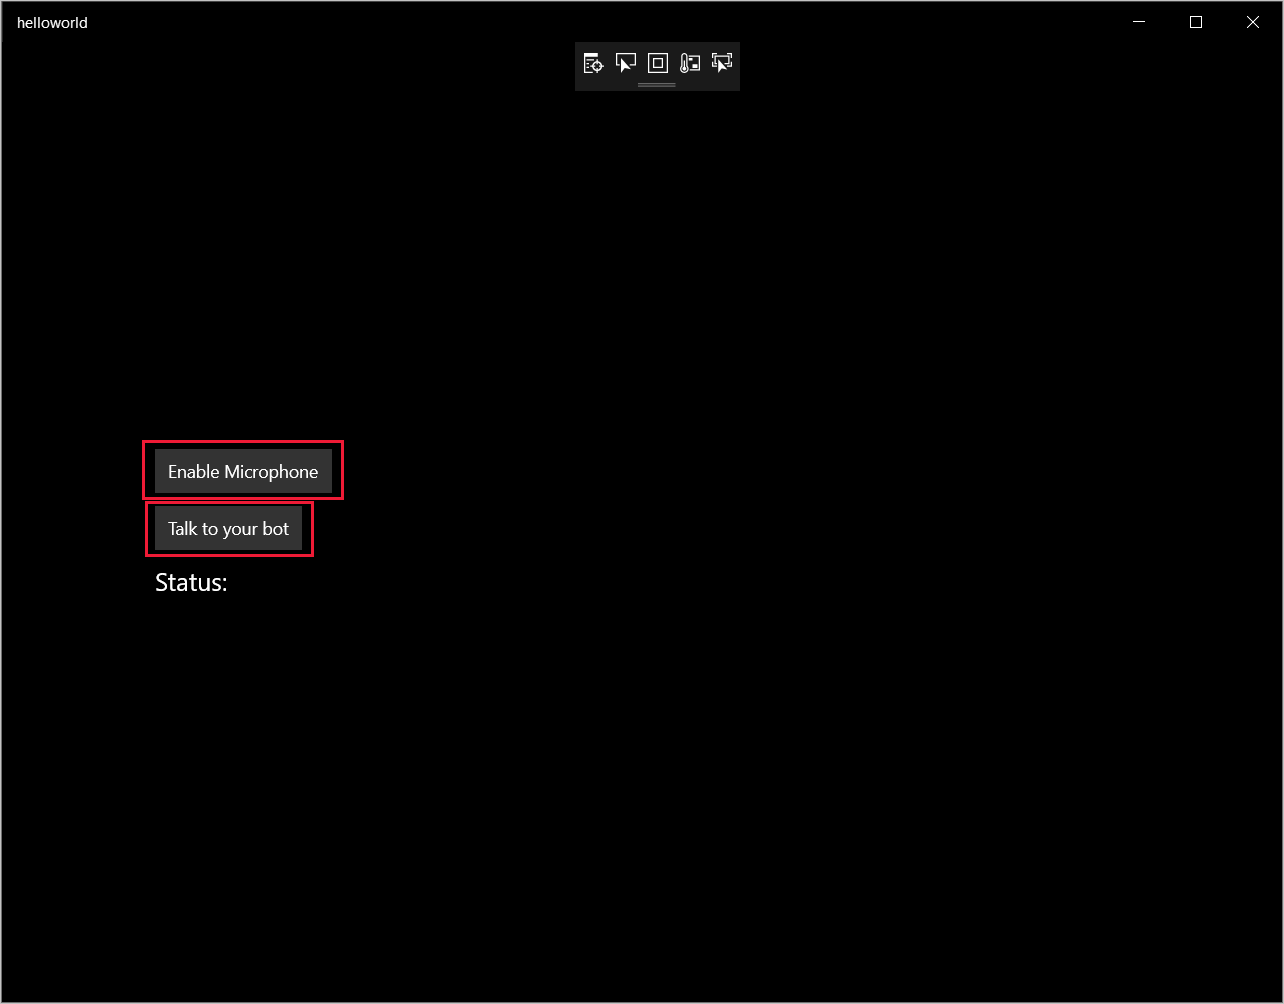
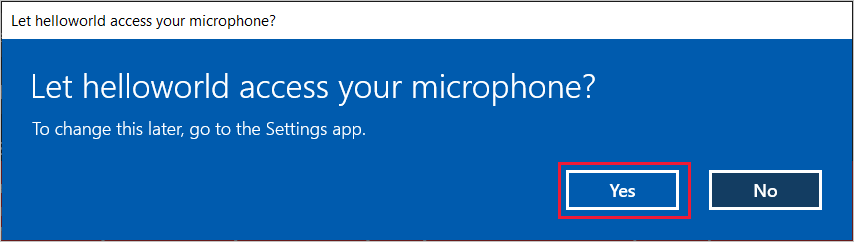
Seleccione Habilitar micrófono. Si aparece la solicitud de permiso de acceso, seleccione Sí.
Seleccione Hablar y diga una expresión o frase en inglés en el micrófono del dispositivo. Lo que diga se transmitirá al canal Direct Line Speech y se transcribirá en texto, que aparece en la misma ventana.