Inicio rápido: Incorporación de una aplicación de llamadas a un operador automático de Teams
En este inicio rápido, aprenderá a iniciar una llamada de un usuario de Azure Communication Services a un operador automático de Teams. Lo logrará con los pasos siguientes:
- Habilitar la federación de recurso de Azure Communication Services con el inquilino de Teams.
- Seleccione o cree el operador automático de Teams a través del Centro de Administración de Teams.
- Obtenga la dirección de correo electrónico del operador automático a través del Centro de Administración de Teams.
- Obtenga el id. de objeto del operador automático a través de Graph API.
- Iniciar una llamada con el SDK de llamadas de Azure Communication Services.
Si quiere ir directamente al final, puede descargar esta guía de inicio rápido como ejemplo desde GitHub.
Habilitar interoperabilidad en el inquilino de Teams
El usuario de Microsoft Entra con el rol de administrador de Teams puede ejecutar el cmdlet de PowerShell con el módulo de MicrosoftTeams para habilitar el recurso de Communication Services en el inquilino.
1. Preparar el módulo de Microsoft Teams
En primer lugar, abra PowerShell y valide la existencia del módulo de Teams con el siguiente comando:
Get-module *teams*
Si no ve el módulo MicrosoftTeams, instálelo primero. Para instalar el módulo debe ejecutar PowerShell como administrador. Luego, ejecute el siguiente comando:
Install-Module -Name MicrosoftTeams
Se le informará sobre los módulos que se instalarán, que puede confirmar con una respuesta Y o A. Si el módulo está instalado pero no está actualizado, puede ejecutar el siguiente comando para actualizar el módulo:
Update-Module MicrosoftTeams
2. Conexión al módulo de Microsoft Teams
Cuando el módulo esté instalado y listo, puede conectarse al módulo MicrosftTeams con el siguiente comando. Se le pedirá que inicie sesión con una ventana interactiva. La cuenta de usuario que va a usar debe tener permisos de administrador de Teams. De lo contrario, puede obtener una respuesta access denied en los pasos siguientes.
Connect-MicrosoftTeams
3. Habilitar la configuración del inquilino
La interoperabilidad con los recursos de Communication Services se controla mediante la configuración de inquilinos y la directiva asignada. El inquilino de Teams tiene una configuración de inquilino único y los usuarios de Teams tienen asignada directiva global o directiva personalizada. Para más información, consulte Asignación de directivas en Teams.
Después de iniciar sesión correctamente, puede ejecutar el cmdlet Set-CsTeamsAcsFederationConfiguration para habilitar el recurso de Communication Services en el inquilino. Reemplace el texto IMMUTABLE_RESOURCE_ID por un identificador de recurso inmutable en el recurso de comunicación. Puede encontrar más detalles sobre cómo obtener esta información aquí.
$allowlist = @('IMMUTABLE_RESOURCE_ID')
Set-CsTeamsAcsFederationConfiguration -EnableAcsUsers $True -AllowedAcsResources $allowlist
4. Habilitar una directiva de inquilino
A cada usuario de Teams se le ha asignado un External Access Policy que determina si los usuarios de Communication Services pueden llamar a este usuario de Teams. Use el cmdlet Set-CsExternalAccessPolicy para asegurarse de que la directiva asignada al usuario de Teams ha establecido EnableAcsFederationAccess en $true
Set-CsExternalAccessPolicy -Identity Global -EnableAcsFederationAccess $true
Crear o seleccionar Operador automático de Teams
El operador automático de Teams es un sistema que proporciona un sistema de control de llamadas automatizado para las llamadas entrantes. Sirve de recepcionista virtual, permitiendo que los autores de llamadas se enruten automáticamente a la persona o departamento adecuados sin necesidad de un operador humano. Puede seleccionar un operador automático existente o crearlo a través del Centro de administración de Teams.
Obtenga más información sobre cómo crear un operador automático mediante el Centro de administración de Teams aquí.
Buscar el id. de objeto para el operador automático
Después de crear el operador automático, es necesario encontrar el id. de objeto correlacionado para usarlo más adelante para las llamadas. El id. de objeto está conectado a la cuenta de recursos que se adjuntó al operador automático: abra la pestaña Cuentas de recursos en Administración de Teams y busque el correo electrónico de la cuenta.
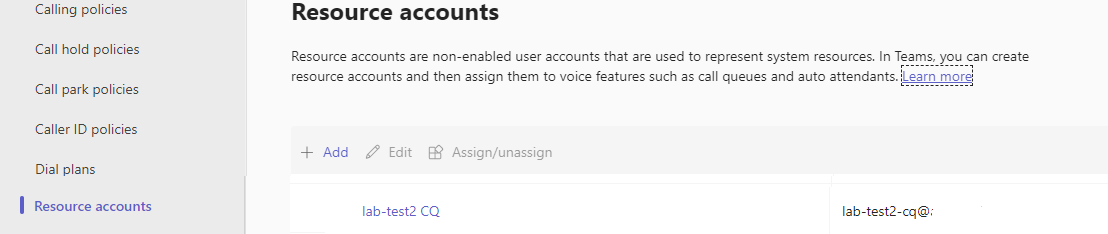 Toda la información necesaria para la cuenta de recursos se puede encontrar en Explorador de Microsoft Graph utilizando este correo electrónico en la búsqueda.
https://graph.microsoft.com/v1.0/users/lab-test2-cq-@contoso.com
En los resultados, encontraremos el campo "Id."
    "userPrincipalName": "lab-test2-cq@contoso.com",
    "id": "31a011c2-2672-4dd0-b6f9-9334ef4999db"
Prerrequisitos
- Obtenga una cuenta de Azure con una suscripción activa. Cree una cuenta gratuita.
- Versiones Active LTS y Maintenance LTS de Node.js (8.11.1 y 10.14.1)
- Cree un recurso activo de Communication Services. Cree un recurso de Communication Services.
Instalación
Creación de una aplicación Node.js
Abra la ventana de comandos o el terminal, cree un nuevo directorio para la aplicación y vaya al directorio.
mkdir calling-quickstart && cd calling-quickstart
Instalar el paquete
Use el comando npm install para instalar el SDK de llamadas de Azure Communication Services para JavaScript.
Importante
En este inicio rápido se usa la versión next del SDK de llamadas de Azure Communication Services.
npm install @azure/communication-common@next --save
npm install @azure/communication-calling@next --save
Instalación del marco de la aplicación
Esta guía de inicio rápido usa webpack para agrupar los recursos de la aplicación. Ejecute el siguiente comando para instalar los paquetes npm webpack, webpack-cli y webpack-dev-server, y los enumera como dependencias de desarrollo en el archivo package.json:
npm install copy-webpack-plugin@^11.0.0 webpack@^5.88.2 webpack-cli@^5.1.4 webpack-dev-server@^4.15.1 --save-dev
Cree un archivo index.html en el directorio raíz del proyecto. Este archivo lo usaremos para configurar un diseño básico que permitirá al usuario realizar una llamada de video 1:1.
Este es el código:
<!-- index.html -->
<!DOCTYPE html>
<html>
    <head>
        <title>Azure Communication Services - Calling Web SDK</title>
    </head>
    <body>
        <h4>Azure Communication Services - Calling Web SDK</h4>
        <input id="user-access-token"
            type="text"
            placeholder="User access token"
            style="margin-bottom:1em; width: 500px;"/>
        <button id="initialize-teams-call-agent" type="button">Initialize Call Agent</button>
        <br>
        <br>
        <input id="application-object-id"
            type="text"
            placeholder="Enter application objectId identity in format: 'APP_GUID'"
            style="margin-bottom:1em; width: 500px; display: block;"/>
        <button id="start-call-button" type="button" disabled="true">Start Call</button>
        <button id="hangup-call-button" type="button" disabled="true">Hang up Call</button>
        <button id="accept-call-button" type="button" disabled="true">Accept Call</button>
        <button id="start-video-button" type="button" disabled="true">Start Video</button>
        <button id="stop-video-button" type="button" disabled="true">Stop Video</button>
        <br>
        <br>
        <div id="connectedLabel" style="color: #13bb13;" hidden>Call is connected!</div>
        <br>
        <div id="remoteVideoContainer" style="width: 40%;" hidden>Remote participants' video streams:</div>
        <br>
        <div id="localVideoContainer" style="width: 30%;" hidden>Local video stream:</div>
        <!-- points to the bundle generated from client.js -->
        <script src="./main.js"></script>
    </body>
</html>
Modelo de objetos del SDK web de llamada de Azure Communication Services
Las siguientes clases e interfaces administran algunas de las características principales de Calling SDK de Azure Communication Services:
| Nombre | Descripción |
|---|---|
CallClient |
El punto de entrada principal al SDK de llamadas. |
CallAgent |
Se utiliza para iniciar y administrar las llamadas. |
DeviceManager |
Se usa para administrar dispositivos multimedia. |
Call |
Se usa para representar una llamada. |
LocalVideoStream |
Se usa para crear una secuencia de vídeo local para un dispositivo de cámara en el sistema local. |
RemoteParticipant |
Se usa para representar a un participante remoto de la llamada. |
RemoteVideoStream |
Se usa para representar una secuencia de vídeo remota desde un participante remoto. |
Cree un archivo en el directorio raíz del proyecto denominado client.js que contendrá la lógica de la aplicación para esta guía de inicio rápido. Agregue el código siguiente a client.js:
// Make sure to install the necessary dependencies
const { CallClient, VideoStreamRenderer, LocalVideoStream } = require('@azure/communication-calling');
const { AzureCommunicationTokenCredential } = require('@azure/communication-common');
const { AzureLogger, setLogLevel } = require("@azure/logger");
// Set the log level and output
setLogLevel('verbose');
AzureLogger.log = (...args) => {
    console.log(...args);
};
// Calling web sdk objects
let callAgent;
let deviceManager;
let call;
let incomingCall;
let localVideoStream;
let localVideoStreamRenderer;
// UI widgets
let userAccessToken = document.getElementById('user-access-token');
let applicationObjectId = document.getElementById('application-object-id');
let initializeCallAgentButton = document.getElementById('initialize-teams-call-agent');
let startCallButton = document.getElementById('start-call-button');
let hangUpCallButton = document.getElementById('hangup-call-button');
let acceptCallButton = document.getElementById('accept-call-button');
let startVideoButton = document.getElementById('start-video-button');
let stopVideoButton = document.getElementById('stop-video-button');
let connectedLabel = document.getElementById('connectedLabel');
let remoteVideoContainer = document.getElementById('remoteVideoContainer');
let localVideoContainer = document.getElementById('localVideoContainer');
/**
 * Create an instance of CallClient. Initialize a CallAgent instance with a AzureCommunicationTokenCredential via created CallClient. CallAgent enables us to make outgoing calls and receive incoming calls.
 * You can then use the CallClient.getDeviceManager() API instance to get the DeviceManager.
 */
initializeCallAgentButton.onclick = async () => {
    try {
        const callClient = new CallClient();
        tokenCredential = new AzureCommunicationTokenCredential(userAccessToken.value.trim());
        callAgent = await callClient.createCallAgent(tokenCredential)
        // Set up a camera device to use.
        deviceManager = await callClient.getDeviceManager();
        await deviceManager.askDevicePermission({ video: true });
        await deviceManager.askDevicePermission({ audio: true });
        // Listen for an incoming call to accept.
        callAgent.on('incomingCall', async (args) => {
            try {
                incomingCall = args.incomingCall;
                acceptCallButton.disabled = false;
                startCallButton.disabled = true;
            } catch (error) {
                console.error(error);
            }
        });
        startCallButton.disabled = false;
        initializeCallAgentButton.disabled = true;
    } catch(error) {
        console.error(error);
    }
}
/**
 * Place a 1:1 outgoing video call to an Teams Auto attendant
 * Add an event listener to initiate a call when the `startCallButton` is selected.
 * Enumerate local cameras using the deviceManager `getCameraList` API.
 * In this quickstart, we're using the first camera in the collection. Once the desired camera is selected, a
 * LocalVideoStream instance will be constructed and passed within `videoOptions` as an item within the
 * localVideoStream array to the call method. When the call connects, your application will be sending a video stream to the other participant.
 */
startCallButton.onclick = async () => {
    try {
        const localVideoStream = await createLocalVideoStream();
        const videoOptions = localVideoStream ? { localVideoStreams: [localVideoStream] } : undefined;
        call = callAgent.startCall([{ teamsAppId: applicationObjectId.value.trim(), cloud:"public" }], { videoOptions: videoOptions });
        // Subscribe to the call's properties and events.
        subscribeToCall(call);
    } catch (error) {
        console.error(error);
    }
}
/**
 * Accepting an incoming call with a video
 * Add an event listener to accept a call when the `acceptCallButton` is selected.
 * You can accept incoming calls after subscribing to the `CallAgent.on('incomingCall')` event.
 * You can pass the local video stream to accept the call with the following code.
 */
acceptCallButton.onclick = async () => {
    try {
        const localVideoStream = await createLocalVideoStream();
        const videoOptions = localVideoStream ? { localVideoStreams: [localVideoStream] } : undefined;
        call = await incomingCall.accept({ videoOptions });
        // Subscribe to the call's properties and events.
        subscribeToCall(call);
    } catch (error) {
        console.error(error);
    }
}
// Subscribe to a call obj.
// Listen for property changes and collection udpates.
subscribeToCall = (call) => {
    try {
        // Inspect the initial call.id value.
        console.log(`Call Id: ${call.id}`);
        //Subsribe to call's 'idChanged' event for value changes.
        call.on('idChanged', () => {
            console.log(`Call ID changed: ${call.id}`);
        });
        // Inspect the initial call.state value.
        console.log(`Call state: ${call.state}`);
        // Subscribe to call's 'stateChanged' event for value changes.
        call.on('stateChanged', async () => {
            console.log(`Call state changed: ${call.state}`);
            if(call.state === 'Connected') {
                connectedLabel.hidden = false;
                acceptCallButton.disabled = true;
                startCallButton.disabled = true;
                hangUpCallButton.disabled = false;
                startVideoButton.disabled = false;
                stopVideoButton.disabled = false;
            } else if (call.state === 'Disconnected') {
                connectedLabel.hidden = true;
                startCallButton.disabled = false;
                hangUpCallButton.disabled = true;
                startVideoButton.disabled = true;
                stopVideoButton.disabled = true;
                console.log(`Call ended, call end reason={code=${call.callEndReason.code}, subCode=${call.callEndReason.subCode}}`);
            }
        });

        call.on('isLocalVideoStartedChanged', () => {
            console.log(`isLocalVideoStarted changed: ${call.isLocalVideoStarted}`);
        });
        console.log(`isLocalVideoStarted: ${call.isLocalVideoStarted}`);
        call.localVideoStreams.forEach(async (lvs) => {
            localVideoStream = lvs;
            await displayLocalVideoStream();
        });
        call.on('localVideoStreamsUpdated', e => {
            e.added.forEach(async (lvs) => {
                localVideoStream = lvs;
                await displayLocalVideoStream();
            });
            e.removed.forEach(lvs => {
               removeLocalVideoStream();
            });
        });

        // Inspect the call's current remote participants and subscribe to them.
        call.remoteParticipants.forEach(remoteParticipant => {
            subscribeToRemoteParticipant(remoteParticipant);
        });
        // Subscribe to the call's 'remoteParticipantsUpdated' event to be
        // notified when new participants are added to the call or removed from the call.
        call.on('remoteParticipantsUpdated', e => {
            // Subscribe to new remote participants that are added to the call.
            e.added.forEach(remoteParticipant => {
                subscribeToRemoteParticipant(remoteParticipant)
            });
            // Unsubscribe from participants that are removed from the call
            e.removed.forEach(remoteParticipant => {
                console.log('Remote participant removed from the call.');
            });
        });
    } catch (error) {
        console.error(error);
    }
}
// Subscribe to a remote participant obj.
// Listen for property changes and collection udpates.
subscribeToRemoteParticipant = (remoteParticipant) => {
    try {
        // Inspect the initial remoteParticipant.state value.
        console.log(`Remote participant state: ${remoteParticipant.state}`);
        // Subscribe to remoteParticipant's 'stateChanged' event for value changes.
        remoteParticipant.on('stateChanged', () => {
            console.log(`Remote participant state changed: ${remoteParticipant.state}`);
        });
        // Inspect the remoteParticipants's current videoStreams and subscribe to them.
        remoteParticipant.videoStreams.forEach(remoteVideoStream => {
            subscribeToRemoteVideoStream(remoteVideoStream)
        });
        // Subscribe to the remoteParticipant's 'videoStreamsUpdated' event to be
        // notified when the remoteParticiapant adds new videoStreams and removes video streams.
        remoteParticipant.on('videoStreamsUpdated', e => {
            // Subscribe to newly added remote participant's video streams.
            e.added.forEach(remoteVideoStream => {
                subscribeToRemoteVideoStream(remoteVideoStream)
            });
            // Unsubscribe from newly removed remote participants' video streams.
            e.removed.forEach(remoteVideoStream => {
                console.log('Remote participant video stream was removed.');
            })
        });
    } catch (error) {
        console.error(error);
    }
}
/**
 * Subscribe to a remote participant's remote video stream obj.
 * You have to subscribe to the 'isAvailableChanged' event to render the remoteVideoStream. If the 'isAvailable' property
 * changes to 'true' a remote participant is sending a stream. Whenever the availability of a remote stream changes
 * you can choose to destroy the whole 'Renderer' a specific 'RendererView' or keep them. Displaying RendererView without a video stream will result in a blank video frame.
 */
subscribeToRemoteVideoStream = async (remoteVideoStream) => {
    // Create a video stream renderer for the remote video stream.
    let videoStreamRenderer = new VideoStreamRenderer(remoteVideoStream);
    let view;
    const renderVideo = async () => {
        try {
            // Create a renderer view for the remote video stream.
            view = await videoStreamRenderer.createView();
            // Attach the renderer view to the UI.
            remoteVideoContainer.hidden = false;
            remoteVideoContainer.appendChild(view.target);
        } catch (e) {
            console.warn(`Failed to createView, reason=${e.message}, code=${e.code}`);
        }
    }

    remoteVideoStream.on('isAvailableChanged', async () => {
        // Participant has switched video on.
        if (remoteVideoStream.isAvailable) {
            await renderVideo();
        // Participant has switched video off.
        } else {
            if (view) {
                view.dispose();
                view = undefined;
            }
        }
    });
    // Participant has video on initially.
    if (remoteVideoStream.isAvailable) {
        await renderVideo();
    }
}
// Start your local video stream.
// This will send your local video stream to remote participants so they can view it.
startVideoButton.onclick = async () => {
    try {
        const localVideoStream = await createLocalVideoStream();
        await call.startVideo(localVideoStream);
    } catch (error) {
        console.error(error);
    }
}
// Stop your local video stream.
// This will stop your local video stream from being sent to remote participants.
stopVideoButton.onclick = async () => {
    try {
        await call.stopVideo(localVideoStream);
    } catch (error) {
        console.error(error);
    }
}
/**
 * To render a LocalVideoStream, you need to create a new instance of VideoStreamRenderer, and then
 * create a new VideoStreamRendererView instance using the asynchronous createView() method.
 * You may then attach view.target to any UI element.
 */
// Create a local video stream for your camera device
createLocalVideoStream = async () => {
    const camera = (await deviceManager.getCameras())[0];
    if (camera) {
        return new LocalVideoStream(camera);
    } else {
        console.error(`No camera device found on the system`);
    }
}
// Display your local video stream preview in your UI
displayLocalVideoStream = async () => {
    try {
        localVideoStreamRenderer = new VideoStreamRenderer(localVideoStream);
        const view = await localVideoStreamRenderer.createView();
        localVideoContainer.hidden = false;
        localVideoContainer.appendChild(view.target);
    } catch (error) {
        console.error(error);
    }
}
// Remove your local video stream preview from your UI
removeLocalVideoStream = async() => {
    try {
        localVideoStreamRenderer.dispose();
        localVideoContainer.hidden = true;
    } catch (error) {
        console.error(error);
    }
}
// End the current call
hangUpCallButton.addEventListener("click", async () => {
    // end the current call
    await call.hangUp();
});
Agregar el código del servidor local del paquete web
Cree un archivo en el directorio raíz del proyecto denominado webpack.config.js que contendrá la lógica de la aplicación para esta guía de inicio rápido. Agregue el siguiente código a webpack.config.js:
const path = require('path');
const CopyPlugin = require("copy-webpack-plugin");

module.exports = {
    mode: 'development',
    entry: './client.js',
    output: {
        filename: 'main.js',
        path: path.resolve(__dirname, 'dist'),
    },
    devServer: {
        static: {
            directory: path.join(__dirname, './')
        },
    },
    plugins: [
        new CopyPlugin({
            patterns: [
                './index.html'
            ]
        }),
    ]
};
Ejecución del código
Utilice webpack-dev-server para compilar y ejecutar la aplicación. Ejecute el siguiente comando para agrupar el host de aplicación en un servidor web local:
npx webpack serve --config webpack.config.js
Pasos manuales para configurar la llamada:
- Abra el explorador web y vaya a http://localhost:8080/.
- Escribir un token de acceso de usuario válido. Consulte la documentación relativa al token de acceso de usuario si aún no tiene ningún token de acceso disponible para utilizarlo.
- Haga clic en los botones "Inicializar agente de llamada".
- Escriba el id. de objeto del operador automático y seleccione el botón "Iniciar llamada". La aplicación iniciará la llamada saliente al operador automático con el id. de objeto especificado.
- La llamada está conectada al operador automático.
- El usuario de Communication Services se enruta a través del operador automático en función de su configuración.
Limpieza de recursos
Si quiere limpiar y quitar una suscripción a Communication Services, puede eliminar el recurso o grupo de recursos. Al eliminar el grupo de recursos, también se elimina cualquier otro recurso que esté asociado a él. Obtenga más información sobre la limpieza de recursos.
Pasos siguientes
Para más información, consulte los siguientes artículos.
- Introducción a las llamadas de interfaz de usuario a Aplicaciones de voz de Teams
- Más información sobre las Funcionalidades del SDK de llamadas
- Más información sobre cómo funciona la llamada