Crear aplicaciones básicas de MVC de ASP.NET con Microsoft Graph
Este tutorial te enseña a crear una aplicación web ASP.NET Core que use la API de Microsoft Graph para recuperar información de calendario para un usuario.
Sugerencia
Si prefiere descargar el tutorial completado, puede descargar o clonar el repositorio GitHub archivo. Consulta el archivo README en la carpeta de demostración para obtener instrucciones sobre cómo configurar la aplicación con un identificador de aplicación y un secreto.
Requisitos previos
Antes de iniciar este tutorial, debe tener instalado el SDK de .NET Core en el equipo de desarrollo. Si no tiene el SDK, visite el vínculo anterior para ver las opciones de descarga.
También debe tener una cuenta personal de Microsoft con un buzón en Outlook.com, o una cuenta de Trabajo o escuela de Microsoft. Si no tienes una cuenta de Microsoft, hay un par de opciones para obtener una cuenta gratuita:
- Puedes suscribirte a una nueva cuenta personal de Microsoft.
- Puedes suscribirte al programa Microsoft 365 desarrolladores para obtener una suscripción Office 365 gratuita.
Nota
Este tutorial se escribió con .NET Core SDK versión 5.0.102. Los pasos de esta guía pueden funcionar con otras versiones, pero eso no se ha probado.
Comentarios
Proporcione cualquier comentario sobre este tutorial en el repositorio GitHub usuario.
Crear una aplicación Web de MVC ASP.NET Core
Comience creando una aplicación ASP.NET Core web.
Abra la interfaz de línea de comandos (CLI) en un directorio donde desee crear el proyecto. Ejecuta el siguiente comando.
dotnet new mvc -o GraphTutorialUna vez creado el proyecto, compruebe que funciona cambiando el directorio actual al directorio GraphTutorial y ejecutando el siguiente comando en la CLI.
dotnet runAbra el explorador y vaya a
https://localhost:5001. Si todo funciona, debería ver una página ASP.NET Core predeterminada.
Importante
Si recibe una advertencia de que el certificado de localhost no es de confianza, puede usar la CLI de .NET Core para instalar y confiar en el certificado de desarrollo. Consulta Aplicar HTTPS en ASP.NET Core para obtener instrucciones para sistemas operativos específicos.
Agregar paquetes NuGet
Antes de seguir, instala algunos paquetes NuGet que usarás más adelante.
- Microsoft.Identity.Web para solicitar y administrar tokens de acceso.
- Microsoft.Identity.Web.MicrosoftGraph para agregar el SDK de Microsoft Graph mediante la inserción de dependencias.
- Microsoft.Identity.Web.UI para la interfaz de usuario de inicio de sesión e inicio de sesión.
- TimeZoneConverter para controlar los identificadores de zonas horarias entre plataformas.
Ejecute los siguientes comandos en la CLI para instalar las dependencias.
dotnet add package Microsoft.Identity.Web --version 1.5.1
dotnet add package Microsoft.Identity.Web.MicrosoftGraph --version 1.5.1
dotnet add package Microsoft.Identity.Web.UI --version 1.5.1
dotnet add package TimeZoneConverter
Diseñar la aplicación
En esta sección, crearás la estructura básica de la interfaz de usuario de la aplicación.
Implementar métodos de extensión de alerta
En esta sección, creará métodos de extensión para el tipo IActionResult devuelto por las vistas de controlador. Esta extensión permitirá pasar mensajes temporales de error o de éxito a la vista.
Sugerencia
Puede usar cualquier editor de texto para editar los archivos de origen de este tutorial. Sin embargo, Visual Studio Code proporciona características adicionales, como la depuración y Intellisense.
Cree un nuevo directorio en el directorio GraphTutorial denominado Alerts.
Cree un nuevo archivo denominado WithAlertResult.cs en el directorio ./Alerts y agregue el código siguiente.
using Microsoft.AspNetCore.Mvc;
using Microsoft.AspNetCore.Mvc.ViewFeatures;
using Microsoft.Extensions.DependencyInjection;
using System.Threading.Tasks;

namespace GraphTutorial
{
    // WithAlertResult adds temporary error/info/success
    // messages to the result of a controller action.
    // This data is read and displayed by the _AlertPartial view
    public class WithAlertResult : IActionResult
    {
        public IActionResult Result { get; }
        public string Type { get; }
        public string Message { get; }
        public string DebugInfo { get; }

        public WithAlertResult(IActionResult result,
                                    string type,
                                    string message,
                                    string debugInfo)
        {
            Result = result;
            Type = type;
            Message = message;
            DebugInfo = debugInfo;
        }

        public async Task ExecuteResultAsync(ActionContext context)
        {
            var factory = context.HttpContext.RequestServices
            .GetService<ITempDataDictionaryFactory>();

            var tempData = factory.GetTempData(context.HttpContext);

            tempData["_alertType"] = Type;
            tempData["_alertMessage"] = Message;
            tempData["_alertDebugInfo"] = DebugInfo;

            await Result.ExecuteResultAsync(context);
        }
    }
}
Cree un nuevo archivo denominado AlertExtensions.cs en el directorio ./Alerts y agregue el siguiente código.
using Microsoft.AspNetCore.Mvc;

namespace GraphTutorial
{
    public static class AlertExtensions
    {
        public static IActionResult WithError(this IActionResult result,
                                            string message,
                                            string debugInfo = null)
        {
            return Alert(result, "danger", message, debugInfo);
        }

        public static IActionResult WithSuccess(this IActionResult result,
                                            string message,
                                            string debugInfo = null)
        {
            return Alert(result, "success", message, debugInfo);
        }

        public static IActionResult WithInfo(this IActionResult result,
                                            string message,
                                            string debugInfo = null)
        {
            return Alert(result, "info", message, debugInfo);
        }

        private static IActionResult Alert(IActionResult result,
                                        string type,
                                        string message,
                                        string debugInfo)
        {
            return new WithAlertResult(result, type, message, debugInfo);
        }
    }
}
Implementar métodos de extensión de datos de usuario
En esta sección, creará métodos de extensión para el ClaimsPrincipal objeto generado por la plataforma Microsoft Identity. Esto le permitirá ampliar la identidad de usuario existente con datos de Microsoft Graph.
Nota
Este código es solo un marcador de posición por ahora, lo completará en una sección posterior.
Cree un nuevo directorio en el directorio GraphTutorial denominado Graph.
Cree un nuevo archivo denominado GraphClaimsPrincipalExtensions.cs y agregue el siguiente código.
using System.Security.Claims;

namespace GraphTutorial
{
    public static class GraphClaimTypes {
        public const string DisplayName ="graph_name";
        public const string Email = "graph_email";
        public const string Photo = "graph_photo";
        public const string TimeZone = "graph_timezone";
        public const string DateTimeFormat = "graph_datetimeformat";
    }

    // Helper methods to access Graph user data stored in
    // the claims principal
    public static class GraphClaimsPrincipalExtensions
    {
        public static string GetUserGraphDisplayName(this ClaimsPrincipal claimsPrincipal)
        {
            return "Adele Vance";
        }

        public static string GetUserGraphEmail(this ClaimsPrincipal claimsPrincipal)
        {
            return "adelev@contoso.com";
        }

        public static string GetUserGraphPhoto(this ClaimsPrincipal claimsPrincipal)
        {
            return "/img/no-profile-photo.png";
        }
    }
}
Crear vistas
En esta sección, implementará las vistas de Razor para la aplicación.
Agregue un nuevo archivo denominado _LoginPartial.cshtml en el directorio ./Views/Shared y agregue el código siguiente.
@using GraphTutorial

<ul class="nav navbar-nav">
@if (User.Identity.IsAuthenticated)
{
    <li class="nav-item dropdown">
        <a class="nav-link dropdown-toggle" data-toggle="dropdown" href="#" role="button">
            <img src="@User.GetUserGraphPhoto()" class="nav-profile-photo rounded-circle align-self-center mr-2">
        </a>
        <div class="dropdown-menu dropdown-menu-right">
            <h5 class="dropdown-item-text mb-0">@User.GetUserGraphDisplayName()</h5>
            <p class="dropdown-item-text text-muted mb-0">@User.GetUserGraphEmail()</p>
            <div class="dropdown-divider"></div>
            <a class="dropdown-item" asp-area="MicrosoftIdentity" asp-controller="Account" asp-action="SignOut">Sign out</a>
        </div>
    </li>
}
else
{
    <li class="nav-item">
        <a class="nav-link" asp-area="MicrosoftIdentity" asp-controller="Account" asp-action="SignIn">Sign in</a>
    </li>
}
</ul>
Agregue un nuevo archivo denominado _AlertPartial.cshtml en el directorio ./Views/Shared y agregue el código siguiente.
@{
    var type = $"{TempData["_alertType"]}";
    var message = $"{TempData["_alertMessage"]}";
    var debugInfo = $"{TempData["_alertDebugInfo"]}";
}

@if (!string.IsNullOrEmpty(type))
{
    <div class="alert alert-@type" role="alert">
        @if (string.IsNullOrEmpty(debugInfo))
        {
            <p class="mb-0">@message</p>
        }
        else
        {
            <p class="mb-3">@message</p>
            <pre class="alert-pre border bg-light p-2"><code>@debugInfo</code></pre>
        }
    </div>
}
Abra el archivo ./Views/Shared/_Layout.cshtml y reemplace todo su contenido con el siguiente código para actualizar el diseño global de la aplicación.
@{
    string controller = $"{ViewContext.RouteData.Values["controller"]}";
}

<!DOCTYPE html>
<html lang="en">
<head>
    <meta charset="utf-8" />
    <meta name="viewport" content="width=device-width, initial-scale=1.0" />
    <title>@ViewData["Title"] - GraphTutorial</title>
    <link rel="stylesheet" href="~/lib/bootstrap/dist/css/bootstrap.min.css" />
    <link rel="stylesheet" href="~/css/site.css" />
</head>
<body>
    <header>
        <nav class="navbar navbar-expand-sm navbar-toggleable-sm navbar-dark bg-dark border-bottom box-shadow mb-3">
            <div class="container">
                <a class="navbar-brand" asp-area="" asp-controller="Home" asp-action="Index">GraphTutorial</a>
                <button class="navbar-toggler" type="button" data-toggle="collapse" data-target=".navbar-collapse"
                    aria-controls="navbarSupportedContent" aria-expanded="false" aria-label="Toggle navigation">
                    <span class="navbar-toggler-icon"></span>
                </button>
                <div class="navbar-collapse collapse mr-auto">
                    <ul class="navbar-nav flex-grow-1">
                        <li class="@(controller == "Home" ? "nav-item active" : "nav-item")">
                            <a class="nav-link" asp-area="" asp-controller="Home" asp-action="Index">Home</a>
                        </li>
                        @if (User.Identity.IsAuthenticated)
                        {
                        <li class="@(controller == "Calendar" ? "nav-item active" : "nav-item")">
                            <a class="nav-link" asp-area="" asp-controller="Calendar" asp-action="Index">Calendar</a>
                        </li>
                        }
                    </ul>
                    <partial name="_LoginPartial"/>
                </div>
            </div>
        </nav>
    </header>
    <div class="container">
        <main role="main" class="pb-3">
            <partial name="_AlertPartial"/>
            @RenderBody()
        </main>
    </div>

    <footer class="border-top footer text-muted">
        <div class="container">
            © 2020 - GraphTutorial - <a asp-area="" asp-controller="Home" asp-action="Privacy">Privacy</a>
        </div>
    </footer>
    <script src="~/lib/jquery/dist/jquery.min.js"></script>
    <script src="~/lib/bootstrap/dist/js/bootstrap.bundle.min.js"></script>
    <script src="~/js/site.js" asp-append-version="true"></script>
    @RenderSection("Scripts", required: false)
</body>
</html>
Abra ./wwwroot/css/site.css y agregue el siguiente código en la parte inferior del archivo.
.nav-profile-photo {
  width: 32px;
}

.alert-pre {
  word-wrap: break-word;
  word-break: break-all;
  white-space: pre-wrap;
}

.calendar-view-date-cell {
  width: 150px;
}

.calendar-view-date {
  width: 40px;
  font-size: 36px;
  line-height: 36px;
  margin-right: 10px;
}

.calendar-view-month {
  font-size: 0.75em;
}

.calendar-view-timespan {
  width: 200px;
}

.calendar-view-subject {
  font-size: 1.25em;
}

.calendar-view-organizer {
  font-size: .75em;
}

.calendar-view-date-diff {
  font-size: .75em
}
Abra el archivo ./Views/Home/index.cshtml y reemplace su contenido por lo siguiente.
@{
    ViewData["Title"] = "Home Page";
}

@using GraphTutorial

<div class="jumbotron">
    <h1>ASP.NET Core Graph Tutorial</h1>
    <p class="lead">This sample app shows how to use the Microsoft Graph API to access a user's data from ASP.NET Core</p>
    @if (User.Identity.IsAuthenticated)
    {
        <h4>Welcome @User.GetUserGraphDisplayName()!</h4>
        <p>Use the navigation bar at the top of the page to get started.</p>
    }
    else
    {
        <a class="btn btn-primary btn-large" asp-area="MicrosoftIdentity" asp-controller="Account" asp-action="SignIn">Click here to sign in</a>
    }
</div>
Cree un nuevo directorio en el directorio ./wwwroot denominado img. Agregue un archivo de imagen de su elección denominado no-profile-photo.png en este directorio. Esta imagen se usará como foto del usuario cuando el usuario no tenga ninguna foto en Microsoft Graph.
Sugerencia
Puedes descargar la imagen usada en estas capturas de pantalla desde GitHub.
Guarde todos los cambios y reinicie el servidor (
dotnet run). Ahora, la aplicación debe tener un aspecto muy diferente.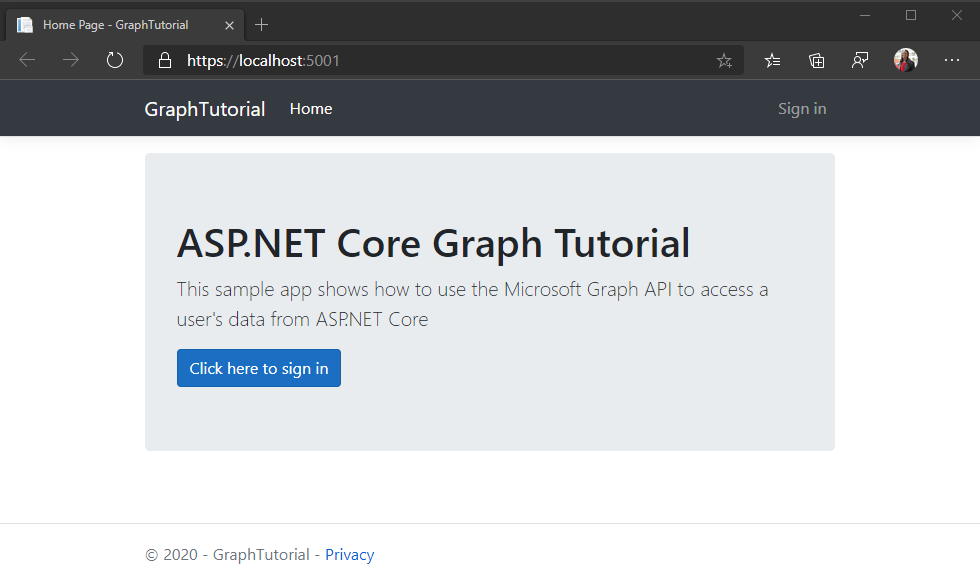
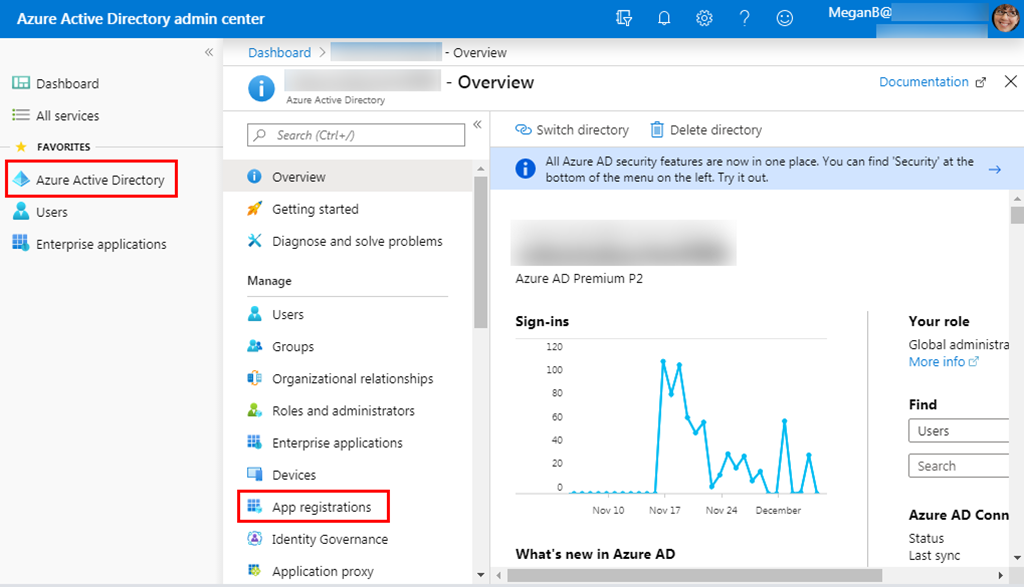
Registrar la aplicación en el portal
En este ejercicio, creará un nuevo registro Azure AD aplicación web mediante el Centro Azure Active Directory administración.
Abra un explorador y vaya al centro de administración de Azure Active Directory. Inicie sesión con una cuenta personal (también conocida como: cuenta Microsoft) o una cuenta profesional o educativa.
Seleccione Azure Active Directory en el panel de navegación izquierdo y, a continuación, seleccione Registros de aplicaciones en Administrar.
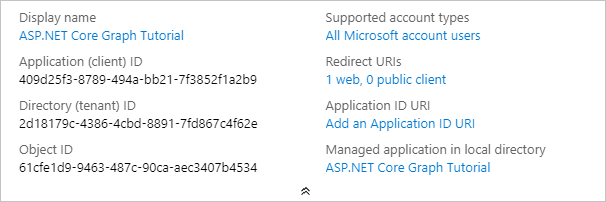
Seleccione Nuevo registro. En la página Registrar una aplicación, establezca los valores siguientes.
- Establezca Nombre como
ASP.NET Core Graph Tutorial. - Establezca Tipos de cuenta admitidos en Cuentas en cualquier directorio de organización y cuentas personales de Microsoft.
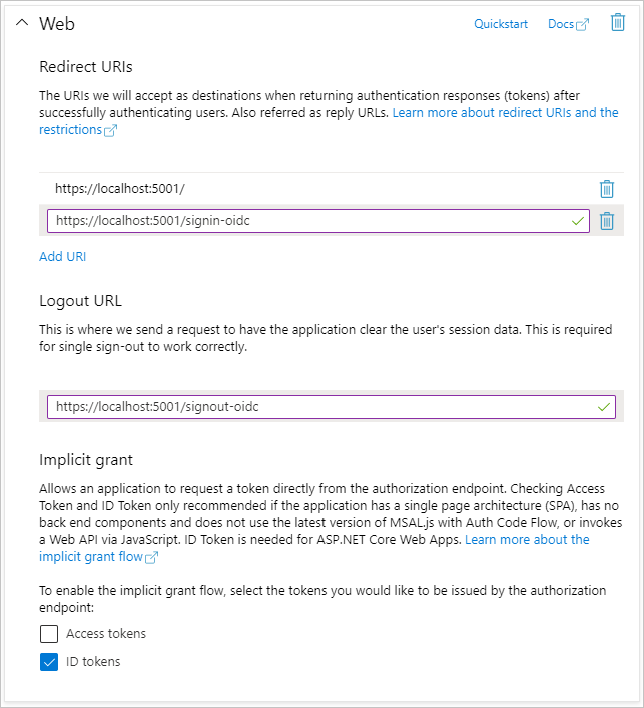
- En URI de redirección, establezca la primera lista desplegable en
Weby establezca el valorhttps://localhost:5001/.

- Establezca Nombre como
Seleccione Registrar. En la ASP.NET Core Graph tutorial, copie el valor del identificador de aplicación (cliente) y guárdelo, lo necesitará en el siguiente paso.
Seleccione Autenticación en Administrar. En Uri de redireccionamiento , agregue un URI con el valor
https://localhost:5001/signin-oidc.Establezca la dirección URL de cierre de sesión en
https://localhost:5001/signout-oidc.Busque la sección Concesión implícita y habilite los tokens de ID. Haga clic en Guardar.
Seleccione Certificados y secretos en Administrar. Seleccione el botón Nuevo secreto de cliente. Escriba un valor en Descripción, y seleccione una de las opciones para Expira, y después, Agregar.

Copie el valor del secreto del cliente antes de salir de esta página. Lo necesitará en el siguiente paso.
Importante
El secreto de cliente no se vuelve a mostrar, así que asegúrese de copiarlo en este momento.

Agregar autenticación de Azure AD
En este ejercicio, extenderá la aplicación desde el ejercicio anterior para admitir la autenticación con Azure AD. Esto es necesario para obtener el token de acceso OAuth necesario para llamar a la API de Microsoft Graph. En este paso, configurará la biblioteca Microsoft.Identity.Web .
Importante
Para evitar almacenar el identificador de aplicación y el secreto en el origen, usará el Administrador de secretos de .NET para almacenar estos valores. El Administrador de secretos solo tiene fines de desarrollo, las aplicaciones de producción deben usar un administrador de secretos de confianza para almacenar secretos.
Abra ./appsettings.json y reemplace su contenido por lo siguiente.
{
  "AzureAd": {
    "Instance": "https://login.microsoftonline.com/",
    "TenantId": "common",
    "CallbackPath": "/signin-oidc"
  },
  "Logging": {
    "LogLevel": {
      "Default": "Information",
      "Microsoft": "Warning",
      "Microsoft.Hosting.Lifetime": "Information"
    }
  },
  "AllowedHosts": "*"
}
Abra la CLI en el directorio donde se encuentra GraphTutorial.csproj y ejecute los siguientes comandos,
YOUR_APP_IDsustituyéndolo por el identificador de la aplicación desde Azure Portal yYOUR_APP_SECRETcon el secreto de la aplicación.dotnet user-secrets init dotnet user-secrets set "AzureAd:ClientId" "YOUR_APP_ID" dotnet user-secrets set "AzureAd:ClientSecret" "YOUR_APP_SECRET"
Implementar el inicio de sesión
Comience agregando los servicios de la plataforma Microsoft Identity a la aplicación.
Cree un nuevo archivo denominado GraphConstants.cs en el directorio ./Graph y agregue el siguiente código.
namespace GraphTutorial
{
    public static class GraphConstants
    {
        // Defines the permission scopes used by the app
        public readonly static string[] Scopes =
        {
            "User.Read",
            "MailboxSettings.Read",
            "Calendars.ReadWrite"
        };
    }
}
Abra el archivo ./Startup.cs y agregue las siguientes
usinginstrucciones a la parte superior del archivo.using Microsoft.AspNetCore.Authentication.OpenIdConnect; using Microsoft.AspNetCore.Authorization; using Microsoft.AspNetCore.Mvc.Authorization; using Microsoft.Identity.Web; using Microsoft.Identity.Web.UI; using Microsoft.IdentityModel.Protocols.OpenIdConnect; using Microsoft.Graph; using System.Net; using System.Net.Http.Headers;Reemplace la función
ConfigureServicesexistente por lo siguiente.public void ConfigureServices(IServiceCollection services) { services // Use OpenId authentication .AddAuthentication(OpenIdConnectDefaults.AuthenticationScheme) // Specify this is a web app and needs auth code flow .AddMicrosoftIdentityWebApp(Configuration) // Add ability to call web API (Graph) // and get access tokens .EnableTokenAcquisitionToCallDownstreamApi(options => { Configuration.Bind("AzureAd", options); }, GraphConstants.Scopes) // Use in-memory token cache // See https://github.com/AzureAD/microsoft-identity-web/wiki/token-cache-serialization .AddInMemoryTokenCaches(); // Require authentication services.AddControllersWithViews(options => { var policy = new AuthorizationPolicyBuilder() .RequireAuthenticatedUser() .Build(); options.Filters.Add(new AuthorizeFilter(policy)); }) // Add the Microsoft Identity UI pages for signin/out .AddMicrosoftIdentityUI(); }En la
Configurefunción, agregue la siguiente línea encima de laapp.UseAuthorization();línea.app.UseAuthentication();Abra ./Controllers/HomeController.cs y reemplace su contenido por lo siguiente.
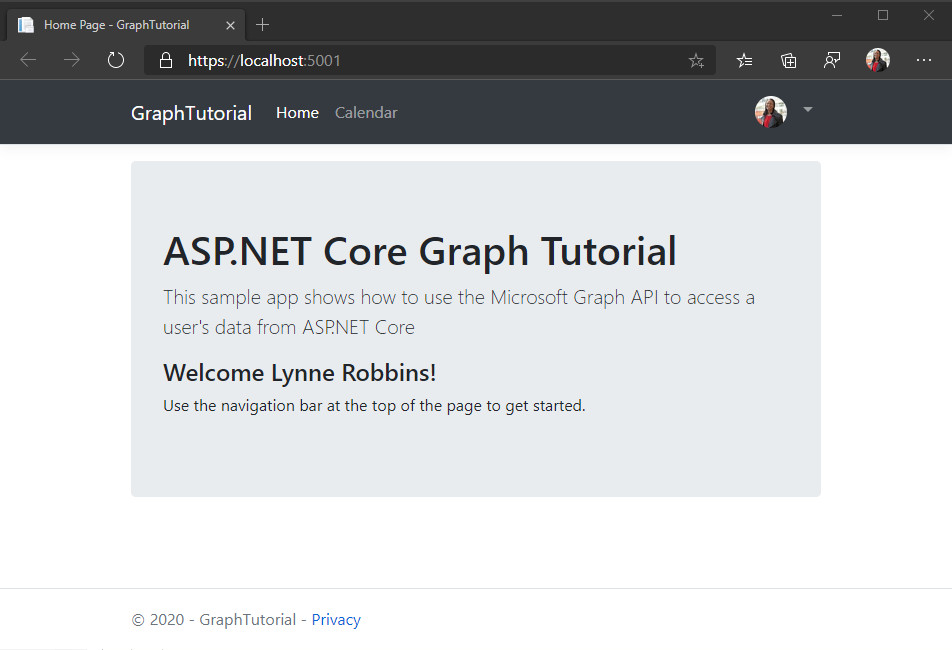
using GraphTutorial.Models;
using Microsoft.AspNetCore.Authorization;
using Microsoft.AspNetCore.Mvc;
using Microsoft.Extensions.Logging;
using Microsoft.Identity.Web;
using System.Diagnostics;
using System.Threading.Tasks;

namespace GraphTutorial.Controllers
{
    public class HomeController : Controller
    {
        ITokenAcquisition _tokenAcquisition;
        private readonly ILogger<HomeController> _logger;

        // Get the ITokenAcquisition interface via
        // dependency injection
        public HomeController(
            ITokenAcquisition tokenAcquisition,
            ILogger<HomeController> logger)
        {
            _tokenAcquisition = tokenAcquisition;
            _logger = logger;
        }

        public async Task<IActionResult> Index()
        {
            // TEMPORARY
            // Get the token and display it
            try
            {
                string token = await _tokenAcquisition
                    .GetAccessTokenForUserAsync(GraphConstants.Scopes);
                return View().WithInfo("Token acquired", token);
            }
            catch (MicrosoftIdentityWebChallengeUserException)
            {
                return Challenge();
            }
        }

        public IActionResult Privacy()
        {
            return View();
        }

        [ResponseCache(Duration = 0, Location = ResponseCacheLocation.None, NoStore = true)]
        public IActionResult Error()
        {
            return View(new ErrorViewModel { RequestId = Activity.Current?.Id ?? HttpContext.TraceIdentifier });
        }

        [ResponseCache(Duration = 0, Location = ResponseCacheLocation.None, NoStore = true)]
        [AllowAnonymous]
        public IActionResult ErrorWithMessage(string message, string debug)
        {
            return View("Index").WithError(message, debug);
        }
    }
}
Guarde los cambios e inicie el proyecto. Inicie sesión con su cuenta de Microsoft.
Examine el símbolo del sistema de consentimiento. La lista de permisos corresponde a una lista de ámbitos de permisos configurados en ./Graph/GraphConstants.cs.
- Mantenga el acceso a los datos a los que le ha concedido acceso: (
offline_access) MSAL solicita este permiso para recuperar tokens de actualización. - Inicia sesión y lee tu perfil: (
User.Read) Este permiso permite a la aplicación obtener el perfil y la foto de perfil del usuario que ha iniciado sesión. - Lea la configuración del buzón: (
MailboxSettings.Read) Este permiso permite a la aplicación leer la configuración del buzón del usuario, incluidos la zona horaria y el formato de hora. - Tener acceso completo a los calendarios: (
Calendars.ReadWrite) Este permiso permite a la aplicación leer eventos en el calendario del usuario, agregar nuevos eventos y modificar los existentes.
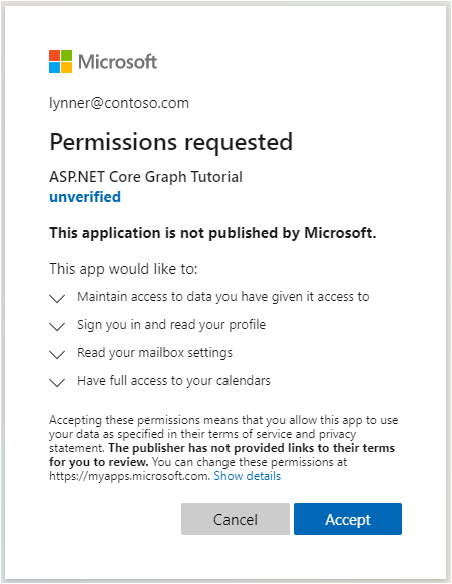
Para obtener más información sobre el consentimiento, vea Understanding Azure AD application consent experiences.
- Mantenga el acceso a los datos a los que le ha concedido acceso: (
Consentimiento para los permisos solicitados. El explorador redirige a la aplicación, que muestra el token.
Obtener detalles del usuario
Una vez que el usuario ha iniciado sesión, puede obtener su información desde Microsoft Graph.
Abra ./Graph/GraphClaimsPrincipalExtensions.cs y reemplace todo su contenido por lo siguiente.
using Microsoft.Graph;
using System;
using System.IO;
using System.Security.Claims;

namespace GraphTutorial
{
    public static class GraphClaimTypes {
        public const string DisplayName ="graph_name";
        public const string Email = "graph_email";
        public const string Photo = "graph_photo";
        public const string TimeZone = "graph_timezone";
        public const string TimeFormat = "graph_timeformat";
    }

    // Helper methods to access Graph user data stored in
    // the claims principal
    public static class GraphClaimsPrincipalExtensions
    {
        public static string GetUserGraphDisplayName(this ClaimsPrincipal claimsPrincipal)
        {
            return claimsPrincipal.FindFirstValue(GraphClaimTypes.DisplayName);
        }

        public static string GetUserGraphEmail(this ClaimsPrincipal claimsPrincipal)
        {
            return claimsPrincipal.FindFirstValue(GraphClaimTypes.Email);
        }

        public static string GetUserGraphPhoto(this ClaimsPrincipal claimsPrincipal)
        {
            return claimsPrincipal.FindFirstValue(GraphClaimTypes.Photo);
        }

        public static string GetUserGraphTimeZone(this ClaimsPrincipal claimsPrincipal)
        {
            return claimsPrincipal.FindFirstValue(GraphClaimTypes.TimeZone);
        }

        public static string GetUserGraphTimeFormat(this ClaimsPrincipal claimsPrincipal)
        {
            return claimsPrincipal.FindFirstValue(GraphClaimTypes.TimeFormat);
        }

        public static void AddUserGraphInfo(this ClaimsPrincipal claimsPrincipal, User user)
        {
            var identity = claimsPrincipal.Identity as ClaimsIdentity;

            identity.AddClaim(
                new Claim(GraphClaimTypes.DisplayName, user.DisplayName));
            identity.AddClaim(
                new Claim(GraphClaimTypes.Email,
                    user.Mail ?? user.UserPrincipalName));
            identity.AddClaim(
                new Claim(GraphClaimTypes.TimeZone,
                    user.MailboxSettings.TimeZone));
            identity.AddClaim(
                new Claim(GraphClaimTypes.TimeFormat, user.MailboxSettings.TimeFormat));
        }

        public static void AddUserGraphPhoto(this ClaimsPrincipal claimsPrincipal, Stream photoStream)
        {
            var identity = claimsPrincipal.Identity as ClaimsIdentity;

            if (photoStream == null)
            {
                // Add the default profile photo
                identity.AddClaim(
                    new Claim(GraphClaimTypes.Photo, "/img/no-profile-photo.png"));
                return;
            }

            // Copy the photo stream to a memory stream
            // to get the bytes out of it
            var memoryStream = new MemoryStream();
            photoStream.CopyTo(memoryStream);
            var photoBytes = memoryStream.ToArray();

            // Generate a date URI for the photo
            var photoUrl = $"data:image/png;base64,{Convert.ToBase64String(photoBytes)}";

            identity.AddClaim(
                new Claim(GraphClaimTypes.Photo, photoUrl));
        }
    }
}
Abra ./Startup.cs y reemplace la línea existente
.AddMicrosoftIdentityWebApp(Configuration)por el siguiente código.// Specify this is a web app and needs auth code flow .AddMicrosoftIdentityWebApp(options => { Configuration.Bind("AzureAd", options); options.Prompt = "select_account"; options.Events.OnTokenValidated = async context => { var tokenAcquisition = context.HttpContext.RequestServices .GetRequiredService<ITokenAcquisition>(); var graphClient = new GraphServiceClient( new DelegateAuthenticationProvider(async (request) => { var token = await tokenAcquisition .GetAccessTokenForUserAsync(GraphConstants.Scopes, user:context.Principal); request.Headers.Authorization = new AuthenticationHeaderValue("Bearer", token); }) ); // Get user information from Graph var user = await graphClient.Me.Request() .Select(u => new { u.DisplayName, u.Mail, u.UserPrincipalName, u.MailboxSettings }) .GetAsync(); context.Principal.AddUserGraphInfo(user); // Get the user's photo // If the user doesn't have a photo, this throws try { var photo = await graphClient.Me .Photos["48x48"] .Content .Request() .GetAsync(); context.Principal.AddUserGraphPhoto(photo); } catch (ServiceException ex) { if (ex.IsMatch("ErrorItemNotFound") || ex.IsMatch("ConsumerPhotoIsNotSupported")) { context.Principal.AddUserGraphPhoto(null); } else { throw; } } }; options.Events.OnAuthenticationFailed = context => { var error = WebUtility.UrlEncode(context.Exception.Message); context.Response .Redirect($"/Home/ErrorWithMessage?message=Authentication+error&debug={error}"); context.HandleResponse(); return Task.FromResult(0); }; options.Events.OnRemoteFailure = context => { if (context.Failure is OpenIdConnectProtocolException) { var error = WebUtility.UrlEncode(context.Failure.Message); context.Response .Redirect($"/Home/ErrorWithMessage?message=Sign+in+error&debug={error}"); context.HandleResponse(); } return Task.FromResult(0); }; })Tenga en cuenta lo que hace este código.
- Agrega un controlador de eventos para el
OnTokenValidatedevento.- Usa la interfaz
ITokenAcquisitionpara obtener un token de acceso. - Llama a Microsoft Graph para obtener el perfil y la foto del usuario.
- Agrega la información Graph a la identidad del usuario.
- Usa la interfaz
- Agrega un controlador de eventos para el
Agregue la siguiente llamada de función después de la
EnableTokenAcquisitionToCallDownstreamApillamada y antes de laAddInMemoryTokenCachesllamada.// Add a GraphServiceClient via dependency injection .AddMicrosoftGraph(options => { options.Scopes = string.Join(' ', GraphConstants.Scopes); })Esto hará que un GraphServiceClient autenticado esté disponible para los controladores mediante la inserción de dependencias.
Abra ./Controllers/HomeController.cs y reemplace la
Indexfunción por la siguiente.public IActionResult Index() { return View(); }Quite todas las referencias a
ITokenAcquisitionen la clase HomeController .Guarda los cambios, inicia la aplicación y pasa por el proceso de inicio de sesión. Debes volver a la página principal, pero la interfaz de usuario debe cambiar para indicar que has iniciado sesión.
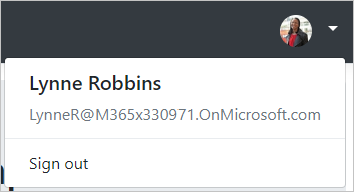
Haga clic en el avatar del usuario en la esquina superior derecha para obtener acceso al vínculo Cerrar sesión . Al hacer clic en Cerrar sesión, se restablece la sesión y se devuelve a la página principal.
Sugerencia
Si no ve el nombre de usuario en la página principal y falta el nombre y el correo electrónico del desplegable usar avatar después de realizar estos cambios, inicie sesión y vuelva a iniciar sesión.
Almacenar y actualizar tokens
En este momento, la aplicación tiene un token de acceso, que se envía en el encabezado Authorization de las llamadas API. Este es el token que permite a la aplicación obtener acceso a Microsoft Graph en nombre del usuario.
Sin embargo, este token es de corta duración. El token expira una hora después de su emisión. Aquí es donde el token de actualización resulta útil. El token de actualización permite a la aplicación solicitar un nuevo token de acceso sin requerir que el usuario vuelva a iniciar sesión.
Dado que la aplicación usa la biblioteca Microsoft.Identity.Web, no es necesario implementar ninguna lógica de actualización o almacenamiento de tokens.
La aplicación usa la memoria caché de tokens en memoria, lo que es suficiente para las aplicaciones que no necesitan conservar tokens cuando se reinicia la aplicación. En su lugar, las aplicaciones de producción pueden usar las opciones de caché distribuida en la biblioteca Microsoft.Identity.Web.
El GetAccessTokenForUserAsync método controla la expiración y actualización del token por usted. Primero comprueba el token almacenado en caché y, si no ha expirado, lo devuelve. Si ha expirado, usa el token de actualización en caché para obtener uno nuevo.
GraphServiceClient que los controladores obtienen a través de la inserción de dependencias se configurarán previamente con un proveedor de autenticación que lo GetAccessTokenForUserAsync use.
Obtener una vista de calendario
En esta sección, incorporará Microsoft Graph a la aplicación. Para esta aplicación, usará la Biblioteca de cliente de Microsoft Graph para .NET para realizar llamadas a Microsoft Graph.
Obtener eventos del calendario desde Outlook
Comience creando un nuevo controlador para vistas de calendario.
Agregue un nuevo archivo denominado CalendarController.cs en el directorio ./Controllers y agregue el código siguiente.
using GraphTutorial.Models;
using Microsoft.AspNetCore.Mvc;
using Microsoft.Extensions.Logging;
using Microsoft.Identity.Web;
using Microsoft.Graph;
using System;
using System.Collections.Generic;
using System.Threading.Tasks;
using TimeZoneConverter;

namespace GraphTutorial.Controllers
{
    public class CalendarController : Controller
    {
        private readonly GraphServiceClient _graphClient;
        private readonly ILogger<HomeController> _logger;

        public CalendarController(
            GraphServiceClient graphClient,
            ILogger<HomeController> logger)
        {
            _graphClient = graphClient;
            _logger = logger;
        }
    }
}
Agregue las siguientes funciones a la clase
CalendarControllerpara obtener la vista de calendario del usuario.private async Task<IList<Event>> GetUserWeekCalendar(DateTime startOfWeekUtc) { // Configure a calendar view for the current week var endOfWeekUtc = startOfWeekUtc.AddDays(7); var viewOptions = new List<QueryOption> { new QueryOption("startDateTime", startOfWeekUtc.ToString("o")), new QueryOption("endDateTime", endOfWeekUtc.ToString("o")) }; var events = await _graphClient.Me .CalendarView .Request(viewOptions) // Send user time zone in request so date/time in // response will be in preferred time zone .Header("Prefer", $"outlook.timezone=\"{User.GetUserGraphTimeZone()}\"") // Get max 50 per request .Top(50) // Only return fields app will use .Select(e => new { e.Subject, e.Organizer, e.Start, e.End }) // Order results chronologically .OrderBy("start/dateTime") .GetAsync(); IList<Event> allEvents; // Handle case where there are more than 50 if (events.NextPageRequest != null) { allEvents = new List<Event>(); // Create a page iterator to iterate over subsequent pages // of results. Build a list from the results var pageIterator = PageIterator<Event>.CreatePageIterator( _graphClient, events, (e) => { allEvents.Add(e); return true; } ); await pageIterator.IterateAsync(); } else { // If only one page, just use the result allEvents = events.CurrentPage; } return allEvents; } private static DateTime GetUtcStartOfWeekInTimeZone(DateTime today, TimeZoneInfo timeZone) { // Assumes Sunday as first day of week int diff = System.DayOfWeek.Sunday - today.DayOfWeek; // create date as unspecified kind var unspecifiedStart = DateTime.SpecifyKind(today.AddDays(diff), DateTimeKind.Unspecified); // convert to UTC return TimeZoneInfo.ConvertTimeToUtc(unspecifiedStart, timeZone); }Tenga en cuenta lo que hace el código
GetUserWeekCalendar.- Usa la zona horaria del usuario para obtener los valores de fecha y hora de inicio y finalización UTC de la semana.
- Consulta la vista de calendario del usuario para obtener todos los eventos que se encuentra entre la fecha y hora de inicio y finalización. El uso de una vista de calendario en lugar de enumerar eventos expande los eventos periódicos y devuelve las repeticiones que se produzcan en la ventana de tiempo especificada.
- Usa el encabezado
Prefer: outlook.timezonepara obtener resultados en la zona horaria del usuario. - Se usa
Selectpara limitar los campos que regresan a solo los que usa la aplicación. - Se usa
OrderBypara ordenar los resultados cronológicamente. - Usa una página para a
PageIteratortravés de la colección de eventos. Esto controla el caso en el que el usuario tiene más eventos en su calendario que el tamaño de página solicitado.
Agregue la siguiente función a la clase
CalendarControllerpara implementar una vista temporal de los datos devueltos.// Minimum permission scope needed for this view [AuthorizeForScopes(Scopes = new[] { "Calendars.Read" })] public async Task<IActionResult> Index() { try { var userTimeZone = TZConvert.GetTimeZoneInfo( User.GetUserGraphTimeZone()); var startOfWeek = CalendarController.GetUtcStartOfWeekInTimeZone( DateTime.Today, userTimeZone); var events = await GetUserWeekCalendar(startOfWeek); // Return a JSON dump of events return new ContentResult { Content = _graphClient.HttpProvider.Serializer.SerializeObject(events), ContentType = "application/json" }; } catch (ServiceException ex) { if (ex.InnerException is MicrosoftIdentityWebChallengeUserException) { throw; } return new ContentResult { Content = $"Error getting calendar view: {ex.Message}", ContentType = "text/plain" }; } }Inicie la aplicación, inicie sesión y haga clic en el vínculo Calendario de la barra de navegación. Si funciona todo, debería ver un volcado JSON de eventos en el calendario del usuario.
Mostrar los resultados
Ahora puede agregar una vista para mostrar los resultados de una manera más fácil de usar.
Crear modelos de vista
Cree un nuevo archivo denominado CalendarViewEvent.cs en el directorio ./Models y agregue el siguiente código.
using Microsoft.Graph;
using System;

namespace GraphTutorial.Models
{
    public class CalendarViewEvent
    {
        public string Subject { get; private set; }
        public string Organizer { get; private set; }
        public DateTime Start { get; private set; }
        public DateTime End { get; private set; }

        public CalendarViewEvent(Event graphEvent)
        {
            Subject = graphEvent.Subject;
            Organizer = graphEvent.Organizer.EmailAddress.Name;
            Start = DateTime.Parse(graphEvent.Start.DateTime);
            End = DateTime.Parse(graphEvent.End.DateTime);
        }
    }
}
Cree un nuevo archivo denominado DailyViewModel.cs en el directorio ./Models y agregue el código siguiente.
using System;
using System.Collections.Generic;

namespace GraphTutorial.Models
{
    public class DailyViewModel
    {
        // Day the view is for
        public DateTime Day { get; private set; }
        // Events on this day
        public IEnumerable<CalendarViewEvent> Events { get; private set; }

        public DailyViewModel(DateTime day, IEnumerable<CalendarViewEvent> events)
        {
            Day = day;
            Events = events;
        }
    }
}
Cree un nuevo archivo denominado CalendarViewModel.cs en el directorio ./Models y agregue el siguiente código.
using Microsoft.Graph;
using System;
using System.Collections.Generic;
using System.Linq;

namespace GraphTutorial.Models
{
    public class CalendarViewModel
    {
        private DateTime _startOfWeek;
        private DateTime _endOfWeek;
        private List<CalendarViewEvent> _events;

        public CalendarViewModel()
        {
            _startOfWeek = DateTime.MinValue;
            _events = new List<CalendarViewEvent>();
        }

        public CalendarViewModel(DateTime startOfWeek, IEnumerable<Event> events)
        {
            _startOfWeek = startOfWeek;
            _endOfWeek = startOfWeek.AddDays(7);
            _events = new List<CalendarViewEvent>();

            if (events != null)
            {
              foreach (var item in events)
              {
                  _events.Add(new CalendarViewEvent(item));
              }
            }
        }

        // Get the start - end dates of the week
        public string TimeSpan()
        {
            return $"{_startOfWeek.ToString("MMMM d, yyyy")} - {_startOfWeek.AddDays(6).ToString("MMMM d, yyyy")}";
        }

        // Property accessors to pass to the daily view partial
        // These properties get all events on the specific day
        public DailyViewModel Sunday
        {
            get
            {
                return new DailyViewModel(
                  _startOfWeek,
                  GetEventsForDay(System.DayOfWeek.Sunday));
            }
        }

        public DailyViewModel Monday
        {
            get
            {
                return new DailyViewModel(
                  _startOfWeek.AddDays(1),
                  GetEventsForDay(System.DayOfWeek.Monday));
            }
        }

        public DailyViewModel Tuesday
        {
            get
            {
                return new DailyViewModel(
                  _startOfWeek.AddDays(2),
                  GetEventsForDay(System.DayOfWeek.Tuesday));
            }
        }

        public DailyViewModel Wednesday
        {
            get
            {
                return new DailyViewModel(
                  _startOfWeek.AddDays(3),
                  GetEventsForDay(System.DayOfWeek.Wednesday));
            }
        }

        public DailyViewModel Thursday
        {
            get
            {
                return new DailyViewModel(
                  _startOfWeek.AddDays(4),
                  GetEventsForDay(System.DayOfWeek.Thursday));
            }
        }

        public DailyViewModel Friday
        {
            get
            {
                return new DailyViewModel(
                  _startOfWeek.AddDays(5),
                  GetEventsForDay(System.DayOfWeek.Friday));
            }
        }

        public DailyViewModel Saturday
        {
            get
            {
                return new DailyViewModel(
                  _startOfWeek.AddDays(6),
                  GetEventsForDay(System.DayOfWeek.Saturday));
            }
        }

        private IEnumerable<CalendarViewEvent> GetEventsForDay(System.DayOfWeek day)
        {
            return _events.Where(e => (e.End > _startOfWeek &&
                ((e.Start.DayOfWeek.Equals(day) && e.Start >= _startOfWeek) ||
                 (e.End.DayOfWeek.Equals(day) && e.End < _endOfWeek))));

        }
    }
}
Crear vistas
Cree un nuevo directorio denominado Calendar en el directorio ./Views .
Cree un nuevo archivo denominado _DailyEventsPartial.cshtml en el directorio ./Views/Calendar y agregue el código siguiente.
@model DailyViewModel

@{
    bool dateCellAdded = false;
    var timeFormat = User.GetUserGraphTimeFormat();
    var rowClass = Model.Day.Date.Equals(DateTime.Today.Date) ? "table-warning" : "";
}

@if (Model.Events.Count() <= 0)
{
  // Render an empty row for the day
  <tr>
    <td class="calendar-view-date-cell">
      <div class="calendar-view-date float-left text-right">@Model.Day.Day</div>
      <div class="calendar-view-day">@Model.Day.ToString("dddd")</div>
      <div class="calendar-view-month text-muted">@Model.Day.ToString("MMMM, yyyy")</div>
    </td>
    <td></td>
    <td></td>
  </tr>
}

@foreach(var item in Model.Events)
{
  <tr class="@rowClass">
    @if (!dateCellAdded)
    {
      // Only add the day cell once
      dateCellAdded = true;
      <td class="calendar-view-date-cell" rowspan="@Model.Events.Count()">
        <div class="calendar-view-date float-left text-right">@Model.Day.Day</div>
        <div class="calendar-view-day">@Model.Day.ToString("dddd")</div>
        <div class="calendar-view-month text-muted">@Model.Day.ToString("MMMM, yyyy")</div>
      </td>
    }
    <td class="calendar-view-timespan">
      <div>@item.Start.ToString(timeFormat) - @item.End.ToString(timeFormat)</div>
      @if (item.Start.Date != Model.Day.Date)
      {
        <div class="calendar-view-date-diff">Start date: @item.Start.Date.ToShortDateString()</div>
      }
      @if (item.End.Date != Model.Day.Date)
      {
        <div class="calendar-view-date-diff">End date: @item.End.Date.ToShortDateString()</div>
      }
    </td>
    <td>
      <div class="calendar-view-subject">@item.Subject</div>
      <div class="calendar-view-organizer">@item.Organizer</div>
    </td>
  </tr>
}
Cree un nuevo archivo denominado Index.cshtml en el directorio ./Views/Calendar y agregue el siguiente código.
@model CalendarViewModel

@{
    ViewData["Title"] = "Calendar";
}

<div class="mb-3">
  <h1 class="mb-3">@Model.TimeSpan()</h1>
  <a class="btn btn-light btn-sm" asp-controller="Calendar" asp-action="New">New event</a>
</div>
<div class="calendar-week">
  <div class="table-responsive">
    <table class="table table-sm">
      <thead>
        <tr>
          <th>Date</th>
          <th>Time</th>
          <th>Event</th>
        </tr>
      </thead>
      <tbody>
        <partial name="_DailyEventsPartial" for="Sunday" />
        <partial name="_DailyEventsPartial" for="Monday" />
        <partial name="_DailyEventsPartial" for="Tuesday" />
        <partial name="_DailyEventsPartial" for="Wednesday" />
        <partial name="_DailyEventsPartial" for="Thursday" />
        <partial name="_DailyEventsPartial" for="Friday" />
        <partial name="_DailyEventsPartial" for="Saturday" />
      </tbody>
    </table>
  </div>
</div>
Actualizar controlador de calendario
Abra ./Controllers/CalendarController.cs y reemplace la función
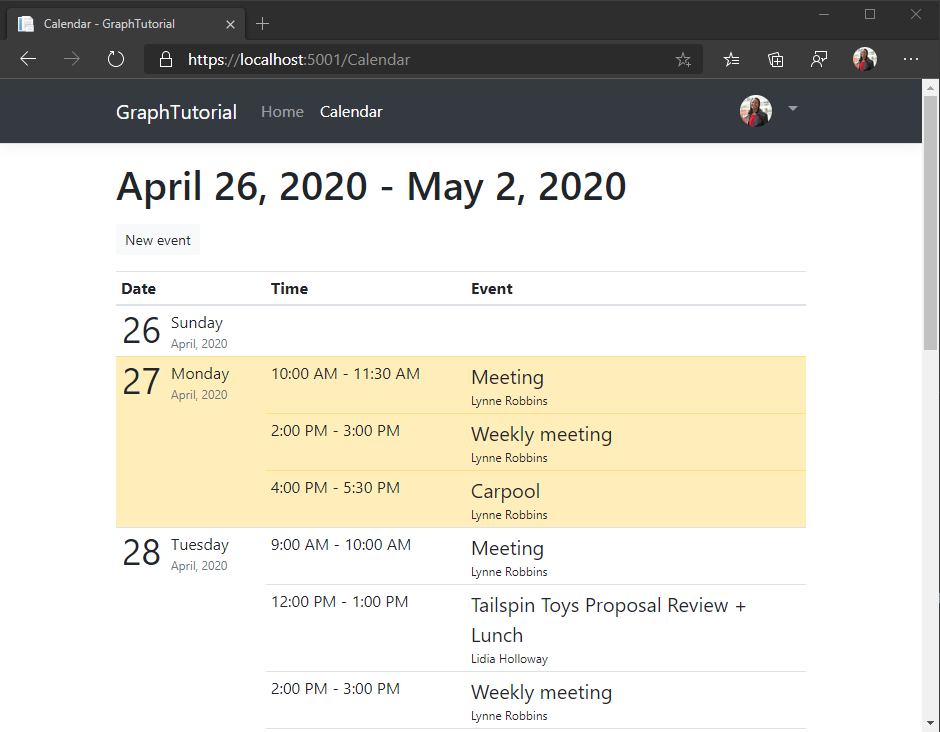
Indexexistente por la siguiente.// Minimum permission scope needed for this view [AuthorizeForScopes(Scopes = new[] { "Calendars.Read" })] public async Task<IActionResult> Index() { try { var userTimeZone = TZConvert.GetTimeZoneInfo( User.GetUserGraphTimeZone()); var startOfWeekUtc = CalendarController.GetUtcStartOfWeekInTimeZone( DateTime.Today, userTimeZone); var events = await GetUserWeekCalendar(startOfWeekUtc); // Convert UTC start of week to user's time zone for // proper display var startOfWeekInTz = TimeZoneInfo.ConvertTimeFromUtc(startOfWeekUtc, userTimeZone); var model = new CalendarViewModel(startOfWeekInTz, events); return View(model); } catch (ServiceException ex) { if (ex.InnerException is MicrosoftIdentityWebChallengeUserException) { throw; } return View(new CalendarViewModel()) .WithError("Error getting calendar view", ex.Message); } }Inicie la aplicación, inicie sesión y haga clic en el vínculo Calendario. La aplicación ahora debería presentar una tabla de eventos.
Crear un nuevo evento
En esta sección, agregará la capacidad de crear eventos en el calendario del usuario.
Crear modelo
Cree un nuevo archivo denominado NewEvent.cs en el directorio ./Models y agregue el siguiente código.
using System;
using System.ComponentModel.DataAnnotations;

namespace GraphTutorial.Models
{
    public class NewEvent
    {
        [Required]
        public string Subject { get; set; }
        public DateTime Start { get; set; }
        public DateTime End { get; set; }
        [DataType(DataType.MultilineText)]
        public string Body { get; set; }
        [RegularExpression(@"((\w+([-+.']\w+)*@\w+([-.]\w+)*\.\w+([-.]\w+)*)*([;])*)*",
          ErrorMessage="Please enter one or more email addresses separated by a semi-colon (;)")]
        public string Attendees { get; set; }
    }
}
Crear vista
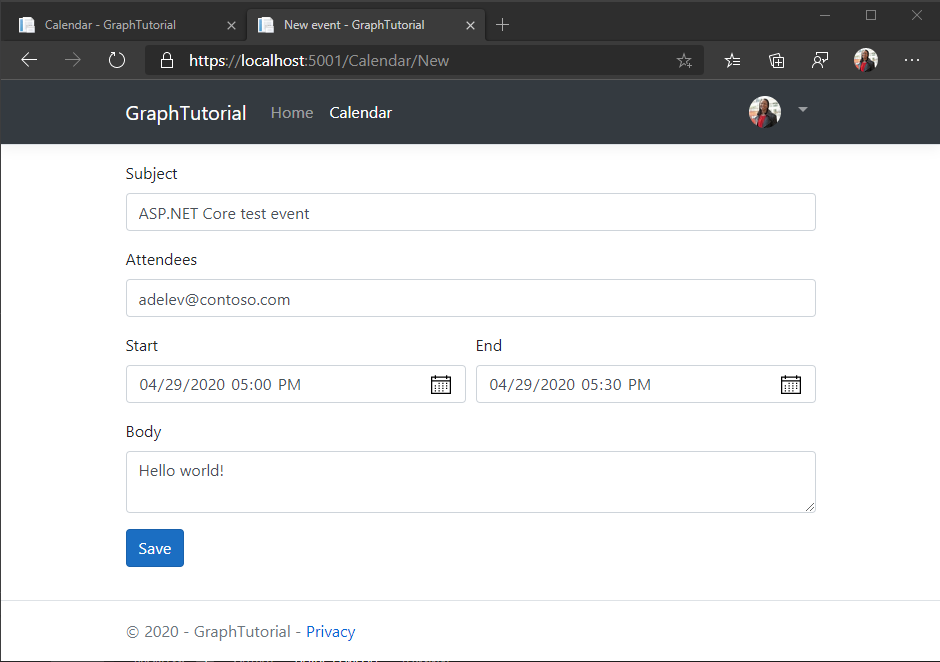
Cree un nuevo archivo denominado New.cshtml en el directorio ./Views/Calendar y agregue el siguiente código.
@model NewEvent

@{
    ViewData["Title"] = "New event";
}

<form asp-action="New">
  <div asp-validation-summary="ModelOnly" class="text-danger"></div>
  <div class="form-group">
    <label asp-for="Subject" class="control-label"></label>
    <input asp-for="Subject" class="form-control" />
    <span asp-validation-for="Subject" class="text-danger"></span>
  </div>
  <div class="form-group">
    <label asp-for="Attendees" class="control-label"></label>
    <input asp-for="Attendees" class="form-control" />
    <span asp-validation-for="Attendees" class="text-danger"></span>
  </div>
  <div class="form-row">
    <div class="col">
      <div class="form-group">
        <label asp-for="Start" class="control-label"></label>
        <input asp-for="Start" class="form-control" />
        <span asp-validation-for="Start" class="text-danger"></span>
      </div>
    </div>
    <div class="col">
      <div class="form-group">
        <label asp-for="End" class="control-label"></label>
        <input asp-for="End" class="form-control" />
        <span asp-validation-for="End" class="text-danger"></span>
      </div>
    </div>
  </div>
  <div class="form-group">
    <label asp-for="Body" class="control-label"></label>
    <textarea asp-for="Body" class="form-control"></textarea>
    <span asp-validation-for="Body" class="text-danger"></span>
  </div>
  <div class="form-group">
    <input type="submit" value="Save" class="btn btn-primary" />
  </div>
</form>

@section Scripts {
    @{await Html.RenderPartialAsync("_ValidationScriptsPartial");}
}
Agregar acciones de controlador
Abra ./Controllers/CalendarController.cs y agregue la siguiente acción a la
CalendarControllerclase para representar el nuevo formulario de evento.// Minimum permission scope needed for this view [AuthorizeForScopes(Scopes = new[] { "Calendars.ReadWrite" })] public IActionResult New() { return View(); }Agregue la siguiente acción a la
CalendarControllerclase para recibir el nuevo evento desde el formulario cuando el usuario haga clic en Guardar y use Microsoft Graph para agregar el evento al calendario del usuario.[HttpPost] [ValidateAntiForgeryToken] [AuthorizeForScopes(Scopes = new[] { "Calendars.ReadWrite" })] public async Task<IActionResult> New([Bind("Subject,Attendees,Start,End,Body")] NewEvent newEvent) { var timeZone = User.GetUserGraphTimeZone(); // Create a Graph event with the required fields var graphEvent = new Event { Subject = newEvent.Subject, Start = new DateTimeTimeZone { DateTime = newEvent.Start.ToString("o"), // Use the user's time zone TimeZone = timeZone }, End = new DateTimeTimeZone { DateTime = newEvent.End.ToString("o"), // Use the user's time zone TimeZone = timeZone } }; // Add body if present if (!string.IsNullOrEmpty(newEvent.Body)) { graphEvent.Body = new ItemBody { ContentType = BodyType.Text, Content = newEvent.Body }; } // Add attendees if present if (!string.IsNullOrEmpty(newEvent.Attendees)) { var attendees = newEvent.Attendees.Split(';', StringSplitOptions.RemoveEmptyEntries); if (attendees.Length > 0) { var attendeeList = new List<Attendee>(); foreach (var attendee in attendees) { attendeeList.Add(new Attendee{ EmailAddress = new EmailAddress { Address = attendee }, Type = AttendeeType.Required }); } graphEvent.Attendees = attendeeList; } } try { // Add the event await _graphClient.Me.Events .Request() .AddAsync(graphEvent); // Redirect to the calendar view with a success message return RedirectToAction("Index").WithSuccess("Event created"); } catch (ServiceException ex) { // Redirect to the calendar view with an error message return RedirectToAction("Index") .WithError("Error creating event", ex.Error.Message); } }Inicie la aplicación, inicie sesión y haga clic en el vínculo Calendario. Haga clic en el botón Nuevo evento, rellene el formulario y haga clic en Guardar.
¡Enhorabuena!
Ha completado el tutorial ASP.NET Core Microsoft Graph. Ahora que tienes una aplicación de trabajo que llama a Microsoft Graph, puedes experimentar y agregar nuevas características. Visite la información general de Microsoft Graph para ver todos los datos a los que puede acceder con Microsoft Graph.
Comentarios
Proporcione cualquier comentario sobre este tutorial en el repositorio GitHub usuario.
¿Tiene algún problema con esta sección? Si es así, envíenos sus comentarios para que podamos mejorarla.