Compilar bots de bot Framework con Microsoft Graph
Este tutorial le enseña a crear un bot de Bot Framework que use la API de Microsoft Graph para recuperar información de calendario para un usuario.
Sugerencia
Si prefiere descargar el tutorial completado, puede descargar o clonar el repositorio GitHub archivo. Consulta el archivo README en la carpeta de demostración para obtener instrucciones sobre cómo configurar la aplicación con un identificador de aplicación y un secreto.
Requisitos previos
Antes de iniciar este tutorial, debe tener lo siguiente instalado en el equipo de desarrollo.
También debe tener una cuenta personal de Microsoft con un buzón en Outlook.com, o una cuenta de Trabajo o escuela de Microsoft. Si no tienes una cuenta de Microsoft, hay un par de opciones para obtener una cuenta gratuita:
- Puedes suscribirte a una nueva cuenta personal de Microsoft.
- Puedes suscribirte al programa Microsoft 365 desarrolladores para obtener una suscripción Microsoft 365 gratuita.
- Una suscripción de Azure. Si no tiene una, cree una cuenta gratuita antes de comenzar.
Nota
Este tutorial se escribió con las siguientes versiones. Los pasos de esta guía pueden funcionar con otras versiones, pero eso no se ha probado.
- SDK de .NET Core versión 5.0.302
- Bot Framework Emulator 4.1.3
- ngrok 2.3.40
Comentarios
Proporcione cualquier comentario sobre este tutorial en el repositorio GitHub usuario.
Crear un proyecto de bot Framework
En esta sección, creará un proyecto de Bot Framework.
Abra la interfaz de línea de comandos (CLI) en un directorio donde desee crear el proyecto. Ejecute el siguiente comando para crear un nuevo proyecto con la plantilla Microsoft.Bot.Framework.CSharp.EchoBot .
dotnet new echobot -n GraphCalendarBotNota
Si recibe un
No templates matched the input template name: echobot.error, instale la plantilla con el siguiente comando y vuelva a ejecutar el comando anterior.dotnet new -i Microsoft.Bot.Framework.CSharp.EchoBotCambie el nombre de la clase EchoBot predeterminada a CalendarBot. Abra ./Bots/EchoBot.cs y reemplace todas las instancias de
EchoBotconCalendarBot. Cambie el nombre del archivo a CalendarBot.cs.Reemplace todas las instancias de
EchoBotwith enCalendarBotlos archivos .cs restantes.En la CLI, cambie el directorio actual al directorio GraphCalendarBot y ejecute el siguiente comando para confirmar las compilaciones del proyecto.
dotnet build
Agregar paquetes NuGet
Antes de seguir, instala algunos paquetes NuGet que usarás más adelante.
- AdaptiveCards para permitir que el bot envíe tarjetas adaptables en respuestas.
- Microsoft.Bot.Builder.Dialogs para agregar compatibilidad de cuadros de diálogo al bot.
- Microsoft.Recognizers.Text.DataTypes.TimexExpression para convertir las expresiones TIMEX devueltas de los mensajes del bot en objetos DateTime .
- Microsoft.Graph para realizar llamadas a Microsoft Graph.
Ejecute los siguientes comandos en la CLI para instalar las dependencias.
dotnet add package AdaptiveCards --version 2.7.1
dotnet add package Microsoft.Bot.Builder.Dialogs --version 4.14.1
dotnet add package Microsoft.Bot.Builder.Integration.AspNet.Core --version 4.14.1
dotnet add package Microsoft.Recognizers.Text.DataTypes.TimexExpression --version 1.8.0
dotnet add package Microsoft.Graph --version 4.1.0
Probar el bot
Antes de agregar cualquier código, pruebe el bot para asegurarse de que funciona correctamente y de que el Bot Framework Emulator está configurado para probarlo.
Inicie el bot ejecutando el siguiente comando.
dotnet runSugerencia
Aunque puede usar cualquier editor de texto para editar los archivos de origen del proyecto, se recomienda usar Visual Studio Code. Visual Studio Code compatibilidad con la depuración, Intellisense y mucho más. Si usa Visual Studio Code, puede iniciar el bot mediante el menú EjecutarInsulción -> de inicio.
Confirme que el bot se está ejecutando abriendo el explorador y yendo a
http://localhost:3978. Debería ver un bot your is ready! Mensaje.Abra el Bot Framework Emulator. Elija el menú Archivo y, a continuación , Abra bot.
Escriba
http://localhost:3978/api/messagesen la dirección URL del bot y, a continuación, seleccione Conectar.El bot responde con en
Hello and welcome!la ventana de chat. Envíe un mensaje al bot y confirme que lo vuelve a hacer eco.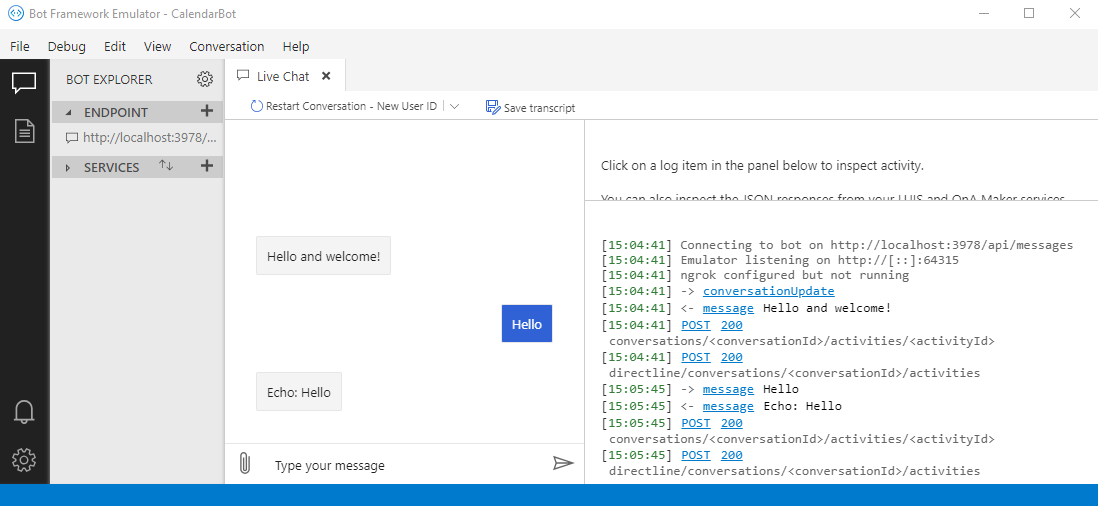
Registro del bot en el portal
En este ejercicio, creará un nuevo registro de canales bot y un registro Azure AD aplicación web mediante Azure Portal.
Crear un registro de canales bot
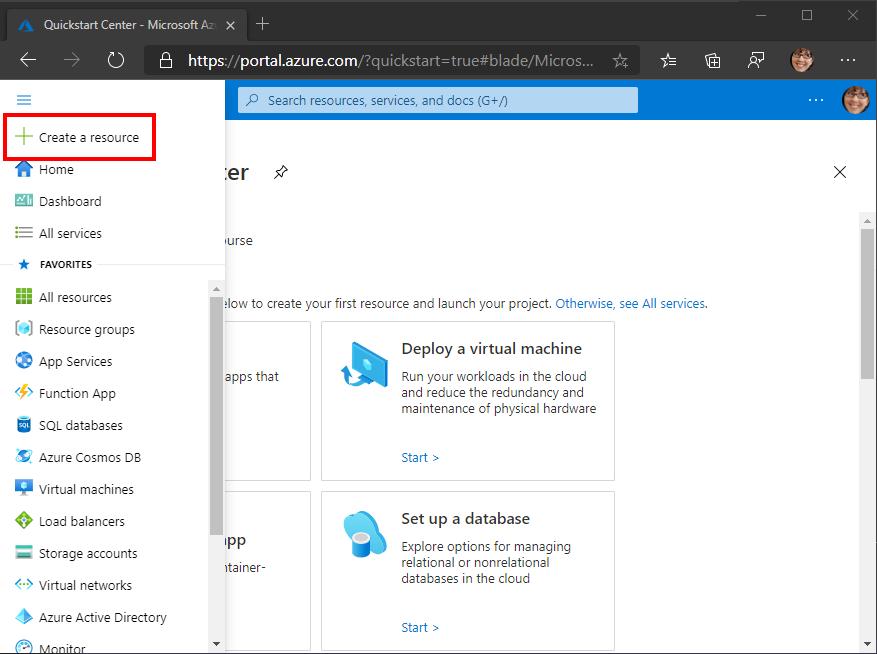
Abra un explorador y vaya a Azure Portal. Inicie sesión con la cuenta asociada a la suscripción de Azure.
Seleccione el menú superior izquierdo y, a continuación, seleccione Crear un recurso.
En la página Nuevo , busque y
Azure Botseleccione Bot de Azure.En la página Bot de Azure , seleccione Crear.
Rellene los campos necesarios y deje el extremo de mensajería en blanco. El campo de identificador bot debe ser único. Asegúrese de revisar los diferentes niveles de precios y seleccionar lo que tiene sentido para su escenario. Si se trata solo de un ejercicio de aprendizaje, es posible que quieras seleccionar la opción gratuita.
Para Id. de aplicación de Microsoft, selecciona Crear nuevo identificador de aplicación de Microsoft.
Seleccione Revisar y crear. Una vez completada la validación, seleccione Crear.
Una vez finalizada la implementación, seleccione Ir al recurso.
En Configuración, seleccione Configuración. Selecciona el vínculo Administrar junto a Id. de aplicación de Microsoft.
Seleccione Nuevo secreto de cliente. Agregue una descripción y elija una expiración y, a continuación, seleccione Agregar.
Copie el valor del secreto del cliente antes de salir de esta página. Lo necesitará en los pasos siguientes.
Importante
El secreto de cliente no se vuelve a mostrar, así que asegúrese de copiarlo en este momento. Deberá escribir este valor en varios lugares para mantenerlo seguro.
Seleccione Información general en el menú de la izquierda. Copie el valor del identificador de aplicación (cliente) y guárdelo, lo necesitará en los pasos siguientes.

Vuelva a la ventana Registro del canal bot del explorador y pegue el identificador de aplicación en el campo Id. de aplicación de Microsoft . Pegue el secreto de cliente en el campo Contraseña . Seleccione Aceptar.
En la página Registro de canales bots , seleccione Crear.
Espere a que se cree el registro de canales de bot. Una vez creado, vuelva a la página principal en Azure Portal y, a continuación, seleccione Servicios de bot. Seleccione el nuevo registro del canal bots para ver sus propiedades.
Crear un registro de aplicación web
Vuelva a la página principal de Azure Portal y, a continuación, seleccione Azure Active Directory.
Seleccione Registros de aplicaciones.
Seleccione Nuevo registro. En la página Registrar una aplicación, establezca los valores siguientes.
- Establezca Nombre como
Graph Calendar Bot Auth. - Establezca Tipos de cuenta admitidos en Cuentas en cualquier directorio de organización y cuentas personales de Microsoft.
- En URI de redirección, establezca la primera lista desplegable en
Weby establezca el valorhttps://token.botframework.com/.auth/web/redirect.
- Establezca Nombre como
Seleccione Registrar. En la Graph autenticación del bot de calendario, copie el valor del identificador de aplicación (cliente) y guárdelo, lo necesitará en los pasos siguientes.
Seleccione Certificados y secretos en Administrar. Seleccione el botón Nuevo secreto de cliente. Escriba un valor en Descripción, y seleccione una de las opciones para Expira, y después, Agregar.
Copie el valor del secreto del cliente antes de salir de esta página. Lo necesitará en los pasos siguientes.
Seleccione Permisos de API y, a continuación, seleccione Agregar un permiso.
Seleccione Microsoft Graph y, a continuación, seleccione Permisos delegados.
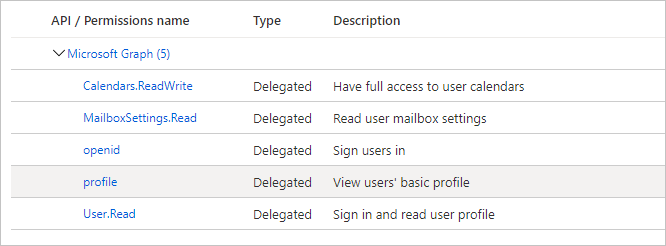
Seleccione los siguientes permisos y, a continuación, seleccione Agregar permisos.
- openid
- perfil
- Calendars.ReadWrite
- MailboxSettings.Read
Acerca de los permisos
Ten en cuenta lo que cada uno de esos ámbitos de permisos permite que haga el bot y para qué los usará el bot.
- openid y profile: permite al bot iniciar sesión en los usuarios y obtener información básica de Azure AD en el token de identidad.
- Calendars.ReadWrite: permite al bot leer el calendario del usuario y agregar nuevos eventos al calendario del usuario.
- MailboxSettings.Read: permite al bot leer la configuración del buzón del usuario. El bot usará esto para obtener la zona horaria seleccionada del usuario.
- User.Read: permite al bot obtener el perfil del usuario de Microsoft Graph. El bot usará esto para obtener el nombre del usuario.
Agregar conexión de OAuth al bot
Vaya a la página bot de Azure del bot en Azure Portal. Seleccione Configuración en Configuración.
Seleccione Agregar conexión de OAuth Configuración.
Rellene el formulario de la siguiente manera y, a continuación, seleccione Guardar.
- Nombre:
GraphBotAuth - Proveedor: Azure Active Directory v2
- Id. de cliente: el identificador de aplicación de su Graph registro de autenticación del bot de calendario.
- Secreto de cliente: el secreto de cliente del registro Graph autenticación del bot de calendario.
- Dirección URL Exchange token: dejar en blanco
- Identificador de inquilino:
common - Ámbitos:
openid profile Calendars.ReadWrite MailboxSettings.Read User.Read
- Nombre:
Seleccione la entrada GraphBotAuth en OAuth Connection Configuración.
Seleccione Probar conexión. Se abre una nueva ventana o pestaña del explorador para iniciar el flujo de OAuth.
Si es necesario, inicie sesión. Revise la lista de permisos solicitados y, a continuación, seleccione Aceptar.
Debería ver un mensaje Probar conexión a 'GraphBotAuth' correctamente .
Sugerencia
Puedes seleccionar el botón Copiar token en esta página y pegar el token en https://jwt.ms para ver las notificaciones dentro del token. Esto es útil al solucionar errores de autenticación.
Agregar autenticación de la plataforma de identidad de Microsoft
En este ejercicio, usará el OAuthPrompt de Bot Framework para implementar la autenticación en el bot y adquirir tokens de acceso para llamar a la API Graph Microsoft.
Abra ./appsettings.json y realice los siguientes cambios.
- Cambie el valor del identificador
MicrosoftAppIdde aplicación del registro Graph aplicación del bot de calendario. - Cambie el valor del secreto
MicrosoftAppPasswordde cliente Graph bot de calendario. - Agregue un valor denominado
ConnectionNamecon un valor deGraphBotAuth.
{
  "MicrosoftAppId": "YOUR_BOT_APP_ID_HERE",
  "MicrosoftAppPassword": "YOUR_BOT_CLIENT_SECRET_HERE",
  "ConnectionName": "GraphBotAuth"
}
Nota
Si usó un valor
GraphBotAuthdistinto del nombre de la entrada en OAuth Connection Configuración en Azure Portal, use ese valor para laConnectionNameentrada.- Cambie el valor del identificador
Implementar cuadros de diálogo
Cree un nuevo directorio en la raíz del proyecto denominado Cuadros de diálogo. Cree un nuevo archivo en el directorio ./Dialogs denominado LogoutDialog.cs y agregue el siguiente código.
using System.Threading;
using System.Threading.Tasks;
using Microsoft.Bot.Builder;
using Microsoft.Bot.Builder.Dialogs;
using Microsoft.Bot.Schema;

namespace CalendarBot.Dialogs
{
    public class LogoutDialog : ComponentDialog
    {
        public LogoutDialog(string id, string connectionName)
            : base(id)
        {
            ConnectionName = connectionName;
        }

        protected string ConnectionName { get; private set; }

        // All dialogs should inherit this class so the user
        // can log out at any time
        protected override async Task<DialogTurnResult> OnBeginDialogAsync(
            DialogContext innerDc,
            object options,
            CancellationToken cancellationToken)
        {
            // Check if this is a logout command
            var result = await InterruptAsync(innerDc, cancellationToken);
            if (result != null)
            {
                return result;
            }

            return await base.OnBeginDialogAsync(innerDc, options, cancellationToken);
        }

        protected override async Task<DialogTurnResult> OnContinueDialogAsync(
            DialogContext innerDc,
            CancellationToken cancellationToken)
        {
            // Check if this is a logout command
            var result = await InterruptAsync(innerDc, cancellationToken);
            if (result != null)
            {
                return result;
            }

            return await base.OnContinueDialogAsync(innerDc, cancellationToken);
        }

        private async Task<DialogTurnResult> InterruptAsync(
            DialogContext innerDc,
            CancellationToken cancellationToken)
        {
            // If this is a logout command, cancel any other activities and log out
            if (innerDc.Context.Activity.Type == ActivityTypes.Message)
            {
                var text = innerDc.Context.Activity.Text.ToLowerInvariant();

                if (text.StartsWith("log out") || text.StartsWith("logout"))
                {
                    // The bot adapter encapsulates the authentication processes.
                    var botAdapter = (BotFrameworkAdapter)innerDc.Context.Adapter;
                    await botAdapter.SignOutUserAsync(
                        innerDc.Context, ConnectionName, null, cancellationToken);
                    await innerDc.Context.SendActivityAsync(
                        MessageFactory.Text("You have been signed out."), cancellationToken);
                    return await innerDc.CancelAllDialogsAsync();
                }
            }
            return null;
        }
    }
}
Este cuadro de diálogo proporciona una clase base para todos los demás cuadros de diálogo del bot de los que se derivará. Esto permite al usuario cerrar sesión independientemente de dónde se encuentran en los cuadros de diálogo del bot.
Cree un nuevo archivo en el directorio ./Dialogs denominado MainDialog.cs y agregue el siguiente código.
using System.Collections.Generic;
using System.Threading;
using System.Threading.Tasks;
using Microsoft.Bot.Builder;
using Microsoft.Bot.Builder.Dialogs;
using Microsoft.Bot.Builder.Dialogs.Choices;
using Microsoft.Bot.Schema;
using Microsoft.Extensions.Configuration;
using Microsoft.Extensions.Logging;

namespace CalendarBot.Dialogs
{
    public class MainDialog : LogoutDialog
    {
        const string NO_PROMPT = "no-prompt";
        protected readonly ILogger _logger;

        public MainDialog(IConfiguration configuration, ILogger<MainDialog> logger)
            : base(nameof(MainDialog), configuration["ConnectionName"])
        {
            _logger = logger;

            // OAuthPrompt dialog handles the authentication and token
            // acquisition
            AddDialog(new OAuthPrompt(
                nameof(OAuthPrompt),
                new OAuthPromptSettings
                {
                    ConnectionName = ConnectionName,
                    Text = "Please login",
                    Title = "Login",
                    Timeout = 300000, // User has 5 minutes to login
                }));

            AddDialog(new ChoicePrompt(nameof(ChoicePrompt)));

            AddDialog(new WaterfallDialog(nameof(WaterfallDialog), new WaterfallStep[]
            {
                LoginPromptStepAsync,
                ProcessLoginStepAsync,
                PromptUserStepAsync,
                CommandStepAsync,
                ProcessStepAsync,
                ReturnToPromptStepAsync
            }));

            // The initial child Dialog to run.
            InitialDialogId = nameof(WaterfallDialog);
        }

        private async Task<DialogTurnResult> LoginPromptStepAsync(
            WaterfallStepContext stepContext,
            CancellationToken cancellationToken)
        {
            // If we're going through the waterfall a second time, don't do an extra OAuthPrompt
            var options = stepContext.Options?.ToString();
            if (options == NO_PROMPT)
            {
                return await stepContext.NextAsync(cancellationToken: cancellationToken);
            }

            return await stepContext.BeginDialogAsync(nameof(OAuthPrompt), null, cancellationToken);
        }

        private async Task<DialogTurnResult> ProcessLoginStepAsync(
            WaterfallStepContext stepContext,
            CancellationToken cancellationToken)
        {
            // If we're going through the waterfall a second time, don't do an extra OAuthPrompt
            var options = stepContext.Options?.ToString();
            if (options == NO_PROMPT)
            {
                return await stepContext.NextAsync(cancellationToken: cancellationToken);
            }

            // Get the token from the previous step. If it's there, login was successful
            if (stepContext.Result != null)
            {
                var tokenResponse = stepContext.Result as TokenResponse;
                if (!string.IsNullOrEmpty(tokenResponse?.Token))
                {
                    await stepContext.Context.SendActivityAsync(
                        MessageFactory.Text("You are now logged in."), cancellationToken);
                    return await stepContext.NextAsync(null, cancellationToken);
                }
            }

            await stepContext.Context.SendActivityAsync(
                MessageFactory.Text("Login was not successful please try again."), cancellationToken);
            return await stepContext.EndDialogAsync();
        }

        private async Task<DialogTurnResult> PromptUserStepAsync(
            WaterfallStepContext stepContext,
            CancellationToken cancellationToken)
        {
            var options = new PromptOptions
            {
                Prompt = MessageFactory.Text("Please choose an option below"),
                Choices = new List<Choice> {
                    new Choice { Value = "Show token" },
                    new Choice { Value = "Show me" },
                    new Choice { Value = "Show calendar" },
                    new Choice { Value = "Add event" },
                    new Choice { Value = "Log out" },
                }
            };

            return await stepContext.PromptAsync(
                nameof(ChoicePrompt),
                options,
                cancellationToken);
        }

        private async Task<DialogTurnResult> CommandStepAsync(
            WaterfallStepContext stepContext,
            CancellationToken cancellationToken)
        {
            // Save the command the user entered so we can get it back after
            // the OAuthPrompt completes
            var foundChoice = stepContext.Result as FoundChoice;
            // Result could be a FoundChoice (if user selected a choice button)
            // or a string (if user just typed something)
            stepContext.Values["command"] = foundChoice?.Value ?? stepContext.Result;

            // There is no reason to store the token locally in the bot because we can always just call
            // the OAuth prompt to get the token or get a new token if needed. The prompt completes silently
            // if the user is already signed in.
            return await stepContext.BeginDialogAsync(nameof(OAuthPrompt), null, cancellationToken);
        }

        private async Task<DialogTurnResult> ProcessStepAsync(
            WaterfallStepContext stepContext,
            CancellationToken cancellationToken)
        {
            if (stepContext.Result != null)
            {
                var tokenResponse = stepContext.Result as TokenResponse;

                // If we have the token use the user is authenticated so we may use it to make API calls.
                if (tokenResponse?.Token != null)
                {
                    var command = ((string)stepContext.Values["command"] ?? string.Empty).ToLowerInvariant();

                    if (command.StartsWith("show token"))
                    {
                        // Show the user's token - for testing and troubleshooting
                        // Generally production apps should not display access tokens
                        await stepContext.Context.SendActivityAsync(
                            MessageFactory.Text($"Your token is: {tokenResponse.Token}"),
                            cancellationToken);
                    }
                    else if (command.StartsWith("show me"))
                    {
                        await stepContext.Context.SendActivityAsync(
                            MessageFactory.Text("I don't know how to do this yet!"),
                            cancellationToken);
                    }
                    else if (command.StartsWith("show calendar"))
                    {
                        await stepContext.Context.SendActivityAsync(
                            MessageFactory.Text("I don't know how to do this yet!"),
                            cancellationToken);
                    }
                    else if (command.StartsWith("add event"))
                    {
                        await stepContext.Context.SendActivityAsync(
                            MessageFactory.Text("I don't know how to do this yet!"),
                            cancellationToken);
                    }
                    else
                    {
                        await stepContext.Context.SendActivityAsync(
                            MessageFactory.Text("I'm sorry, I didn't understand. Please try again."),
                            cancellationToken);
                    }
                }
            }
            else
            {
                await stepContext.Context.SendActivityAsync(
                    MessageFactory.Text("We couldn't log you in. Please try again later."),
                    cancellationToken);
                return await stepContext.EndDialogAsync(cancellationToken: cancellationToken);
            }

            // Go to the next step
            return await stepContext.NextAsync(cancellationToken: cancellationToken);
        }

        private async Task<DialogTurnResult> ReturnToPromptStepAsync(
            WaterfallStepContext stepContext,
            CancellationToken cancellationToken)
        {
            // Restart the dialog, but skip the initial login prompt
            return await stepContext.ReplaceDialogAsync(InitialDialogId, NO_PROMPT, cancellationToken);
        }
    }
}
Tómese un momento para revisar este código.
- En el constructor, configura un WaterfallDialog con un conjunto de pasos que se producen en orden.
- En
LoginPromptStepAsyncél se envía un OAuthPrompt. Si el usuario no ha iniciado sesión, se enviará un mensaje de interfaz de usuario al usuario. - En
ProcessLoginStepAsyncél comprueba si el inicio de sesión se ha realizado correctamente y envía una confirmación. - En
PromptUserStepAsyncél se envía un ChoicePrompt con los comandos disponibles. - En
CommandStepAsyncella se guarda la elección del usuario y, a continuación, se vuelve a enviar un OAuthPrompt. - En
ProcessStepAsyncella se realiza una acción basada en el comando recibido. - In
ReturnToPromptStepAsyncit starts the waterfall over, but passes a flag to skip the initial user login.
- En
- En el constructor, configura un WaterfallDialog con un conjunto de pasos que se producen en orden.
Actualizar CalendarBot
El siguiente paso es actualizar CalendarBot para usar estos nuevos cuadros de diálogo.
Abra ./Bots/CalendarBot.cs y reemplace todo su contenido por el código siguiente.
using System.Collections.Generic;
using System.Threading;
using System.Threading.Tasks;
using Microsoft.Bot.Builder;
using Microsoft.Bot.Builder.Dialogs;
using Microsoft.Bot.Builder.Teams;
using Microsoft.Bot.Schema;
using Microsoft.Extensions.Logging;

namespace CalendarBot.Bots
{
    public class CalendarBot<T> : TeamsActivityHandler where T : Dialog
    {
        protected readonly BotState ConversationState;
        protected readonly Dialog Dialog;
        protected readonly ILogger Logger;
        protected readonly BotState UserState;

        public CalendarBot(
            ConversationState conversationState,
            UserState userState,
            T dialog,
            ILogger<CalendarBot<T>> logger)
        {
            ConversationState = conversationState;
            UserState = userState;
            Dialog = dialog;
            Logger = logger;
        }

        public override async Task OnTurnAsync(
            ITurnContext turnContext,
            CancellationToken cancellationToken = default(CancellationToken))
        {
            Logger.LogInformation("CalendarBot.OnTurnAsync");
            await base.OnTurnAsync(turnContext, cancellationToken);

            // Save any state changes that might have occurred during the turn.
            await ConversationState.SaveChangesAsync(turnContext, false, cancellationToken);
            await UserState.SaveChangesAsync(turnContext, false, cancellationToken);
        }

        protected override async Task OnMessageActivityAsync(
            ITurnContext<IMessageActivity> turnContext,
            CancellationToken cancellationToken)
        {
            Logger.LogInformation("CalendarBot.OnMessageActivityAsync");
            await Dialog.RunAsync(turnContext,
                ConversationState.CreateProperty<DialogState>(nameof(DialogState)),
                cancellationToken);
        }

        protected override async Task OnMembersAddedAsync(
            IList<ChannelAccount> membersAdded,
            ITurnContext<IConversationUpdateActivity> turnContext,
            CancellationToken cancellationToken)
        {
            Logger.LogInformation("CalendarBot.OnMembersAddedAsync");
            var welcomeText =
                "Welcome to Microsoft Graph CalendarBot. Type anything to get started.";

            foreach (var member in membersAdded)
            {
                if (member.Id != turnContext.Activity.Recipient.Id)
                {
                    await turnContext.SendActivityAsync(
                        MessageFactory.Text(welcomeText),
                        cancellationToken);
                }
            }
        }

        protected override async Task OnTokenResponseEventAsync(
            ITurnContext<IEventActivity> turnContext,
            CancellationToken cancellationToken)
        {
            Logger.LogInformation("CalendarBot.OnTokenResponseEventAsync");
            await Dialog.RunAsync(turnContext,
                ConversationState.CreateProperty<DialogState>(nameof(DialogState)),
                cancellationToken);
        }

        protected override async Task OnTeamsSigninVerifyStateAsync(
            ITurnContext<IInvokeActivity> turnContext,
            CancellationToken cancellationToken)
        {
            Logger.LogInformation("CalendarBot.OnTeamsSigninVerifyStateAsync");
            await Dialog.RunAsync(turnContext,
                ConversationState.CreateProperty<DialogState>(nameof(DialogState)),
                cancellationToken);
        }
    }
}
Este es un breve resumen de los cambios.
- Se cambió la clase CalendarBot para que sea una clase de plantilla, recibiendo un cuadro de diálogo.
- Se cambió la clase CalendarBot para extender TeamsActivityHandler, lo que le permite iniciar sesión en Microsoft Teams.
- Se agregaron invalidaciones de método adicionales para habilitar la autenticación.
Actualizar Startup.cs
El último paso es actualizar el método ConfigureServices para agregar los servicios necesarios para la autenticación y el nuevo cuadro de diálogo.
Abra ./Startup.cs y quite la
services.AddTransient<IBot, Bots.CalendarBot>();línea delConfigureServicesmétodo.Inserte el siguiente código al final del
ConfigureServicesmétodo.// Create the storage we'll be using for User and Conversation state. (Memory is great for testing purposes.) services.AddSingleton<IStorage, MemoryStorage>(); // Create the User state. (Used in this bot's Dialog implementation.) services.AddSingleton<UserState>(); // Create the Conversation state. (Used by the Dialog system itself.) services.AddSingleton<ConversationState>(); // The Dialog that will be run by the bot. services.AddSingleton<Dialogs.MainDialog>(); // Create the bot as a transient. In this case the ASP Controller is expecting an IBot. services.AddTransient<IBot, Bots.CalendarBot<Dialogs.MainDialog>>();
Autenticación de prueba
Guarde todos los cambios e inicie el bot con
dotnet run.Abra el Bot Framework Emulator. Seleccione el icono de engranaje ⚙ en la parte inferior izquierda.
Escriba la ruta de acceso local a la instalación de ngrok y habilite omitir ngrok para direcciones locales y Ejecutar ngrok cuando el Emulator inicie las opciones. Haga clic en Guardar.
Seleccione el menú Archivo y, a continuación, Nueva configuración del bot....
Rellene los campos de la siguiente manera.
- Nombre del bot:
CalendarBot - Dirección URL del extremo:
https://localhost:3978/api/messages - Id. de aplicación de Microsoft: el identificador de aplicación de su Graph registro de la aplicación bot de calendario
- Contraseña de la aplicación microsoft: el secreto Graph cliente del bot de calendario
- Cifrar claves almacenadas en la configuración del bot: Habilitado
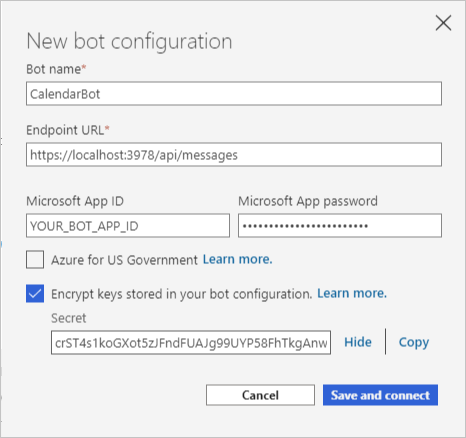
- Nombre del bot:
Seleccione Guardar y conectar. Después de conectar el emulador, debería ver
Welcome to Microsoft Graph CalendarBot. Type anything to get started.Escriba texto y envíelo al bot. El bot responde con un mensaje de inicio de sesión.
Seleccione el botón Inicio de sesión. El emulador le pide que confirme la dirección URL que empieza por
oauthlink://https://token.botframeworkcom. Seleccione Confirmar para continuar.En la ventana emergente, inicie sesión con su Microsoft 365 cuenta. Revise los permisos solicitados y acepte.
Una vez completada la autenticación y el consentimiento, la ventana emergente proporciona un código de validación. Copie el código y cierre la ventana.
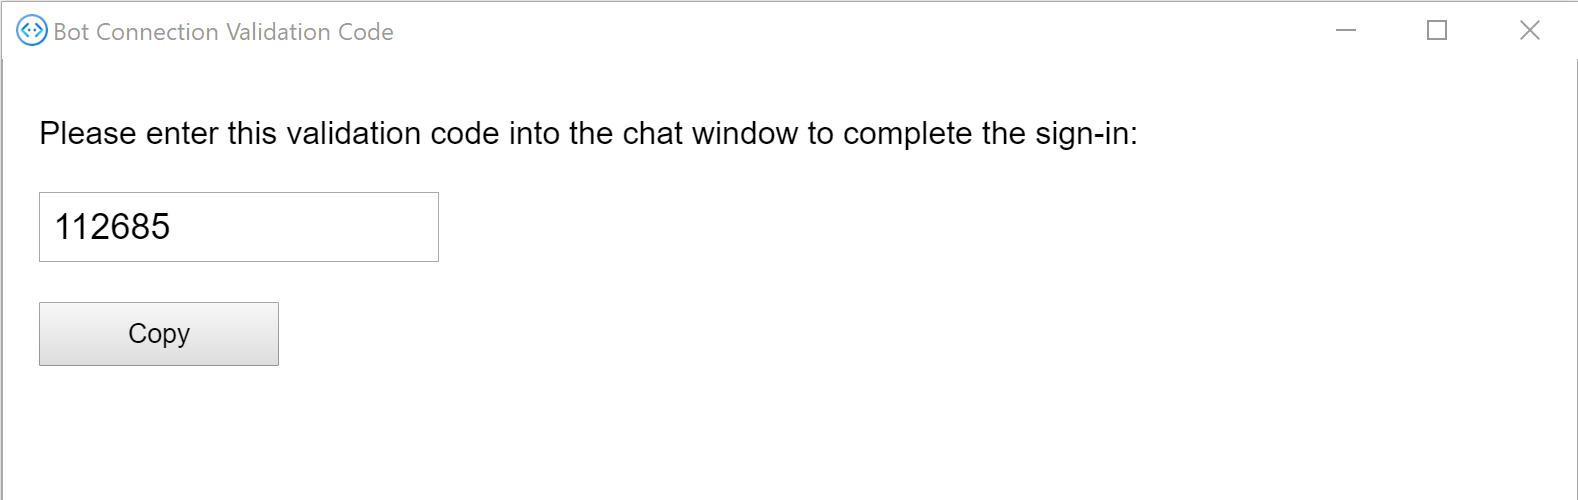
Escriba el código de validación en la ventana de chat para completar el inicio de sesión.
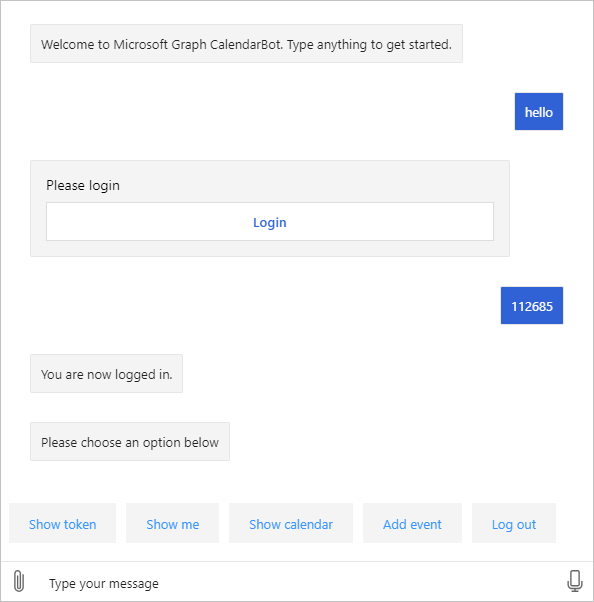
Si selecciona el botón Mostrar token (o tipo
show token), el bot muestra el token de acceso. El botón Cerrar sesión (o escribirlog out) le cerrará la sesión.
Sugerencia
Es posible que reciba el siguiente mensaje de error en la Bot Framework Emulator al iniciar una conversación con el bot.
Failed to generate an actual sign-in link: Error: Failed to connect to ngrok instance for OAuth postback URL:
FetchError: request to http://127.0.0.1:4041/api/tunnels failed, reason: connect ECONNREFUSED 127.0.0.1:4041
Si esto sucede, asegúrese de habilitar la opción Ejecutar ngrok cuando el Emulator se inicie en la configuración del emulador y reinicie el emulador.
Obtener detalles del usuario con Microsoft Graph
En esta sección, usará el SDK de Microsoft Graph para obtener el usuario que ha iniciado sesión.
Crear un servicio Graph web
Comience implementando un servicio que el bot puede usar para obtener un GraphServiceClient del SDK de Microsoft Graph y, a continuación, poner ese servicio a disposición del bot a través de la inserción de dependencias.
Cree un nuevo directorio en la raíz del proyecto denominado Graph. Cree un nuevo archivo en el directorio ./Graph denominado IGraphClientService.cs y agregue el siguiente código.
using Microsoft.Graph;

namespace CalendarBot.Graph
{
    public interface IGraphClientService
    {
        GraphServiceClient GetAuthenticatedGraphClient(string accessToken);
    }
}
Cree un nuevo archivo en el directorio ./Graph denominado GraphClientService.cs y agregue el siguiente código.
using Microsoft.Graph;
using System.Net.Http.Headers;
using System.Threading.Tasks;

namespace CalendarBot.Graph
{
    public class GraphClientService : IGraphClientService
    {
        public GraphServiceClient GetAuthenticatedGraphClient(string accessToken)
        {
            return new GraphServiceClient(new DelegateAuthenticationProvider(
                async (request) => {
                    // Add the access token to the Authorization header
                    // on the outgoing request
                    request.Headers.Authorization =
                        new AuthenticationHeaderValue("Bearer", accessToken);
                    await Task.CompletedTask;
                }
            ));
        }
    }
}
Abra ./Startup.cs y agregue la siguiente
usinginstrucción en la parte superior del archivo.using CalendarBot.Graph;Agregue el siguiente código al final de la función
ConfigureServices.// Add the Graph client service services.AddSingleton<IGraphClientService, GraphClientService>();Abra ./Dialogs/MainDialog.cs. Agregue las siguientes
usinginstrucciones a la parte superior del archivo.using System; using System.IO; using AdaptiveCards; using CalendarBot.Graph; using Microsoft.Graph;Agregue la siguiente propiedad a la clase MainDialog .
private readonly IGraphClientService _graphClientService;Busque el constructor de la clase MainDialog y actualice su firma para tomar un parámetro IGraphServiceClient .
public MainDialog(
    IConfiguration configuration,
    ILogger<MainDialog> logger,
    IGraphClientService graphClientService)
    : base(nameof(MainDialog), configuration["ConnectionName"])
Agregue el siguiente código al constructor.
_graphClientService = graphClientService;
Obtener el usuario que ha iniciado sesión
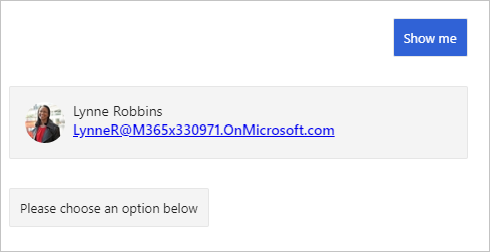
En esta sección, usará el Graph Microsoft para obtener el nombre, la dirección de correo electrónico y la foto del usuario. A continuación, creará una tarjeta adaptable para mostrar la información.
Cree un nuevo archivo en la raíz del proyecto denominado CardHelper.cs. Agregue el siguiente código al archivo.
using AdaptiveCards;
using Microsoft.Graph;
using System;
using System.IO;

namespace CalendarBot
{
    public class CardHelper
    {
        public static AdaptiveCard GetUserCard(User user, Stream photo)
        {
          // Create an Adaptive Card to display the user
            // See https://adaptivecards.io/designer/ for possibilities
            var userCard = new AdaptiveCard("1.2");

            var columns = new AdaptiveColumnSet();
            userCard.Body.Add(columns);

            var userPhotoColumn = new AdaptiveColumn { Width = AdaptiveColumnWidth.Auto };
            columns.Columns.Add(userPhotoColumn);

            userPhotoColumn.Items.Add(new AdaptiveImage {
                Style = AdaptiveImageStyle.Person,
                Size = AdaptiveImageSize.Small,
                Url = GetDataUriFromPhoto(photo)
            });

            var userInfoColumn = new AdaptiveColumn {Width = AdaptiveColumnWidth.Stretch };
            columns.Columns.Add(userInfoColumn);

            userInfoColumn.Items.Add(new AdaptiveTextBlock {
                Weight = AdaptiveTextWeight.Bolder,
                Wrap = true,
                Text = user.DisplayName
            });

            userInfoColumn.Items.Add(new AdaptiveTextBlock {
                Spacing = AdaptiveSpacing.None,
                IsSubtle = true,
                Wrap = true,
                Text = user.Mail ?? user.UserPrincipalName
            });

            return userCard;
        }

        private static Uri GetDataUriFromPhoto(Stream photo)
        {
            // Copy to a MemoryStream to get access to bytes
            var photoStream = new MemoryStream();
            photo.CopyTo(photoStream);

            var photoBytes = photoStream.ToArray();

            return new Uri($"data:image/png;base64,{Convert.ToBase64String(photoBytes)}");
        }
    }
}
Este código usa el paquete de NuGet AdaptiveCard para crear una tarjeta adaptable para mostrar al usuario.
Agregue la siguiente función a la clase MainDialog .
private async Task DisplayLoggedInUser(
    string accessToken,
    WaterfallStepContext stepContext,
    CancellationToken cancellationToken)
{
    var graphClient = _graphClientService
        .GetAuthenticatedGraphClient(accessToken);

    // Get the user
    // GET /me?$select=displayName,mail,userPrincipalName
    var user = await graphClient.Me
        .Request()
        .Select(u => new {
            u.DisplayName,
            u.Mail,
            u.UserPrincipalName
        })
        .GetAsync();

    // Get the user's photo
    // GET /me/photos/48x48/$value
    var userPhoto = await graphClient.Me
        .Photos["48x48"]
        .Content
        .Request()
        .GetAsync();

    // Generate an Adaptive Card
    var userCard = CardHelper.GetUserCard(user, userPhoto);

    // Create an attachment message to send the card
    var userMessage = MessageFactory.Attachment(
        new Microsoft.Bot.Schema.Attachment {
            ContentType = AdaptiveCard.ContentType,
            Content = userCard
        });

    await stepContext.Context.SendActivityAsync(userMessage, cancellationToken);
}
Tenga en cuenta lo que hace este código.
- Usa graphClient para obtener el usuario que ha iniciado sesión.
- Usa el método
Selectpara limitar los campos que se devuelven.
- Usa el método
- Usa graphClient para obtener la foto del usuario, solicitando el tamaño admitido más pequeño de 48 x 48 píxeles.
- Usa la clase CardHelper para construir una tarjeta adaptable y envía la tarjeta como datos adjuntos.
- Usa graphClient para obtener el usuario que ha iniciado sesión.
Reemplace el código dentro del
else if (command.StartsWith("show me"))bloque porProcessStepAsynclo siguiente.else if (command.StartsWith("show me")) { await DisplayLoggedInUser(tokenResponse.Token, stepContext, cancellationToken); }Guarde todos los cambios y reinicie el bot.
Use el Bot Framework Emulator para conectarse al bot e iniciar sesión. Seleccione el botón Mostrarme para mostrar al usuario que ha iniciado sesión.
Obtener una vista de calendario
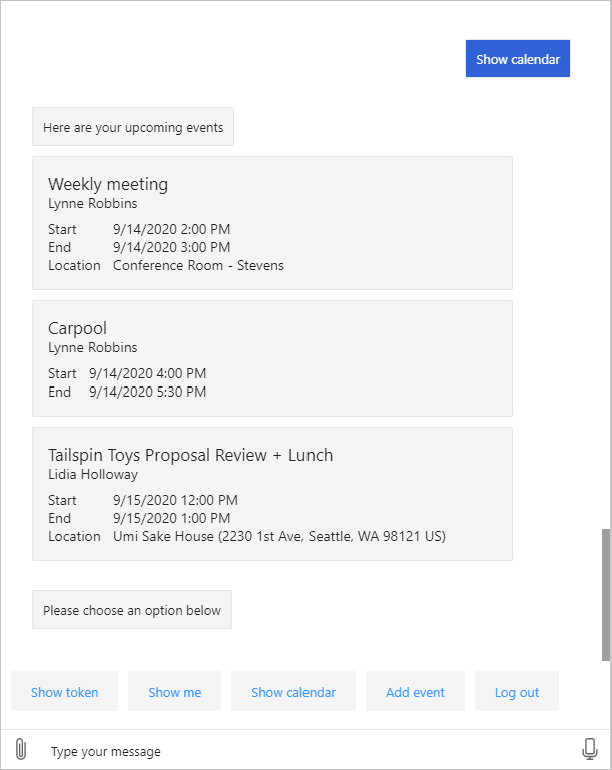
En esta sección, usará el SDK de Microsoft Graph para obtener los siguientes 3 próximos eventos en el calendario del usuario para la semana actual.
Obtener una vista de calendario
Una vista de calendario es una lista de eventos del calendario de un usuario que se encuentra entre dos valores de fecha y hora. La ventaja de usar una vista de calendario es que incluye cualquier ocurrencia de reuniones periódicas.
Abra ./CardHelper.cs y agregue la siguiente función a la clase CardHelper .
public static AdaptiveCard GetEventCard(Event calendarEvent, string dateTimeFormat)
{
    // Build an Adaptive Card for the event
    var eventCard = new AdaptiveCard("1.2");

    // Add subject as card title
    eventCard.Body.Add(new AdaptiveTextBlock
    {
        Size = AdaptiveTextSize.Medium,
        Weight = AdaptiveTextWeight.Bolder,
        Text = calendarEvent.Subject
    });

    // Add organizer
    eventCard.Body.Add(new AdaptiveTextBlock
    {
        Size = AdaptiveTextSize.Default,
        Weight = AdaptiveTextWeight.Lighter,
        Spacing = AdaptiveSpacing.None,
        Text = calendarEvent.Organizer.EmailAddress.Name
    });

    // Add details
    var details = new AdaptiveFactSet();

    details.Facts.Add(new AdaptiveFact
    {
        Title = "Start",
        Value = DateTime.Parse(calendarEvent.Start.DateTime).ToString(dateTimeFormat)
    });

    details.Facts.Add(new AdaptiveFact
    {
        Title = "End",
        Value = DateTime.Parse(calendarEvent.End.DateTime).ToString(dateTimeFormat)
    });

    if (calendarEvent.Location != null &&
        !string.IsNullOrEmpty(calendarEvent.Location.DisplayName))
    {
        details.Facts.Add(new AdaptiveFact
        {
            Title = "Location",
            Value = calendarEvent.Location.DisplayName
        });
    }

    eventCard.Body.Add(details);

    return eventCard;
}
Este código crea una tarjeta adaptable para representar un evento de calendario.
Abra ./Dialogs/MainDialog.cs y agregue la siguiente función a la clase MainDialog .
private async Task DisplayCalendarView(
    string accessToken,
    WaterfallStepContext stepContext,
    CancellationToken cancellationToken)
{
    var graphClient = _graphClientService
        .GetAuthenticatedGraphClient(accessToken);

    // Get user's preferred time zone and format
    var user = await graphClient.Me
        .Request()
        .Select(u => new { u.MailboxSettings })
        .GetAsync();

    var dateTimeFormat =
        $"{user.MailboxSettings.DateFormat} {user.MailboxSettings.TimeFormat}";
    if (string.IsNullOrWhiteSpace(dateTimeFormat)) {
        // Default to a standard format if user's preference not set
        dateTimeFormat = "G";
    }

    var preferredTimeZone = user.MailboxSettings.TimeZone;
    var userTimeZone = TimeZoneInfo.FindSystemTimeZoneById(preferredTimeZone);

    var now = DateTime.UtcNow;
    // Calculate the end of the week (Sunday, midnight)
    int diff = 7 - (int)DateTime.Today.DayOfWeek;
    var weekEndUnspecified = DateTime.SpecifyKind(
        DateTime.Today.AddDays(diff), DateTimeKind.Unspecified);
    var endOfWeek = TimeZoneInfo.ConvertTimeToUtc(weekEndUnspecified, userTimeZone);

    // Set query parameters for the calendar view request
    var viewOptions = new List<QueryOption>
    {
        new QueryOption("startDateTime", now.ToString("o")),
        new QueryOption("endDateTime", endOfWeek.ToString("o"))
    };

    // Get events happening between right now and the end of the week
    // GET /me/calendarView?startDateTime=""&endDateTime=""
    var events = await graphClient.Me
        .CalendarView
        .Request(viewOptions)
        // Send user time zone in request so date/time in
        // response will be in preferred time zone
        .Header("Prefer", $"outlook.timezone=\"{preferredTimeZone}\"")
        // Get max 3 per request
        .Top(3)
        // Only return fields app will use
        .Select(e => new
        {
            e.Subject,
            e.Organizer,
            e.Start,
            e.End,
            e.Location
        })
        // Order results chronologically
        .OrderBy("start/dateTime")
        .GetAsync();

    var calendarViewMessage = MessageFactory.Text("Here are your upcoming events");
    calendarViewMessage.AttachmentLayout = AttachmentLayoutTypes.List;

    foreach(var calendarEvent in events.CurrentPage)
    {
        var eventCard = CardHelper.GetEventCard(calendarEvent, dateTimeFormat);

        // Add the card to the message's attachments
        calendarViewMessage.Attachments.Add(new Microsoft.Bot.Schema.Attachment
        {
            ContentType = AdaptiveCard.ContentType,
            Content = eventCard
        });
    }

    await stepContext.Context.SendActivityAsync(calendarViewMessage, cancellationToken);
}
Tenga en cuenta lo que hace este código.
- Obtiene mailboxSettings del usuario para determinar la zona horaria preferida del usuario y los formatos de fecha y hora.
- Establece los valores startDateTime y endDateTime en ahora y al final de la semana, respectivamente. Esto define la ventana de tiempo que usa la vista de calendario.
- Llama con
graphClient.Me.CalendarViewlos siguientes detalles.- Establece el encabezado
Prefer: outlook.timezoneen la zona horaria preferida del usuario, lo que hace que las horas de inicio y finalización de los eventos se den en la zona horaria del usuario. - Usa el método
Top(3)para limitar los resultados solo a los tres primeros eventos. - Se usa
Selectpara limitar los campos devueltos a solo los campos usados por el bot. - Se usa
OrderBypara ordenar los eventos por hora de inicio.
- Establece el encabezado
- Agrega una tarjeta adaptable para cada evento al mensaje de respuesta.
Reemplace el código dentro del
else if (command.StartsWith("show calendar"))bloque porProcessStepAsynclo siguiente.else if (command.StartsWith("show calendar")) { await DisplayCalendarView(tokenResponse.Token, stepContext, cancellationToken); }Guarde todos los cambios y reinicie el bot.
Use el Bot Framework Emulator para conectarse al bot e iniciar sesión. Seleccione el botón Mostrar calendario para mostrar la vista de calendario.
Crear un nuevo evento
En esta sección, usará el SDK de Microsoft Graph para agregar un evento al calendario del usuario.
Implementar un cuadro de diálogo
Comience creando un nuevo cuadro de diálogo personalizado para solicitar al usuario los valores necesarios para agregar un evento a su calendario. Este cuadro de diálogo usará un WaterfallDialog para realizar los pasos siguientes.
- Preguntar por un asunto
- Preguntar si el usuario quiere invitar a personas
- Preguntar a los asistentes (si el usuario ha dicho que sí al paso anterior)
- Solicitar una fecha y hora de inicio
- Solicitar una fecha y hora de finalización
- Mostrar todos los valores recopilados y pedir al usuario que confirme
- Si el usuario lo confirma, obtenga el token de acceso de OAuthPrompt
- Crear el evento
Cree un nuevo archivo en el directorio ./Dialogs denominado NewEventDialog.cs y agregue el código siguiente.
using System;
using System.Collections.Generic;
using System.Threading;
using System.Threading.Tasks;
using CalendarBot.Graph;
using Microsoft.Bot.Builder;
using Microsoft.Bot.Builder.Dialogs;
using Microsoft.Bot.Schema;
using Microsoft.Extensions.Configuration;
using Microsoft.Extensions.Logging;
using Microsoft.Graph;
using Microsoft.Recognizers.Text.DataTypes.TimexExpression;
using TimexTypes = Microsoft.Recognizers.Text.DataTypes.TimexExpression.Constants.TimexTypes;

namespace CalendarBot.Dialogs
{
    public class NewEventDialog : LogoutDialog
    {
        protected readonly ILogger _logger;
        private readonly IGraphClientService _graphClientService;

        public NewEventDialog(
            IConfiguration configuration,
            IGraphClientService graphClientService)
            : base(nameof(NewEventDialog), configuration["ConnectionName"])
        {

        }

        // Generate a DateTime from the list of
        // DateTimeResolutions provided by the DateTimePrompt
        private static DateTime GetDateTimeFromResolutions(IList<DateTimeResolution> resolutions)
        {
            var timex = new TimexProperty(resolutions[0].Timex);

            // Handle the "now" case
            if (timex.Now ?? false)
            {
                return DateTime.Now;
            }

            // Otherwise generate a DateTime
            return TimexHelpers.DateFromTimex(timex);
        }
    }
}
Este es el shell de un nuevo cuadro de diálogo que pedirá al usuario los valores necesarios para agregar un evento a su calendario.
Agregue la siguiente función a la clase NewEventDialog para solicitar al usuario un asunto.
private async Task<DialogTurnResult> PromptForSubjectAsync(
    WaterfallStepContext stepContext,
    CancellationToken cancellationToken)
{
    return await stepContext.PromptAsync("subjectPrompt",
        new PromptOptions{
            Prompt = MessageFactory.Text("What's the subject for your event?")
        },
        cancellationToken);
}
Agregue la siguiente función a la clase NewEventDialog para almacenar el asunto que el usuario dio en el paso anterior y para preguntar si desea agregar asistentes.
private async Task<DialogTurnResult> PromptForAddAttendeesAsync(
    WaterfallStepContext stepContext,
    CancellationToken cancellationToken)
{
    stepContext.Values["subject"] = (string)stepContext.Result;

    return await stepContext.PromptAsync(nameof(ConfirmPrompt),
        new PromptOptions{
            Prompt = MessageFactory.Text("Do you want to invite other people to this event?")
        },
        cancellationToken);
}
Agregue la siguiente función a la clase NewEventDialog para comprobar la respuesta del usuario del paso anterior y solicitar al usuario una lista de asistentes si es necesario.
private async Task<DialogTurnResult> PromptForAttendeesAsync(
    WaterfallStepContext stepContext,
    CancellationToken cancellationToken)
{
    if ((bool)stepContext.Result)
    {
        // user wants to invite attendees
        // prompt for email addresses
        return await stepContext.PromptAsync("attendeesPrompt",
        new PromptOptions{
            Prompt = MessageFactory.Text("Enter one or more email addresses of the people you want to invite. Separate multiple addresses with a semi-colon (;)."),
            RetryPrompt = MessageFactory.Text("One or more email addresses you entered are not valid. Please try again.")
        },
        cancellationToken);
    }
    else
    {
        // Skip attendees prompt
        return await stepContext.NextAsync(null, cancellationToken);
    }
}
Agregue la siguiente función a la clase NewEventDialog para almacenar la lista de asistentes del paso anterior (si está presente) y solicitar al usuario una fecha y hora de inicio.
private async Task<DialogTurnResult> PromptForStartAsync(
    WaterfallStepContext stepContext,
    CancellationToken cancellationToken)
{
    stepContext.Values["attendees"] = (string)stepContext.Result;

    return await stepContext.PromptAsync("startPrompt",
        new PromptOptions{
            Prompt = MessageFactory.Text("When does the event start?"),
            RetryPrompt = MessageFactory.Text("I'm sorry, I didn't get that. Please provide both a day and a time.")
        },
        cancellationToken);
}
Agregue la siguiente función a la clase NewEventDialog para almacenar el valor de inicio del paso anterior y solicitar al usuario una fecha y hora de finalización.
private async Task<DialogTurnResult> PromptForEndAsync(
    WaterfallStepContext stepContext,
    CancellationToken cancellationToken)
{
    var dateTimes = stepContext.Result as IList<DateTimeResolution>;

    var start = GetDateTimeFromResolutions(dateTimes);

    stepContext.Values["start"] = start;

    return await stepContext.PromptAsync("endPrompt",
        new PromptOptions{
            Prompt = MessageFactory.Text("When does the event end?"),
            RetryPrompt = MessageFactory.Text("I'm sorry, I didn't get that. Please provide both a day and a time, and ensure that it is later than the start."),
            Validations = start
        },
        cancellationToken);
}
Agregue la siguiente función a la clase NewEventDialog para almacenar el valor final del paso anterior y pida al usuario que confirme todas las entradas.
private async Task<DialogTurnResult> ConfirmNewEventAsync(
    WaterfallStepContext stepContext,
    CancellationToken cancellationToken)
{
    var dateTimes = stepContext.Result as IList<DateTimeResolution>;

    var end = GetDateTimeFromResolutions(dateTimes);

    stepContext.Values["end"] = end;

    // Playback the values as we understand them
    var subject = stepContext.Values["subject"] as string;
    var attendees = stepContext.Values["attendees"] as string;
    var start = stepContext.Values["start"] as DateTime?;

    // Build a Markdown string
    var markdown = "Here's what I heard:\n\n";
    markdown += $"- **Subject:** {subject}\n";
    markdown += $"- **Attendees:** {attendees ?? "none"}\n";
    markdown += $"- **Start:** {start?.ToString()}\n";
    markdown += $"- **End:** {end.ToString()}";

    await stepContext.Context.SendActivityAsync(
        MessageFactory.Text(markdown));

    return await stepContext.PromptAsync(nameof(ConfirmPrompt),
        new PromptOptions {
            Prompt = MessageFactory.Text("Is this correct?")
        },
        cancellationToken);
}
Agregue la siguiente función a la clase NewEventDialog para comprobar la respuesta del usuario del paso anterior. Si el usuario confirma las entradas, use la clase OAuthPrompt para obtener un token de acceso. De lo contrario, finalice el cuadro de diálogo.
private async Task<DialogTurnResult> GetTokenAsync(
    WaterfallStepContext stepContext,
    CancellationToken cancellationToken)
{
    if ((bool)stepContext.Result)
    {
        return await stepContext.BeginDialogAsync(nameof(OAuthPrompt), null, cancellationToken);
    }
    else
    {
        await stepContext.Context.SendActivityAsync(
            MessageFactory.Text("Please try again."));

        return await stepContext.EndDialogAsync(cancellationToken: cancellationToken);
    }
}
Agregue la siguiente función a la clase NewEventDialog para usar el SDK de Microsoft Graph para crear el nuevo evento.
private async Task<DialogTurnResult> AddEventAsync(
    WaterfallStepContext stepContext,
    CancellationToken cancellationToken)
{
    if (stepContext.Result != null)
    {
        var tokenResponse = stepContext.Result as TokenResponse;
        if (tokenResponse?.Token != null)
        {
            var subject = stepContext.Values["subject"] as string;
            var attendees = stepContext.Values["attendees"] as string;
            var start = stepContext.Values["start"] as DateTime?;
            var end = stepContext.Values["end"] as DateTime?;

            // Get an authenticated Graph client using
            // the access token
            var graphClient = _graphClientService
                .GetAuthenticatedGraphClient(tokenResponse?.Token);

            try
            {
                // Get user's preferred time zone
                var user = await graphClient.Me
                    .Request()
                    .Select(u => new { u.MailboxSettings })
                    .GetAsync();

                // Initialize an Event object
                var newEvent = new Event
                {
                    Subject = subject,
                    Start = new DateTimeTimeZone
                    {
                        DateTime = start?.ToString("o"),
                        TimeZone = user.MailboxSettings.TimeZone
                    },
                    End = new DateTimeTimeZone
                    {
                        DateTime = end?.ToString("o"),
                        TimeZone = user.MailboxSettings.TimeZone
                    }
                };

                // If attendees were provided, add them
                if (!string.IsNullOrEmpty(attendees))
                {
                    // Initialize a list
                    var attendeeList = new List<Attendee>();

                    // Split the string into an array
                    var emails = attendees.Split(";");
                    foreach (var email in emails)
                    {
                        // Skip empty strings
                        if (!string.IsNullOrEmpty(email))
                        {
                            // Build a new Attendee object and
                            // add to the list
                            attendeeList.Add(new Attendee {
                                Type = AttendeeType.Required,
                                EmailAddress = new EmailAddress
                                {
                                    Address = email
                                }
                            });
                        }
                    }

                    newEvent.Attendees = attendeeList;
                }

                // Add the event
                // POST /me/events
                await graphClient.Me
                    .Events
                    .Request()
                    .AddAsync(newEvent);

                await stepContext.Context.SendActivityAsync(
                    MessageFactory.Text("Event added"),
                    cancellationToken);
            }
            catch (ServiceException ex)
            {
                _logger.LogError(ex, "Could not add event");
                await stepContext.Context.SendActivityAsync(
                    MessageFactory.Text("Something went wrong. Please try again."),
                    cancellationToken);
            }
            return await stepContext.EndDialogAsync(cancellationToken: cancellationToken);
        }
    }

    await stepContext.Context.SendActivityAsync(
            MessageFactory.Text("We couldn't log you in. Please try again later."),
            cancellationToken);
    return await stepContext.EndDialogAsync(cancellationToken: cancellationToken);
}
Tenga en cuenta lo que hace este código.
- Obtiene mailboxSettings del usuario para determinar la zona horaria preferida del usuario.
- Crea un objeto Event con los valores proporcionados por el usuario. Tenga en cuenta que las propiedades Start y End se establecen con la zona horaria del usuario.
- Crea el evento en el calendario del usuario.
Agregar validación
Ahora agregue validación a la entrada del usuario para evitar errores al crear el evento con Microsoft Graph. Queremos asegurarnos de que:
- Si el usuario proporciona una lista de asistentes, debe ser una lista delimitada por punto y coma de direcciones de correo electrónico válidas.
- La fecha y hora de inicio debe ser una fecha y hora válidas.
- La fecha y hora de finalización debe ser una fecha y hora válidas y debe ser posterior al inicio.
Agregue la siguiente función a la clase NewEventDialog para validar la entrada del usuario para los asistentes.
private static Task<bool> AttendeesPromptValidatorAsync(
    PromptValidatorContext<string> promptContext,
    CancellationToken cancellationToken)
{
    if (promptContext.Recognized.Succeeded)
    {
        // Check if these are emails
        var emails = promptContext.Recognized.Value.Split(";");

        foreach (var email in emails)
        {
            // Skip empty entries
            if (string.IsNullOrEmpty(email))
            {
                continue;
            }

            // If there's no '@' symbol it's invalid
            if (email.IndexOf('@') <= 0)
            {
                return Task.FromResult(false);
            }

            try
            {
                // Let the System.Net.Mail.MailAddress class
                // validate the rest. If invalid it will throw
                var mailAddress = new System.Net.Mail.MailAddress(email);
                if (mailAddress.Address != email)
                {
                    return Task.FromResult(false);
                }
            }
            catch
            {
                return Task.FromResult(false);
            }
        }

        return Task.FromResult(true);
    }

    return Task.FromResult(false);
}
Agregue las siguientes funciones a la clase NewEventDialog para validar la entrada del usuario para la fecha y hora de inicio.
private static bool TimexHasDateAndTime(TimexProperty timex)
{
    return timex.Now ?? false ||
        (timex.Types.Contains(TimexTypes.DateTime) &&
        timex.Types.Contains(TimexTypes.Definite));
}

private static Task<bool> StartPromptValidatorAsync(
    PromptValidatorContext<IList<DateTimeResolution>> promptContext,
    CancellationToken cancellationToken)
{
    if (promptContext.Recognized.Succeeded)
    {
        // Initialize a TimexProperty from the first
        // recognized value
        var timex = new TimexProperty(
            promptContext.Recognized.Value[0].Timex);

        // If it has a definite date and time, it's valid
        return Task.FromResult(TimexHasDateAndTime(timex));
    }

    return Task.FromResult(false);
}
Agregue la siguiente función a la clase NewEventDialog para validar la entrada del usuario para la fecha y hora de finalización.
private static Task<bool> EndPromptValidatorAsync(
    PromptValidatorContext<IList<DateTimeResolution>> promptContext,
    CancellationToken cancellationToken)
{
    if (promptContext.Recognized.Succeeded)
    {
        if (promptContext.Options.Validations is DateTime start)
        {
            // Initialize a TimexProperty from the first
            // recognized value
            var timex = new TimexProperty(
                promptContext.Recognized.Value[0].Timex);

            // Get the DateTime from this value to compare with start
            var end = GetDateTimeFromResolutions(promptContext.Recognized.Value);

            // If it has a definite date and time, and
            // the value is later than start, it's valid
            return Task.FromResult(TimexHasDateAndTime(timex) &&
                DateTime.Compare(start, end) < 0);
        }
    }

    return Task.FromResult(false);
}
Agregar pasos a WaterfallDialog
Ahora que tiene todos los "pasos" para el cuadro de diálogo, el último paso es agregarlos a un WaterfallDialog en el constructor y, a continuación, agregar newEventDialog a MainDialog.
Busque el constructor NewEventDialog y agréle el siguiente código.
_graphClientService = graphClientService;

// OAuthPrompt dialog handles the token
// acquisition
AddDialog(new OAuthPrompt(
    nameof(OAuthPrompt),
    new OAuthPromptSettings
    {
        ConnectionName = ConnectionName,
        Text = "Please login",
        Title = "Login",
        Timeout = 300000, // User has 5 minutes to login
    }));

AddDialog(new TextPrompt("subjectPrompt"));
// Validator ensures that the input is a semi-colon delimited
// list of email addresses
AddDialog(new TextPrompt("attendeesPrompt", AttendeesPromptValidatorAsync));
// Validator ensures that the input is a valid date and time
AddDialog(new DateTimePrompt("startPrompt", StartPromptValidatorAsync));
// Validator ensures that the input is a valid date and time
// and that it is later than the start
AddDialog(new DateTimePrompt("endPrompt", EndPromptValidatorAsync));
AddDialog(new ConfirmPrompt(nameof(ConfirmPrompt)));

AddDialog(new WaterfallDialog(nameof(WaterfallDialog), new WaterfallStep[]
{
    PromptForSubjectAsync,
    PromptForAddAttendeesAsync,
    PromptForAttendeesAsync,
    PromptForStartAsync,
    PromptForEndAsync,
    ConfirmNewEventAsync,
    GetTokenAsync,
    AddEventAsync
}));

// The initial child Dialog to run.
InitialDialogId = nameof(WaterfallDialog);
Esto agrega todos los cuadros de diálogo que se usan y agrega todas las funciones que implementó como pasos en el WaterfallDialog.
Abra ./Dialogs/MainDialog.cs y agregue la siguiente línea al constructor.
AddDialog(new NewEventDialog(configuration, graphClientService));Reemplace el código dentro del
else if (command.StartsWith("add event"))bloque porProcessStepAsynclo siguiente.else if (command.StartsWith("add event")) { return await stepContext.BeginDialogAsync(nameof(NewEventDialog), null, cancellationToken); }Guarde todos los cambios y reinicie el bot.
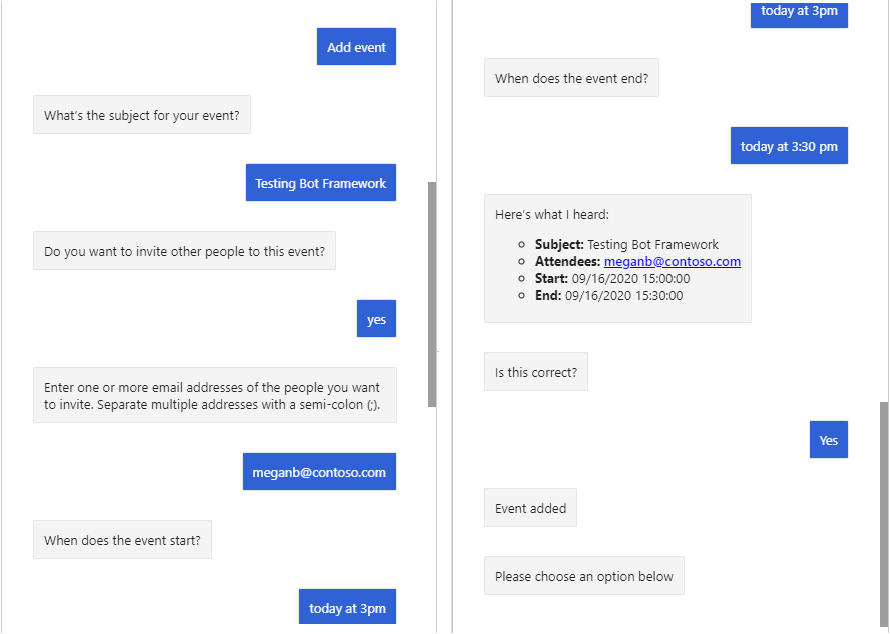
Use el Bot Framework Emulator para conectarse al bot e iniciar sesión. Seleccione el botón Agregar evento .
Responda a los avisos para crear un nuevo evento. Tenga en cuenta que cuando se le soliciten los valores de inicio y finalización, puede usar frases como "hoy a las 3PM" o "ahora".
¡Enhorabuena!
Ha completado el tutorial de Bot Framework Graph Microsoft. Ahora que tienes un bot de trabajo que llama a Microsoft Graph, puedes experimentar y agregar nuevas características. Visite la información general de Microsoft Graph para ver todos los datos a los que puede acceder con Microsoft Graph.
Comentarios
Proporcione cualquier comentario sobre este tutorial en el repositorio GitHub usuario.
¿Tiene algún problema con esta sección? Si es así, envíenos sus comentarios para que podamos mejorarla.