Enable SSL or TLS for Connection Security in Machine Learning Server
Important
This content is being retired and may not be updated in the future. The support for Machine Learning Server will end on July 1, 2022. For more information, see What's happening to Machine Learning Server?
Applies to: Machine Learning Server, Microsoft R Server 9.x
For security reasons, we strongly recommend that SSL/TLS 1.2 be enabled in all production environments. Since we cannot ship certificates for you, these protocols are disabled by default.
You can use HTTPS within a connection encrypted by SSL/TLS 1.2. To enable SSL/TLS, you need some or all of these certificates.
| HTTPS Certificates | Description | Web Node | Compute Node |
|---|---|---|---|
| API certificate | Secures communication between client applications and web node. This certificate works for both one-box and enterprise setups. |
Yes, with private key | No |
| Compute node certificate | Encrypts the traffic between the web node and compute node. You can use a unique certificate for each compute node, or you can use one common Multi-Domain (SAN) certificate for all compute nodes. Note: If a compute node is inside the web node's trust boundary, then this certificate is not needed. This certificate works for enterprise setups. |
No | Yes, with private key |
| Authentication certificate | Authenticates the web node with the compute node so that only the web node can communicate with the compute node. Note: If a compute node is inside the web node's trust boundary, then this certificate is not needed. This certificate works for enterprise setups. |
Yes, with private and a public key | No |
Encrypt the Traffic between Client Applications and Machine Learning Server/R Server
Important
We strongly recommend that SSL/TLS 1.2 be enabled in all production environments.
This section walks you through the steps for securing the connections between the client application and the web node. Doing so encrypts the communication between client and web node to prevent traffic from being modified or read.
Windows: Using Your Default ASP .NET Core Web Server to Encrypt Traffic
On each machine hosting the web node, install and configure the certificate in the certificate store. For example, if you launch "Manage Computer Certificates" from your Windows Start menu, you can:
Install the trusted, signed API HTTPS certificate with a private key in the certificate store.
Make sure the name of the certificate matches the domain name of the web node URL.
Set the private key permissions.
- Right click on the certificate and choose Manage private certificate from the menu.
- Add a group called NETWORK SERVICE and give that group
Readaccess.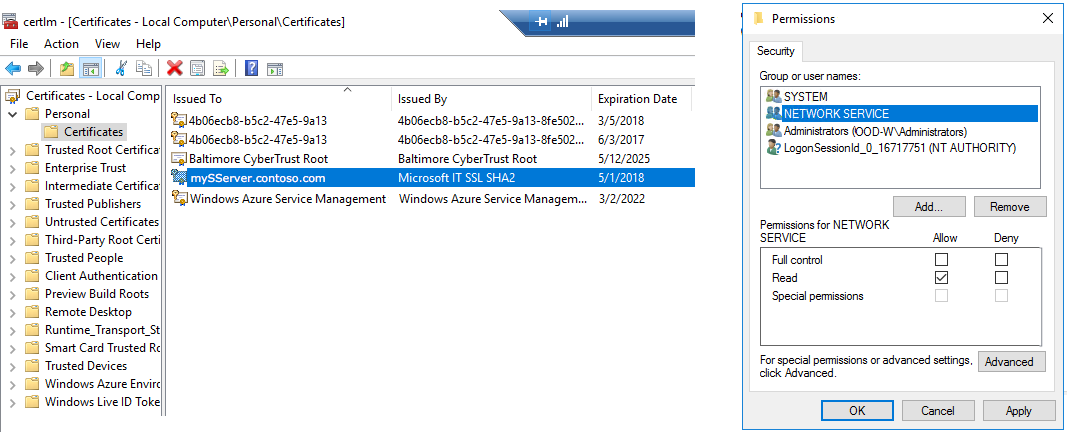
Take note of the
Subjectname of the certificate as you need this info later.
Open the configuration file, <web-node-install-path>/appsettings.json. You can configure the HTTPS port for the web node in this file.
In that file, search for the section starting with: "Kestrel": {
Update and add properties in the Kestrel section to match the values for the API certificate. The Subject name can be found as a property of your certificate in the certificate store.
{
    "Kestrel": {
        "Port": 443,
        "HttpsEnabled": true,
        "HttpsCertificate": {
            "Enabled": true,
            "StoreName": "My",
            "StoreLocation": "LocalMachine",
            "SubjectName": "CN=<certificate-subject-name>"
            "Thumbprint": "<certificate-thumbprint>"
        }
    },
Note
Use
"Thumbprint"to ensure that the correct certificate is loaded if there are multiple certificates on the same system with same name used for different purposes such as IPsec, TLS Web Server Authentication, Client Authentication, Server Authentication, and so on. If you do not have multiple certificates with same name, you can leave the Thumbprint field empty.Close and save the file.
Create a firewall rule to open port 443 to the public IP of the web node so that remote machines can access it.
Launch the administration tool/CLI and restart the web node.
In the same tool, run the diagnostic test to send a test HTTPs request.
Windows: Using IIS to Encrypt
Make sure the name of the certificate matches the domain name of the web node URL.
On each machine hosting a web node:
Open the certificate store:
Install the trusted, signed API HTTPS certificate with a private key in the certificate store.
Make sure the name of the certificate matches the domain name of the web node URL.
Set the private key permissions.
Right click on the certificate and choose Manage private certificate from the menu.
Add a group called
NETWORK SERVICEand give that groupReadaccess.
Launch IIS.
In the Connections pane on the left, expand the Sites folder and select the website.
Click on Bindings under the Actions pane on the right.
Click on Add.
Choose HTTPS as the type and enter the Port, which is 443 by default. Take note of the port number.
Select the SSL certificate you installed previously.
Click OK to create the new HTTPS binding.
Back in the Connections pane, select the website name.
Click the SSL Settings icon in the center of the screen to open the dialog.
Select the checkbox to Require SSL and require a client certificate.
Create a firewall rule to open port 443 to the public IP of the web node so that remote machines can access it.
Run the diagnostic tool to send a test HTTPs request.
Restart the node or just run 'iisreset' on the command line.
Repeat on every web node.
If satisfied with the new HTTPS binding, consider removing the "HTTP" binding to prevent any access via HTTP.
Linux: Encrypting Traffic
Make sure the name of the certificate matches the domain name of the web node URL.
On each Linux machine hosting a web node:
Install the trusted, signed API HTTPS certificate with a private key in the certificate store.
Install NGINX version 1.11.6 or later.
Enable HTTPS on NGINX as described in these articles:
Declare the certificate in the NGINX configuration file
nginx.conf. Find theservercode block and update the following values:server_namewith the name of web nodessl_certificatewith full path to the API HTTPS certificatessl_certificate_keywith the private key for that certificate
server
{
    listen 443;
    ssl     on;
    server_name <webnode-server-name>;
    ssl_certificate <certificate-location>;
    ssl_certificate_key <certificate-key-location>;
In the same
servercode block, forward the traffic from port 443 to the web node's port 12800 (or another port if you changed it). Add the following lines afterssl_certificate_key.location / { proxy_pass http://127.0.0.1:<web-node-port>; } }Close and save
nginx.conf.Restart NGINX service.
If using IPTABLES firewall, add the HTTPS port, which is 443 by default, to the firewall settings to allow communications between the client application and Machine Learning Server.
Launch the administration tool/CLI and restart the web node.
Repeat on each web node.
Run the diagnostic tool to send a test HTTPs request.
Now, you can access Machine Learning Server to operationalize analytics securely on https:// from your client applications.
Encrypt Communication between the Web Node and Compute Node
This section walks you through the steps for encrypting the traffic between the web node and each of its compute nodes.
If a compute node is inside the web node's trust boundary, then encryption of this piece is not needed. However, if the compute node resides outside of the trust boundary, consider using the compute node certificate to encrypt the traffic between the web node and compute node.
When encrypting, you have the choice of using one of the following compute node HTTPS certificates:
- One unique certificate per machine hosting a compute node.
- One common Multi-Domain (SAN) certificate with all compute node names declared in the single certificate
Windows: Using Your Default ASP .NET Core Web Server to Encrypt
On each machine hosting a compute node, install the trusted, signed compute node HTTPS certificate with a private key in the certificate store.
Make sure the name of the certificate matches the domain name of the compute node URL.
Also, take note of the
Subjectname of the certificate as you need this info later.For non production environments, this blog post demonstrates how to use a self-signed certificate in Linux. However, self-signed certificates are NOT recommended for production usage.
Update the external JSON configuration file, appsettings.json to configure the HTTPS port for the compute node:
Open the configuration file, <compute-node-install-path>/appsettings.json.
In that file, search for the section starting with: "Kestrel": {
Update and add properties in that section to match the values for the compute node certificate. The
Subjectname can be found as a property of your certificate in the certificate store.{ "Kestrel": { "Port": <https-port-number>, "HttpsEnabled": true, "HttpsCertificate": { "Enabled": true, "StoreName": "My", "StoreLocation": "LocalMachine", "SubjectName": "CN=<certificate-subject-name>" "Thumbprint": "<certificate-thumbprint>" } },Note
Use
"Thumbprint"to ensure that the correct certificate is loaded if there are multiple certificates on the same system with same name used for different purposes such as IPsec, TLS Web Server Authentication, Client Authentication, Server Authentication, and so on. If you do not have multiple certificates with same name, you can leave the Thumbprint field empty.Close and save the file.
Launch the administration tool/CLI and restart the compute node.
In the same tool, run the diagnostic test to send a test HTTPs request.
Windows: Using IIS to Encrypt
On each machine hosting a compute node, install the trusted, signed compute node HTTPS certificate with a private key in the certificate store.
Make sure the name of the certificate matches the domain name of the compute node URL.
Launch IIS and follow the instructions above.
Restart the node or just run 'iisreset' on the command line.
Linux: Encrypting Traffic between Web Node and Compute Node
Make sure the name of the certificate matches the domain name of the web node URL.
On each Linux machine hosting a compute node:
Install the trusted, signed compute node HTTPS certificate with a private key in the certificate store.
Install NGINX version 1.11.6 or later.
Enable HTTPS on NGINX as described in these articles:
Declare the certificate in the NGINX configuration file
nginx.conf. Find theservercode block and update the following values:server_namewith the name of web nodessl_certificatewith full path to the compute node HTTPS certificatessl_certificate_keywith the private key for that certificate
server
{
    listen 443;
    ssl     on;
    server_name <compute-node-server-name>;
    ssl_certificate <certificate-location>;
    ssl_certificate_key <certificate-key-location>;
In the same
servercode block, forward all the traffic (location /) from port 443 to the compute node's port 12805 (or another port if you changed it). Add the following lines afterssl_certificate_key.location / { proxy_pass http://127.0.0.1:<web-node-port>; } }Close and save
nginx.conf.Restart NGINX service.
Launch the administration tool/CLI and restart the compute node.
Repeat on each compute node.
On each web node, update the compute node URIs so they can be found.
Log in to each web node machine.
For Machine Learning Server, declare the new URIs in administration tool/CLI.
For R Server 9.x:
Open the configuration file, <web-node-install-path>/appsettings.json.
Update the
"Uris": {properties so that declared compute node now points tohttps://<compute-node-ip>(without the port number):"Uris": { "Values": [ "https://<IP-ADDRESS-OF-COMPUTE-NODE-1>", "https://<IP-ADDRESS-OF-COMPUTE-NODE-2>", "https://<IP-ADDRESS-OF-COMPUTE-NODE-3>" ] }Close and save the file.
Launch the administration tool/CLI and restart the web node.
Verify the configuration by running diagnostic test in the administration tool/CLI on the web node.
Repeat on each web node.
Authenticate the Web Node with the Compute Node
This section walks you through the steps for authenticating the web node with the compute node so that only the web node can communicate with the compute node.
If a compute node is inside the web node's trust boundary, then this certificate is not needed. However, if the compute node resides outside of the trust boundary, consider using the compute node certificate to encrypt the traffic between the web node and compute node.
On each web node:
Install the trusted, signed HTTPS authentication certificate with both private and public keys in the certificate store.
Take note of the
Subjectname of the certificate as you need this info later.Open the configuration file, <web-node-install-path>/appsettings.json. You can configure the HTTPS port for the web node in this file.
In the file, search for the section starting with: "BackEndConfiguration": {
Enable this section with
"Enabled": trueand update the properties to match the values for the Authentication certificate:"BackEndConfiguration": { "ClientCertificate": { "Enabled": false, "StoreName": "My", "StoreLocation": "LocalMachine", "SubjectName": "<name-of-certificate-subject>" "Thumbprint": "<certificate-thumbprint>"Note
Use
"Thumbprint"to ensure that the correct certificate is loaded if there are multiple certificates on the same system with same name used for different purposes such as IPsec, TLS Web Server Authentication, Client Authentication, Server Authentication, and so on. If you do not have multiple certificates with same name, you can leave the Thumbprint field empty.Close and save the file.
Launch the administration tool/CLI and restart the web node.
Repeat on each web node.
On each compute node:
These steps assume the trusted, signed HTTPS authentication certificate is already installed on the machine hosting the web node with a private key.
Open the configuration file, <compute-node-install-path>/appsettings.json.
In the file, search for the section starting with: "BackEndConfiguration": {
Enable this section with
"Enabled": trueand match the properties to the values for the Authentication certificate:"ClientCertificate": { "Enabled": false, "Issuer": "<certificate issuer name>", "Subject": "<certificate subject name>" },Close and save the file.
Launch the administration tool/CLI and restart the compute node.
Repeat on each compute node.