Assign policies to users and groups
This article reviews the different ways to assign policies to users and groups in Microsoft Teams.
For more information on policies supported by Teams admin center and Teams PowerShell module, see Teams policy reference.
Before reading, be sure you've read Assign policies in Teams - getting started.
This video shows how to assign policies to multiple users.
Assign a policy to individual users
Follow these steps to assign a policy to an individual user or to a few users at a time.
Use the Microsoft Teams admin center
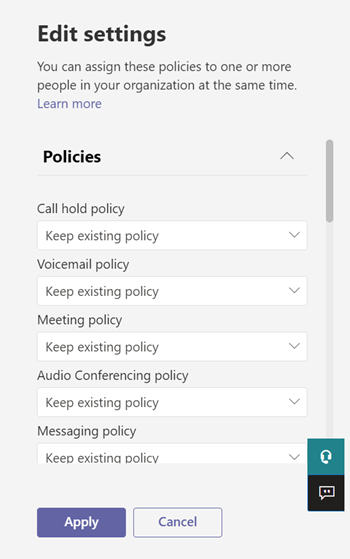
To assign a policy to a user:
In the left navigation of the Microsoft Teams admin center, go to Users > Manage users.
Select the user by clicking to the left of the user name, and then select Edit settings.
Select the policy you want to assign, and then select Apply.

Note
To unassign a specialized policy from a user, you can set each policy to Global (Org-wide default). You can also remove policy assignments in bulk for all users directly assigned to a policy. To learn more, read Unassign policies in bulk.
You can also do the following to assign a policy to a user:
In the left navigation of the Microsoft Teams admin center, go to the policy page.
Select the policy you want to assign by clicking to the left of the policy name.
Select Assign users.
In the Manage users pane, search for the user by display name or by user name, select the name, and then select Add. Repeat this step for each user that you want to add.
When you're finished adding users, select Apply.


Use PowerShell
Each policy type has its own set of cmdlets for managing it. Use the Grant- cmdlet for a given policy type to assign the policy. For example, use the Grant-CsTeamsMeetingPolicy cmdlet to assign a Teams meeting policy to users. These cmdlets are included in the Teams PowerShell module and are documented in the Skype for Business cmdlet reference.
Download and install the Teams PowerShell public release (if you haven't already), and then run the following to connect.
  # When using Teams PowerShell Module

   Import-Module MicrosoftTeams
   Connect-MicrosoftTeams
In this example, we assign a Teams meeting policy named Student Meeting Policy to a user named Reda.
Grant-CsTeamsMeetingPolicy -Identity reda@contoso.com -PolicyName "Student Meeting Policy"
To learn more, read Manage policies via PowerShell.
Assign a policy to a group
Policy assignment to groups lets you assign a policy to a group of users, such as a Microsoft 365 group, a security group, or a distribution list. The policy assignment is propagated to members of the group according to precedence rules. As members are added to or removed from a group, their inherited policy assignments are updated accordingly.
Policy assignment to groups is recommended for groups of up to 50,000 users but it will also work with larger groups.
When you assign the policy, it's immediately assigned to the group. However, the propagation of the policy assignment to members of the group is performed as a background operation and might take some time, depending on the size of the group. The same is true when a policy is unassigned from a group, or when members are added to or removed from a group.
Group policy assignments are only propagated to users who are direct members of the group. The assignments aren't propagated to members of nested groups.
Important
The Teams Powershell module and Teams admin center don't support the following policies for group policy assignment.
- Teams App Permission Policy
- Teams Emergency Call Routing Policy
- Teams Network Roaming Policy
- Teams Upgrade Policy
- Teams Voice Applications Policy
What you need to know about policy assignment to groups
Before you get started, it's important to understand precedence rules and group assignment ranking.
Precedence rules
For a given policy type, a user's effective policy is determined according to the following:
- A policy that's directly assigned to a user takes precedence over any other policy of the same type that's assigned to a group. In other words, if a user is directly assigned a policy of a given type, that user won't inherit a policy of the same type from a group. This also means that if a user has a policy of a given type that was directly assigned to them, you have to remove that policy from the user before they can inherit a policy of the same type from a group.
- If a user doesn't have a policy directly assigned to them and is a member of two or more groups and each group has a policy of the same type assigned to it, the user inherits the policy of the group assignment that has the highest ranking. Smaller the number, the higher the ranking with 1 being the highest ranking.
- If a user isn't a member of any groups that are assigned a policy, the global (Org-wide default) policy for that policy type applies to the user.
A user's effective policy is updated according to these rules:
- when a user is added to or removed from a group that's assigned a policy.
- a policy is unassigned from a group.
- a policy that's directly assigned to the user is removed.
Group assignment ranking
Note
A given policy type can be assigned to a maximum of 64 groups across policy instances for that type.
When you assign a policy to a group, you specify a ranking for the group assignment. This ranking is used to determine which policy a user should inherit as their effective policy if the user is a member of two or more groups and each group is assigned a policy of the same type.
The group assignment ranking is relative to other group assignments of the same type. For example, if you're assigning a calling policy to two groups, set the ranking of one assignment to 1 and the other to 2, with 1 being the highest ranking. The group assignment ranking indicates which group membership is more important or more relevant than other group memberships regarding inheritance.
Say, for example, you have two groups, Store Employees and Store Managers. Both groups are assigned a Teams calling policy, Store Employees Calling Policy and Store Managers Calling Policy, respectively. For a store manager who is in both groups, their role as a manager is more relevant than their role as an employee, so the calling policy that's assigned to the Store Managers group should have a higher ranking.
| Group | Teams calling policy name | Rank |
|---|---|---|
| Store Managers | Store Managers Calling Policy | 1 |
| Store Employees | Store Employees Calling Policy | 2 |
If you don't specify a ranking, the policy assignment is given the lowest ranking.
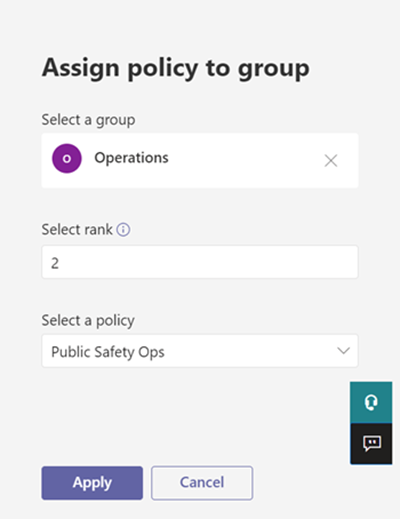
In the Teams admin center
- In the left navigation of the Microsoft Teams admin center, go to the policy type page. For example, go to Meetings > Meeting policies.
- Select the Group policy assignment tab.
- Select Add group, and then in the Assign policy to group pane, do the following:
Search for and add the group you want to assign the policy to.
Set the ranking for the group assignment.
Select the policy that you want to assign.
Select Apply.

To remove a group policy assignment, on the Group policy assignment tab of the policy page, select the group assignment, and then select Remove.
To change the ranking of a group assignment, you need to remove the group policy assignment first. Then, follow the steps above to assign the policy to a group.
This video shows the steps to create and assign a custom meeting policy to a group.
Install and connect to the Microsoft Teams PowerShell module
For step-by-step guidance, see Install Teams PowerShell.
Assign a policy to a group of users
Use the appropriate Grant cmdlet to assign a policy to a group. You can specify a group by using the object ID, SIP address, or email address.
In this example, we assign a Teams meeting policy named Retail Managers Meeting Policy to a group with an assignment ranking of 1.
Grant-CsTeamsMeetingPolicy -Group d8ebfa45-0f28-4d2d-9bcc-b158a49e2d17 -PolicyName "Retail Managers Meeting Policy" -Rank 1
Get policy assignments for a group
Use the Get-CsGroupPolicyAssignment cmdlet to get all policies assigned to a group. Groups are always listed by their group ID even if its SIP address or email address was used to assign the policy.
In this example, we retrieve all policies assigned to a specific group.
Get-CsGroupPolicyAssignment -GroupId e050ce51-54bc-45b7-b3e6-c00343d31274
In this example, we return all groups that are assigned a Teams meeting policy.
Get-CsGroupPolicyAssignment -PolicyType TeamsMeetingPolicy
Remove a policy from a group
Use the appropriate Grant cmdlet to remove a policy from a group. When you remove a policy from a group, the priorities of other policies of the same type assigned to other groups, and that have a lower ranking, are updated. For example, if you remove a policy that has a ranking of 2, policies that have a ranking of 3 and 4 are updated to reflect their new ranking. The following two tables show this example.
Here's a list of the policy assignments and priorities for a Teams meeting policy.
| Group name | Policy name | Rank |
|---|---|---|
| Sales | Sales policy | 1 |
| West Region | West Region policy | 2 |
| Division | Division policy | 3 |
| Subsidiary | Subsidiary policy | 4 |
If we remove the West Region policy from the West Region group, the policy assignments and priorities are updated as follows.
| Group name | Policy name | Rank |
|---|---|---|
| Sales | Sales policy | 1 |
| Division | Division policy | 2 |
| Subsidiary | Subsidiary policy | 3 |
In this example, we remove the Teams meeting policy from a group.
Grant-CsTeamsMeetingPolicy -Group f985e013-0826-40bb-8c94-e5f367076044 -PolicyName $null
Change a policy assignment for a group
Note
To change a group policy assignment, you can remove the current policy assignment from the group, and then add a new policy assignment.
After you assign a policy to a group, you can use the appropriate Grant cmdlet to change that group's policy assignment as follows:
- Change the ranking
- Change the policy of a given policy type
- Change the policy of a given policy type and the ranking
In this example, we change a group's Teams call park policy to a policy named SupportCallPark and the assignment ranking to 3.
Grant-CsTeamsCallParkPolicy -Group 566b8d39-5c5c-4aaa-bc07-4f36278a1b38 -PolicyName SupportCallPark -Rank 3
Change the effective policy for a user
Here's an example of how to change the effective policy for a user who is directly assigned a policy.
First, we use the Get-CsUserPolicyAssignment cmdlet together with the PolicySource parameter to get details of the Teams meeting broadcast policies associated with the user.
Get-CsUserPolicyAssignment -Identity daniel@contoso.com -PolicyType TeamsMeetingBroadcastPolicy | select -ExpandProperty PolicySource
The output shows that the user was directly assigned a Teams meeting broadcast policy named Employee Events, which takes precedence over the policy named Vendor Live Events that's assigned to a group the user belongs to.
AssignmentType PolicyName         Reference
-------------- ----------         ---------
Direct         Employee Events
Group          Vendor Live Events 566b8d39-5c5c-4aaa-bc07-4f36278a1b38
Now, we remove the Employee Events policy from the user. This means that the user no longer has a Teams meeting broadcast policy directly assigned to them and will inherit the Vendor Live Events policy that's assigned to the group the user belongs to.
Use the following cmdlet in the Microsoft Teams PowerShell module to do this.
Grant-CsTeamsMeetingBroadcastPolicy -Identity daniel@contoso.com -PolicyName $null
Use following cmdlet in the Teams PowerShell module to do this at scale through a batch policy assignment, where $users is a list of users that you specify.
New-CsBatchPolicyAssignmentOperation -OperationName "Assigning null at bulk" -PolicyType TeamsMeetingBroadcastPolicy -PolicyName $null -Identity $users
Assign a policy to a batch of users
Use the admin center
To assign a policy to users in bulk:
- In the left navigation of the Microsoft Teams admin center, select Users.
- Search for the users you want to assign the policy to or filter the view to show the users you want.
- In the ✓ (check mark) column, select the users. To select all users, select the ✓ (check mark) at the top of the table.
- Select Edit settings, make the changes that you want, and then select Apply.
To view the status of your policy assignment, in the banner that appears at the top of the Users page after you select Apply to submit your policy assignment, select Activity log. Or, in the left navigation of the Microsoft Teams admin center, go to Dashboard, and then under Activity log, select View details. The Activity log shows policy assignments to batches of more than 20 users through the Microsoft Teams admin center from the last 30 days. To learn more, see View your policy assignments in the Activity log.
Use PowerShell method
Note
Batch policy assignment using PowerShell isn't available for all Teams policy types. See New-CsBatchPolicyAssignmentOperation for the list of supported policy types.
With batch policy assignment, you can assign a policy to large sets of users at a time without using a script. You use the New-CsBatchPolicyAssignmentOperation cmdlet to submit a batch of users and the policy that you want to assign. The assignments are processed as a background operation and an operation ID is generated for each batch. You can then use the Get-CsBatchPolicyAssignmentOperation cmdlet to track the progress and status of the assignments in a batch.
Specify users by their object ID or Session Initiation Protocol (SIP) address. A user's SIP address often has the same value as the User Principal Name (UPN) or email address, but this isn't required. If a user is specified using their UPN or email, but it has a different value than their SIP address, then policy assignment will fail for the user. If a batch includes duplicate users, the duplicates will be removed from the batch before processing, and status will only be provided for the unique users remaining in the batch.
A batch can contain up to 5,000 users. For best results, don't submit more than a few batches at a time. Allow batches to complete processing before submitting more batches.
Install and connect to the Teams PowerShell module
Run the following to install the Microsoft Teams PowerShell module.
Install-Module -Name MicrosoftTeams
Run the following to connect to Teams and start a session.
Connect-MicrosoftTeams
When you're prompted, sign in using your admin credentials.
Install and connect to the Microsoft Graph PowerShell module (optional)
You might also want to download and install Microsoft Graph PowerShell module (if you haven't already) and connect to Microsoft Entra ID so that you can retrieve a list of users in your organization.
Run the following to connect to Microsoft Entra ID.
Connect-MgGraph
When you're prompted, sign in using the same admin credentials that you used to connect to Teams.
Assign a setup policy to a batch of users
In this example, we use the New-CsBatchPolicyAssignmentOperation cmdlet to assign an app setup policy named HR App Setup Policy to a batch of users listed in the users_ids.text file.
$user_ids = Get-Content .\users_ids.txt
New-CsBatchPolicyAssignmentOperation -PolicyType TeamsAppSetupPolicy -PolicyName "HR App Setup Policy" -Identity $user_ids -OperationName "Example 1 batch"
In this example, we connect to Microsoft Entra ID to retrieve a collection of users and then assign a messaging policy named New Hire Messaging Policy to a batch of users specified by using their SIP address.
Connect-MgGraph
$users = Get-MgUser
New-CsBatchPolicyAssignmentOperation -PolicyType TeamsMessagingPolicy -PolicyName "New Hire Messaging Policy" -Identity $users.SipProxyAddress -OperationName "Example 2 batch"
Get the status of a batch assignment
Run the following to get the status of a batch assignment, where OperationId is the operation ID that's returned by the New-CsBatchPolicyAssignmentOperation cmdlet for a given batch.
$Get-CsBatchPolicyAssignmentOperation -OperationId f985e013-0826-40bb-8c94-e5f367076044 | fl
If the output shows that an error occurred, run the following to get more information about errors, which are in the UserState property.
Get-CsBatchPolicyAssignmentOperation -OperationId f985e013-0826-40bb-8c94-e5f367076044 | Select -ExpandProperty UserState
To learn more, see Get-CsBatchPolicyAssignmentOperation.
Remove a direct policy assignment
You can remove a direct policy assignment from a user. This can be done to allow a group policy assignment to take effect.
To remove a direct policy assignment
- Go to Users > Manage users.
- Select the user whose policy assignment you want to remove.
- On the user page, select the Policies tab.
- In the policies list, select the policy that you want to remove, and then select Remove.
- Select Confirm.
Unassign policies in bulk
When you unassign policies in bulk, you're removing policy assignments that were assigned to individual users through direct assignment. This is useful in the following scenarios:
- For Global (Org-wide default) or group policy assignments to take effect: Due to precedence rules, Global (Org-wide default) or group policy assignments won't take effect for uses who have a direct policy assignment. As an admin, you can unassign policies in bulk to remove direct assignments so Global (Org-wide default) or group policy assignments take effect.
- Clean up policy assignments from the Teams Education wizard: The Teams Education policy wizard applies the global policy defaults for students and assigns a custom policy set for a group of staff using group policy assignment. Admins need to clean up student and staff individual policies for Global (Org-wide default) and group assignments to be effective.
- Remove incorrect policy assignments: If there's a large group of individual users who were assigned the wrong policy through direct assignment, you can use unassign policies in bulk to remove these assignments.
You can unassign policies in bulk from the Microsoft Teams admin center.
Go to Users > Manage users.
In the top right corner of the page, select Unassign policies in bulk from the Actions drop-down menu.

Note
You can also unassign policies from the individual policy pages by choosing a policy and selecting Manage users.
Select a policy type.
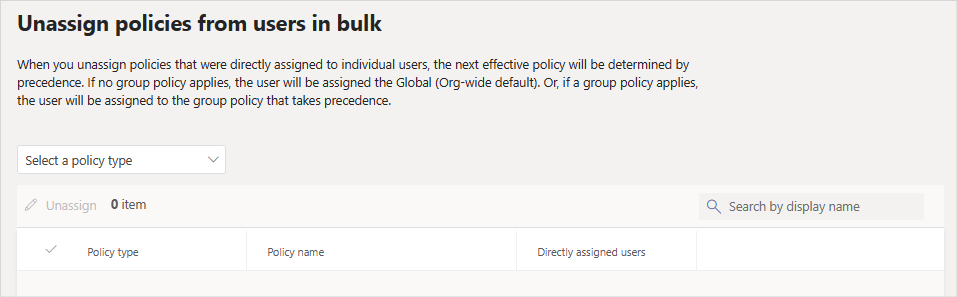
Choose the policy that you want to reassign and select Load data to get the number of users who are currently assigned to that policy.
Important
When you choose a policy, you're removing all of the individually assigned users from that policy.
Select Unassign policy.
After you unassign policies, you can review operation details in the Activity log.
Related topics
Tagasiside
Varsti tulekul: 2024. aasta jooksul tühistame GitHubi probleemide funktsiooni sisutagasiside mehhanismina ja asendame selle uue tagasisidesüsteemiga. Lisateabe saamiseks vt https://aka.ms/ContentUserFeedback.
Esita ja vaata tagasisidet