How to use Microsoft Teams panels
Microsoft Teams panels are compact digital display devices that are mounted right outside of your meeting spaces, typically next to entrances. These touchscreen panels are dedicated Microsoft Teams devices that provide at-a-glance view about your meeting space and the scheduled meeting. With the vibrant color-coded LED and Home screen indicators, you can determine if the space is available or reserved from a distance. You can use Teams panels to reserve an available meeting space for an ad hoc meeting, on the spot.
Teams panels devices come preinstalled with Microsoft Teams and display meeting details that are scheduled through Outlook or Teams calendars.
This article provides guidance, to both end users and admins, on how to use the Teams panels devices. It also provides answers to the frequently asked questions about using these devices.
For an overview of the panels devices, and the guidance on how to plan, deliver, and manage them in your organization, see Deploy Microsoft Teams panels.
For a quick start, check out Get started with Teams panels.
Teams panels end-user experience
Explore the Home screen of your Teams panels device to view meeting space and meeting details. Or, tap and scroll on the touchscreen panel to do other actions.
Use your Teams panels devices to:
- View meeting space details and availability, meeting details, upcoming reservations
- Reserve an available meeting space
- View or update a device setting
Explore Teams panels Home screen
The Home screen is the main visual interface of your Teams panels device.
From the Home screen, you can view location and meeting details, reserve a space, view upcoming reservations, and identify current availability status.
The following screenshot shows different parts or tiles on the Teams panels Home screen:
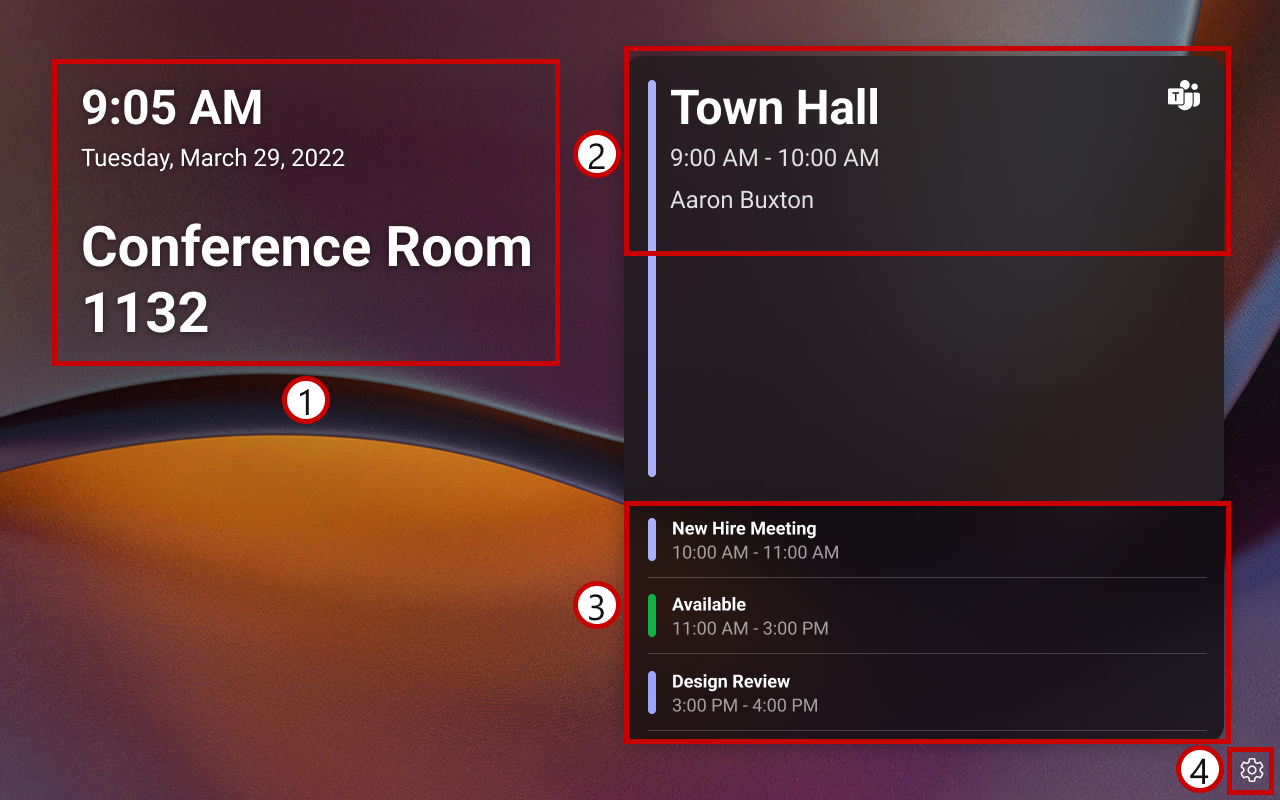
Refer to the following table for a description of each tile:
| Tile | Description |
|---|---|
| 1-Current time, day, date, and meeting space details | Displays current time, day, date, and meeting space name. The meeting space name is the name of the resource account that signed in to panels. |
| 2-Meeting space availability and meeting details | Indicates meeting space availability and displays meeting details. See Meeting space availability and meeting details tile. |
| 3-Upcoming Calendar | Displays the meeting space calendar and availability for up to 24 hours from the current hour. Scroll up or down to determine which time slots are available and which are reserved. |
| 4-Settings | Displays the Settings icon. Tap it to update available device settings. |
Meeting space availability and meeting details tile
The appearance of this tile and its capabilities vary depending on the meeting space availability and type of reservation.
Meeting space is reserved for a scheduled meeting
The tile appears in purple for a meeting space that is reserved for a scheduled meeting (scheduled via Outlook or Teams). It displays meeting title in prominent text, meeting start and end times, and meeting organizer's name. For a Teams meeting, the Teams logo also appears. With meeting details prominently displayed, attendees can easily confirm they’re in the right meeting space, at the right time, and for the right meeting.
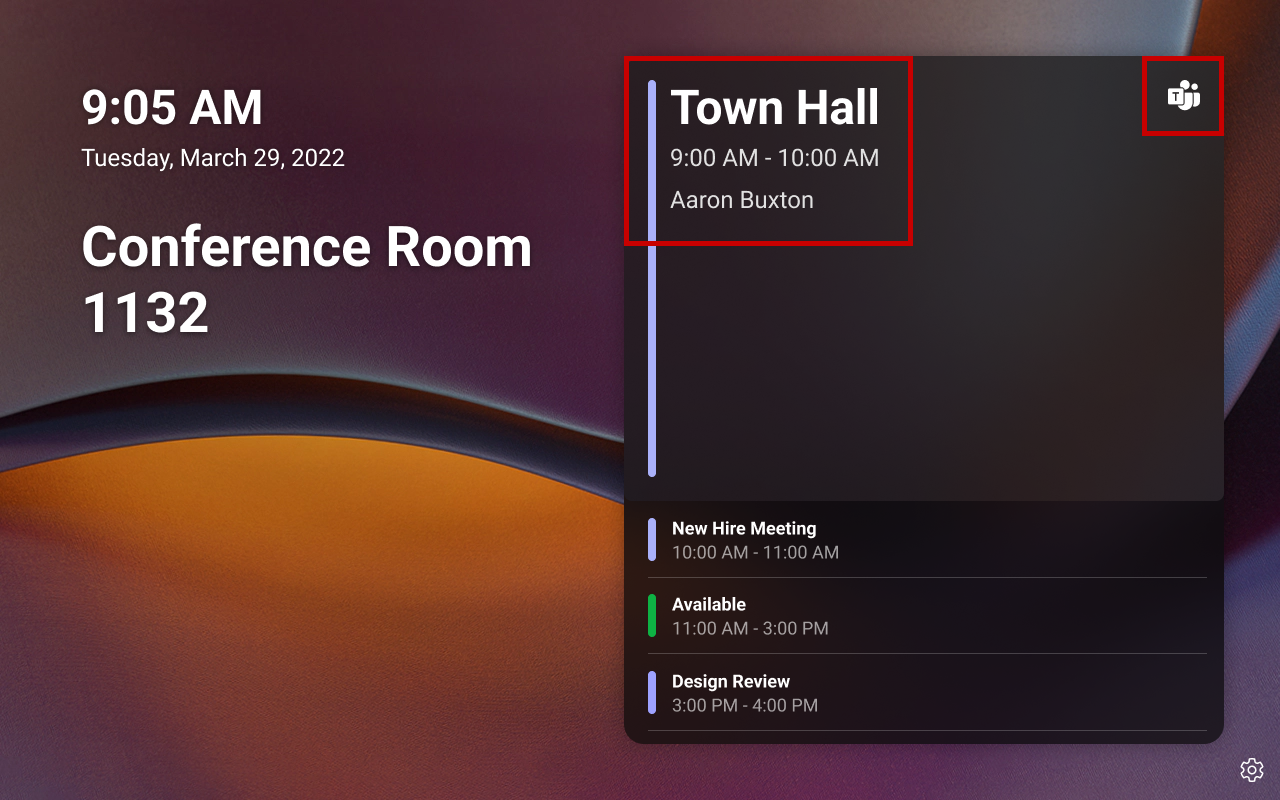
Note
- After you schedule a meeting, it can take up to 90 seconds for the calendar to sync and reflect it on the panels screen.
- For a scheduled meeting that is marked as private, Private meeting is displayed instead of the actual meeting title.
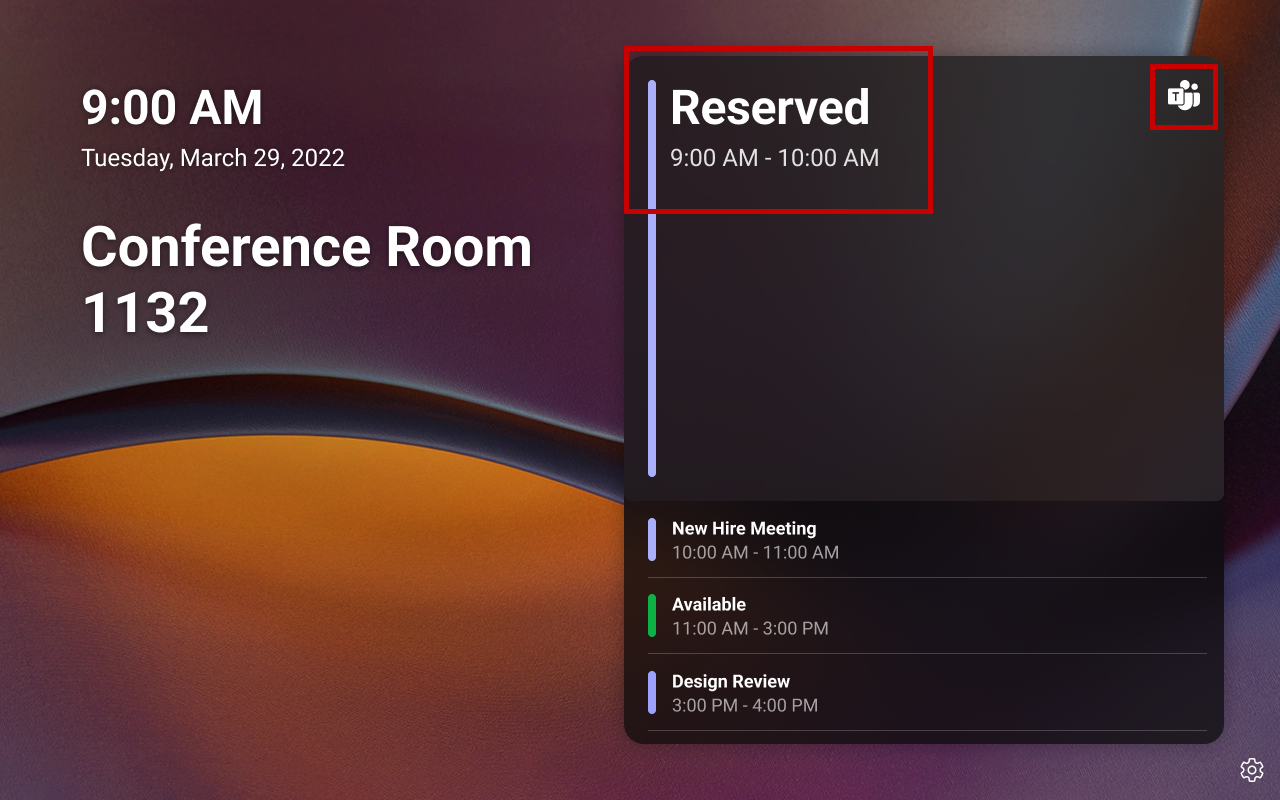
Meeting space is reserved for an ad hoc meeting
The tile appears in purple for a meeting space that is reserved for an ad hoc meeting. It displays Reserved in prominent text along with the meeting start and end times. Ad-hoc meetings are automatically scheduled as Teams meetings, hence the Teams logo always appears on the screen.
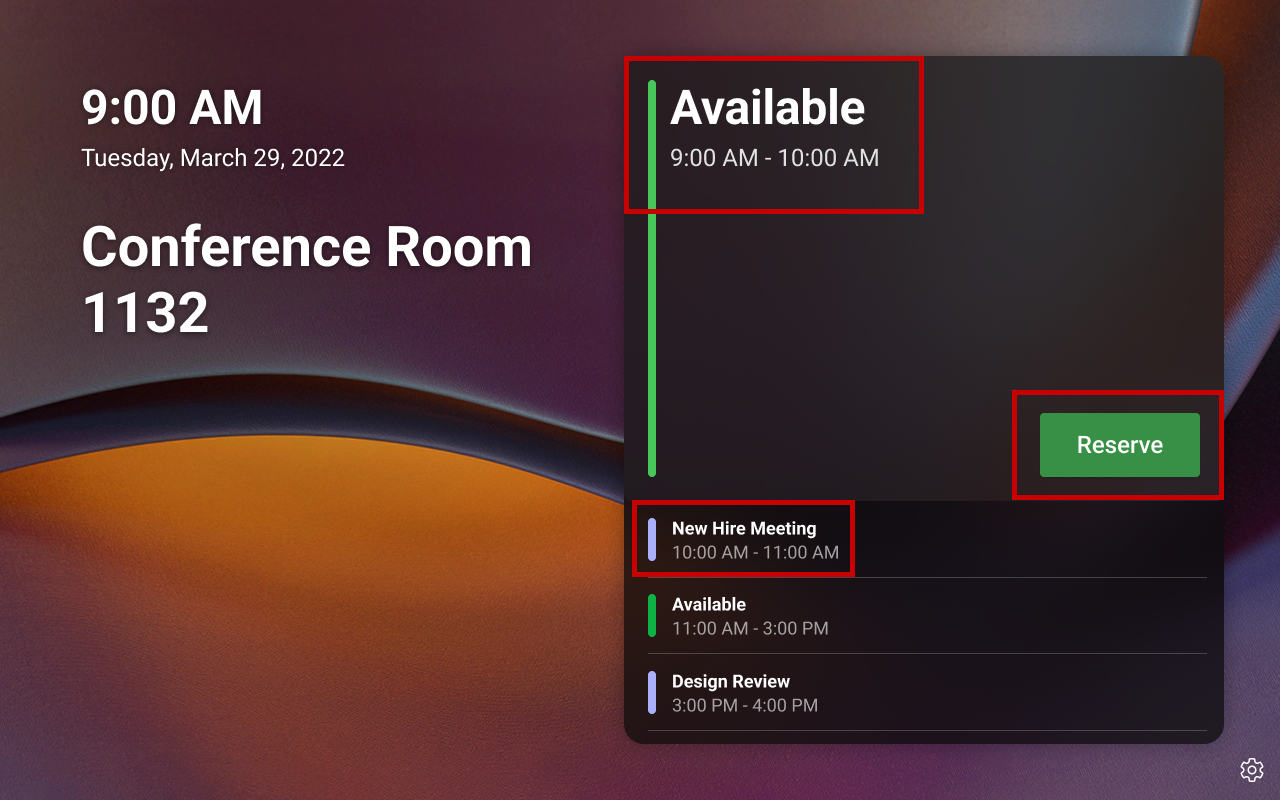
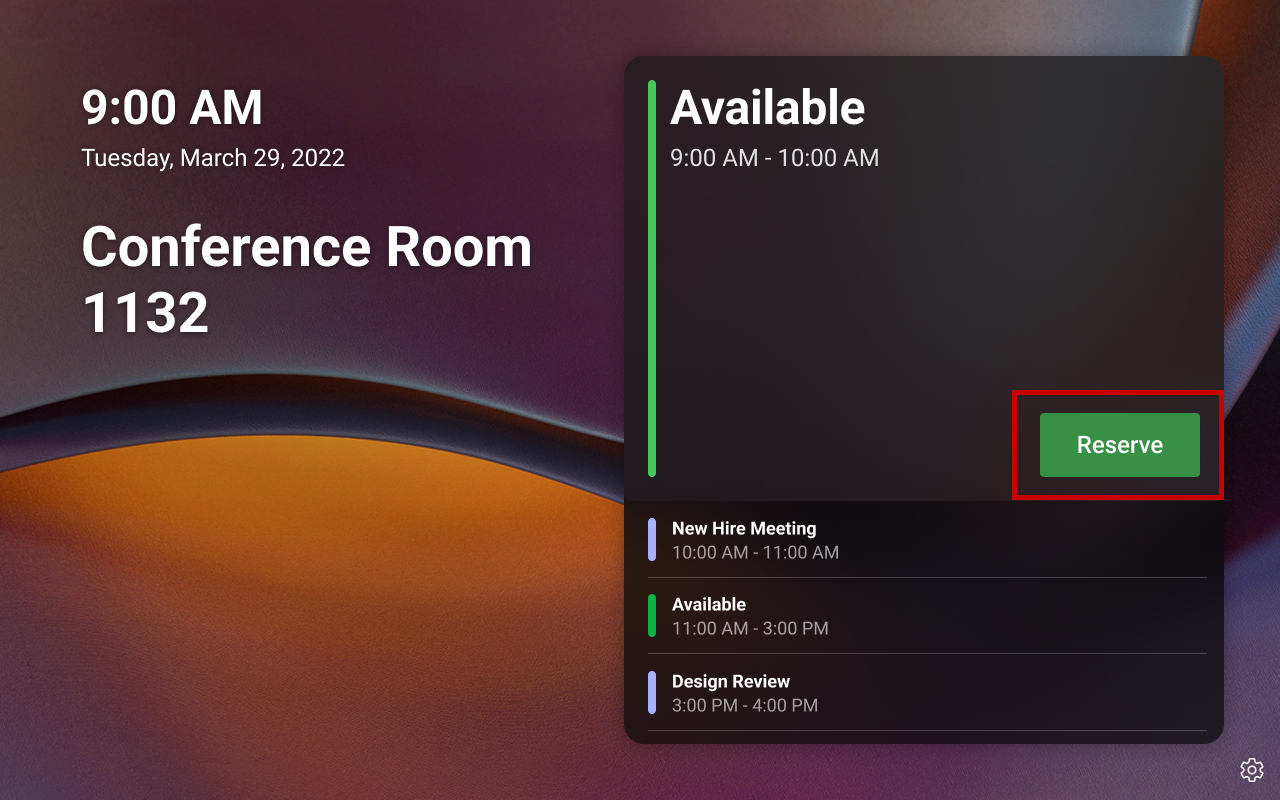
Meeting space is available
The tile appears in green for an available meeting space. It displays Available in prominent text, and a Reserve button also appears that you can tap to reserve the meeting space for an ad hoc meeting. You can check the upcoming calendar of the meeting space (right bottom tile) to decide the end time for your ad hoc meeting.
Reserve meeting spaces for ad hoc meetings
You can reserve an available meeting space directly from panels for an ad hoc meeting. All ad hoc meetings are automatically scheduled as Teams meetings. However, once reserved, you can't release or unreserve that meeting space through panels. Only admins of the device's resource account can cancel the ad hoc meeting (via Outlook or Teams calendar) to unreserve the space.
For ad hoc meetings that are booked directly from panels:
- The start time is always the current time and as such you can't schedule it for a future time.
- The end time can be until the next scheduled meeting or up to 24 hours from the current hour, whichever is earlier. Check the Upcoming Calendar tile on the Home screen to determine the time slots during which the meeting space is available or booked.
To reserve an available meeting space for an ad hoc meeting:
On the Home screen, tap the Reserve button.
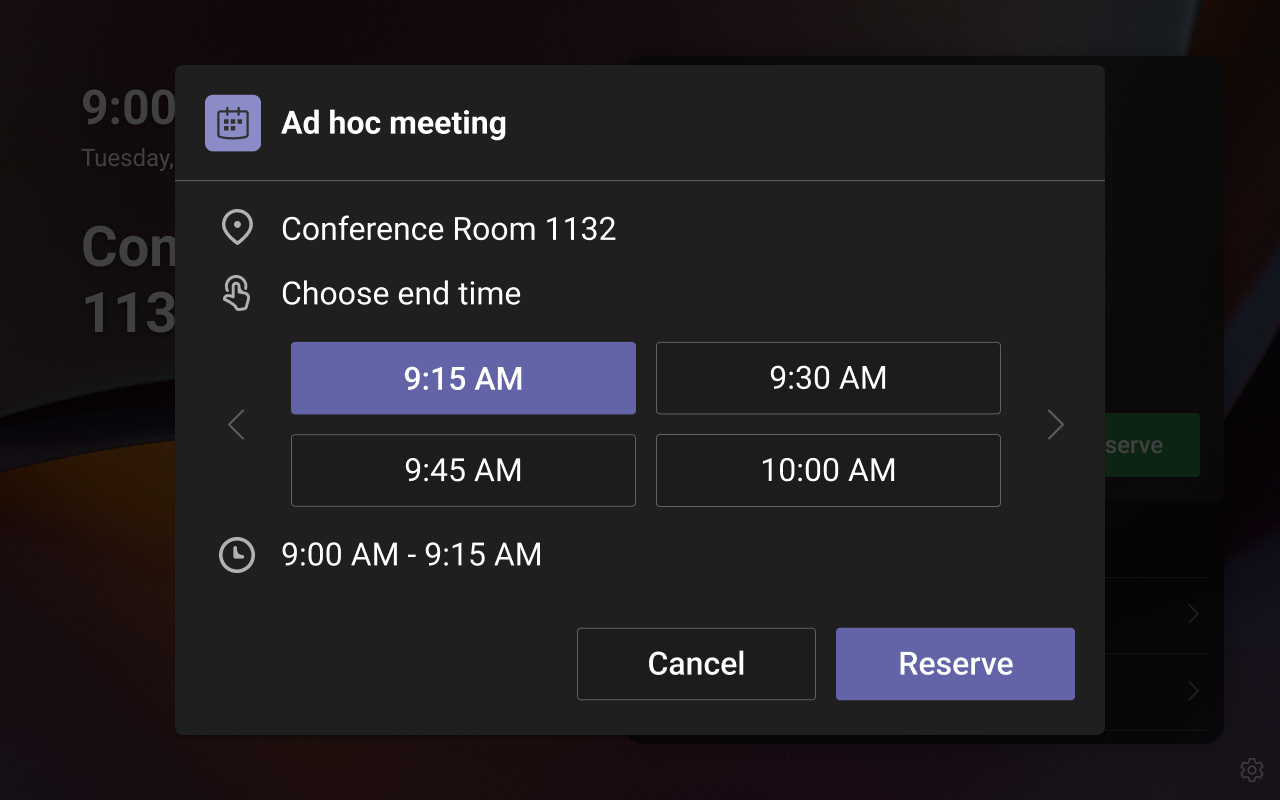
In the Ad hoc meeting screen, review the available end time choices. You can use the right or left arrows to browse the available end time choices.
Note
- The end time choices are displayed in 15-minute intervals of an hour.
- The end time defaults to the next 15-minute interval that is at least five minutes after the current time. For example, if the current time is 1:57 PM, the default end time displays as 2:15 PM, and not 2:00 PM. This prevents users from booking the space for five minutes or less. In the above screenshot, the default end time displays as 2:00 PM, which is the next 15-minute interval that is at least five minutes after the current time (1:53 PM).
- An exception to the above rule is when the start time of the next meeting is within five minutes from the current time. In such cases, you can book the space until the next meeting start time. For example, if the current time is 1:57 PM and the next meeting start time is 2:00 PM, then 2:00 PM displays as the only end time option and you can reserve the space for three minutes.
Tap the desired end time interval, and then tap Reserve.
A confirmation window appears with a thumbs-up emoji, meeting start and end time, and meeting space name.
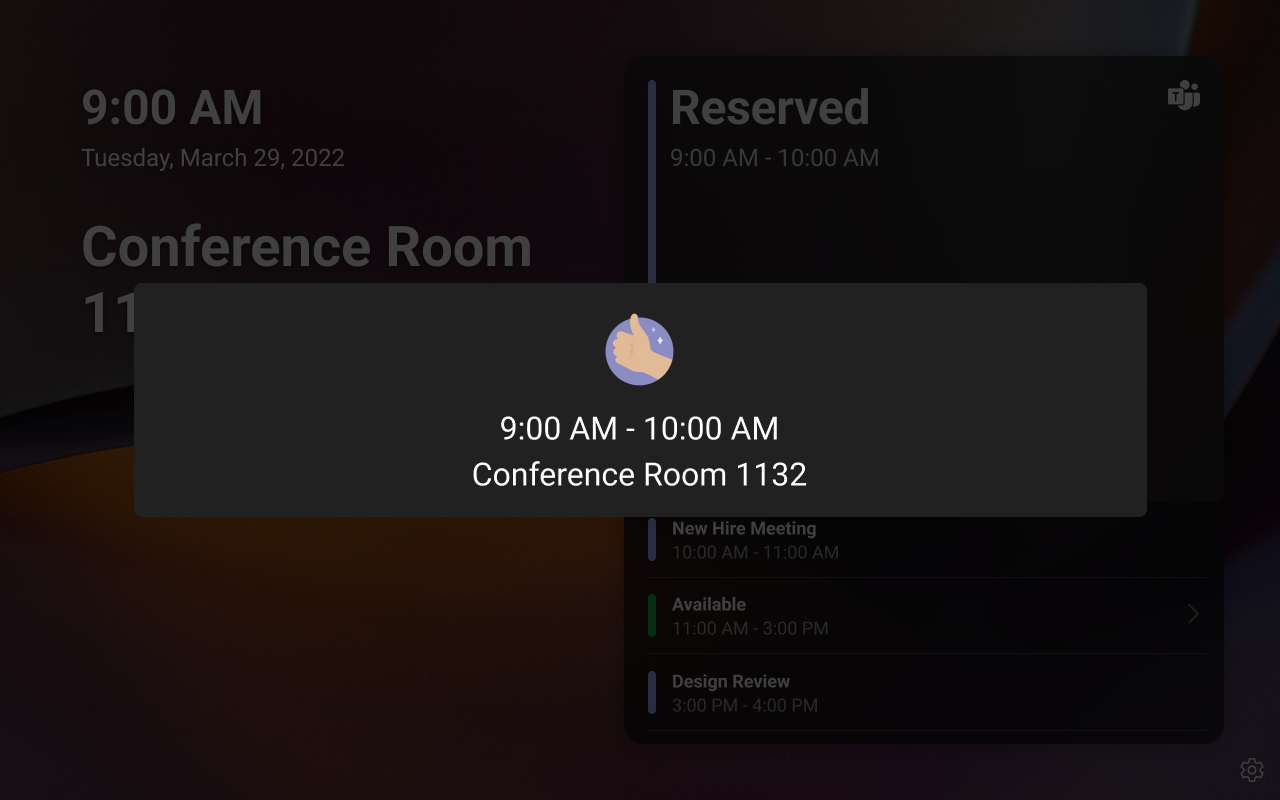 The right tile on the Home screen now appears in purple and displays the Reserved text and the Teams logo. This indicates that the meeting space is now reserved for an ad hoc Teams meeting.
Note
If the meeting space is a Microsoft Teams Rooms, you can join this Teams meeting with the in-room Microsoft Teams Rooms or Surface Hub devices.
View or update a device setting
There are several device settings, such as about, accessibility, reboot, and privacy policy that you can view or update directly from panels. The available device settings may differ based on the Original Equipment Manufacturer (OEM) of your device. For information on settings specific to your device, see the OEM documentation.
To view or update a device setting:
- Tap the Settings icon on the Home screen.
- In the Settings screen, tap Device settings.
- In the Device Settings screen, tap the setting that you want to view or update.
- Follow the prompt on the screen to view or update the setting.
Teams panels admin experience
If you're the admin of Teams panel's resource account, then you're also the admin of Panels App on the device. As the Panels App admin, you can do all the functions that are mentioned in the end-user experience section, in addition to managing the Panels App settings on the device.
Your panels devices provide two types of admin settings. You must be a device admin to access the available admin settings. End users can't access these settings.
- Admin settings that are specific to the device, such as display, time and date, language, bluetooth, WiFi, and so on. Refer to the OEM documentation to know more about these settings.
- Admin settings that are specific to Panels App on your device, such as wallpaper and LED indicator color. Only an admin of Panels App can access these settings. Since Panels App settings are available as part of admin settings, you must have admin sign in credentials for both the device and Panels App to access Panels App settings.
Note
Any updates to the Panels App settings done via the device are applicable only to that specific device. Those updates will not impact other panels devices in your organization. For example, if you change the Home screen wallpaper image from the Panels App settings, the wallpaper image will change only for that specific device.
Access Panels App settings
You can access Panels App-specific settings by using the Teams admin settings option under the admin settings. The steps to access Teams admin settings may differ based on the OEM of your device.
To access the Teams admin settings option:
Tap the Settings icon on the Home screen.
On the Settings screen, tap Device settings.
Note
Depending on the OEM of your device, you may need to enter the device admin password now or after the next step.
Scroll down to find the Teams admin settings option. Tap it.
Note
Some OEMs may replace the Teams admin settings option with their own custom option. If you don't see the Teams admin settings option, check your device documentation for instructions on how to access your panel's admin settings.
Pair a Teams panel with Microsoft Teams Rooms on Android
To pair a Teams panel and Teams Rooms on Android, both devices must be signed into the same resource account.
On the Teams panel, sign in using your admin credentials.
Go to Settings > Device settings > Teams admin settings > Device pairing.
A six-digit code will appear on the Teams Rooms on Android front of room display. Enter the code on the Teams Panel.
Enable or disable meeting check-in and automatic room release
Check-in and room release settings let users check in to a meeting on Teams Panels at the room they reserved at the start of the meeting. If a user doesn't check in within a set amount of time after the meeting start time, the room is released and becomes available for others to reserve.
When Teams Panels is paired with Microsoft Teams Rooms on Android, check-in notifications can be enabled to appear on the front-of-room display when meetings run late.
To enable check-in and room release, see Check-in and room release on Microsoft Teams Panels.
Enable or disable check out (manual room release)
When check out is enabled, end users can use a Teams panel to manually release a room. Releasing a room ends the current reservation and makes the room available for others to schedule.
This feature is disabled by default, but it can be enabled per device. To enable the feature, go to Settings > Device settings > Teams admin settings > Meetings and then turn on Allow early check-out.
Note
If a room is released before the end of a scheduled reservation, the organizer will receive an email message from the room declining it. This happens because the room removes the reservation from its schedule so it can be booked by other users. The message declining the reservation can be ignored.
Note
A Teams panel can't be used to release a room if the Teams Rooms device it shares a resource account with is in an active call.
Enable or disable room reservations
When room reservations are enabled, end users can use a Teams panel to reserve a room that's currently available. Reservations start at the time the Reserve button is tapped and their duration can be increased in 15-minute increments up to the start time of the next reservation, or to a maximum of 24 hours.
This feature is enabled by default, but it can be disabled per device. To disable the feature, go to Settings > Device settings > Teams admin settings > Meetings and then turn off Allow room reservations.
Enable or disable extension of existing room reservations
When room reservation extensions are enabled, end users can use a Teams panel to extend a room's existing reservation if the room is available after the reservation's original end time. Reservations can be extended in 15-minute increments up to the start time of the next meeting, or to a maximum of 24 hours in the future, whichever is sooner.
This feature is disabled by default, but it can be enabled per device. To enable the feature, go to Settings > Device settings > Teams admin settings > Meetings and then turn on Allow room reservation extensions.
Enable or disable room capacity warnings
Teams panels that are paired with Teams Rooms on Android can display a warning message when a room is at or over capacity. To use this feature, Teams Rooms must have a camera that supports people counting. Teams Rooms on Android support room capacity warnings without a Teams panel.
Note
Room capacity warnings aren't available in the GCC-High environment.
Room capacity warnings are disabled by default, but they can be enabled per device. To enable the feature, do the following:
- Follow the steps in Pair a Teams panel with Microsoft Teams Rooms on Android. The panel and the Teams Rooms device must be signed into the same resource account.
- Go to Settings > Device settings > Teams admin settings > Meetings and turn on Max room occupancy notification.
Enable or disable viewing of room equipment
When this feature is turned on, end-users can view what equipment is available in a space on a Teams panel.
This feature is off by default, and it can be enabled per device. To turn it on, use Set-Place in PowerShell to configure the display names for AudioDeviceName, DisplayDeviceName, VideoDeviceName, Tags, and IsWheelChairAccessible.
Or, you can enable this feature in the Exchange admin center. See Edit a resource for more information.
Update the wallpaper
Change the Home screen wallpaper image.
- Access Teams admin settings.
- Tap Wallpapers.
- From Choose your image, select an image to set as the Home screen background image. Preview the selected image under Background.
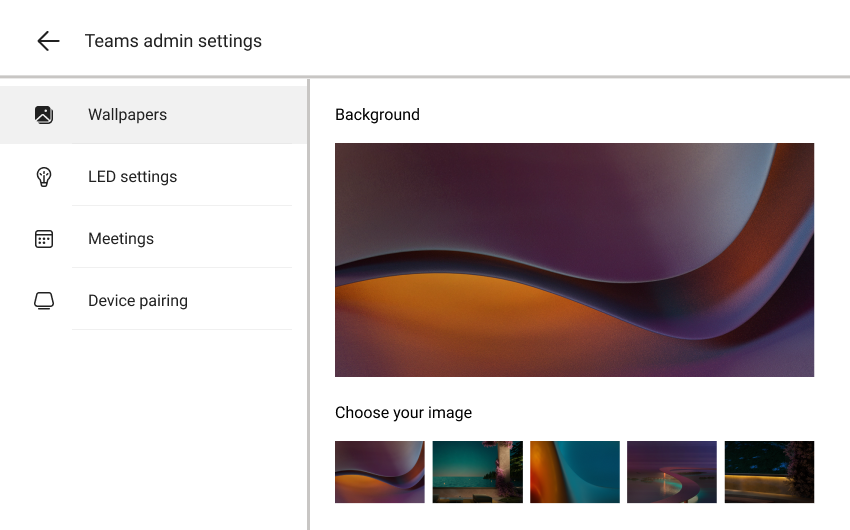
- Go back to the Home screen and verify that the wallpaper is updated.
Change the busy state LED color
Admins can choose either red or purple as the LED color to indicate that the meeting space is busy or reserved. The LED color to indicate an available space is always green and can't be changed.
- Access Teams admin settings.
- Tap LED Settings.
- From Choose your LED color, select the desired color.
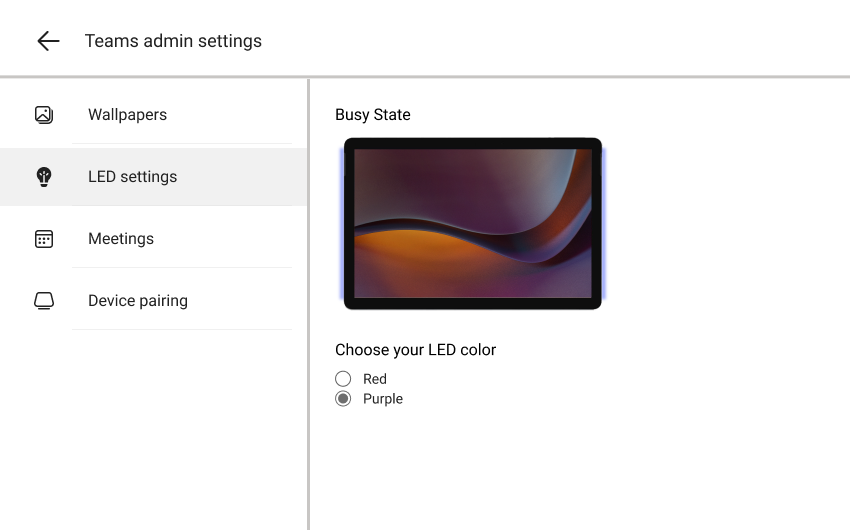
- Go back to the Home screen and verify that the LED color for the busy state is updated. If the meeting space is currently available, try to schedule a test meeting to verify the change in LED color for the busy state.
Frequently asked questions
Find answers to frequently asked questions about the Teams panels devices.
How far in the future can I see the scheduling details of a meeting space?
In the Upcoming Calendar tile (bottom right) on the Home screen, you can see the scheduling details of a meeting space for up to 24 hours in the future from the current hour.
Can I reserve a meeting space for a future time from the Teams panels device?
No, you can't reserve a meeting space for a future time from panels. The start time is always the current time for an ad hoc meeting scheduled from panels.
How long I can reserve an available meeting space for an ad hoc meeting?
You can reserve an available meeting space starting from your current time until the next scheduled meeting time, or up to a maximum of 24 hours from your current hour, whichever is earlier. For example, if the current time is 10 AM, and the next meeting start time is 2 PM, you can reserve the meeting space from 10 AM until 2 PM.
Tagasiside
Varsti tulekul: 2024. aasta jooksul tühistame GitHubi probleemide funktsiooni sisutagasiside mehhanismina ja asendame selle uue tagasisidesüsteemiga. Lisateabe saamiseks vt https://aka.ms/ContentUserFeedback.
Esita ja vaata tagasisidet