Page design guidelines
Important
The finance and operations (Dynamics 365) mobile app and platform have been deprecated. For more information, see Removed or deprecated platform features.
Before you begin to use the designer to build pages and actions, it’s important that you plan the overall design of the mobile workspace that you want to build. We recommend that you orient your design around the entities that you plan to use in the mobile workspace. Don't begin by thinking about the forms that you want to use. From the perspective of the mobile app, the forms are just a mechanism for retrieving data, and the run-time UI behavior of a form isn't applicable to the mobile app. Therefore, you should first identify your entities and the relationships between them. For each entity, the following questions will help you decide how you should design your forms and pages.
How do I create a list view for an entity in the mobile app?
- Identify or create a form in the web client that contains a grid for the entity.
- Make sure that the grid is bound to the table that represents the entity.
- Make sure that the form has a menu item that is root-navigable.
- Make sure that the form can be opened directly via a URL that includes the menu item parameter.
- Make sure that the filter pane enables the grid to be filtered based on the desired fields.
- In the designer, create a page for the entity.
- In the designer, put only a list on the page.
- In the designer, put the desired fields in the list on the page.
What if I don’t want a list view for this entity?
If you want just a details view for an entity, it's likely that the entity is a singleton for a given context (such as a given user or a given company). This pattern applies, for example, to a details view for an employee’s own profile in a self-service workspace or a details view for the company context that is used for the current session. See the guidelines for creating a page for a details view.
How do I create a details view for an entity in the mobile app?
- Identify or create a form in the web client that contains the details view for this entity.
- Make sure that the Master Root Data Source on the form is bound to the table that represents the entity.
- Make sure that the form has a menu item that is root-navigable.
- Make sure that the form can be opened directly via a URL that includes the menu item parameter.
- In the designer, create a page for the entity.
- In the designer, put the desired fields on the page.
How do I create list-to-details navigation for an entity in the mobile app?
Make sure that you've created both a list view page and a details view page for the entity by using the designer.
Make sure that the entity for the list view is the same as the entity for the details view. In other words, the table that is bound to the grid on the form that is used for the list view must be the same table that is the Master Root Data Source on the form that is used for the details view.
Make sure that the form that is used for the details view can be filtered on a unique key field by using the filter pane.
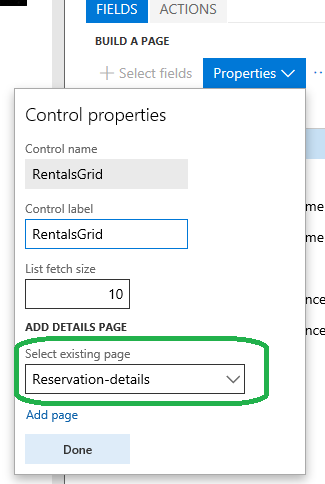
In the designer, make sure that the list view page is linked to the details view page. Click the list, open the properties, and then set the details view page by using the lookup.
How do I add a reference field that enables navigation to a related entity?
Make sure that either a list view page or a details view page exists for the entity that contains the reference.
Make sure that the page contains the reference field from the entity that is being referenced.
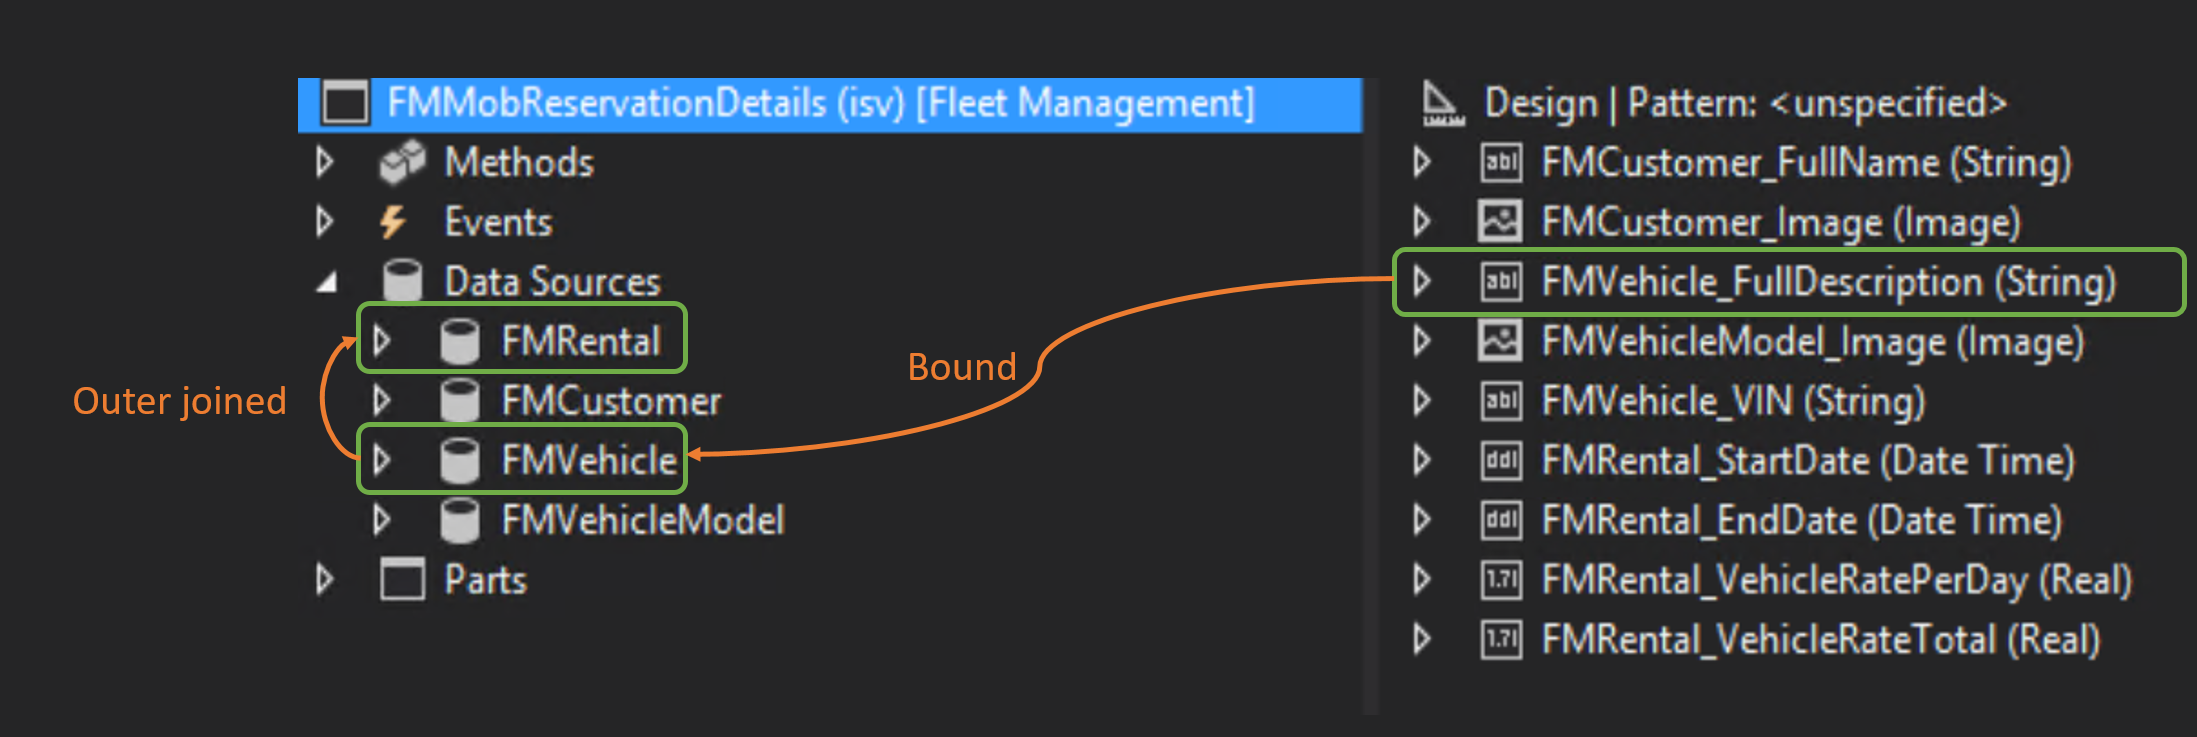
Make sure that the referenced field is bound to the referenced entity’s data source, and that the referenced entity is outer joined (1-0..1) or inner joined (1-1) to the data source for the entity that contains the reference. For example, in the following illustration, FMRental is the entity that contains the reference, and FMVehicle is the referenced entity.
Make sure that you've created a separate details view page for the entity that is being referenced.
Make sure that the reference field has been added to the page.
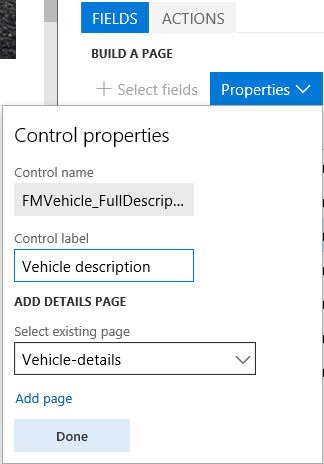
In the designer, make sure that the reference field has been linked to the details view for the referenced entity. For example, in the following illustration, Vehicle-details is the details view page for the referenced entity.
How do I add a list that contains items from a related entity to a details view page?
How do I make the list show up in-line in the details view?
- Identify or create a form in the web client that contains the details view for the entity, and make sure that the form adheres to the guidelines in the "How do I create a details view for an entity in the mobile app" section.
- Make sure that the form contains a grid that is bound to the table that represents the related entity.
- Make sure that the table for the related entity is active joined to the table for the entity that contains the reference.
- Create a details view page that contains the desired fields for the entity, and that also contains a list that has the desired fields from the related entity.
How do I make the list accessible from a link in the details view (instead of in-line)?
Identify or create a form in the web client that contains the details view for the entity, and make sure that the form adheres to the guidelines in the "How do I create a details view for an entity in the mobile app" section.
Make sure that the form contains a grid that is bound to the table that represents the related entity.
Make sure that the table for the related entity is active joined to the table for the entity that contains the reference.
Use the form to create a details view page that contains the desired fields for the entity.
Use the same form to create a separate list view page that contains only a list that has the desired fields from the related entity.
On the details view page, add a PageLinkControl that links to the list view page. Currently, you must use business logic to add the PageLinkControl. The following example show the code that Fleet Management uses.
function main(metadataService, dataService, cacheService, $q) {
    return {
        appInit: function (appMetadata) {
            metadataService.addLink(
                'Customer-details', // the Page to add the link to
                'Customer-rentals', // the Page the link goes to
                'cust-rentals-nav-control', // unique name for the control
                'Rentals', // text to display for the link in the UI
                true, // show/hide the count for items on the linked page
                );
        },
    };
}
How do I read data from a hidden page?
Identify or create a page that contains the controls with the data that you want.
Refer to the following code example, which hides the page from the navigation menus, and accesses data on the page using the provided APIs. Note that 'My-Hidden-Page' and 'My-Field-Id' are the names of the page and control, respectively, and can be found when viewing the corresponding page in the designer.
function main(metadataService, dataService, cacheService, $q) {
    myField1Value = ''; // This variable will be populated in appInit, and can then be used elsewhere in the business logic.
    return {
        appInit: function (appMetadata) {
            var myHiddenPage = metadataService.findPage('My-Hidden-Page');
            if(myHiddenPage) {
                var dataPromise = dataService.getPageData(myHiddenPage.Id,'','',0);
                dataPromise.then(function (result) {
                    var myField1Id = metadataService.findControl(myHiddenPage, 'My-Field-1').Id;
                    myField1Value = result.data[myField1Id];
                }
            }
    };
}
How do I adjust the number of records returned in a list page using list fetch size?
The number of records returned in a list page is controlled by the List fetch size value. The default is 50 records. The List fetch size indicates the maximum number of records returned by a page when it first loads, and the maximum number of records returned when search is used to find a specific set of records. Be careful not to make the value too large or it may negatively affect the user experience.
- In the Mobile App designer,add a page containing a grid and select some fields from the grid.
- Click the Grid node and then click Properties.
- The Control properties dialog box will contain a default fetch size of 50 records.
- Adjust the fetch size as needed.
Commentaires
Bientôt disponible : pendant toute l’année 2024, nous allons éliminer progressivement Problèmes GitHub comme mécanisme de commentaires pour le contenu et le remplacer par un nouveau système de commentaires. Pour plus d’informations, voir : https://aka.ms/ContentUserFeedback.
Soumettre et afficher des commentaires pour