How to configure and use Live Unit Testing
Applies to: ![]() Visual Studio
Visual Studio ![]() Visual Studio for Mac
Visual Studio for Mac
Note
This article applies to Visual Studio 2017. If you're looking for the latest Visual Studio documentation, see Visual Studio documentation. We recommend upgrading to the latest version of Visual Studio. Download it here
As you're developing an application, Live Unit Testing automatically runs any impacted unit tests in the background and presents the results and code coverage in real time. As you modify your code, Live Unit Testing provides feedback on how your changes impacted existing tests and whether the new code you've added is covered by one or more existing tests. This gently reminds you to write unit tests as you're making bug fixes or adding new features.
Note
Live Unit Testing is available for C# and Visual Basic projects that target .NET Core or .NET Framework in the Enterprise edition of Visual Studio.
When you use Live Unit Testing for your tests, it persists data about the status of your tests. Using persisted data allows Live Unit Testing to offer superior performance while running your tests dynamically in response to code changes.
Supported test frameworks
Live Unit Testing works with the three popular unit testing frameworks listed in the following table. The minimum supported version of their adapters and frameworks is also shown. The unit testing frameworks are all available from NuGet.org.
| Test Framework | Visual Studio Adapter minimum version | Framework minimum version |
|---|---|---|
| xUnit.net | xunit.runner.visualstudio version 2.2.0-beta3-build1187 | xunit 1.9.2 |
| NUnit | NUnit3TestAdapter version 3.5.1 | NUnit version 3.5.0 |
| MSTest | MSTest.TestAdapter 1.1.4-preview | MSTest.TestFramework 1.0.5-preview |
If you have older MSTest-based test projects that reference Microsoft.VisualStudio.QualityTools.UnitTestFramework, and you don’t wish to move to the newer MSTest NuGet packages, upgrade to Visual Studio 2019 or Visual Studio 2017.
In some cases, you may need to explicitly restore the NuGet packages referenced by a project in order for Live Unit Testing to work. You can do this either by doing an explicit build of the solution (select Build > Rebuild Solution from the top-level Visual Studio menu) or by restoring packages in the solution (right-click on the solution and select Restore NuGet Packages).
Configure
Configure Live Unit Testing by selecting Tools > Options from the top-level Visual Studio menu bar, and then selecting Live Unit Testing in the left pane of the Options dialog.
Tip
After Live Unit Testing is enabled (see the next section, Start, pause, and stop Live Unit Testing), you can also open the Options dialog by selecting Test > Live Unit Testing > Options.
The following image shows the Live Unit Testing configuration options available in the dialog:
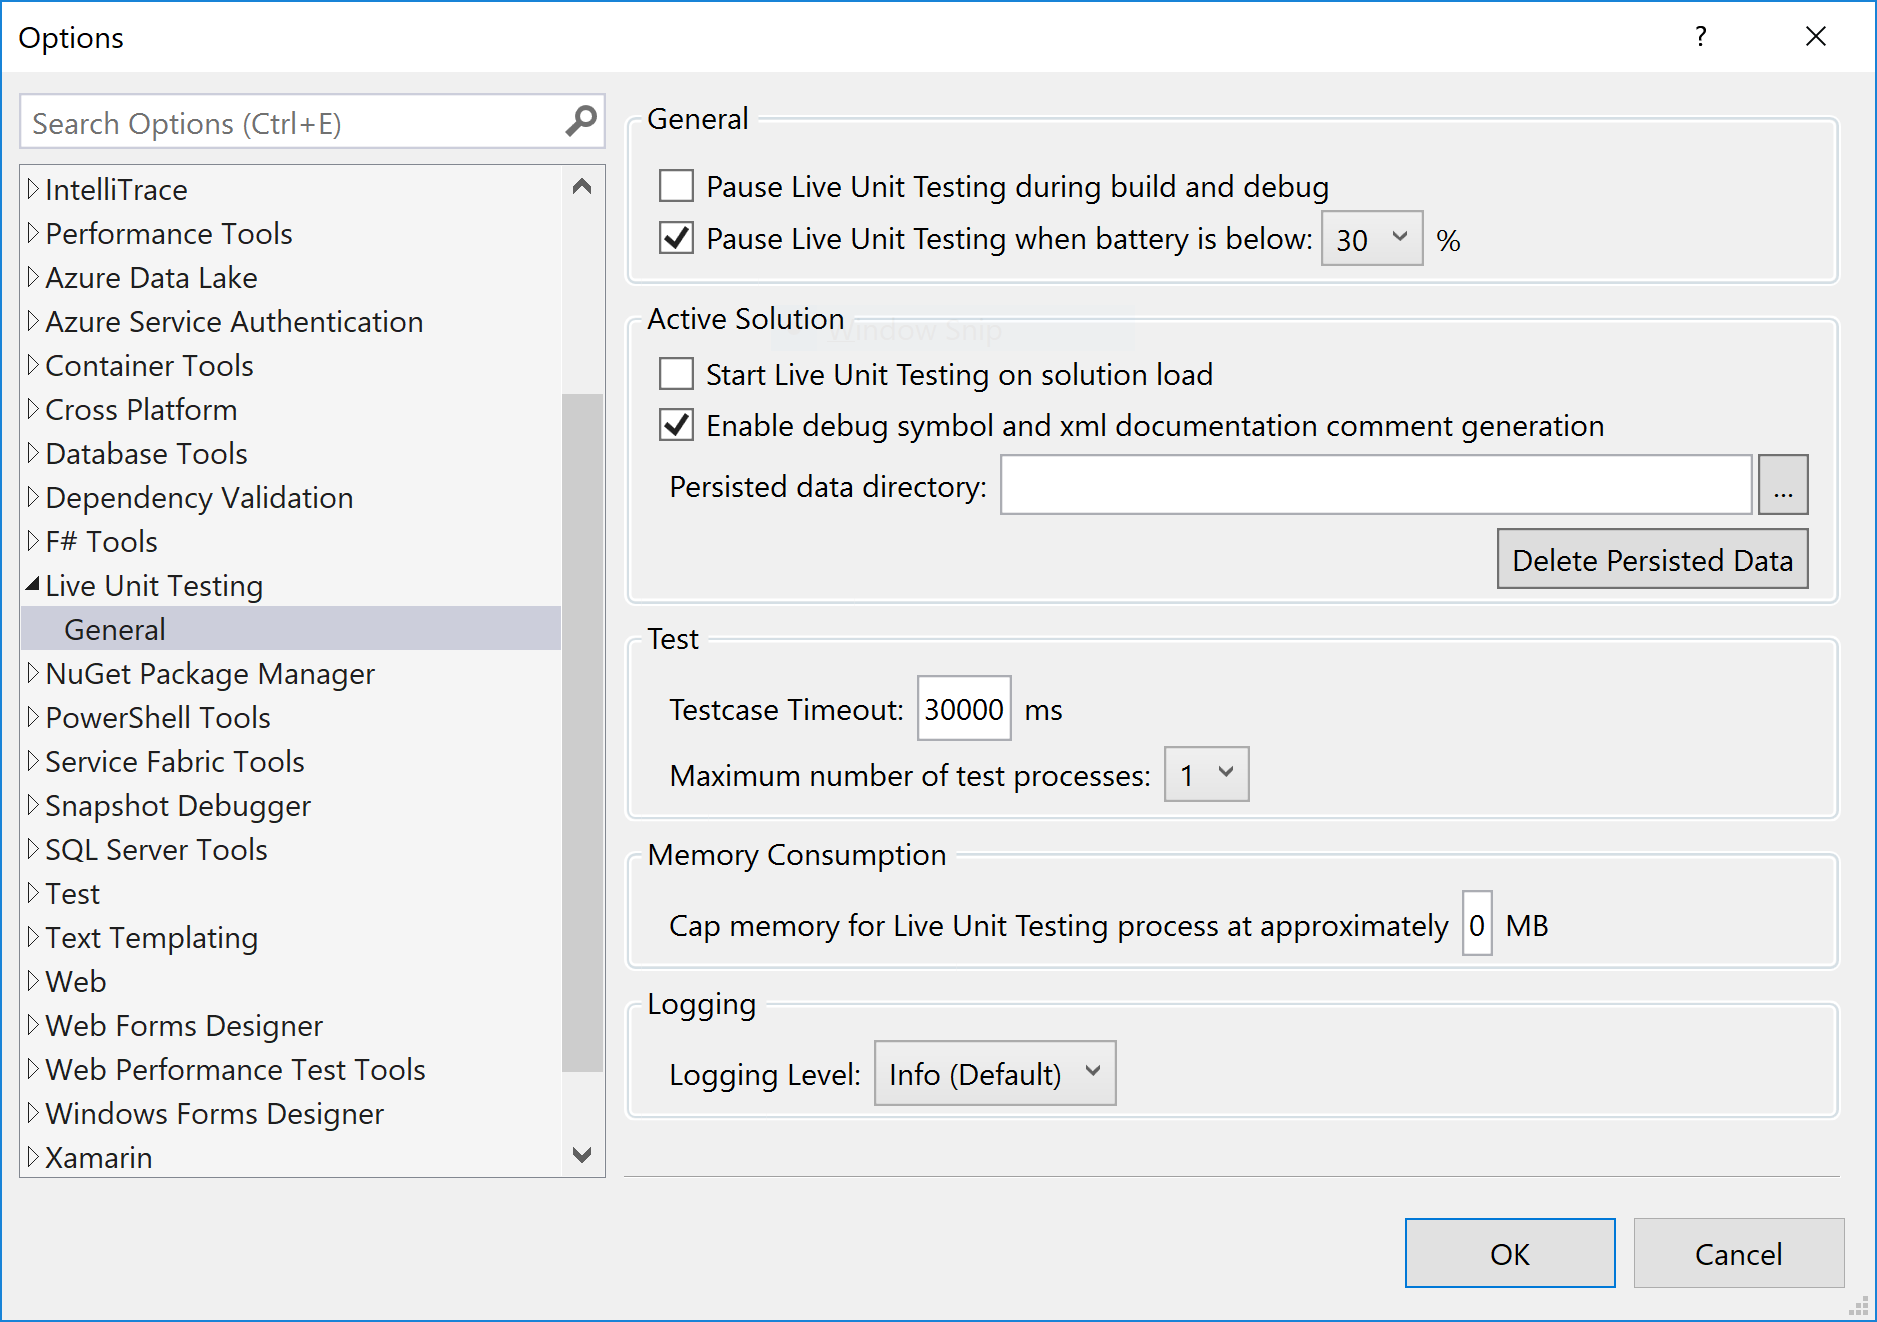
The configurable options include:
Whether Live Unit Testing pauses when a solution is built and debugged.
Whether Live Unit Testing pauses when a system's battery power falls below a specified threshold.
Whether Live Unit Testing runs automatically when a solution is opened.
Whether to enable debug symbol and XML documentation comment generation.
The directory in which to store persisted data.
The ability to delete all persisted data. This is useful when Live Unit Testing is behaving in an unpredictable or unexpected way, which suggests that the persisted data has become corrupted.
The interval after which a test case times out. The default is 30 seconds.
The maximum number of test processes that Live Unit Testing creates.
The maximum amount of memory that Live Unit Testing processes can consume.
The level of information written to the Live Unit Testing Output window.
Options include no logging (None), error messages only (Error), error and informational messages (Info, the default), or all detail (Verbose).
You can also display verbose output in the Live Unit Testing Output window by assigning a value of "1" to a user-level environment variable named
VS_UTE_DIAGNOSTICS, and then restarting Visual Studio.To capture detailed MSBuild log messages from Live Unit Testing in a file, set the
LiveUnitTesting_BuildLoguser-level environment variable to the name of the file to contain the log.
Start, pause, and stop
To enable Live Unit Testing, select Test > Live Unit Testing > Start from the top-level Visual Studio menu. When Live Unit Testing is enabled, the options available on the Live Unit Testing menu change from a single item, Start, to Pause and Stop:
Pause temporarily suspends Live Unit Testing.
When Live Unit Testing is paused, coverage visualization does not appear in the editor, but all the data that was collected is preserved. To resume Live Unit Testing, select Continue from the Live Unit Testing menu. Live Unit Testing does the necessary work to catch up with all the edits that have been made while it was paused and updates the glyphs appropriately.
Stop completely stops Live Unit Testing. Live Unit Testing discards all data that it has collected.
Note
If you start Live Unit Testing in a solution that does not include a unit test project, the Pause and Stop options appear on the Live Unit Testing menu, but Live Unit Testing does not start. The Output window displays a message that begins, "No supported test adapters are referenced by this solution...".
At any time, you can temporarily pause or completely stop Live Unit Testing. You may want to do this, for example, if you're in the middle of a refactoring and know that your tests will be broken for a while.
View coverage visualization
After it's enabled, Live Unit Testing updates each line of code in the Visual Studio editor to show you whether the code you're writing is covered by unit tests and whether the tests that cover it are passing. The following image shows lines of code with both passing and failing tests, as well as lines of code that are not covered by tests. Lines decorated with a green "✓" are covered only by passing tests, lines decorated with a red "x" are covered by one or more failing tests, and lines decorated by a blue "➖" are not covered by any test.
Live Unit Testing coverage visualization is updated immediately when you modify code in the code editor. While processing the edits, visualization changes to indicate that the data is not up-to-date by adding a round timer image below the passing, failing, and not covered symbols, as the following image shows.
Get information about test status
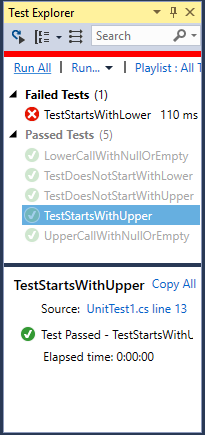
By hovering over the succeeded or failed symbol in the code window, you can see how many tests are hitting that line. To see the status of the individual tests, select the symbol:
In addition to providing the names and result of tests, the tooltip lets you rerun or debug the set of tests. If you select one or more of the tests in the tooltip, you can also run or debug just those tests. This allows you to debug your tests without having to leave the code window. When debugging, in addition to observing any breakpoints you may have already set, program execution pauses when the debugger executes an Assert method that returns an unexpected result.
When you hover over a failed test in the tooltip, it expands to provide additional info about the failure, as shown in the following image. To navigate directly to a failed test, double-click it in the tooltip.
When you navigate to the failed test, Live Unit Testing visually indicates in the method signature the tests that have:
- passed (indicated by a half-full beaker along with a green "✓")
- failed (a half-full beaker along with a red "🞩")
- are not involved in Live Unit Testing (a half-full beaker along with a blue "➖")
Non-test methods are not decorated with a symbol. The following image illustrates all four types of methods.
Diagnose and correct test failures
From the failed test, you can easily debug the product code, make edits, and continue developing your application. Because Live Unit Testing runs in the background, you don't have to stop and restart Live Unit Testing during the debug, edit, and continue cycle.
For example, the test failure shown in the previous image was caused by an incorrect assumption in the test method that non-alphabetic characters return true when passed to the System.Char.IsLower method. After you correct the test method, all the tests should pass. You don't have to pause or stop Live Unit Testing.
Test Explorer
Test Explorer provides an interface that lets you run and debug tests and analyze test results. Live Unit Testing integrates with Test Explorer. When Live Unit Testing is not enabled or is stopped, Test Explorer displays the status of unit tests the last time a test was run. Source code changes require that you rerun the tests. In contrast, when Live Unit Testing is enabled, the status of unit tests in Test Explorer is updated immediately. You don't need to explicitly run the unit tests.
Tip
Open Live Unit Testing by selecting Test > Windows > Test Explorer from the top-level Visual Studio menu.
You may notice in the Test Explorer window that some tests are faded out. For example, when you enable Live Unit Testing after opening a previously saved project, the Test Explorer window had faded out all but the failed test, as the following image shows. In this case, Live Unit Testing has rerun the failed test, but it has not rerun the successful tests. This is because Live Unit Testing's persisted data indicates that there were no changes since the tests were last run successfully.
You can rerun any tests that appear faded by selecting the Run All or Run options from the Test Explorer menu. Or, select one or more tests in the Test Explorer menu, right-click, and then select Run Selected Tests or Debug Selected Tests from the popup menu. As tests are run, they bubble up the top.
There are some differences between Live Unit Testing automatically running and updating test results and explicitly running tests from Test Explorer. These differences include:
- Running or debugging tests from the Test Explorer window runs regular binaries, whereas Live Unit Testing runs instrumented binaries.
- Live Unit Testing does not create a new application domain to run tests, but rather runs tests from the default domain. Tests run from the Test Explorer window do create a new application domain.
- Live Unit Testing runs tests in each test assembly sequentially. In the Test Explorer window, you can choose to run multiple tests in parallel.
Large solutions
If your solution has 10 or more projects, Visual Studio displays the following dialog when you:
- start Live Unit Testing and there is no persisted data
- select Tools > Options > Live Unit Testing > Delete Persisted Data
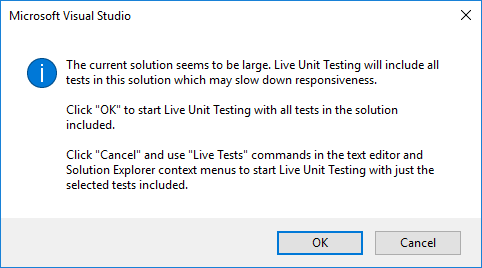
The dialog warns you that dynamic execution of large numbers of tests in large projects can severely impact performance. If you select OK, Live Unit Testing executes all tests in the solution. If you select Cancel, you can select the tests to execute. The following section explains how to do this.
Include and exclude test projects and test methods
For solutions with many test projects, you can control which projects and individual methods in a project participate in Live Unit Testing. For example, if you have a solution with hundreds of test projects, you can select a targeted set of test projects to participate in Live Unit Testing. There are a number of ways to do this, depending on whether you want to exclude all the tests in the project or solution, include or exclude most tests, or exclude individual tests. Live Unit Testing saves include/exclude state as a user setting and remembers it when a solution is closed and reopened.
Exclude all tests in a project or solution
To select the individual projects in unit tests, do the following after Live Unit Testing is started:
- Right-click the solution in Solution Explorer and choose Live Unit Testing > Exclude to exclude the entire solution.
- Right-click each test project that you'd like to include in the tests and choose Live Unit Testing > Include.
Exclude individual tests from the code editor window
You can use the code editor window to include or exclude individual test methods. Right-click on the signature of the test method in the code editor window, and then select one of the following options:
- Live Unit Testing > Include <selected method>
- Live Unit Testing > Exclude <selected method>
- Live Unit Testing > Exclude All But <selected method>
Exclude tests programmatically
You can apply the ExcludeFromCodeCoverageAttribute attribute to programmatically exclude methods, classes, or structures from reporting their coverage in Live Unit Testing.
Use the following attributes to exclude individual methods from Live Unit Testing:
- For xUnit:
[Trait("Category", "SkipWhenLiveUnitTesting")] - For NUnit:
[Category("SkipWhenLiveUnitTesting")] - For MSTest:
[TestCategory("SkipWhenLiveUnitTesting")]
Use the following attributes to exclude an entire assembly of tests from Live Unit Testing:
- For xUnit:
[assembly: AssemblyTrait("Category", "SkipWhenLiveUnitTesting")] - For NUnit:
[assembly: Category("SkipWhenLiveUnitTesting")] - For MSTest:
[assembly: TestCategory("SkipWhenLiveUnitTesting")]