Customize the Azure IoT Central UI
This article describes how you can customize the UI of your application by applying custom themes, changing the text, and modifying the help links to point to your own custom help resources.
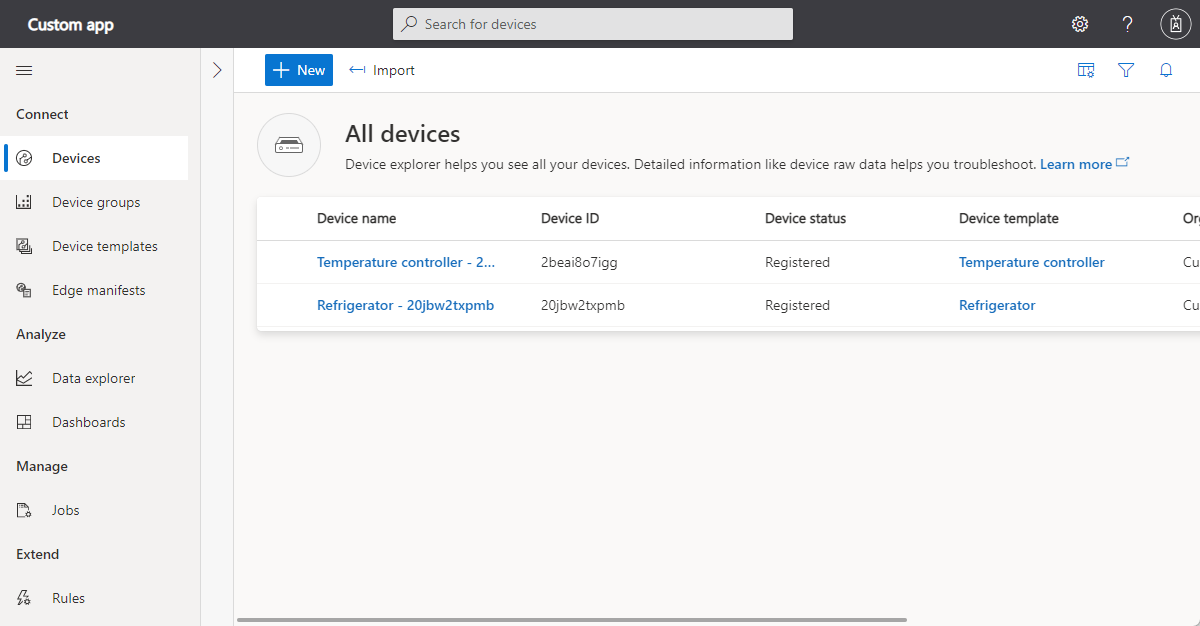
The following screenshot shows a page using the standard theme:
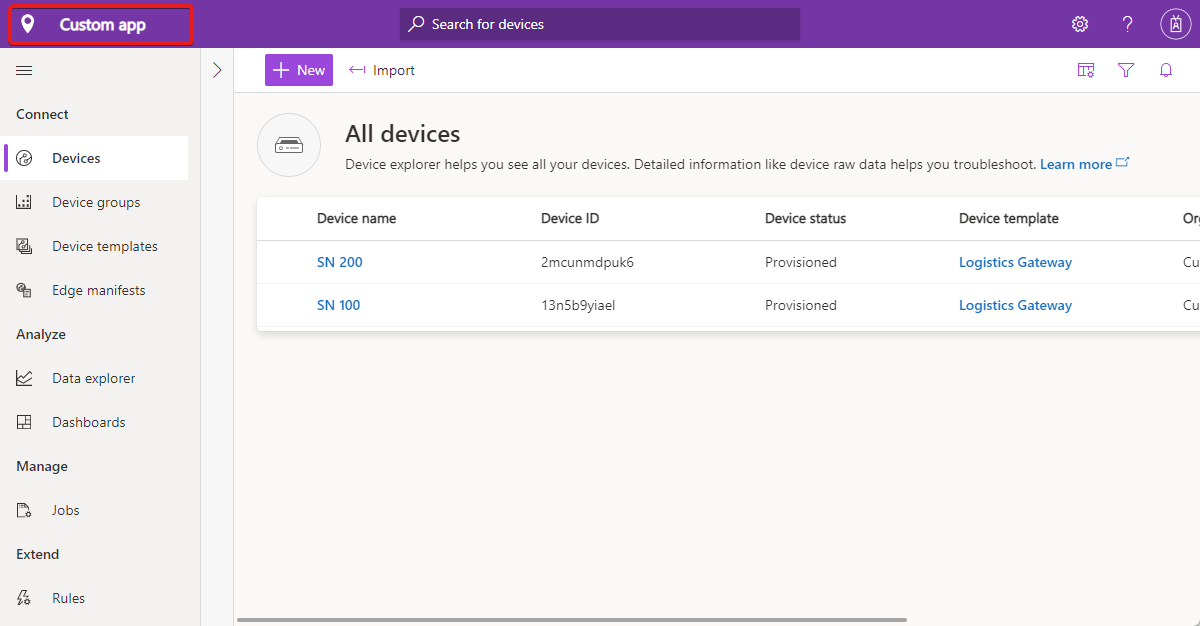
The following screenshot shows a page using a custom screenshot with the customized UI elements highlighted:
Tip
You can also customize the image shown in browser's address bar and list of favorites.
Create theme
To create a custom theme, navigate to the Appearance section in the Customization page.
On this page, you can customize the following aspects of your application:
Application logo
A PNG image, no larger than 1 MB, with a transparent background. This logo displays to the left on the IoT Central application title bar.
If your logo image includes the name of your application, you can hide the application name text. For more information, see Manage your application.
Browser icon (favicon)
A PNG image, no larger than 32 x 32 pixels, with a transparent background. A web browser can use this image in the address bar, history, bookmarks, and browser tab.
Browser colors
You can change the color of the page header and the color used for accenting buttons and other highlights. Use a six character hex color value in the format ##ff6347. For more information about HEX Value color notation, see HTML Colors.
Note
You can always revert back to the default options on the Appearance section.
Changes for operators
If an administrator creates a custom theme, then operators and other users of your application can no longer choose a theme in Appearance.
Replace help links
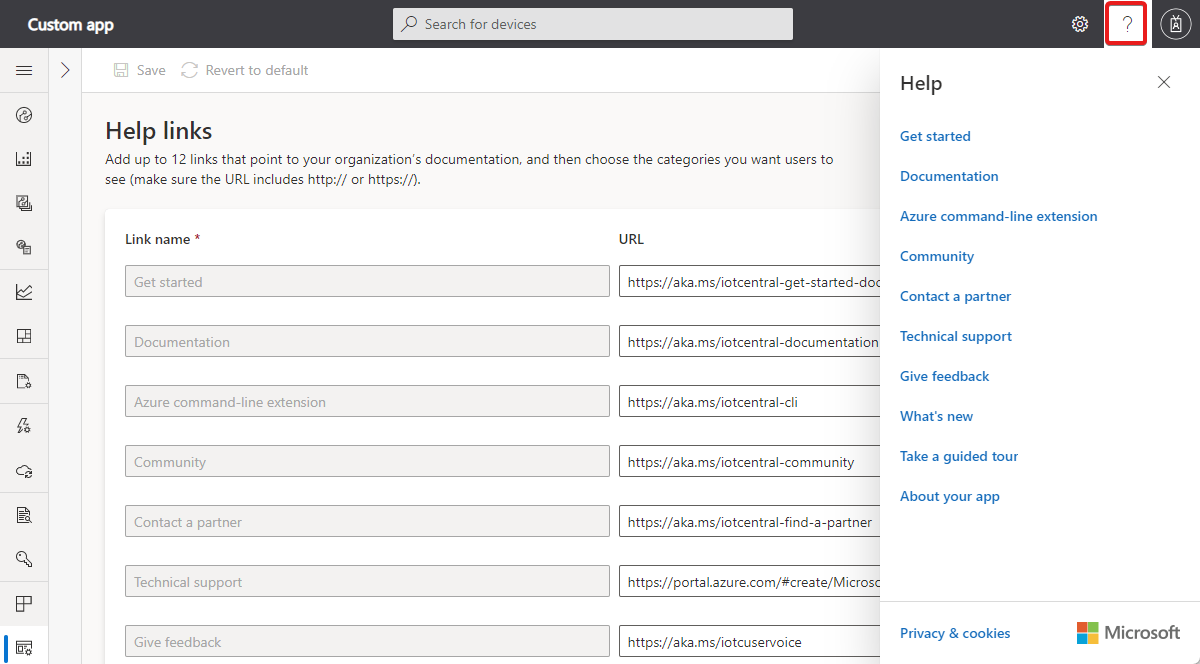
To provide custom help information to your operators and other users, you can modify the links on the application Help menu.
To modify the help links, navigate to the Help links section in the Customization page.
You can also add new entries to the help menu and remove default entries:
Note
You can always revert back to the default help links on the Customization page.
Change application text
To change text labels in the application, navigate to the Text section in the Customization page.
On this page, you can customize the text of your application for all supported languages. After you upload the custom text file, the application text automatically appears with the updated text. You can make further customizations by editing and overwriting the customization file. You can repeat the process for any language that the IoT Central UI supports.
Following example shows how to change the word Device to Asset when you view the application in English:
Select Add application text and select the English language in the dropdown.
Download the default text file. The file contains a JSON definition of the text strings you can change.
Open the file in a text editor and edit the right-hand side strings to replace the word
devicewithassetas shown in the following example:{ "Device": { "AllEntities": "All assets", "Approve": { "Confirmation": "Are you sure you want to approve this asset?", "Confirmation_plural": "Are you sure you want to approve these assets?" }, "Block": { "Confirmation": "Are you sure you want to block this asset?", "Confirmation_plural": "Are you sure you want to block these assets?" }, "ConnectionStatus": { "Connected": "Connected", "ConnectedAt": "Connected {{lastReportedTime}}", "Disconnected": "Disconnected", "DisconnectedAt": "Disconnected {{lastReportedTime}}" }, "Create": { "Description": "Create a new asset with the given settings", "ID_HelpText": "Enter a unique identifier this asset will use to connect.", "Instructions": "To create a new asset, select an asset template, a name, and a unique ID. <1>Learn more <1></1></1>", "Name_HelpText": "Enter a user friendly name for this asset. If not specified, this will be the same as the asset ID.", "Simulated_Label": "Simulate this asset?", "Simulated_HelpText": "A simulated asset generates telemetry that enables you to test the behavior of your application before you connect a real asset.", "Title": "Create a new asset", "Unassigned_HelpText": "Choosing this will not assign the new asset to any asset template.", "HardwareId_Label": "Hardware type", "HardwareId_HelpText": "Optionally specify the manufacturer of the asset", "MiddlewareId_Label": "Connectivity solution", "MiddlewareId_HelpText": "Optionally choose what type of connectivity solution is installed on the asset" }, "Delete": { "Confirmation": "Are you sure you want to delete this asset?", "Confirmation_plural": "Are you sure you want to delete these assets?", "Title": "Delete asset permanently?", "Title_plural": "Delete assets permanently?" }, "Entity": "Asset", "Entity_plural": "Assets", "Import": { "Title": "Import assets from a file", "HelpText": "Choose the organization that can access the assets you’re importing, and then choose the file you’ll use to import. <1>Learn more <1></1></1>", "Action": "Import assets with an org assignment from a chosen file.", "Upload_Action": "Upload a .csv file", "Browse_HelpText": "You’ll use a CSV file to import assets. Click “Learn more” for samples and formatting guidelines." }, "JoinToGateway": "Attach to gateway", "List": { "Description": "Grid displaying list of assets", "Empty": { "Text": "Assets will send data to IoT Central for you to monitor, store, and analyze. <1>Learn more <1></1></1>", "Title": "Create an Asset" } }, "Migrate": { "Confirmation": "Migrating selected asset to another template. Select migration target.", "Confirmation_plural": "Migrating selected assets to another template. Select migration target." }, "Properties": { "Definition": "Asset template", "DefinitionId": "Asset template ID", "Id": "Asset ID", "Name": "Asset name", "Scope": "Organization", "Simulated": "Simulated", "Status": "Asset status" }, "Rename": "Rename asset", "Status": { "Blocked": "Blocked", "Provisioned": "Provisioned", "Registered": "Registered", "Unassociated": "Unassociated", "WaitingForApproval": "Waiting for approval" }, "SystemAreas": { "Downstreamassets": "Downstream assets", "Module_plural": "Modules", "Properties": "Properties", "RawData": "Raw data" }, "TemplateList": { "Empty": "No definitions found.", "FilterInstructions": "Filter templates" }, "Unassigned": "Unassigned", "Unblock": { "Confirmation": "Are you sure you want to unblock this asset?", "Confirmation_plural": "Are you sure you want to unblock these assets?" } } }Upload your edited customization file and select Save to see your new text in the application:
The UI now uses the new text values:
You can reupload the customization file with further changes by selecting the relevant language from the list on the Text section in the Customization page.
Next steps
Now that you've learned how to customize the UI in your IoT Central application, here are some suggested next steps:
प्रतिक्रिया
जल्द आ रहा है: 2024 के दौरान हम सामग्री के लिए फीडबैक तंत्र के रूप में GitHub मुद्दों को चरणबद्ध तरीके से समाप्त कर देंगे और इसे एक नई फीडबैक प्रणाली से बदल देंगे. अधिक जानकारी के लिए, देखें: https://aka.ms/ContentUserFeedback.
के लिए प्रतिक्रिया सबमिट करें और देखें


