Quick Start Guide for User-Driven Installation
Microsoft Deployment Toolkit (MDT) 2013 provides technology for deploying Windows operating systems, and Microsoft Office. This quick start guide helps you quickly evaluate MDT 2013 by providing condensed, step-by-step instructions for using it to install the Windows 8.1 operating system and Microsoft Office Professional Plus 2010 with User-Driven Installation (UDI) and Microsoft System Center 2012 R2 Configuration Manager. This quick start guide demonstrates how to perform the MDT New Computer deployment scenario, which covers the deployment of Windows 8.1 to a new computer. This scenario assumes that there is no user data or profile to preserve.
Note
In this document, Windows applies to the Windows 8.1, Windows 8, Windows 7, Windows Server® 2012 R2, Windows Server 2012, and Windows Server 2008 R2 operating systems unless otherwise noted. MDT does not support ARM processor-based versions of Windows. Similarly, MDT refers to MDT 2013 unless otherwise stated.
After using this guide to evaluate MDT, review the rest of the MDT guidance to learn more about the technology's advanced features.
Note
The infrastructure setup described here is for evaluation purposes and not intended for a production system.
Prerequisites
UDI installations using System Center 2012 R2 Configuration Manager have the following prerequisites.
Required Software
To complete this guide, the following software is required:
Windows Server 2008 R2
Microsoft SQL Server® 2008 R2
SQL Server 2008 R2 Service Pack 1 (SP1)
SQL Server 2008 R2 SP1 Cumulative Update 6 (CU6)
Windows 8.1
System Center 2012 R2 Configuration Manager
Office Professional Plus 2010 volume license, 32-bit version
Microsoft .NET Framework version 3.5 with SP1
Windows PowerShell™ version 2.0
Windows Preinstallation Environment (Windows PE), which is included in Configuration Manager
Networking services, including Domain Name System (DNS) and Dynamic Host Configuration Protocol (DHCP)
Active Directory® Domain Services (AD DS)
Note
The Task Sequencer used in MDT deployments requires that the Create Global Object right be assigned to credentials used to access and run the Deployment Workbench and the deployment process. This right is normally available to accounts with Administrator-level permissions (unless explicitly removed). Also, the Specialized Security - Limited Functionality (SSLF) security profile removes the Create Global Object right and should not be applied to computers deployed using MDT.
Computer Configuration
To complete this guide, set up the computers listed in Table 1. These computers can be either physical computers or virtual machines (VMs) with the system resources designated.
Table 1. Computers Used in This Guide
| Computer | Description and system resources |
|---|---|
| WDG-MDT-01 | This computer runs the MDT infrastructure and Configuration Manager. The computer runs Windows Server 2008 R2 with the following networking services installed: - AD DS - DNS Server - DHCP Server - Windows Deployment Services The system resources of the computer are as follows: - Quad-core processor running at 2.66 gigahertz (GHz) or faster - 4 gigabytes (GB) or more of physical memory - A disk partition that has 40 GB or more of available disk space; it will become the drive C partition - One CD-ROM or DVD-ROM drive that will be assigned the drive letter D - A disk partition that has 40 GB or more of available disk space; it will become partition E. |
| WDG-REF-01 | This is the reference computer, which runs no current operating system. The system resources of the computer are as follows: - Processor running at 1.4 GHz or faster - 1 GB or more of physical memory - 16 GB or more of available disk space |
| WDG-CLI-01 | This is the target computer, which runs no current operating system. The system resources of the computer are as follows: - Processor running at 1.4 GHz or faster - 1 GB or more of physical memory - 16 GB or more of available disk space |
The resources listed in Table 1 reflect the system resources recommended to perform the steps in this guide. For information on the minimum system resource requirements for:
Windows Server 2008 R2, see Installing Windows Server 2008 R2
SQL Server 2008 R2, see Hardware and Software Requirements for Installing SQL Server 2008 R2
Note
This guide assumes that MDT is being evaluated on 64-bit (x64) physical or virtual computers. If evaluating MDT on 32-bit (x86) platforms, download and install the x86 editions of MDT and the components that this guide describes.
Step 1: Prepare the Prerequisite Infrastructure
For purposes of this guide, all the prerequisite infrastructure services run on the computer named WDG-MDT-01. Install the prerequisite software, server roles, and services on this computer before installing MDT.
Note
This section assumes that you are creating a new Configuration Manager infrastructure for MDT. If you are using an existing Configuration Manager infrastructure, review the steps in this section and substitute existing resource names for the resources created in this section (such as the computer name and shared network folders). After reviewing this section, proceed to Step 2: Prepare the MDT Environment
Prepare the prerequisite infrastructure before installing MDT by:
Installing Windows Server 2008 R2 as described in Step 1-1: Install Windows Server 2008 R2
Creating the required folders and network shares as described in Step 1-2: Create the Required Folders and Network Shares
Obtaining the software required to perform the steps in this guide as described in Step 1-3: Obtain the Required Software
Installing the AD DS server role as described in Step 1-4: Install the AD DS Server Role
Installing the DHCP Server server role as described in Step 1-5: Install the DHCP Server Server Role
Installing the Web Services (IIS) server role as described in Step 1-6: Install the Web Services (IIS) Server Role
Adding the required Windows Server 2008 R2 features as described in Step 1-7: Add the Required Windows Server 2008 R2 Features
Creating the user and service accounts required to perform the steps in this guide as described in Step 1-8: Create the Required User and Service Accounts
Installing SQL Server 2008 R2 for Configuration Manager to use as described in Step 1-9: Install SQL Server 2008 R2
Adding the site server to the Administrators security group as described in Step 1-10: Add the Site Server to the Administrators Security Group
Installing Configuration Manager as described in Step 1-11: Install Configuration Manager
Configuring the Network Access Account that Configuration Manager clients use to access Configuration Manager distribution points as described in Step 1-12: Configure the Network Access Account
Configuring the Configuration Manager site boundaries and boundary groups as described in Step 1-13: Configure the Configuration Manager Site Boundaries and Boundary Groups
Configuring the publishing of site information in AD DS and DNS as described in Step 1-14: Configure the Publishing of Site Information in AD DS and DNS
Configuring discovery of users in AD DS as described in Step 1-15: Configure Discovery of Active Directory Users
Step 1-1: Install Windows Server 2008 R2
Use the information in 2 to install Windows Server 2008 R2. Accept default values unless otherwise specified.
Table 2. Information for Installing Windows Server 2008 R2
| When prompted for | Provide these values |
|---|---|
| Where do you want to install Windows? | Disk 0 Unallocated Space |
| Password | Any strong password |
| Computer name | WDG-MDT-01 |
| Format for volumes C and E | NTFS |
| TCP/IP configuration | Configure with a static IP address configuration, with the other TCP/IP configuration options as appropriate for the environment |
Step 1-2: Create the Required Folders and Network Shares
The MDT deployment process requires additional folders that are used as the source for files or to store files created during the MDT deployment process. Some of these folders need to be shared so that they can be accessed from other computers.
To create the required folders and shares
Create the folders and shares listed in Table 3 with the permissions specified for each share
Table 3. Folders That the MDT Deployment Process Requires
Create this folder With this share name With these share permissions E:\Source$ Source$ Administrators: Co-owner
Everyone: ReadE:\Images$ Images$ Administrators: Co-owner
Everyone: ReadE:\Capture$ Capture$ Administrators: Co-owner
Everyone: ReadE:\Packages$ Packages$ Administrators: Co-owner
Everyone: ReadCreate the following folders:
E:\CMDownloads
E:\Source$\CustomSettings
E:\Source$\Drivers
E:Source$Windows_8-1
E:Source$MDT_2013
E:Source$SQL2008R2
E:Source$SQL2008R2SP1
E:Source$SQL2008R2CU6
E:Source$OfficeProPlus2010
E:Source$ConfigMgr
E:Packages$Drivers
Copy the device drivers for the reference computer (WDG-REF-01) and the target computer (WDG-CLI-01) to E:\Source$\Drivers.
Note
The processes in this guide assume that the reference computer and target computer have the same devices and do not require different devices drivers.
Step 1-3: Obtain the Required Software
Besides Windows Server 2008 R2, Windows 8.1, and System Center 2012 R2 Configuration Manager, certain software is required to evaluate MDT based on the processes in this guide. Table 4 lists the software required to perform deployments using MDT, where to obtain the software, and where to place the software on WDG-MDT-01.
Table 4. Additional Software Required for Deployment Using MDT
| Obtain this software | Place in this folder |
|---|---|
| MDT 2013 | E:\Source$\MDT_2013 |
| Windows 8.1 distribution files from the product media | E:\Source$\Windows_8-1 |
| Device drivers required for the reference and target computers (WDG-REF-01 and WDG-CLI-01) | E:\Source$\Drivers |
| SQL Server 2008 R2 from the product media | E:\Source$\SQL2008 |
| SQL Server 2008 R2 SP1, available at https://www.microsoft.com/download/details.aspx?id=26113 | E:\Source$\SQL2008R2SP1 |
| SQL Server 2008 R2 SP1 CU6, available at https://support.microsoft.com/kb/2679367 | E:\Source$\SQL2008R2SP1CU6 |
| System Center 2012 R2 Configuration Manager from the product media | E:\Source$\ConfigMgr |
| Office Professional Plus 2010 32-bit Volume Licensing version from the product media | E:\ Source$\OfficeProPlus2010 |
Step 1-4: Install the AD DS Server Role
AD DS is required to provide authentication and act as a repository for configuration values for the Microsoft products and technologies that MDT uses, such as Microsoft SQL Server and Configuration Manager.
To install AD DS, run the DCPROMO Wizard to configure the computer as a domain controller. Install AD DS using the information in Table 5, accepting any defaults unless otherwise specified.
Table 5. Information for Installing AD DS
| When prompted | Do this |
|---|---|
| For the domain type | Create a new domain in a new forest. |
| For the fully qualified domain name | Type mdt2013.corp.woodgrovebank.com. |
| For the forest functional level | Select Windows Server 2008 R2. |
| To install the DNS Server service as part of the domain controller installation process | Select Yes. |
Step 1-5: Install the DHCP Server Server Role
The DHCP Server server role is required to provide automatic IP configuration for the target computers. Install DHCP Server using the information in Table 6, accepting any defaults unless otherwise specified.
Note
If you are using a virtualized environment, disable any DHCP configuration that the computer-virtualization software provides. Ensure that the DHCP Server service running WDG-MDT-01 is the only provider of IP configuration using DHCP.
Table 6. Information for Installing the DHCP Server Server Role
| On this wizard page | Do this |
|---|---|
| Authorize DHCP server in Active Directory | Authorize WDG-MDT-01 to provide client IP configuration. |
| DHCP scopes | Create an appropriate scope that can be used to automatically configure TCP/IP for WDG-REF-01 and WDG-CLI-01. |
| DHCPv6 stateless mode configuration | Disable DHCPv6 stateless mode for this server. |
Step 1-6: Install the Web Services (IIS) Server Role
Install the Web Services (IIS) server role with the role services listed in Table 7, which are required for SQL Server 2008 R2 and Configuration Manager. Unless otherwise specified, use the default values.
Table 7. Information for Installing the Web Services (IIS) Server Role
| Role service | Status |
|---|---|
| Web Server | Installed |
| Common HTTP Features | Installed |
| Static Content | Installed |
| Default Document | Installed |
| Directory Browsing | Installed |
| HTTP Errors | Installed |
| HTTP Redirection | Installed |
| WebDAV Publishing | Installed |
| Application Development | Installed |
| ASP.NET | Installed |
| .NET Extensibility | Installed |
| ASP | Not installed |
| CGI | Not installed |
| ISAPI Extensions | Installed |
| ISAPI Filters | Installed |
| Server Side Includes | Not installed |
| Health and Diagnostics | Installed |
| HTTP Logging | Installed |
| Logging Tools | Installed |
| Request Monitor | Installed |
| Tracing | Installed |
| Custom Logging | Not installed |
| ODBC Logging | Not installed |
| Security | Installed |
| Basic Authentication | Not installed |
| Windows Authentication | Installed |
| Digest Authentication | Not installed |
| Client Certificate Mapping Authentication | Not installed |
| IIS Client Certificate Mapping Authentication | Not installed |
| URL Authorization | Not installed |
| Request Filtering | Installed |
| IP and Domain Restriction | Not installed |
| Performance | Installed |
| Static Content Compression | Installed |
| Dynamic Content Compression | Not installed |
| Management Tools | Installed |
| IIS Management Console | Installed |
| IIS Management Scripts and Tools | Not installed |
| Management Service | Not installed |
| IIS 6 Management Compatibility | Installed |
| IIS 6 Metabase Compatibility | Installed |
| IIS 6 WMI Compatibility | Installed |
| IIS 6 Scripting Tools | Not installed |
| IIS 6 Management Console | Not installed |
| FTP Publishing Service | Not installed |
| FTP Server | Not installed |
| FTP Management Console | Not installed |
| IIS Hostable Web Core | Not installed |
Step 1-7: Add the Required Windows Server 2008 R2 Features
In addition to installing the required Windows Server 2008 R2 server roles, add the following required features in Server Manager in the Features Summary section:
Background Intelligent Transfer Service
Remote Differential Compression
Step 1-8: Create the Required User and Service Accounts
Configuration Manager and SQL Server 2008 R2 require user accounts during the installation process. Table 8 lists the information needed for creating these accounts.
Table 8. Information for Creating the Required Accounts
| Create this account | With these settings |
|---|---|
| SQL Server Agent service account | 1. In First name, type SQL Agent. 2. In Last name, type Service Account. 3. In User logon name, type SQLAgent. 4. In Password and Confirm password, type P@ssw0rd. 5. Clear the User must change password at next logon check box. 6. Select the Password never expires check box. 7. Make the account a member of the Domain Admins security group. 8. In Description, type Service account used to run SQL Server 2008 R2 Agent service. |
| SQL Server Database Engine service account | 1. In First name, type SQL DB Engine. 2. In Last name, type Service Account. 3. In User logon name, type SQLDBEngine. 4. In Password and Confirm password, type P@ssw0rd. 5. Clear the User must change password at next logon check box. 6. Select the Password never expires check box. 7. Make the account a member of the Domain Admins security group. 8. In Description, type Service account used to run SQL Server 2008 R2 database engine. |
| SQL Server Reporting Services service account | 1. In First name, type SQL Reporting. 2. In Last name, type Service Account. 3. In User logon name, type SQLReport. 4. In Password and Confirm password, type P@ssw0rd. 5. Clear the User must change password at next logon check box. 6. Select the Password never expires check box. 7. Make the account a member of the Domain Admins security group. 8. In Description, type Service account used to run SQL Server 2008 R2 reporting services. |
| Configuration Manager Client Network Access account | 1. In First name, type CM 2012. 2. In Last name, type Client Network Access. 3. In User logon name, type CMNetAccess. 4. In Password and Confirm password, type P@ssw0rd. 5. Clear the User must change password at next logon check box. 6. Select the Password never expires check box. 7. In Description, type Service account used as the network access account for Configuration Manager Client. |
Step 1-9: Install SQL Server 2008 R2
Before installing Configuration Manager, install SQL Server 2008 R2 SP1 and CU6.
Note
To enable all SQL Server 2008 R2 features, install the Web Services (IIS) server role before installing SQL Server 2008 R2.
To install SQL Server 2008 R2
Start the SQL Server Installation Center.
In the SQL Server Installation Center, in the navigation pane, select Installation.
In the preview pane, select New installation or add features to an existing installation.
SQL Server 2008 R2 Setup Wizard starts.
Install SQL Server 2008 R2 using the information in Table 9, accepting the defaults unless otherwise specified.
Table 9. Information for Installing SQL Server 2008 R2
On this wizard page Do this Setup Support Rules Select OK. Product Key Select Next. License Terms Select the I accept the license terms check box, and then select Next. Setup Support Files Select Install. Setup Support Rules Ensure that no critical results exist for the rules, and then select Next. Setup Role Select SQL Server Feature Installation, and then select Next. Feature Selection 1. Select the Database Engine Services check box.
2. Select the Reporting Services check box.
3. Select the Full-Text Search check box.
4. Select the Management Tools - Complete check box.
5. Select Next.Installation Rules Select Next. Instance Configuration Select Next. Disk Space Requirements Select Next. Server Configuration 1. For SQL Server Agent, in Account Name, type MDT2013\SQLAgent, in Password, type P@ssw0rd.
2. For SQL Server Database Engine, in Account Name, type MDT2013\SQLDBEngine, in Password, type P@ssw0rd.
3. For SQL Server Reporting Services, in Account Name, type MDT2013\SQLReport, in Password, type P@ssw0rd.
4. Select Next.Database Engine Configuration Select Add Current User, and then select Next. Reporting Services Configuration Select Next. Error Reporting Select Next. Installation Configuration Rules Select Next. Ready to Install Select Install. Complete Select Close. Close the SQL Server Installation Center.
To install SQL Server 2008 R2 SP1
In Windows Explorer, go to E:\Source$\SQL2008R2SP1, and double-click SQLServer2008R2SP1-KB2528583-x64-ENU.exe.
The Extracting Files dialog box displays the file-extraction process. When the process is complete, the SQL Server 2008 R2 Service Pack 1 Update Setup Wizard starts.
Install SQL Server 2008 R2 SP1 using the information in Table 10, accepting the defaults unless otherwise specified.
Table 10. Information for Installing SQL Server 2008 R2 SP1
On this wizard page Do this SQL Server 2008 R2 update Select Next. License Terms Select the I accept the license terms check box, and then select Next. Select Features Select Next. Check Files In Use Select Next. Ready to update Select Update. Update Progress The progress is displayed on the wizard page as the update is performed and finishes. Complete Select Close. To install SQL Server 2008 R2 SP1 CU6
In Windows Explorer, go to E:\Source$\SQL2008R2SP1CU6, and double-click 446622_intl_x64_zip.exe.
The Microsoft Self-Extractor dialog box appears.
In the Microsoft Self-Extractor dialog box, select Continue.
In the Microsoft Self-Extractor dialog box, in Select the folder where you want to unzip the files to, type E:\Source$\SQL2008R2SP1CU6, and then select OK.
Note
You can select the ellipsis (...) to browse for the E:\Source$\SQL2008R2SP1CU6 folder.
The extraction process is displayed. When the process is complete, the completion status is displayed.
In the Microsoft Self-Extractor dialog box, select OK.
In Windows Explorer, go to E:\Source$\SQL2008R2SP1CU6, and double-click SQLServer2008R2- KB2679367-x64.exe.
The Extracting Files dialog box displays the file-extraction process. When the process is complete, the SQL Server 2008 R2 Service Pack 1 CU6 Update Setup Wizard starts.
Install SQL Server 2008 R2 SP1 CU6 using the information in Table 11, accepting the defaults unless otherwise specified.
Table 11. Information for Installing SQL Server 2008 R2 SP1 CU6
On this wizard page Do this SQL Server 2008 R2 update Select Next. License Terms Select the I accept the license terms check box, and then select Next. Select Features Select Next. Check Files In Use Select Next. Ready to update Select Update. Update Progress The progress is displayed on the wizard page as the update is performed and finishes. Complete Select Close. The Install a SQL Server 2008 R2 update dialog box appears prompting you to restart the computer to complete the setup.
In the Install a SQL Server 2008 R2 update dialog box, select OK.
Restart the computer.
After installing SQL Server 2008 R2 SP1 CU6, the SQL Server build number should be 10.51.2811.0.
Tip
You can verify the SQL Server build number by viewing the SQL Server updates applied in the Programs and Features Control Panel item by selecting View installed updates.
Step 1-10: Add the Site Server to the Administrators Security Group
When all computers are in the same forest, manually add the site server computer account to the local Administrators group on each computer. Complete this step before configuring the computer as a site system.
To add the site server to the Administrators security group
Select Start, point to Administrative Tools, and then select Active Directory Users and Computers.
In the Active Directory Users and Computers console tree, go to mdt2013.corp.woodgrovebank.com/Builtin.
In the preview pane, right-click Administrators, and then select Properties.
In the Administrators Properties dialog box, select the Members tab, and then select Add.
In the Select Users, Contacts, Computers, or Groups dialog box, select Object Types.
In the Object Types dialog box, in Object types, select Computers, and then select OK.
In the Select Users, Contacts, Computers, or Groups dialog box, in Enter the object names to select, type WDG-MDT-01. Select Check Names, and then select OK.
Close any open windows.
Step 1-11: Install Configuration Manager
When the other products and technologies have been installed, install Configuration Manager. Before doing so, however, extend the Active Directory schema so that computers can locate the distribution points, service locator points, and other server roles. Also, you can extend the schema after you have installed Configuration Manager. For more information about how to extend the Active Directory schema for Configuration Manager, see the section, "Extend the Active Directory Schema," in the Configuration Manager Documentation Library, which is installed with Configuration Manager.
After extending the Active Directory schema, install Configuration Manager. The configuration of WDG-MDT-01 supports Configuration Manager for this sample. The configuration of computers in the production network may vary. To find out more about the prerequisites for installing Configuration Manager, see Supported Configurations for Configuration Manager.
To install Configuration Manager
Start the System Center 2012 R2 Configuration Manager Setup splash screen.
On the System Center 2012 R2 Configuration Manager Setup splash screen, select the Install link.
The Microsoft System Center 2012 R2 Configuration Manager Setup Wizard starts.
Complete the Microsoft System Center 2012 R2 Configuration Manager Setup Wizard using the information in Table 12. Accept the defaults unless otherwise specified.
Table 12. Information for Installing Configuration Manager
On this wizard page Do this Before You Begin Select Next. Getting Started Select Next. Product Key In Enter your 25-character product key, type product_key (where product_key is your product key for Configuration Manager). Microsoft Software License Terms Select the I accept these license terms check box, and then select Next. Update Prerequisite Components In Download and use the latest updates. Updates will be saved to the following location, type E:\CMDownloads, and then select Next. Server Language Selection Select Next. Client Language Selection Select Next. Site and Installation Settings 1. In Site code, type NYC.
2. In Site name, type New York City Site.
3. Select Next.Primary Site Installation 1. Select Install the primary site as a stand-alone site.
2. Select Next.
The Configuration Manager dialog box appears, confirming that you want to install this site as a stand-alone site.
3. In the Configuration Manager dialog box, select Yes.Database Information Select Next. SMS Provider Settings Select Next. Client Computer Communication Settings Select Configure the communication method on each site system role, and then select Next. Site System Roles Select Next. Customer Experience Improvement Program Configuration Select the appropriate participation in the Customer Experience Improvement program for your organization, and then select Next. Settings Summary Select Next. Prerequisite Check Select Begin Install. Install Monitor the installation process until it is complete, and then select Close. Close all open windows and dialog boxes.
When the wizard is complete, Configuration Manager is installed.
Step 1-12: Configure the Network Access Account
The Configuration Manager client needs an account to provide credentials when accessing the Configuration Manager distribution points, MDT deployment shares, and shared folders. This account is called the Network Access account. The CMNetAccess account was created earlier in the process to use as the Network Access account.
To configure the Network Access account
Select Start, point to All Programs, and then point to Microsoft System Center 2012. Point to Configuration Manager, and then select Configuration Manager Console.
In the Configuration Manager console, in the navigation pane, select Administration.
In the Administration workspace, go to Overview/Site Configuration/Sites.
In the preview pane, select NYC - New York City Site.
On the Ribbon, select Settings, select Configure Site Components, and then select Software Distribution.
In the Software Distribution Properties dialog box, select the Network Access Account tab.
In Network Access Account, select Specify the account that accessed network locations, select Set, and then select New Account.
The Windows User Account dialog box appears.
Complete the Windows User Account dialog box using the information in Table 13, and then select OK.
Table 13. Information Required to Complete the Windows User Account Dialog Box
For this Do this User name Type MDT2013\CMNetAccess. Password Type P@ssw0rd. Confirm password Type P@ssw0rd. In the Software Distribution Properties dialog box, select OK.
Close any open windows.
Step 1-13: Configure the Configuration Manager Site Boundaries and Boundary Groups
The Configuration Manager client needs to know the boundaries for the site. Unless the site boundaries are specified, the client assumes that the computer running Configuration Manager is in a remote site. Add a site boundary based on the IP subnet that WDG-MDT-01, WDG-REF-01, and WDG-CLI-01 use. Then, add the site boundary to a site boundary group.
To create a Configuration Manager site boundary
Select Start, point to All Programs, and then point to Microsoft System Center 2012. Point to Configuration Manager, and then select Configuration Manger Console.
In the Configuration Manager console, in the navigation pane, select Administration.
In the Administration workspace, go to Overview/Hierarchy Configuration/Boundaries.
On the Ribbon, select Create Boundary.
The Create Boundary dialog box opens.
Complete the Create Boundary dialog box using the information in Table 14, and then select OK.
Note
For this sample, the site boundary is specified by network address. However, you can also specify site boundaries using an AD DS site name or an IP address range.
Table 14. Information Required to Complete the Create Boundary Dialog Box
For this Do this Description Type IP Subnet Boundary. Type Select IP subnet. Network Type network_address (where network_address is the network address of the subnet where the computers are installed). Subnet mask Type subnet_mask (where subnet_mask is the subnet mask of the subnet where the computers are installed). To add the Configuration Manager site boundary to a site boundary group
In the Configuration Manager console, in the navigation pane, select Administration.
In the Administration workspace, go to Overview/Hierarchy Configuration/Boundary Groups.
On the Ribbon, select Create Boundary Group.
The Create Boundary Group dialog box opens.
Complete the General tab of the Create Boundary Group dialog box using the information in Table 15.
Table ARABIC 15. Information Required to Complete the General Tab of the Create Boundary Group Dialog Box
For this Do this Name Type New York City Boundary Group. Description Type Boundary group for the site boundaries at the New York City site. Boundaries 1. Select Add.
The Add Boundaries dialog box appears.
2. In the Add Boundaries dialog box, select site_boundary (where site_boundary is the site boundary you created earlier in the process), and then select OK.
The site boundary appears in the list of boundaries.Complete the References tab of the Create Boundary Group dialog box using the information in Table 16, and then select OK.
Table 16. Information Required to Complete the References Tab of the Create Boundary Group Dialog Box
For this Do this Site assignment Select the Use this boundary group for site assignment check box. Content location 1. Select Add.
The Add Site Systems dialog box appears.
2. In the Add Site Systems dialog box, select \\WDG-MDT-01.mdt2013.corp.woodgrovebank.com, and then select OK.
The site system server appears in the list of site system servers.Close any open windows.
Step 1-14: Configure the Publishing of Site Information in AD DS and DNS
The Configuration Manager client needs to locate the various Configuration Manager server roles. Modify the site properties to publish the site information in AD DS and in DNS.
To configure the publishing of site information in AD DS and in DNS
Select Start, point to All Programs, and then point to Microsoft System Center 2012. Point to Configuration Manager, and then select Configuration Manager Console.
In the Configuration Manager console, in the navigation pane, select Administration.
In the Administration workspace, go to Overview/Site Configuration/Sites.
In the preview pane, select NYC - New York City Site.
On the Ribbon, select Properties.
In the New York City Site Properties dialog box, on the Publishing tab, verify that the mdt2013.corp.woodgrovebank.com Active Directory forest is listed, and then select Cancel.
Close any open windows.
Step 1-15: Configure Discovery of Active Directory Users
In some instances, software will be deployed to user collections that Configuration Manager discovers. Configuration Manager can discovery user accounts stored in AD DS using the Active Directory User Discovery method.
To configure discovery of Active Directory users
Select Start, point to All Programs, and then point to Microsoft System Center 2012. Point to Configuration Manager, and then select Configuration Manager Console.
In the Configuration Manager console, in the navigation pane, select Administration.
In the Administration workspace, go to Overview/Hierarchy/Discovery Methods.
In the preview pane, select Active Directory User Discovery.
On the Ribbon, on the Home tab, select Properties.
The Active Directory User Discovery Properties dialog box appears.
In the Active Directory User Discovery Properties dialog box, on the General tab, perform the following steps:
Select the Enable Active Directory User Discovery check box.
In Active Directory containers, select New.
The New Active Directory Container dialog box appears.
In the New Active Directory Container dialog box, in Path, select Browse.
The Select New Container dialog box appears.
In the Select New Container dialog box, select mdt2013, and then select OK.
In the New Active Directory Container dialog box, the Lightweight Directory Access Protocol (LDAP) path is displayed in the Path box.
In the New Active Directory Container dialog box, select OK.
The LDAP path appears in the Active Directory containers list box.
In the Active Directory User Discovery Properties dialog box, select OK.
The Configuration Manager dialog box appears, querying whether you want to perform the discovery as soon as possible.
In the Configuration Manager dialog box, select Yes.
In the Configuration Manager console, in the navigation pane, select Assets and Compliance.
In the Assets and Compliance workspace, go to Overview/Users.
The list of users discovered in AD DS is displayed in the preview pane.
Close any open windows.
Step 2: Prepare the MDT Environment
The first step in the deployment process is to prepare the MDT environment. When this step is complete, you can create the reference computer and deploy a captured image of it to the target computer (WDG-CLI-01) using Configuration Manager integration with MDT.
Prepare the MDT environment by:
Installing MDT as described in Step 2-1: Install MDT
Enabling Configuration Manager console integration by running the Configure ConfigMgr Integration wizard as described in Step 2-2: Enable Configuration Manager Console Integration
Step 2-1: Install MDT
To install MDT, complete the following steps:
In Windows Explorer, go to E:\Source$\MDT_2013.
Double-click MicrosoftDeploymentToolkit2013_x64.msi (for 64-bit operating systems) or MicrosoftDeploymentToolkit2013_x86.msi (for 32-bit operating systems), and then select Install.
The Microsoft Deployment Toolkit 2013 Setup Wizard starts.
Complete the Microsoft Deployment Toolkit 2013 Setup Wizard using the information in Table 17. Accept the default values unless otherwise specified.
Table 17. Information for Completing the Microsoft Deployment Toolkit 2013 Setup Wizard
On this wizard page Do this Welcome to the Microsoft Deployment Toolkit 2013 Setup Wizard Select Next. End-User License Agreement Select I accept the terms in the License Agreement, and then select Next. Custom Setup Select Next. Ready to install Microsoft Deployment Toolkit 2013 Select Install. Installing Microsoft Deployment Toolkit 2013 The progress for installing MDT is displayed. Completed the Microsoft Deployment Toolkit 2013 Setup Wizard Select Finish. The Microsoft Deployment Toolkit 2013 Setup Wizard finishes, and MDT is installed on WDG-MDT-01.
Step 2-2: Enable Configuration Manager Console Integration
Before you can use the Configuration Manager integration features of MDT, run the Configure ConfigMgr Integration wizard. This wizard copies the appropriate integration files to the folder in which Configuration Manager is installed. The wizard also adds Windows Management Instrumentation (WMI) classes for the new MDT custom actions. The classes are added by compiling a new Managed Object Format (.mof) file that contains the new class definitions.
To enable Configuration Manager console integration
Note
Ensure that the Configuration Manager console is closed while performing these steps.
Select Start, and then point to All Programs. Point to Microsoft Deployment Toolkit, and then select Configure ConfigMgr Integration.
The Configure ConfigMgr Integration Wizard starts.
Complete the Configure ConfigMgr Integration Wizard using the information in Table 18. Accept the default values unless otherwise specified.
Table 18. Information for Completing the Configure ConfigMgr Integration Wizard
On this wizard page Do this Options 1. Verify that the Install the MDT console extensions for ConfigMgr 2012 check box is selected.
2. Verify that the Add the MDT task sequence actions to a ConfigMgr server check box is selected.
3. In Site server name, verify that the value is WDG-MDT-01.mdt2013.corp.woodgrovebank.com.
4. In Site code, verify that the value is NYC.
5. Select Next.Confirmation Select Finish. The Configure ConfigMgr Integration Wizard finishes, and MDT is integrated with Configuration Manager.
Step 3: Create and Configure a Task Sequence to Create a Reference Computer
When you have prepared the MDT environment, create the reference computer. The reference computer is the template for deploying new images to the target computers. Configure this computer (WDG-REF-01) exactly as you will configure the target computers. You will then capture an image of the reference computer and deploy the image to the target computers.
Create the reference computer, WDG-REF-01, by:
Creating an MDT task sequence to deploy Windows 8.1 to the reference computer as described in Step 3-1: Create an MDT Task Sequence for Deploying the Reference Computer
Selecting the distribution points for the new packages and images that the Create MDT Task Sequence Wizard creates as described in Step 3-2: Select the Distribution Points for the New Packages and Images
Adding the necessary device drivers to a new drive package and to the appropriate boot images as described in Step 3-3: Add the Necessary Device Drivers
Enable monitoring of the MDT deployment process as described in Step 3-4: Enable MDT Deployment Process Monitoring
Configuring the MDT configuration files for the reference computer—specifically, the CustomSettings.ini file—as described in Step 3-5: Customize the MDT Configuration Files for the Reference Computer
Updating the Configuration Manager distribution points for the Custom Settings Files package as described in Step 3-6: Update the Distribution Points for the Custom Settings Files Package
Customizing the task sequence for the reference computer as described in Step 3-7: Customize the Task Sequence for the Reference Computer
Step 3-1: Create an MDT Task Sequence for Deploying the Reference Computer
Use the Create MDT Task Sequence Wizard in the Configuration Manager console to create task sequences in Configuration Manager that are integrated with MDT. MDT includes the Standard Client Task Sequence template, which you can use to deploy the reference computer.
The Create MDT Task Sequence Wizard substitutes the packages and images selected for the placeholders in the task sequence templates. After completing the wizard, the new task sequence references the appropriate packages and images.
Note
Always use the Create MDT Task Sequence Wizard to create task sequences based on the MDT task sequence templates. Although you can manually import the task sequence templates, Microsoft does not recommend this process.
To create a task sequence for deploying the reference computer
Select Start, point to All Programs, and then point to Microsoft System Center 2012. Point to Configuration Manager, and then select Configuration Manager Console.
In the Configuration Manager console, in the navigation pane, select Software Library.
In the Software Library workspace, go to Overview/Operating Systems/Task Sequences.
On the Ribbon, on the Home tab, in the Task Sequences group, select Create MDT Task Sequence.
The Create MDT Task Sequence Wizard starts.
Complete the Create MDT Task Sequence Wizard using the information in Table 19. Accept the default values unless otherwise specified.
Table 19. Information for Completing the Create MDT Task Sequence Wizard
On this wizard page Do this Choose Template Select Client Task Sequence, and then select Next. Choose Template: General 1. In Task sequence name, type Windows 8.1 Reference Deployment.
2. In Task sequence comments, type Task sequence for deploying Windows 8.1 to the reference computer (WDG-REF-01), and then select Next.Choose Template: Details 1. Select Join a workgroup.
2. In Workgroup, type WORKGROUP.
3. In User name, type Woodgrove Bank Employee.
4. In Organization name, type Woodgrove Bank.
5. In Product key, type product_key (where product_key is the product key for Windows 8.1).
6. Select Next.Choose Template: Capture Settings - Select This task sequence may be used to capture and image.
- In Capture destination, type \\WDG-MDT-01\Capture$\WDG-REF-01.wim.
- In Capture account, select Set.
- Complete the Windows User Account dialog box by performing the following steps:
- In User name, type MDT2013\Administrator.
- In Password and Confirm password, type P@ssw0rd.
- Select OK.
- Select Next.
Boot Image 1. Select Create a new boot image package.
2. In Package source folder to be created, type \\WDG-MDT-01\Packages$\WINPE_Custom, and then select Next.Boot Image: General Settings 1. In Name, type Windows PE Custom.
2. In Version, type 1.00.
3. In Comments, type Customized version of Windows PE to be used in deployment of reference and target computers, and then select Next.Boot Image: Options Under Platform, select x64, and then select Next. Boot Image: Components Select Next. Boot Image: Customization Select Next. MDT Package 1. Select Create a new Microsoft Deployment Toolkit Files package.
2. In Package source folder to be created, type \\WDG-MDT-01\Packages$\MDT_Files, and then select Next.MDT Package: MDT Details 1. In Name, type MDT Files.
2. In Version, type 1.00.
3. In Comments, type Provides access to MDT files during Configuration Manager deployment process, and then select Next.OS Image 1. Select Create a new OS install package.
2. In OS installation folder location, type \\WDG-MDT-01\Source$\Windows_8-1.
3. In Package source folder to be created, type \\WDG-MDT-01\Packages$\Windows_8-1, and then select Next.OS Image: Image Details 1. In Name, type Windows 8.1.
2. In Version, type 1.00.
3. In Comments, type Windows 8.1 package used to deploy to reference computers, and then select Next.Deployment Method Select Next. Client Package Select Create a new ConfigMgr client package, and then select Next. USMT Package 1. Select Create a new USMT package.
2. In Package source folder to be created, type \\WDG-MDT-01\Packages$\USMT, and then select Next.USMT Package: USMT Details 1. In Name, type USMT.
2. In Version, type 1.00.
3. In Comments, type USMT files used to capture and restore user state migration information, and then select Next.Settings Package 1. Select Create a new settings package.
2. In Package source folder to be created, type \\WDG-MDT-01\Packages$\CustomSettings_Reference, and then select Next.Settings Package: Settings Details 1. In Name, type MDT Reference Computer Custom Settings.
2. In Version, type 1.00.
3. In Comments, type Configuration settings for MDT deployment process (such as CustomSettings.ini) for the reference computer, and then select Next.Sysprep Package Select Next. Summary Review the information in the Details box that you provided while completing the previous wizard pages, and then select Next. Progress The progress for creating the task sequence is displayed. Confirmation Select Finish. The new task sequence appears in the preview pane.
Step 3-2: Select the Distribution Points for the New Packages and Images
The Create MDT Task Sequence Wizard creates a number of packages and images. After these packages and images are created, select the distribution points from which the packages and images will be copied and available to target computers.
Note
In this sample, there is only one distribution point (WDG-MDT-01). However, most production networks have multiple distribution points. When performing this step in a production environment, select the appropriate distribution points for the network.
To select the distribution points for software distribution packages
Select Start, point to All Programs, and then point to Microsoft System Center 2012. Point to Configuration Manager, and then select Configuration Manager Console.
In the Configuration Manager console, in the navigation pane, select Software Library.
In the Software Library workspace, go to Overview/Operating Systems/Task Sequences.
In the preview pane, select Windows 8.1 Reference Deployment.
On the Ribbon, on the Home tab, in the Deployment group, select Distribute Content.
The Distribute Content Wizard starts.
Complete the Distribute Content Wizard using the information in 20. Accept default values unless otherwise specified.
Table 20. Information for Completing the Distribute Content Wizard
On this wizard page Do this General Select Next. General: Content Select Next. General: Content Destination 1. Select Add, and then select Distribution Point.
The Add Distribution Points dialog box appears.
2. In the Add Distribution Points dialog box, select \\WDGMDT01.mdt2013.corp.woodgrovebank.com, and then select OK.
\\WDGMDT01.mdt2013.corp.woodgrovebank.com appears in the Content destination list.
3. Select Next.Summary Review the information in the Details box that you provided while completing the previous wizard pages, and then select Next. Progress The progress for distributing the software is displayed. Completion Select Close. Close all open windows and dialog boxes.
Step 3-3: Add the Necessary Device Drivers
When the MDT task sequence has been created, add any device drivers required for the reference computer (WDG-REF-01) to the Windows PE boot image and to the Windows 8.1 image. Add the device drivers in the Drivers node in the Configuration Manager console. Create a package that contains the device drivers, and inject the drivers into the custom Windows PE image created earlier in the process.
After creating the package that contains the device drivers, select the distribution point to which the package will be deployed.
To add the necessary device drivers
Select Start, point to All Programs, and then point to Microsoft System Center 2012. Point to Configuration Manager, and then select Configuration Manager Console.
In the Configuration Manager console, in the navigation pane, select Software Library.
In the Software Library workspace, go to Overview/Operating Systems/Drivers.
On the Ribbon, on the Home tab, in the Create group, select Import Driver.
The Import New Driver Wizard starts.
Complete the Import New Driver Wizard using the information in Table 21. Accept the default values unless otherwise specified.
Table 21. Information for Completing the Import New Driver Wizard
On this wizard page Do this Locate Driver In Source folder, type \\WDG-MDT-01\Source$\Drivers, and then select Next. Locate Driver: Driver Details Select Next. Locate Driver: Add Driver to Package - Select New Package.
- Complete the New Driver Package dialog box by performing the following steps:
- In Name, type device_driver_name Package (where device_driver_name is a descriptive name for the device drivers).
- In Comment, type Device drivers that are necessary for the reference and target computers.
- In Driver package source, type \\WDG-MDT-01\Packages$\Drivers, and then select OK.
- Select Next.
Locate Driver: Add Driver to Boot Images 1. In the list of images, select the Windows PE Custom check box.
2. Select the Update distribution points when finished check box, and then select Next.Summary Review the information in the Details box that you provided while completing the previous wizard pages, and then select Next. Progress The progress for importing the device drivers is displayed. Confirmation Select Close. To select the distribution points for the driver package
Select Start, point to All Programs, and then point to Microsoft System Center 2012. Point to Configuration Manager, and then select Configuration Manager Console.
In the Configuration Manager console, in the navigation pane, select Software Library.
In the Software Library workspace, go to Overview/Operating Systems/Driver Packages.
In the preview pane, select device_driver_name Package (where device_driver_name is a descriptive name for the device drivers).
On the Ribbon, on the Home tab, in the Deployment group, select Distribute Content.
The Distribute Content Wizard starts.
Complete the Distribute Content Wizard using the information in Table 22. Accept the default values unless otherwise specified.
Table 22. Information for Completing the Distribute Content Wizard
On this wizard page Do this General Select Next. General: Content Select Next. General: Content Destination 1. Select Add, and then select Distribution Point.
The Add Distribution Points dialog box appears.
2. In the Add Distribution Points dialog box, select \\WDG-MDT-01.mdt2013.corp.woodgrovebank.com, and then select OK.
\\WDGMDT01.mdt2013.corp.woodgrovebank.com appears in the Content destination list.
3. Select Next.Summary Review the information in the Details box that you provided while completing the previous wizard pages, and then select Next. Progress The progress for distributing the software is displayed. Completion Select Close. Close all open windows and dialog boxes.
Step 3-4: Enable MDT Deployment Process Monitoring
Prior to deploying the reference computer (WDG-REF-01) with the task sequence bootable media, enable MDT monitoring of the ZTI deployment process. You enable monitoring on the Monitoring tab on the deployment share Properties dialog box. Later in the process, you will monitor the ZTI deployment process using the Deployment Workbench or the Get-MDTMonitorData cmdlet.
To enable MDT monitoring of the ZTI deployment process
Select Start, and then point to All Programs. Point to Microsoft Deployment Toolkit, and then select Deployment Workbench.
In the Deployment Workbench console tree, go to Deployment Workbench/Deployment Shares.
In the Actions pane, select New Deployment Shares.
The New Deployment Share Wizard starts.
Complete the New Deployment Share Wizard using the information in Table 23.
Table 23. Information for Completing the New Deployment Share Wizard
On this wizard page Do this Path In Deployment share path, type C:\DeploymentShare$, and then select Next. Share Select Next. Descriptive Name Select Next. Options Select Next. Summary Select Next. Progress The progress for creating the deployment share is displayed. Confirmation Select Finish. The New Deployment Share Wizard finishes, and the new deployment share—MDT Deployment Share (C:\DeploymentShare$)—appears in the details pane.
In the details pane, select MDT Deployment Share (C:\DeploymentShare$).
In the Actions pane, select Properties.
The MDT Deployment Share (C:\DeploymentShare$) Properties dialog box opens.
In the MDT Deployment Share (C:\DeploymentShare$) Properties dialog box, on the Monitoring tab, select the Enable monitoring for this deployment share check box, and then select Apply.
In the MDT Deployment Share (C:\DeploymentShare$) Properties dialog box, on the Rules tab, notice that the EventService property has been added to the CustomSettings.ini file, and then select OK.
The EventService property is as follows:
EventService=http://WDG-MDT-01:9800Close all open windows and dialog boxes.
Step 3-5: Customize the MDT Configuration Files for the Reference Computer
When the MDT task sequence has been created, customize the MDT configuration files that provide the configuration settings for deploying Windows 8.1 to the target computer. Specifically, customize the CustomSettings.ini file.
When the CustomSettings.ini file customization is finished, save the updated files to the source folder for the MDT Reference Computer Custom Settings package created earlier in the process (E:\Packages$\CustomSettings_Reference). Then, add the DoCapture and EventService properties and corresponding values to the CustomSettings.ini file so that the MDT deployment process captures an image of the reference computer (WDG-REF-01) after deploying Windows 8.1.
To customize the MDT configuration files for the reference computer
In Windows Explorer, go to E:\Packages$\CustomSettings_Reference, and then double-click CustomSettings.ini.
Open Microsoft Notepad, and then add the following lines to the end of the CustomSettings.ini file, as shown in Listing 1:
DoCapture=YES
EventService=http://WDG-MDT-01:9800
Note
Ensure that you remove any additional settings other than those shown in Listing 1.
Listing 1. CustomSettings.ini File After Adding the DoCapture Property
[Settings]
Priority=Default
Properties=MyCustomProperty

[Default]
OSInstall=Y
SkipCapture=YES
SkipAdminPassword=NO
SkipProductKey=YES
DoCapture=YES
EventService=http://WDG-MDT-01:9800
Save the file, and then exit Notepad.
Step 3-6: Update the Distribution Points for the Custom Settings Files Package
When the source folder has been updated for the MDT Reference Computer Custom Settings package in Configuration Manager, update the distribution points for the MDT Reference Computer Custom Settings Files package. Updating the distribution points copies the updated version of the CustomSettings.ini file to the deployment shares specified in the package.
To update the distribution points for the Custom Settings package
Select Start, point to All Programs, and then point to Microsoft System Center 2012. Point to Configuration Manager, and then select Configuration Manager Console.
In the Configuration Manager console, in the navigation pane, select Software Library.
In the Software Library workspace, go to Overview/Application Management/Packages.
In the preview pane, select MDT Reference Computer Custom Settings.
On the Ribbon, on the Home tab, in the Deployment group, select Update Distribution Points.
The Configuration Manager dialog box opens, notifying you that you are going to update the package on all distribution points.
In the Configuration Manager dialog box, select OK.
Close all open windows and dialog boxes.
Configuration Manager starts updating the distribution points with the latest versions of the CustomSettings.ini file. This process could take several minutes. Check the status of the package until the Last Update value of the package status has been updated to a recent date and time.
Step 3-7: Customize the Task Sequence for the Reference Computer
For most deployments, the Windows 8.1 Reference Deployment task sequence created earlier in the process performs all the necessary steps without modification. In this sample, modify the task sequence to set the password for the local Administrator account to a known value. By default, the task sequence sets the password for the local Administrator account to a random value. Further customization of the task sequence may be required depending on the environment.
To customize the Windows 8.1 Reference Deployment task sequence
Select Start, point to All Programs, and then point to Microsoft System Center 2012. Point to Configuration Manager, and then select Configuration Manager Console.
In the Configuration Manager console, in the navigation pane, select Software Library.
In the Software Library workspace, go to Overview/Operating Systems/Task Sequences.
In the preview pane, select Windows 8.1 Reference Deployment.
On the Ribbon, on the Home tab, in the Task Sequence group, select Edit.
The Windows 8.1 Reference Deployment Task Sequence Editor dialog box opens.
In the Windows 8.1 Reference Deployment Task Sequence Editor dialog box, go to PostInstall/Apply Windows Settings.
On the Properties tab, select Enable the account and specify the local administrator password.
On the Properties tab, in Password and Confirm Password, type P@ssw0rd, and then select Apply.
Make any additional modifications to the task sequence that the environment requires, and then select OK.
Close all open windows and dialog boxes.
Step 4: Deploy Windows 8.1 and Capture an Image of the Reference Computer
When you have created the task sequence to deploy Windows 8.1 to the reference computer and captured an image of the reference computer, start the task sequence. Create the operating system capture by using the Task Sequence Media Wizard in the Configuration Manager console.
Deploy Windows 8.1 and capture an image of the reference computer by:
Adding the reference computer to the Configuration Manager site database as described in Step 4-1: Add the Reference Computer to the Configuration Manager Site Database
Creating a collection that contains the reference computer you just added as described in Step 4-2: Create a Collection That Contains the Reference Computer
Deploy the reference computer task sequence as described in Step 4-3: Deploy the Reference Computer Task Sequence
Using the Task Sequence Media Wizard to create a task sequence bootable media disk as described in Step 4-4: Create the Task Sequence Bootable Media
Starting the reference computer with the task sequence bootable media disk as described in Step 4-5: Start the Reference Computer with the Task Sequence Bootable Media
Step 4-1: Add the Reference Computer to the Configuration Manager Site Database
To deploy an operating system without stand-alone media to a new computer that Configuration Manager does not currently manage, add the new computer to the Configuration Manager site database prior to initiating the operating system deployment process. Configuration Manager can automatically discover computers on the network that have a Windows operating system installed; however, if the computer has no operating system installed, use the Import Computer Information Wizard to import the new computer information.
To add the reference computer to the Configuration Manager site database
Select Start, point to All Programs, and then point to Microsoft System Center 2012. Point to Configuration Manager, and then select Configuration Manager Console.
In the Configuration Manager console, in the navigation pane, select Assets and Compliance.
In the Assets and Compliance workspace, go to Overview/Devices.
On the Ribbon, on the Home tab, in the Create group, select Import Computer Information.
The Import Computer Information Wizard starts.
Complete the Import Computer Information Wizard using the information in 24. Accept the default values unless otherwise specified.
Table 24. Information for Completing Import Computer Information Wizard
On this wizard page Do this Select Source Select Import single computer, and then select Next. Select Source: Single Computer 1. In Computer Name, type WDG-REF-01.
2. In MAC address, type mac_address (where mac_address is the media access control [MAC] address of the primary network adapter for the reference computer, WDG-REF-01).
3. Select Next.Select Source: Data Preview Select Next. Select Source: Choose Target Collection Select Next. Summary Review the information in the Details box that you provided while completing the previous wizard pages, and then select Next. Progress The progress for importing the computer is displayed. Confirmation Select Close. For more information on adding a new computer to the Configuration Manager site database, see the section, "To import computer information for a single computer," in the section, "How to Deploy Operating Systems in Configuration Manager," in the Configuration Manager Documentation Library, which is installed with Configuration Manager.
Step 4-2: Create a Collection That Contains the Reference Computer
In the Configuration Manager console, create a collection that includes the reference computer (WDG-REF-01). This computer collection is used later when advertising the task sequence created earlier in the process.
To create a collection that includes the reference computer
Select Start, point to All Programs, and then point to Microsoft System Center 2012. Point to Configuration Manager, and then select Configuration Manager Console.
In the Configuration Manager console, in the navigation pane, select Assets and Compliance.
In the Assets and Compliance workspace, go to Overview/Device Collections.
On the Ribbon, on the Home tab, in the Create group, select Create, and then select Create Device Collection.
The Create Device Collection Wizard starts.
Complete the Create Device Collection Wizard using the information in Table 25. Accept the default values unless otherwise specified.
Table 25. Information for Completing the Create Device Collection Wizard
On this wizard page Do this General - In Name, type Microsoft Deployment - Reference Computer.
- In Comment, type Computer that is to be the reference computer for the target computers to be deployed.
- In Limited Collection, select Browse.
The Select Collection dialog box appears. Complete the dialog box by performing the following steps:
- In Name, select All Systems.
- Select OK.
- Select Next.
Membership Rules - Select Add Rule, and then select Direct Rule.
The Create Direct Membership Rule Wizard starts. - Complete the Create Direct Membership Rule Wizard by performing the following steps:
- On the Welcome page, select Next.
- On the Search for Resources page, in Resource class, select System Resource; in Attribute name, select Name; in Value, type WDG-REF-01; and then select Next.
- On the Select Resources page, select WDG-REF-01, and then select Next.
- On the Summary page, select Next.
- On the Progress page, view the progress for creating the new membership rule.
- On the Completion page, select Close.
- Select Next.
Summary Review the information in the Details box that you provided while completing the previous wizard pages, and then select Next. Progress The progress for creating the device collection is displayed. Completion Select Close. For more information, see the section, "How to Create Collections in Configuration Manager," in the Configuration Manager Documentation Library, which is installed with Configuration Manager.
Step 4-3: Deploy the Reference Computer Task Sequence
In the Configuration Manager console, deploy the task sequence created earlier in the process to the device collection that includes the reference computer created earlier in the process.
To deploy the task sequence
Select Start, point to All Programs, and then point to Microsoft System Center 2012. Point to Configuration Manager, and then select Configuration Manager Console.
In the Configuration Manager console, in the navigation pane, select Software Library.
In the Software Library workspace, go to Overview/Operating Systems/Task Sequences.
In the preview pane, select Windows 8.1 Reference Deployment.
On the Ribbon, on the Home tab, in the Deployment group, select Deploy.
The Deploy Software Wizard starts.
Complete the Deploy Software Wizard using the information in Table 26. Accept the default values unless otherwise specified.
Table ARABIC 26. Information for Completing the Deploy Software Wizard
On this wizard page Do this General 1. In Collection, select Browse.
2. In the Browse Collection dialog box, select Microsoft Deployment - Reference Computer, and then select OK.
3. In Comment, type Deploy Windows 8.1 to the reference computer and then capture an image of the reference computer.
4. Select Next.Deployment Settings 1. In Purpose, select Available.
2. Select the Make available to boot media and PXE check box.
3. Select Next.Deployment Settings: Schedule Select Next. Deployment Settings: User Experience Select Next. Deployment Settings: Alerts Select Next. Deployment Settings: Distribution Points Select Next. Summary Review the information in the Details box that you provided while completing the previous wizard pages, and then select Next. Progress The progress for deploying the task sequence is displayed. Completion Select Close. For more information, see the section, "How to Deploy a Task Sequence," in the Configuration Manager Documentation Library, which is installed with Configuration Manager.
Step 4-4: Create the Task Sequence Bootable Media
To initiate the MDT process, provide a method for starting the computer with Windows PE and the necessary software by creating the task sequence bootable media disk. Use the Task Sequence Media Wizard in the Configuration Manager console to create bootable media for storage on a USB flash drive, CD, or DVD.
To create a task sequence bootable media disk
Select Start, point to All Programs, and then point to Microsoft System Center 2012. Point to Configuration Manager, and then select Configuration Manager Console.
In the Configuration Manager console, in the navigation pane, select Software Library.
In the Software Library workspace, go to Overview/Operating Systems/Task Sequences.
On the Ribbon, on the Home tab, in the Create group, select Create Task Sequence Media.
The Create Task Sequence Media Wizard starts.
Complete the Create Task Sequence Media Wizard using the information in Table 27. Accept the default values unless otherwise specified.
Table 27. Information for Completing the Create Task Sequence Media Wizard
On this wizard page Do this Select Media Type 1. Select Bootable media.
2. Clear the Allow unattended operating system deployment check box.
3. Select Next.Select Media Type: Media Management Select Site-based media, and then select Next. Select Media Type: Media Type In Media file, type \\WDG-MDT-01\Capture$\CM2012_TS_Boot_Media.iso, and then select Next. Select Media Type: Security In Password and Confirm password, type P@ssw0rd, and then select Next. Select Media Type: Boot Image 1. In Boot image, select Browse.
2. In the Select a Boot Image dialog box, select Windows PE Custom, and then select OK.
3. In Distribution point, select \\WDG-MDT-01.mdt2013.corp.woodgrovebank.com, and then select OK.
4. In Management point, select \\WDG-MDT-01.mdt2013.corp.woodgrovebank.com, and then select OK.
5. Select Next.Select Media Type: Customization Select Next. Summary Review the information in the Details box that you provided while completing the previous wizard pages, and then select Next. Progress The progress for creating the task sequence media is displayed. Completion Select Close. The wizard creates the CM2012_TS_Boot_Media.iso file in the WDG-MDT-01Capture$ shared folder.
If WDG-REF-01 is a physical computer, create a CD or DVD of the International Organization for Standardization (ISO) file. If WDG-REF-01 is a VM, start the VM directly from the ISO file.
For more information on creating the task sequence bootable media disk, see the section, "How to Create Bootable Media," in the Configuration Manager Documentation Library, which is installed with Configuration Manager.
Step 4-5: Start the Reference Computer with the Task Sequence Bootable Media
Start the reference computer (WDG-REF-01) with the task sequence bootable media disk created earlier in the process. This medium starts Windows PE on the reference computer and initiates the MDT process. At the end of the MDT process, Windows 8.1 is deployed on the reference computer and an image of the reference computer is saved to \WDG-MDT-01\Capture$\WDG-REF-01.wim.
Note
You can also initiate the MDT process by starting the target computer from Windows Deployment Services.
To start the reference computer with the task sequence bootable media
Start WDG-REF-01 with the task sequence bootable media created earlier in the process.
Windows PE starts, and then the Task Sequence Wizard starts.
Complete the Task Sequence Wizard using the information in Table 28. Accept the default values unless otherwise specified.
Table 28. Information for Completing the Task Sequence Wizard
On this wizard page Do this Welcome to the Task Sequence Wizard In Password, type P@ssw0rd, and then select Next. Select a Task Sequence In the list box, select Windows 8.1 Reference Deployment, and then select Next. To monitor the reference computer deployment process using the Deployment Workbench
On WDG-MDT-01, select Start, and then point to All Programs. Point to Microsoft Deployment Toolkit, and then select Deployment Workbench.
In the Deployment Workbench console tree, go to Deployment Workbench/Deployment Shares/MDT Deployment Share (C:\DeploymentShare$)/Monitoring.
In the details pane, view the deployment process for WDG-REF-01.
In the Actions pane, periodically select Refresh.
The status of the deployment process is updated in the details pane. Continue to monitor the deployment process until the process is complete.
In the details pane, select WDG-REF-01.
In the Actions pane, select Properties.
The WDG-REF-01 Properties dialog box is displayed.
In the WDG-REF-01 Properties dialog box, on the Identity tab, view the monitoring information provided about the deployment process as described in Table 29.
Table 29. Monitoring Information About the Deployment Process
Information Description ID Unique identifier for the computer being deployed. Computer Name The name of the computer being deployed. Deployment status The current status of the computer being deployed; the status can be one of the following:
- Running. The task sequence is healthy and running.
- Failed. The task sequence failed, and the deployment process was unsuccessful.
- Completed. The task sequence has finished.
- Unresponsive. The task sequence has not updated its status in the past four hours and is assumed to be nonresponsive.Step The current task sequence step being run. Progress The overall progress of the task sequence. The progress bar indicates how many task sequence steps have been run out of the total number of task sequence steps. Start The time the deployment process started. End The time the deployment process ended. Elapsed The length of time the deployment process has been running or took to run if the deployment process has finished. Errors The number of errors encountered during the deployment process. Warnings The number of warnings encountered during the deployment process. Remote Desktop This button allows you to establish a remote desktop connection with the computer being deployed using the Windows Remote Desktop feature. This method assumes that:
- The target operating system is running and has remote desktop support enabled
- mstsc.exe is in the path Note: This button is always visible but may not be able to establish a remote desktop session if the monitored computer is running Windows PE, has not completed installation of the target operating system, or does not have the Remote Desktop feature enabled.VM Connection This button allows you to establish a remote desktop connection to a VM running in HyperV®. This method assumes that:
- The deployment is being performed to a VM running on Hyper-V
- vmconnect.exe is located in the %ProgramFiles%\Hyper-V folder Note: This button appears when ZTIGather.wsf detects that Hyper-V integration components are running on the monitored computer. Otherwise, this button will not be visible.DaRT Remote Control This button allows you to establish a remote control session using the remote viewer feature in the Diagnostics and Recovery Toolkit (DaRT).
This method assumes that:
- DaRT has been deployed to the target computer and is currently running
- DartRemoteViewer.exe is located in the %ProgramFiles%\Microsoft DaRT 7\v7 folder Note: This button appears when ZTIGather.wsf detects that DaRT is running on the monitored computer. Otherwise, this button will not be visible.Automatically refresh this information every 10 seconds Check box that controls whether the information in the dialog box is automatically refreshed. If the check box is:
- Selected, the information is refreshed every 10 seconds
- Cleared, the information is not automatically refreshed and must be manually refreshed using the Refresh Now buttonRefresh Now This button immediately refreshes the information displayed in the dialog box. In the WDG-REF-01 Properties dialog box, select OK.
Close the Deployment Workbench.
To monitor the reference computer deployment process using the Get-MDTMonitorData cmdlet
On WDG-MDT-01, select Start, point to Administrative Tools, and then select Windows PowerShell Modules.
The Windows PowerShell Modules command prompt opens.
Create a Windows PowerShell drive that uses the MDT PowerShell provider by running the New-PSDrive cmdlet, as shown in the following example:
New-PSDrive -Name DS001 -PSProvider mdtprovider -Root d:\DeploymentShare$View the MDT monitoring process by running the Get-MDTMonitorData cmdlet, as shown in the following example:
Get-MDTMonitorData -Path DS001:This command returns the monitoring data collected by the MDT monitoring service running on the same computer that hosts the deployment share, as shown in the following example output:
Name               : WDG-REF-01
PercentComplete    : 96
Settings           :
Warnings           : 0
Errors             : 0
DeploymentStatus   : 1
StartTime          : 6/7/2012 6:45:39 PM
EndTime            :
ID                 : 1
UniqueID           : 94a0830e-f2bb-421c-b1e0-6f86f9eb9fa1
CurrentStep        : 130
TotalSteps         : 134
StepName           : Gather
LastTime           : 6/7/2012 8:46:32 PM
DartIP             :
DartPort           :
DartTicket         :
VMHost             : XYL-DC-02
VMName             : WDG-REF-01
ComputerIdentities : {}
Close the Windows PowerShell console.
If any problems occur during the deployment, consult the MDT document Troubleshooting Reference. When completed, a captured image of the reference computer should exist in \\WDG-MDT-01\Capture$\WDG-REF-01.wim.
Step 5: Create and Configure a Task Sequence to Deploy the Target Computer
After the task sequence to deploy the reference computer (WDG-REF-01) finishes, a captured image of the reference computer is stored in \\WDG-MDT-01\Capture$\WDG-REF-01.wim. Now, create a task sequence that will deploy the captured image of the reference computer to the target computer (WDG-CLI-01). When this step is complete, you can deploy the captured image of the reference computer to the target computer.
Create and configure a task sequence to deploy the target computer by:
Importing the .wim file captured in the previous step into Configuration Manager using the Add Operating System Image Wizard as described in Step 5-1: Import the Captured .wim File into Configuration Manager
Using the Create MDT Task Sequence Wizard to create an MDT task sequence template to deploy the captured image of the reference computer to the target computer as described in Step 5-2: Create an MDT Task Sequence to Deploy the Captured Image
Selecting the distribution points for the new packages and images that the Create MDT Task Sequence Wizard creates as described in Step 5-3: Select the Distribution Points for the New Packages and Images
Customizing the MDT configuration files for the target computer—specifically, the CustomSettings.ini file—as described in Step 5-4: Customize the MDT Configuration Files
Updating the Configuration Manager distribution points for the Custom Settings package as described in Step 5-5: Update the Distribution Points for the Custom Settings Package
Customizing the task sequence for the target computer as described in Step 5-6: Customize the Task Sequence for the Target Computer
Configuring unattended installation of Office Professional Plus 2010 as described in Step 5-7: Configure an Unattended Installation of Office Professional Plus 2010
Creating a Configuration Manager application to deploy Office Professional Plus 2010 as described in Step 5-8: Create an Office Professional Plus 2010 Application
Distributing the Office Professional Plus 2010 application to the distributions points as described in Step 5-9: Distribute the Office Professional Plus 2010 Application
Making the Office Professional Plus 2010 application available to all users as described in Step 5-10: Make the Office Professional Plus 2010 Application Available to All Users
Customizing the UDI Wizard configuration file as described in Step 5-11: Customize the UDI Wizard Configuration File for the Target Computer
Creating a new custom wizard page to collect additional deployment information as described in Step 5-13: Create a New Custom Wizard Page
Adding controls to the new custom wizard page as described in Step 5-14: Add Controls to New Custom Wizard Page
Updating the MDT files package that contains the updated UDI Wizard configuration file as described in Step 5-15: Update the Distribution Points for the MDT Files Package
Step 5-1: Import the Captured .wim File into Configuration Manager
After the image of the reference computer (WDG-REF-01) is captured in to the .wim file, import the captured .wim file into Configuration Manager. Import the captured .wim file into the Operating System Images node using the Add Operating System Image Wizard.
The captured WIM file contains two images, one for each partition on the reference computer. Identify which of the images has the captured Windows 8.1 operating system using the image description containing Windows 8.1. You use the image index when you create the task sequence for deploying the captured image to the target computer.
To import the captured .wim file into Configuration Manager
Select Start, point to All Programs, and then point to Microsoft System Center 2012. Point to Configuration Manager, and then select Configuration Manager Console.
In the Configuration Manager console, in the navigation pane, select Software Library.
In the Software Library workspace, go to Overview/Operating Systems/Operating System Images.
On the Ribbon, in the Create group, select Add Operating System Image.
The Add Operating System Image Wizard starts.
Complete the Add Operating System Image Wizard using the information in Table 30. Accept the default values unless otherwise specified.
Table 30. Information for Completing the Add Operating System Image Wizard
On this wizard page Do this Data Source In Path, type \\WDG-MDT-01\Capture$\WDG-REF-01.wim, and then select Next. General 1. In Name, type Windows 8.1 Reference Image.
2. In Version, type 1.00.
3. In Comments, type Windows 8.1 captured image of reference computer (WDG-REF-01) used to deploy to target computers, and then select Next.Summary Review the information in the Details box that you provided while completing the previous wizard pages, and then select Next. Progress The progress for importing the operating system image is displayed. Completion Select Close. In the preview pane, select Windows 8.1 Reference Image.
In the preview pane, select the Details tab.
The list of operating system partitions captured in the .wim file is displayed. The image index that contains Windows 8.1 is the image index you will specify later during the Create MDT Task Sequence Wizard.
Record the image index that contains Windows 8.1.
Tip
For the purposes of this example, image index 2 should have the Windows 8.1 operating system.
Step 5-2: Create an MDT Task Sequence to Deploy the Captured Image
After the image is captured, create a task sequence to deploy the captured image of the reference computer (WDG-REF-01) to the target computer (WDG-CLI-01). Most of the packages needed for this task sequence were created earlier in the process. However, you must create a new MDT Custom Settings package that has the proper configuration settings for the target computer and creates an operating system image of the captured image of the reference computer.
To create a task sequence template to deploy the captured image to the target computer
Select Start, point to All Programs, and then point to Microsoft System Center 2012. Point to Configuration Manager, and then select Configuration Manager Console.
In the Configuration Manager console, in the navigation pane, select Software Library.
In the Software Library workspace, go to Overview/Operating Systems/Task Sequences.
On the Ribbon, on the Home tab, in the Task Sequences group, select Create MDT Task Sequence.
The Create MDT Task Sequence Wizard starts.
Complete the Create MDT Task Sequence Wizard using the information in Table 31. Accept the default values unless otherwise specified.
Table 31. Information for Completing the Create MDT Task Sequence Wizard
On this wizard page Do this Choose Template Select Client Task Sequence, and then select Next. Choose Template: General 1. In Task sequence name, type UDI - Windows 8.1 Target Deployment.
2. In Task sequence comments, type Task sequence for deploying captured reference computer image to the target computer (WDG-CLI-01) using UDI, and then select Next.Choose Template: Details 1. In Use name, type Woodgrove Bank Employee.
2. In Organization name, type Woodgrove Bank.
3. Select Next.Choose Template: Capture Settings Select Next. Boot Image 1. In Specify an existing boot image package, select Browse.
2. In Select a Package dialog box, select Windows PE Custom, and then select OK.
3. Select Next.MDT Package 1. In Specify an existing Microsoft Deployment Toolkit Files package, select Browse.
2. In the Select a Package dialog box, select MDT Files, and then select OK.
3. Select Next.OS Image 1. Select Specify an existing OS image.
2. In Specify an existing OS image, select Browse.
3. In the Select a Package dialog box, select Windows 8.1 Reference Image, and then select OK.
4. Select Next.OS Image: OS Image Index 1. In The selected operating system image (WIM) file contains multiple images. Specify which image you would like to deploy, select image_index (where image_index is the image index of the image that contains Windows 8.1, which was identified in the Step 5-1: Import the Captured .wim File into Configuration Manager; for the purposes of this guide, select 2).
2. Select Next.Deployment Method Select Perform a "User-Driven Installation", and then select Next. Client Package 1. In Specify an existing ConfigMgr client package, select Browse.
2. In the Select a Package dialog box, select Microsoft Configuration Manager Client Upgrade, and then select OK.
3. Select Next.USMT Package 1. In Specify an existing USMT package, select Browse.
2. In the Select a Package dialog box, select USMT, and then select OK.
3. Select Next.Settings Package 1. Select Create a new settings package.
2. In Package source folder to be created, type \\WDG-MDT-01\Packages$\UDICustomSettings_Target, and then select Next.Settings Package: Settings Details 1. In Name, type UDI Target Computer Custom Settings.
2. In Version, type 1.00.
3. In Comments, type Configuration settings for MDT deployment process using UDI (such as CustomSettings.ini) for the target computer, and then select Next.Sysprep Package Select Next. Summary Review the information in the Details box that you provided while completing the previous wizard pages, and then select Next. Progress The progress for creating the task sequence is displayed. Confirmation Select Finish. The list of task sequences is displayed. The task sequence that you just created (UDI - Windows 8.1 Target Deployment) is listed in the list of task sequences.
Step 5-3: Select the Distribution Points for the New Packages and Images
Running the Create MDT Task Sequence Wizard to create the task sequence for the target generates a new software-distribution package and a new image. When the package and image are created, select the distribution points from which the package and image will be copied and available to target computers.
Note
In this sample, there is only one distribution point (WDG-MDT-01). However, most production networks will have multiple distribution points. When performing this step in a production environment, select the appropriate distribution points for the network.
Select the distribution points for the software-distribution package (for the new target computer custom settings package called MDT 2013 Target Computer Custom Settings) and the operating system image package (for the new captured .wim file of the reference computer called Windows 8.1 Reference Image).
To select the distribution points for the software-distribution package
Select Start, point to All Programs, and then point to Microsoft System Center 2012. Point to Configuration Manager, and then select Configuration Manager Console.
In the Configuration Manager console, in the navigation pane, select Software Library.
In the Software Library workspace, go to Overview/Operating Systems/Task Sequences.
In the preview pane, select UDI - Windows 8.1 Target Deployment.
On the Ribbon, on the Home tab, in the Deployment group, select Distribute Content.
The Distribute Content Wizard starts.
Complete the Distribute Content Wizard using the information in Table 32. Accept default values unless otherwise specified.
Table 32. Information for Completing the Distribute Content Wizard
On this wizard page Do this General Select Next. Content Select Next. General: Content Destination 1. Select Add, and then select Distribution Point.
The Add Distribution Points dialog box appears.
2. In the Add Distribution Points dialog box, select \\WDGMDT01.mdt2013.corp.woodgrovebank.com, and then select OK.
\\WDGMDT01.mdt2013.corp.woodgrovebank.com appears in the Content destination list.
3. Select Next.Summary Review the information in the Details box that you provided while completing the previous wizard pages, and then select Next. Progress The progress for distributing the software is displayed. Completion Select Close.
Step 5-4: Customize the MDT Configuration Files
When the task sequence for the target computer has been created, customize the MDT configuration files that provide the configuration settings for deploying Windows 8.1 to the target computer—specifically, CustomSettings.ini.
When the CustomSettings.ini file has been customized, save the updated files to the source folder for the MDT Custom Settings package created earlier in the process (E:\Packages$\CustomSettings_Target).
To customize the MDT configuration files for the target computer
In Windows Explorer, go to E:\Packages$\CustomSettings_Target folder, and then double-click CustomSettings.ini.
Open Notepad, and then add the following line to the CustomSettings.ini file that the environment requires, as shown in Listing 2:
This setting configures monitoring of the target computer deployment.
Note
Make any other changes that your environment requires.
Listing 2. Default CustomSettings.ini File
[Settings]
Priority=Default
Properties=MyCustomProperty

[Default]
OSInstall=Y
SkipCapture=YES
SkipAdminPassword=NO
SkipProductKey=YES
EventService=http://WDG-MDT-01:9800
Save the file, and then close Notepad.
Step 5-5: Update the Distribution Points for the Custom Settings Package
When the source folder has been updated for the MDT Target Computer Custom Settings package in Configuration Manager, update the distribution points for the MDT Target Computer Custom Settings package. Updating the distribution points copies the updated version of the CustomSettings.ini file to the deployment shares specified in the package.
To update the distribution points for the Custom Settings package
Select Start, point to All Programs, and then point to Microsoft System Center 2012. Point to Configuration Manager, and then select Configuration Manager Console.
In the Configuration Manager console, in the navigation pane, select Software Library.
In the Software Library workspace, go to Overview/Application Management/Packages.
In the preview pane, select MDT Target Computer Custom Settings.
On the Ribbon, on the Home tab, in the Deployment group, select Update Distribution Points.
The Configuration Manager dialog box opens, notifying you that you are going to update the package on all distribution points.
In the Configuration Manager dialog box, select OK.
Close all open windows and dialog boxes.
Step 5-6: Customize the Task Sequence for the Target Computer
For most deployments, the Windows 8.1 Target Deployment task sequence created earlier in the process performs all the necessary steps without modification. In this sample, modify the task sequence template to set the password for the local Administrator account to a known value. (By default, the task sequence sets the password for the local Administrator account to a random value.) The task sequence may require further customization depending on the environment.
To customize the Windows 8.1 Target Deployment task sequence
Select Start, point to All Programs, and then point to Microsoft System Center 2012. Point to Configuration Manager, and then select Configuration Manager Console.
In the Configuration Manager console, in the navigation pane, select Software Library.
In the Software Library workspace, go to Overview/Operating Systems/Task Sequences.
In the preview pane, select UDI - Windows 8.1 Target Deployment.
On the Ribbon, on the Home tab, in the Task Sequence group, select Edit.
The Windows 8.1 Reference Deployment Task Sequence Editor dialog box opens.
In the Windows 8.1 Reference Deployment Task Sequence Editor dialog box, go to PostInstall/Apply Windows Settings.
On the Properties tab, select Enable the account and specify the local administrator password.
On the Properties tab, in Password and Confirm Password, type P@ssw0rd, and then select Apply.
Make any additional modifications to the task sequence that the environment requires, and then select OK.
Close all open windows and dialog boxes.
Step 5-7: Configure an Unattended Installation of Office Professional Plus 2010
Configuration Manager distributes the files and folders used to deploy Office Professional Plus 2010 but does not provide the method for performing an unattended installation after distribution. Instead, the unattended installation must be configured using methods provided in Office Professional Plus 2010. You can configure unattended (silent) installation of Office Professional Plus 2010 using one of the following methods:
Create an Office Customization Tool (OCT) Setup customization file (.msp file).
Modify the Config.xml file.
For more information about each of these methods, see Customize Setup before installing Office 2010.
For the purposes of this guide, the unattended installation of Office Professional Plus 2010 will be done by creating an OCT Setup customization file (.msp file). You will save the OCT Setup customization file in the Updates folder, which is automatically scanned by the Office Professional Plus 2010 Setup Wizard.
To configure an unattended installation of Office Professional Plus 2010
At a command prompt, type the following command, and then press ENTER.
e:At a command prompt, type the following command, and then press ENTER.
cd \Source$\OfficeProPlus2010\At a command prompt, type the following command, and then press ENTER.
setup /adminThe OCT starts, and the Select Product dialog box opens.
In the OCT, in the Select Product dialog box, select OK.
The OCT loads the appropriate information, and then displays the settings that can be customized in the .msp file.
In the OCT, in the navigation pane, go to Setup/Install location and organization name.
In the preview pane, in Organization name, type Woodgrove Bank.
In the OCT, in the navigation pane, go to Setup/Licensing and user interface.
In the preview pane, select the I accept the terms in the License Agreement check box.
In the preview pane, in Display level, select None.
From the File menu, select Save As.
The Save As dialog box opens.
In the Save As dialog box, type E:\Source$\OfficeProPlus2010\Updates\OPP2010_Unattend, and then select Save.
The OPP2010_Unattend.msp file is saved.
Close all open windows and dialog boxes.
Step 5-8: Create an Office Professional Plus 2010 Application
One of the advantages to performing MDT deployments using UDI is the ability for the user to select the applications to install at deployment time. You can add any number of applications to Configuration Manager, and then select the applications when running the UDI Wizard, as described in Step 6-4: Start the Target Computer with the Task Sequence Bootable Media.
You can configure the applications that appear in the UDI Wizard using the UDI Wizard Designer, as described in Step 5-11: Customize the UDI Wizard Configuration File for the Target Computer.
To create an Office Professional Plus 2010 application
Select Start, point to All Programs, and then point to Microsoft System Center 2012. Point to Configuration Manager, and then select Configuration Manager Console.
In the Configuration Manager console, in the navigation pane, select Software Library.
In the Software Library workspace, go to Overview/Application Management/Applications.
On the Ribbon, on the Home tab, in the Create group, select Create Application.
The Create Application Wizard starts.
Complete the Create Application Wizard using the information in Table 33. Accept default values unless otherwise specified.
Table 3. Information for Completing the Create Application Wizard
On this wizard page Do this General Select Manually specify the application information, and then select Next. General: General 1. In Name, type Microsoft Office Professional Plus 2010 - x86.
2. In Administrator comments, type 32-bit version of Microsoft Office Professional Plus 2010.
3. Select the Allow this application to be installed from Install Application task sequence action instead of deploying it manually check box.
4. Select Next.General: Application Catalog 1. In Localized description, type 32-bit version of Microsoft Office Professional Plus 2010 for use by Woodgrove Bank Employees.
2. In Keywords, type Office Professional Plus 2010.
3. Select Next.General: Deployment Type s - Select Add.
The Create Deployment Type Wizard Starts. - In the Create Deployment Type Wizard, on the General page, select Manually specify the deployment type information and then select Next.
- On the General: General Information page, perform the following steps, and then select Next:
- In Name, type Microsoft Office Professional Plus 2010 - x32 (Windows Installer).
- In Administrator comments, type Deploy Microsoft Office Professional Plus 2010 using native Windows Installer.
- On the General: Content page, perform the following steps, and then select Next:
- In Content location, type \\WDGMDT01\Source$\OfficeProPlus2010.
- In Installation program, type setup.exe.
- In Uninstall program, type setup.exe /uninstall PROPLUS.
- On the General: Detection Method page, perform the following steps, and then select Next:
- Select Add Clause,
The Detection Rule dialog box appears. - In the Detection Rule dialog box, in Setting Type, select Windows Installer.
- In Product code, select Browse
The Open dialog box appears. - In the Open dialog box, in File name, type \\WDGMDT01\Source$\OfficeProPlus2010\ProPlus.WW\ProPlusWW.msi, and then select Open.
The product code for Office Professional Plus 2010 appears in the Product code box. - In the Detection Rule dialog box, select OK.
- Select Add Clause,
- On the General: User Experience page, perform the following steps, and then select Next:
- In Installation behavior, select Install for system.
- In Logon requirement, select Whether or not a user is logged on.
- In Installation program visibility, select Normal.
- In Estimated installation time, type 120.
- On the Requirements page, select Next.
- On the Dependencies page, select Next.
- On the Summary page, select Next.
- On the Completion page, select Close.
The Create Application Wizard starts. - Select Next.
Summary Review the information in the Details box that you provided while completing the previous wizard pages, and then select Next. Progress The progress for creating the application is displayed. Completion Select Close. The Office Professional Plus 2010 - x86 application appears in the preview pane.
- Select Add.
Step 5-9: Distribute the Office Professional Plus 2010 Application
After you have created the Office Professional Plus 2010 application, you need to distribute the application to the distribution points. Doing so allows installation of the application from the distribution points. For the purposes of this guide, there is only one distribution point (WDG-MDT-01). In typical Configuration Manager deployments, there are usually multiple distribution points.
To distribute the Office Professional Plus 2010 application
Select Start, point to All Programs, and then point to Microsoft System Center 2012. Point to Configuration Manager, and then select Configuration Manager Console.
In the Configuration Manager console, in the navigation pane, select Software Library.
In the Software Library workspace, go to Overview/Application Management/Applications.
In the preview pane, select Microsoft Office Professional Plus 2012 - x86.
On the Ribbon, on the Home tab, in the Deployment group, select Distribute Content.
The Distribute Content Wizard starts.
Complete the Distribute Content Wizard using the information in Table 34. Accept the default values unless otherwise specified.
Table 34. Information for Completing the Distribute Content Wizard
On this wizard page Do this General Select Next. General: Content Select Next. General: Content Destination 1. Select Add, and then select Distribution Point.
The Add Distribution Points dialog box appears.
2. In the Add Distribution Points dialog box, select \\WDGMDT01.mdt2013.corp.woodgrovebank.com, and then select OK.
\\WDGMDT01.mdt2013.corp.woodgrovebank.com appears in the Content destination list.
3. Select Next.Summary Review the information in the Details box that you provided while completing the previous wizard pages, and then select Next. Progress The progress for distributing the application is displayed. Completion Select Close. Close all open windows and dialog boxes.
Step 5-10: Make the Office Professional Plus 2010 Application Available to All Users
After you have created the Office Professional Plus 2010 application, you need to distribute the application to the distribution points. Doing so allows installation of the application from the distribution points. For the purposes of this guide, there is only one distribution point (WDG-MDT-01). In typical Configuration Manager deployments, there are usually multiple distribution points.
To make the Office Professional Plus 2010 application available to all users
Select Start, point to All Programs, and then point to Microsoft System Center 2012. Point to Configuration Manager, and then select Configuration Manager Console.
In the Configuration Manager console, in the navigation pane, select Software Library.
In the Software Library workspace, go to Overview/Application Management/Applications.
In the preview pane, select Microsoft Office Professional Plus 2010 - x86.
On the Ribbon, on the Home tab, in the Deployment group, select Deploy.
The Deploy Software Wizard starts.
Complete the Deploy Software Wizard using the information in Table 35. Accept the default values unless otherwise specified.
Table 35. Information for Completing the Deploy Software Wizard
On this wizard page Do this General 1. In Collection, select Browse.
The Select Collection dialog box appears.
2. In the Select Collection dialog box, select All Users, and then select OK.
3. In Comments, type Make Microsoft Office Professional Plus 2010 available for deployment to all users.
4. Select Next.Content Select Next. Deployment Settings Select Next. Scheduling Select Next. Alerts Select Next. Summary Review the information in the Details box that you provided while completing the previous wizard pages, and then select Next. Progress The progress for deploying the application is displayed. Completion Select Close. Close all open windows and dialog boxes.
Step 5-11: Customize the UDI Wizard Configuration File for the Target Computer
The User-Driven Installation task sequence template includes a task sequence step that runs the UDI Wizard. When a task sequence step runs the UDI Wizard, the step also references an XML file that determines the configuration of the UDI Wizard. The UDIWizard_Config.xml file in the Scripts folder controls the behavior of the UDI Wizard. Customize the UDIWizard_Config.xml file using the UDI Wizard Designer.
The UDI Wizard Designer includes predefined stage groups for the UDI Wizard listed in Table 36. You can add or remove the wizard pages that appear in the UDI Wizard and the sequence of each wizard page for each stage group.
Table 36. Predefined Stage Groups for Each Supported MDT Deployment Scenario
| Stage group | Description |
|---|---|
| New Computer | Use this stage group as the basis for your deployment when a new installation of a Windows operating system is deployed to a new computer and no user state is migrated. |
| Refresh | Use this stage group as the basis for your deployment when a computer is refreshed, including computers that must be re-imaged for image standardization or to address a problem. |
| Replace | Use this stage group as the basis for your deployment when one computer replaces another computer. The existing user state migration data is saved from the original computer. Then, a new installation of Windows is deployed to a new computer. Finally, the user state data is restored to the new computer. |
To customize the UDI Wizard configuration file for the reference computer
Select Start, point to All Programs, point to Microsoft Deployment Toolkit, and then select UDI Wizard Designer.
The UDI Wizard Designer starts.
On the Ribbon, on the Home tab, in the File Menu group, select Open.
In the Open dialog box, in File name, type \\WDG-MDT-01\Packages$\MDT_Files\Scripts\UDIWizard_Config.xml, and then select Open.
Note
This opens the copy of the UDIWizard_Config.xml file that resides in the MDT Package folder you created when you ran the Create Microsoft Deployment Task Sequence Wizard earlier in the process.
In the Page Library, select Install Programs.
On the Ribbon, on the Home tab, in the Edit Settings group, select Configuration Manager.
The Site Settings dialog box appears.
In the Site Settings dialog box, perform the following steps, and then select OK:
In Site Server Name, type WDG-MDT-01.
In Site Code, type NYC.
Select Validate Site.
In Application Collection, type All Users.
Note
The Configuration Manager collection you type here must match the Configuration Manager collection to which you deployed your applications. In this guide, you selected the All Users collection in Step 5-10: Make the Office Professional Plus 2010 Application Available to All Users.
In the preview pane, on the Flow tab, expand StageGroup: New Computer.
The list of wizard pages used in the StageGroup: New Computer flow is displayed.
Note
Make note of the sequence of the wizard pages in the StageGroup: New Computer flow in the UDI Wizard Designer. You will see the same sequence of wizard pages when you run the UDI Wizard in Step 6-4: Start the Target Computer with the Task Sequence Bootable Media.
Configure the StageGroup: New Computer flow using the information for each page listed in Table 37. Accept the default values unless otherwise specified.
Table 37. Information for Configuring UDI Wizard Designer Pages
Wizard page Select the Configure tab and do the following BitLocker - Under BitLocker Mode, expand BitLocker Mode. In BitLocker Checkbox, clear the Initially check this check box check box.
- Under BitLocker Mode, select Unlocked for each of the following configuration options:
- BitLocker Checkbox
- BitLocker Mode Radio Buttons
- PIN Text Box
The status for each configuration option changes to Locked, which prevents users from changing these options in the UDI Wizard.Volume - Under Image Combo Box, expand Image Combo Behavior, under Image Combo Box Values, right-click Windows 8.1 RTM (x86), and then select Select an Operating System Image.
The Select an Operating System Image dialog box appears. - Complete the Select an Operating System Image dialog box by performing the following steps, and then select OK:
- In Select an Operating System Image/Installer to add, select image_index (where image_index is the image index of the image that contains Windows 8.1, which was identified in Step 5-1: Import the Captured .wim File into Configuration Manager; for the purposes of this guide, select 2).
- In Display Name, type Windows 8.1 Reference Image - x64.
- Under Image Combo Box, expand Image Combo Behavior; under Image Combo Box Values, right-click Windows 8.1 RTM (x86), and then select Remove Item.
The Delete Item Confirmation dialog box appears. - In the Delete Item Confirmation dialog box, select Yes.
- Under User Data and Settings, expand User Data Combo Behavior, and then select the Format: Clean all the data on the target volume during install check box.
- Under User Data Combo Behavior, select Unlocked for each of the following configuration options:
- Format Drive
- Windows Directory
The status for each configuration option changes to Locked, which prevents users from changing these options in the UDI Wizard.New Computer Details 1. Under Network Details, expand Network Details; in Domain or Workgroup Radio Buttons, select Domain.
2. Under Domain or Workgroup Radio Buttons, select Unlocked.
The status changes to Locked, which prevents users from changing this option in the UDI Wizard.
3. Under Network Details, expand Domains and OUs, and then select Add Domain.
The Create or Edit Domain Information dialog box appears.
4. In the Create or Edit Domain Information dialog box, in Domain Name type mdt2013.corp.woodgrovebank.com.
5. In the Create or Edit Domain Information dialog box, in Friendly Name, type Woodgrove Bank Active Directory Domain, and then select OK.Install Programs - Under Software and Groups, right-click any blank area, and then select Add Software Group.
The Add/Edit a Software Group dialog box appears. - In the Add/Edit a Software Group dialog box, in Name, type Woodgrove Bank Applications, and then select OK.
- Under Software and Groups, select Woodgrove Bank Applications.
- On the Ribbon, on the Home tab, in the General Software Item Settings group, select Add, and then select Add Software to Group.
The Add Software to Group Wizard starts. - Complete the Add Software to Group Wizard by performing the following steps:
- On the What type of software item do you want to add page, select I want to add an Application, and then select Next.
- On the Search Configuration Manager for the Software Item to Add page, in Display Name, type Microsoft Office Professional Plus 2010 - x86.
- On the Search Configuration Manager for the Software Item to Add page, select Select.
The Search Applications dialog box appears. - In the Search Applications dialog box, select Search, select Microsoft Office Professional Plus 2010 - X86, and then select OK.
- On the Search Configuration Manager for the Software Item to Add page, select Finish.
Microsoft Office Professional Plus 2010 - x86 appears underneath the Woodgrove Bank Applications software group. - Under Software and Groups, select General Software.
- On the Ribbon, on the Home tab, in the General Software Item Settings group, select Add, and then select Remove Item.
The Delete the Selected Item dialog box appears. - In the Delete the Selected Item dialog box, select Yes.
- Under Software and Groups, select the check box for Woodgrove Bank Applications.
The group and Microsoft Office Professional Plus 2010 - x86 are selected.
On the Ribbon, on the Home tab, select Save.
The File Save dialog box appears.
In the File Save dialog box, select OK.
Leave the UDI Wizard Designer open for the next step.
Step 5-13: Create a New Custom Wizard Page
You can create custom wizard pages that allow you to collect deployment information in addition to the information collected on other UDI Wizard pages. You create custom wizard pages based on the Build Your Own Page wizard page type. After you create the custom wizard page, you can add controls to it and configure the task sequence variables the controls set.
For this guide, Woodgrove Bank wants to allow users to enter their name and the department in which they work. Woodgrove Bank is departmentalized by geographic location. This information will be used to configure the registered user name and organization in Windows. In this step, you add a new custom wizard page to the New Computer stage group.
To create a new custom wizard page
On the Ribbon, on the Home tab, in the Page Library group, select Add Page.The Add New Page dialog box appears.
In the Add New Page dialog box, in the Page Type column, select Build Your Own Page.
In Display Name, type User Information.
In Page Name, type UserInformationPage, and then select OK.
The User Information page appears in the Page Library.
In the details pane, select the Flow tab.
On the Flow tab, expand the New Computer stage group.
The list of wizard pages in the New Computer stage group is displayed.
In the Page Library, drag the User Information page to a point immediately before the BitLocker page in the New Computer stage group on the Flow tab.
On the Ribbon, on the Home tab, select Save.
The File Save dialog box appears.
In the File Save dialog box, select OK.
Leave the UDI Wizard Designer open for the next step.
Step 5-14: Add Controls to New Custom Wizard Page
After the new UDI custom wizard page has been added to the New Computer stage group, the appropriate controls need to be added to the new custom wizard page. The controls are added to the custom wizard page from the Build Your Own Page toolbox, which is displayed when you view the custom wizard page on the Configure tab in the UDI Wizard Designer.
Table 38 lists the types of controls to your custom wizard page, which is illustrated in Figure 1.
Table 38. Types of Controls in the UDI Build Your Own Page Toolbox
| Control type | Description |
|---|---|
| Checkbox | This control allows you to select or clear a configuration option and behaves as a traditional user interface (UI) check box. This control has a corresponding label that you can use to describe the purpose of the check box. The state of this control is True when the check box is selected and False when the check box is cleared. The state of the check box is stored in the task sequence variable configured for this control. For more information on this control, see "Checkbox Control" in the MDT document, Toolkit Reference. |
| Combobox | This control allows you to select an item from a list of items and behaves as a traditional UI drop-down list. This control allows you to add or remove items from the list and provide a corresponding value that will be set in the task sequence variable configured for this control. For more information on this control, see "Combobox Control" in the MDT document, Toolkit Reference. |
| Line | This control allows you to add a horizontal line to divide one portion of the custom wizard page from another. This control does not collect any configuration values but rather is used to visually enhance the UI. For more information on this control, see "Line Control" in the MDT document, Toolkit Reference. |
| Label | This control allows you to add descriptive, read-only text to the wizard page. This control does not collect any configuration values but rather is used to visually enhance the UI. For more information on this control, see "Label Control" in the MDT document, Toolkit Reference. |
| Radio | This control allows you to select one configuration option from a group of two or more options. As with traditional radio buttons, two or more of these controls can be grouped together, and then the user can select one of the options in the radio button group. A unique value is assigned to each option. The value assigned to the selected option control is saved in the task sequence variable configured for this control. For more information on this control, see "Radio Control" in the MDT document, Toolkit Reference. |
| Bitmap | This control allows you to add a bitmap graphic (.bmp file) to the custom wizard page. This control does not collect any configuration values but rather is used to visually enhance the UI. The path to the .bmp file is relative to the location of the UDI Wizard (OSDSetupWizard.exe). For more information on this control, see "Bitmap Control" in the MDT document, Toolkit Reference. |
| Textbox | This control allows you to enter text on the custom wizard page. The text typed into this control is saved in the task sequence variable configured for this control. For more information on this control, see "Textbox Control" in the MDT document, Toolkit Reference. |
You can add any combination of these controls to your custom wizard page based on the information you want to collect. In addition, you can use the Show Gridlines check box to show or hide gridlines that can be used to assist in visually designing the custom wizard page.
For the purposes of this example, you will create a custom wizard page as illustrated in Figure 1.
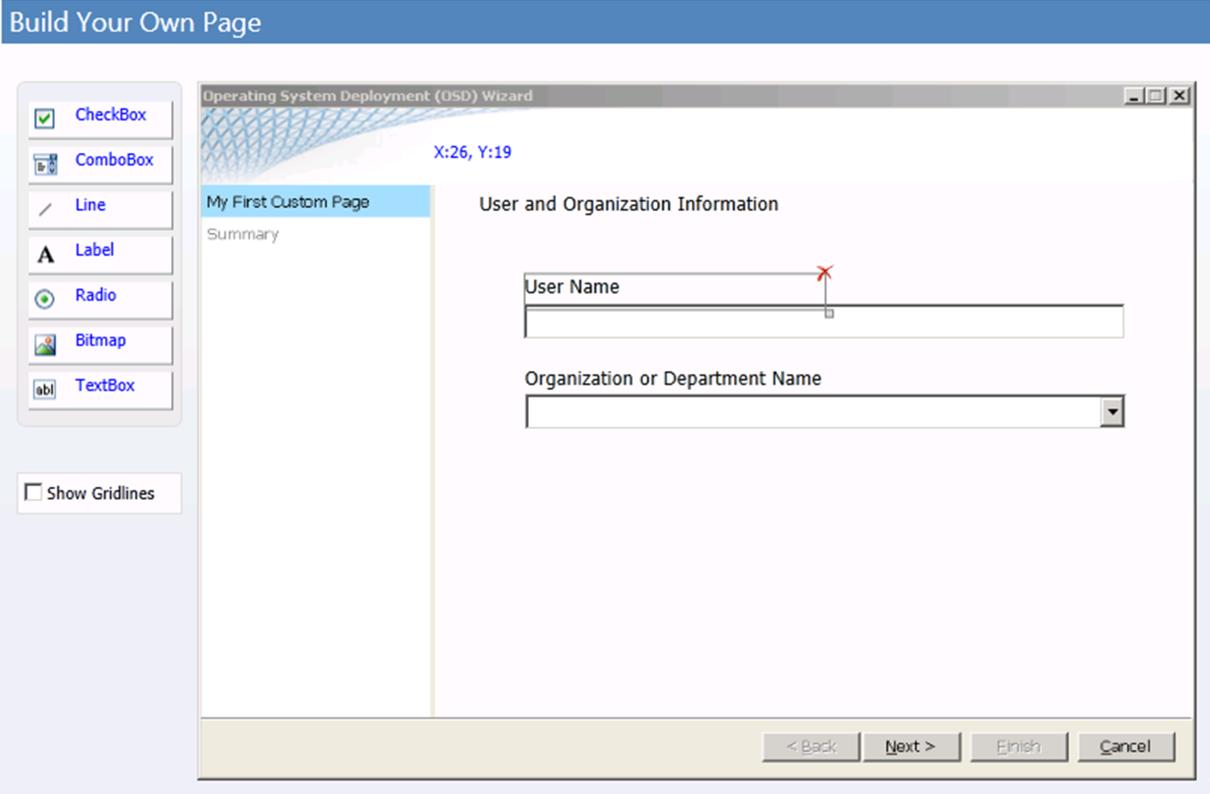 Figure 1. Custom wizard page to be created
Figure 1. Custom wizard page to be created
To add controls to the new custom wizard page
In the Page Library, select User Information page.
In the details pane, select the Configure tab.
The Build Your Own Page toolbox and empty wizard page are displayed.
In the Build Your Own Page toolbox, drag the Label control to the empty wizard page at approximately the following coordinates:
x = 30
y = 5
The label control is placed on the wizard page and named label1.
On the custom wizard page, select label1 (the label control added in step 3).
This control acts as a heading for the custom wizard page and describes the purpose of the page.
Configure the layout properties of label1 on the Layout tab using the information in Table 39. Accept the default values unless otherwise stated.
Table 39. label1 Layout Properties
Property Value Label User and organization information X 30 Y 5 In the Build Your Own Page toolbox, drag the Label control to the empty wizard page at approximately the following coordinates:
x = 60
y = 60
The label control is placed on the wizard page and named label2.
On the custom wizard page, select label2 (the control added in the previous step).
This control acts as a label for the text box used to enter the user name.
Configure the layout properties of label2 on the Layout tab using the information in Table 40. Accept the default values unless otherwise stated.
Table 40. lable2 Layout Properties
Property Value Label User name X 60 Y 60 In the Build Your Own Page toolbox, select and drag the Textbox control to the empty wizard page at approximately the following coordinates:
x = 60
y = 80
The Textbox control is placed on the wizard page and named text1.
On the custom wizard page, select text1 (the control added in the previous step).
This control is the text box used to enter the user name.
Configure the layout properties of text1 on the Layout tab using the information in Table 41. Accept the default values unless otherwise stated.
Table 41. text1 Layout Properties
Property Value X 60 Y 80 Width 400 Configure the settings properties of text1 on the Settings tab using the information in Table 42. Accept the default values unless otherwise stated.
Table 42. text1 Settings Properties
Property Value Task sequence variable name FullName Friendly display name visible in summary page Registered user name In the Build Your Own Page toolbox, drag the Label control to the empty wizard page at approximately the following coordinates:
x = 60
y = 60
The Label control is placed on the wizard page and named label3.
On the custom wizard page, select label3 (the control added in the previous step).
This control acts as a label for the combo box used to select the organization or department name for the user.
Configure the layout properties of lable3 on the Layout tab using the information in Table 43. Accept the default values unless otherwise stated.
Table 43. lable3 Layout Properties
Property Value Label Organization or department name X 60 Y 121 In the Build Your Own Page toolbox, drag the Combobox control to the empty wizard page at approximately the following coordinates:
x = 60
y = 140
The Combobox control is placed on the wizard page and named combo1.
On the custom wizard page, select combo1 (the control added in the previous step).
This control is the combo box used to select the organization name.
Configure the layout properties of combo1 on the Layout tab using the information in Table 44. Accept the default values unless otherwise stated.
Table 44. combo1 Layout Properties
Property Value X 60 Y 80 Width 400 Add data items to the layout properties of combo1 on the Layout tab using the information in Table 45. Accept the default values unless otherwise stated.
Table 45. combo1 Data Items
Value Display Value Woodgrove Bank - New York City Woodgrove Bank - New York City Woodgrove Bank - Dallas Woodgrove Bank - Dallas Woodgrove Bank - Chicago Woodgrove Bank - Chicago Woodgrove Bank - Seattle Woodgrove Bank - Seattle Configure the settings properties of combo1 on the Settings tab using the information in Table 46. Accept the default values unless otherwise stated.
Table 46. combo1 Settings Properties
Property Value Task sequence variable name OrgName Friendly display name visible in summary page Registered organization name On the Ribbon, on the Home tab, select Save.
The File Save dialog box appears.
In the File Save dialog box, select OK.
Close the UDI Wizard Designer.
Step 5-15: Update the Distribution Points for the MDT Files Package
After the UDI Wizard configuration file, UDIWizard_Config.xml, has been updated for the MDT Files package in Configuration Manager, update the distribution points for the MDT Files package. Updating the distribution points copies the updated version of the UDIWizard_Config.xml file to the deployment shares specified in the package.
To update the distribution points for the MDT Files package
Select Start, point to All Programs, and then point to Microsoft System Center 2012. Point to Configuration Manager, and then select Configuration Manager Console.
In the Configuration Manager console, in the navigation pane, select Software Library.
In the Software Library workspace, go to Overview/Application Management/Packages.
In the preview pane, select MDT Files.
On the Ribbon, on the Home tab, in the Deployment group, select Update Distribution Points.
The Configuration Manager dialog box opens, notifying you that you are going to update the package on all distribution points.
In the Configuration Manager dialog box, select OK.
Close all open windows and dialog boxes.
Configuration Manager starts updating the distribution points with the latest versions of the UDIWizard_Config.xml file. This process could take several minutes. Check the status of the package until the Last Update value of the package status has been updated to a recent date and time.
Step 6: Deploy the Captured Image of the Reference Computer to the Target Computer
When you have captured the image of the reference computer and created and configured the task sequence, deploy the captured image. Configure MDT to provide all the necessary configuration settings to deploy to the target computer. After initiating the deployment process, the image of the reference computer running Windows 8.1 is automatically deployed to the target computer and configured with the settings defined.
Deploy the captured image by:
Adding the target computer to the Configuration Manager site database as described in Step 6-1: Add the Target Computer to the Configuration Manager Site Database
Creating a computer collection that includes the target computer as described in Step 6-2: Create a Computer Collection That Includes the Target Computer
Deploy the task sequence created earlier in the process as described in Step 6-3: Deploy the Target Computer Task Sequence
Starting the target computer with the task sequence bootable media as described in Step 6-4: Start the Target Computer with the Task Sequence Bootable Media
Step 6-1: Add the Target Computer to the Configuration Manager Site Database
To deploy an operating system without stand-alone media to a new computer that Configuration Manager does not currently manage, add the new computer to the Configuration Manager site database prior to initiating the operating system deployment process. Configuration Manager can automatically discover computers on the network that have a Windows operating system installed; however, if the computer has no operating system installed, use the Import Computer Information Wizard to import the new computer information.
To add the target computer to the Configuration Manager site database
Select Start, point to All Programs, and then point to Microsoft System Center 2012. Point to Configuration Manager, and then select Configuration Manager Console.
In the Configuration Manager console, in the navigation pane, select Assets and Compliance.
In the Assets and Compliance workspace, go to Overview/Devices.
On the Ribbon, on the Home tab, in the Create group, select Import Computer Information.
The Import Computer Information Wizard starts.
Complete the Import Computer Information Wizard using the information in Table 47. Accept the default values unless otherwise specified.
Table 47. Information for Completing Import Computer Information Wizard
On this wizard page Do this Select Source Select Import single computer, and then select Next. Select Source: Single Computer 1. In Computer Name, type WDG-CLI-01.
2. In MAC address, type mac_address (where mac_address is the MAC address of the primary network adapter for the target computer, WDG-CLI-01).
3. Select Next.Select Source: Data Preview Select Next. Select Source: Choose Target Collection Select Next. Summary Review the information in the Details box that you provided while completing the previous wizard pages, and then select Next. Progress The progress for importing the computer is displayed. Confirmation Select Close. For more information on adding a new computer to the Configuration Manager site database, see the section, "To import computer information for a single computer," in the section, "How to Deploy Operating Systems in Configuration Manager," in the Configuration Manager Documentation Library, which is installed with Configuration Manager.
Step 6-2: Create a Computer Collection That Includes the Target Computer
In the Configuration Manager console, create a collection that includes the target computer (WDG-CLI-01). You use this computer collection later when advertising the task sequence created earlier in the process.
To create a computer collection that includes the target computer
Select Start, point to All Programs, and then point to Microsoft System Center 2012. Point to Configuration Manager, and then select Configuration Manager Console.
In the Configuration Manager console, in the navigation pane, select Assets and Compliance.
In the Assets and Compliance workspace, go to Overview/Device Collections.
On the Ribbon, on the Home tab, in the Create group, select Create Device Collection.
The Create Device Collection Wizard starts.
Complete the Create Device Collection Wizard using the information in Table 48. Accept the default values unless otherwise specified.
Table 48. Information for Completing the Create Device Collection Wizard
On this wizard page Do this General - In Name, type Microsoft Deployment - Batch 01.
- In Comment, type Computers that are to be included in the first batch of computers deployed.
- In Limited Collection, select Browse.
The Browse Collections dialog box appears. Complete the dialog box by performing the following steps:
- In the Browse Collection dialog box, in Name, select All Systems.
- Select OK.
- Select Next.
Membership Rules - Select Add Rule, and then select Direct Rule.
The Create Direct Membership Rule Wizard starts. - Complete the Create Direct Membership Rule Wizard by performing the following steps:
- On the Welcome page, select Next.
- On the Search for Resources page, in Resource class, select System Resource; in Attribute name, select Name; in Value, type WDG-CLI-01; and then select Next.
- On the Select Resources page, select WDG-CLI-01, and then select Next. Note: The process for adding the target computer (WDG-CLI-01) to All Systems can take a few minutes to finish. If WDG-CLI-01 does not appear in the list, repeat steps b and c until WDGCLI01 appears.
- On the Summary page, select Next.
- On the Completion page, select Close.
- Select Next.
Summary Review the information in the Details box that you provided while completing the previous wizard pages, and then select Next. Progress The progress for creating the device collection is displayed. Completion Select Close. For more information, see the section, "How to Create Collections in Configuration Manager," in the Configuration Manager Documentation Library, which is installed with Configuration Manager.
Step 6-3: Deploy the Target Computer Task Sequence
In the Configuration Manager console, deploy the task sequence created earlier in the process for the target computers. Deploy the task sequence to the collection of target computers created earlier in the process.
To deploy the task sequence
Select Start, point to All Programs, and then point to Microsoft System Center 2012. Point to Configuration Manager, and then select Configuration Manager Console.
In the Configuration Manager console, in the navigation pane, select Software Library.
In the Software Library workspace, go to Overview/Operating Systems/Task Sequences.
In the preview pane, select UDI - Windows 8.1 Target Deployment.
On the Ribbon, on the Home tab, in the Deployment group, select Deploy.
The Deploy Software Wizard starts.
Complete the Deploy Software Wizard using the information in Table 49. Accept the default values unless otherwise specified.
Table 49. Information for Completing the Deploy Software Wizard
On this wizard page Do this General 1. In Collection, select Browse.
2. In the Browse Collection dialog box, select Microsoft Deployment - Batch 01, and then select OK.
3. In Comment, type Deploy Windows 8.1 to the first batch of target computers using UDI.
4. Select Next.Deployment Settings 1. In Purpose, select Available.
2. Select the Make available to boot media and PXE check box.
3. Select Next.Deployment Settings: Schedule Select Next. Deployment Settings: User Experience Select Next. Deployment Settings: Alerts Select Next. Deployment Settings: Distribution Points Select Next. Summary Review the information in the Details box that you provided while completing the previous wizard pages, and then select Next. Progress The progress for creating the deploying the task sequence is displayed. Completion Select Close. For more information, see the section, "How to Deploy a Task Sequence," in the Configuration Manager Documentation Library, which is installed with Configuration Manager.
Step 6-4: Start the Target Computer with the Task Sequence Bootable Media
Start the target computer (WDG-CLI-01) with the task sequence bootable media created earlier in the process. This medium starts Windows PE on the reference computer and initiates the MDT process. At the end of the MDT process, Windows 8.1 is deployed on the target computer.
Note
You can also initiate the MDT process by starting the target computer from Windows Deployment Services.
To start the target computer with the task sequence bootable media
Start WDG-CLI-01 with the task sequence bootable media created earlier in the process.
Windows PE starts, and then the Task Sequence Wizard starts.
Complete the Task Sequence Wizard using the information in Table 50. Accept the default values unless otherwise specified.
Table 50. Information for Completing the Task Sequence Wizard
On this wizard page Do this Welcome to the Task Sequence Wizard In Password, type P@ssw0rd, and then select Next. Select a Task Sequence In the list box, select UDI - Windows 8.1 Target Deployment, and then select Next. At the appropriate task sequence step, the UDI Deployment Wizard starts.
Complete the UDI Deployment Wizard using the information in Table 51. Accept the default values unless otherwise specified.
Table 51. Information for UDI Deployment Wizard
On this wizard page Do this Welcome Select Next. User Information 1. In User Name, type Woodgrove Bank Chicago Employee.
2. In Organization or Department Name, select Woodgrove Bank - Chicago.
3. Select Next.BitLocker Select Next. Volume Select Next. Select Target Select Next. Deployment Readiness 1. Review the configuration checks, and ensure that the status for all checks are set to Success.
2. Select Next.New Computer Details 1. In Computer name, type WDG-CLI-01. Note: In unknown computer scenarios, users could change the computer name to the appropriate value.
2. In User name, type MDT2013\Administrator.
3. In Password and Confirm password, type P@ssw0rd.
4. Select Next.Administrator Password 1. In Administrator password and Confirm password, type P@ssw0rd.
2. Select Next.User Device Affinity Select the Set primary user check box, and then select Next. Language Select Next. Install Programs Verify that the Microsoft Office Professional Plus 2010 - x86 check box is selected, and then select Next. Summary Review the information that you provided while completing the previous wizard pages, and then select Finish. To monitor the reference computer deployment process using the Deployment Workbench
On WDG-MDT-01, select Start, and then point to All Programs. Point to Microsoft Deployment Toolkit, and then select Deployment Workbench.
In the Deployment Workbench console tree, go to Deployment Workbench/Deployment Shares/MDT Deployment Share (C:\DeploymentShare$)/Monitoring.
In the details pane, view the deployment process for WDG-REF-01.
In the Actions pane, periodically select Refresh.
The status of the deployment process is updated in the details pane. Continue to monitor the deployment process until the process is complete.
In the details pane, select WDG-REF-01.
In the Actions pane, select Properties.
The WDG-REF-01 Properties dialog box is displayed.
In the WDG-REF-01 Properties dialog box, on the Identity tab, view the monitoring information provided about the deployment process as described in Table 52.
Table 52. Monitoring Information About the Deployment Process
Information Description ID Unique identifier for the computer being deployed. Computer Name The name of the computer being deployed. Deployment status The current status of the computer being deployed; the status can be one of the following:
- Running. The task sequence is healthy and running.
- Failed. The task sequence failed, and the deployment process was unsuccessful.
- Completed. The task sequence has finished.
- Unresponsive. The task sequence has not updated its status in the past four hours and is assumed to be nonresponsive.Step The current task sequence step being run. Progress The overall progress of the task sequence. The progress bar indicates how many task sequence steps have been run out of the total number of task sequence steps. Start The time the deployment process started. End The time the deployment process ended. Elapsed The length of time the deployment process has been running or took to run if the deployment process has finished. Errors The number of errors encountered during the deployment process. Warnings The number of warnings encountered during the deployment process. Remote Desktop This button allows you to establish a remote desktop connection with the computer being deployed using the Windows Remote Desktop feature. This method assumes that:
- The target operating system is running and has remote desktop support enabled
- mstsc.exe is in the path Note: This button is always visible but may not be able to establish a remote desktop session if the monitored computer is running Windows PE, has not completed installation of the target operating system, or does not have the Remote Desktop feature enabled.VM Connection This button allows you to establish a remote desktop connection to a VM running in HyperV. This method assumes that:
- The deployment is being performed to a VM running on Hyper-V
- vmconnect.exe is located in the %ProgramFiles%\Hyper-V folder Note: This button appears when ZTIGather.wsf detects that Hyper-V integration components are running on the monitored computer. Otherwise, this button will not be visible.DaRT Remote Control This button allows you to establish a remote control session using the remote viewer feature in DaRT.
This method assumes that:
- DaRT has been deployed to the target computer and is currently running
- DartRemoteViewer.exe is located in the %ProgramFiles%\Microsoft DaRT 7\v7 folder Note: This button appears when ZTIGather.wsf detects that DaRT is running on the monitored computer. Otherwise, this button will not be visible.Automatically refresh this information every 10 seconds Check box that controls whether the information in the dialog box is automatically refreshed. If the check box is:
- Selected, the information is refreshed every 10 seconds
- Cleared, the information is not automatically refreshed and must be manually refreshed using the Refresh Now buttonRefresh Now This button immediately refreshes the information displayed in the dialog box. In the WDG-REF-01 Properties dialog box, select OK.
Close the Deployment Workbench.
To monitor the reference computer deployment process using the Get-MDTMonitorData cmdlet
On WDG-MDT-01, select Start, point to Administrative Tools, and then select Windows PowerShell Modules.
The Windows PowerShell Modules command prompt opens.
Create a Windows PowerShell drive that uses the MDT PowerShell provider by running the New-PSDrive cmdlet as shown in the following example:
New-PSDrive -Name DS001 -PSProvider mdtprovider -Root d:\DeploymentShare$View the MDT monitoring process by running the Get-MDTMonitorData cmdlet, as shown in the following example:
Get-MDTMonitorData -Path DS001:This command returns the monitoring data collected by the MDT monitoring service running on the same computer that hosts the deployment share as shown in the following example output:
Name               : WDG-REF-01
PercentComplete    : 96
Settings           :
Warnings           : 0
Errors             : 0
DeploymentStatus   : 1
StartTime          : 6/7/2012 6:45:39 PM
EndTime            :
ID                 : 1
UniqueID           : 94a0830e-f2bb-421c-b1e0-6f86f9eb9fa1
CurrentStep        : 130
TotalSteps         : 134
StepName           : Gather
LastTime           : 6/7/2012 8:46:32 PM
DartIP             :
DartPort           :
DartTicket         :
VMHost             : XYL-DC-02
VMName             : WDG-REF-01
ComputerIdentities : {}

Name               : WDG-CLI-01
PercentComplete    : 26
Settings           :
Warnings           : 0
Errors             : 0
DeploymentStatus   : 1
StartTime          : 6/7/2012 3:07:13 AM
EndTime            :
ID                 : 2
UniqueID           : 94a0830e-f2bb-421c-b1e0-6f86f9eb9fa1
CurrentStep        : 49
TotalSteps         : 134
StepName           : Capture Network Settings using MDT
LastTime           : 6/7/2012 3:08:32 AM
DartIP             :
DartPort           :
DartTicket         :
VMHost             :
VMName             :
ComputerIdentities : {}
Close the Windows PowerShell console.
If any problems occur during the deployment, consult the MDT document Troubleshooting Reference. When successfully completed, the target computer is running a Windows 8.1 operating system configured like the reference computer.
At the completion of the deployment process, Windows 8.1 starts for the first time, and the Welcome tab in the Deployment Complete dialog box is displayed. The Welcome tab displays helpful information about the deployment and provides contact information in the event issues with the deployment occur.
Review the information on the Deployment Summary and Applications Installed tabs to verify that Windows 8.1 and Office Professional Plus 2010 were installed correctly. When you have finished reviewing these tables, select Start Windows to log on to Windows 8.1 for the first time.
Note
Configuration Manager applications are not displayed on the Applications Installed tab. Instead, they are detected after the user logs on to the target computer for the first time.
प्रतिक्रिया
जल्द आ रहा है: 2024 के दौरान हम सामग्री के लिए फीडबैक तंत्र के रूप में GitHub मुद्दों को चरणबद्ध तरीके से समाप्त कर देंगे और इसे एक नई फीडबैक प्रणाली से बदल देंगे. अधिक जानकारी के लिए, देखें: https://aka.ms/ContentUserFeedback.
के लिए प्रतिक्रिया सबमिट करें और देखें