Tutorial: Memasukkan pengguna dan memanggil Microsoft Graph API dari aplikasi satu halaman (SPA) Angular menggunakan alur kode autentikasi
Dalam tutorial ini, Anda akan membuat aplikasi satu halaman (SPA) Angular yang memasukkan pengguna dan memanggil Microsoft Graph API dengan menggunakan alur kode otorisasi dengan PKCE. SPA yang Anda buat menggunakan Pustaka Autentikasi Microsoft (MSAL) untuk Angular v2.
Dalam tutorial ini:
- Mendaftarkan aplikasi di pusat admin Microsoft Entra
- Membuat proyek Angular dengan
npm - Menambahkan kode untuk mendukung upaya masuk dan keluar pengguna
- Menambahkan kode untuk memanggil Microsoft Graph API
- Menguji aplikasi
MSAL Angular v2 meningkatkan MSAL Angular v1 dengan mendukung alur kode otorisasi di browser alih-alih alur grant implisit. MSAL Angular v2 TIDAK mendukung aliran implisit.
Prasyarat
- Node.js untuk menjalankan server web lokal.
- Visual Studio Code atau editor lain untuk memodifikasi file proyek.
Cara kerja contoh aplikasi
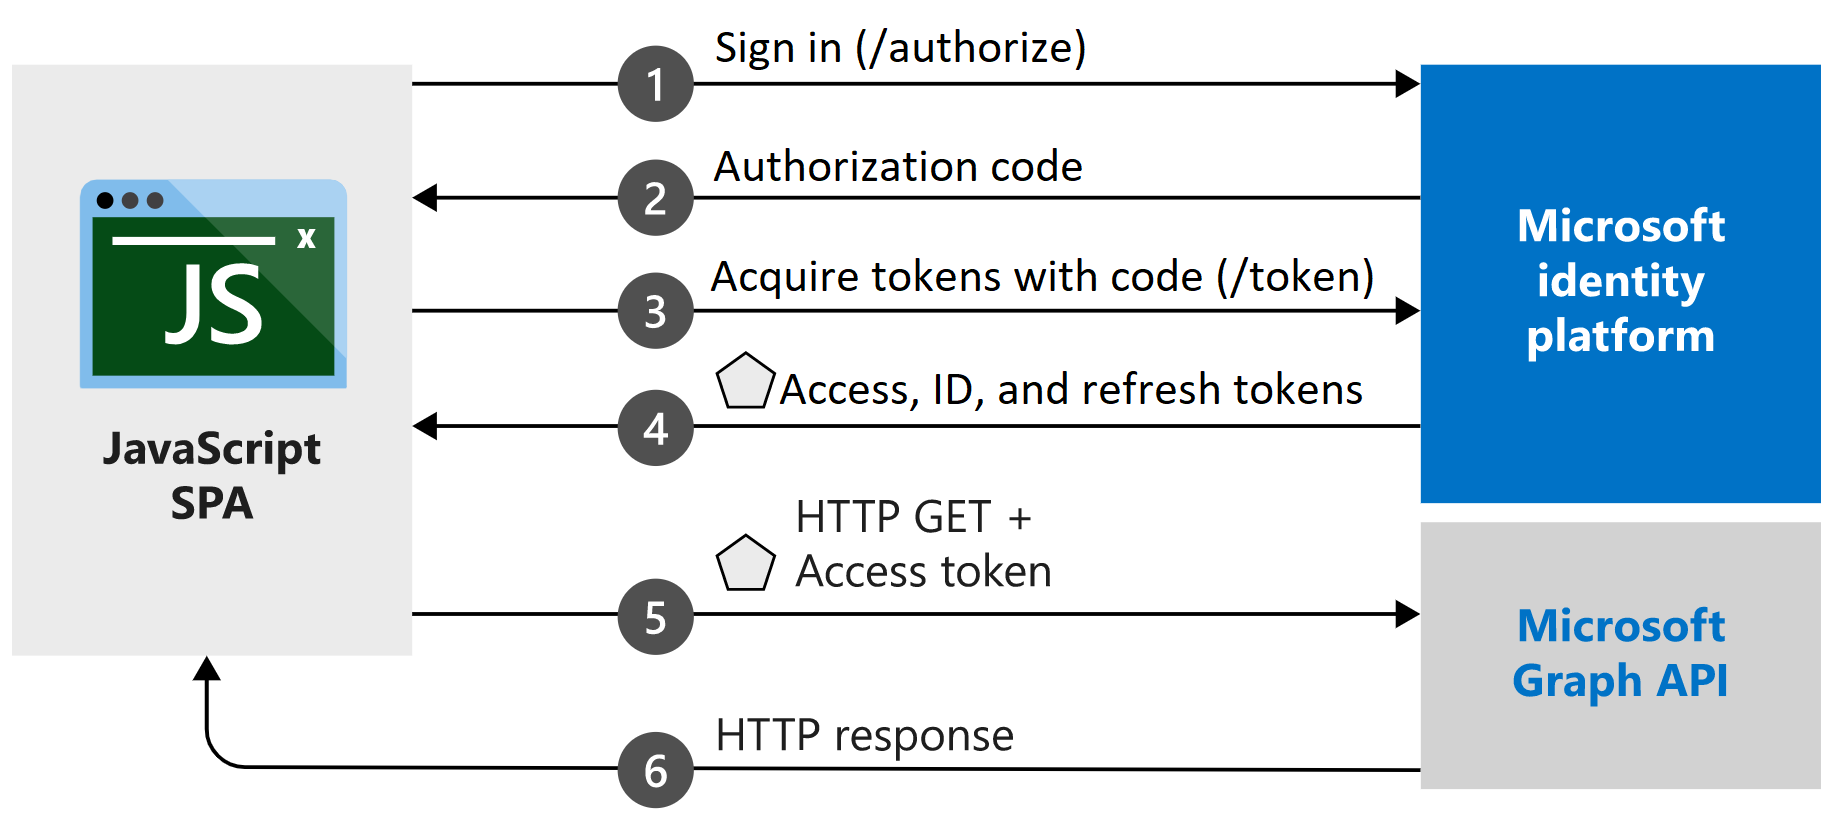
Contoh aplikasi yang dibuat dalam tutorial ini memungkinkan SPA Angular mengajukan kueri ke Microsoft Graph API atau API web yang menerima token yang dikeluarkan oleh platform identitas Microsoft. Ini menggunakan Pustaka Autentikasi Microsoft (MSAL) untuk Angular v2, wrapper pustaka MSAL.js v2. MSAL Angular memungkinkan aplikasi Angular 9+ untuk mengautentikasi pengguna perusahaan dengan menggunakan ID Microsoft Entra, dan juga pengguna dengan akun Microsoft dan identitas sosial seperti Facebook, Google, dan LinkedIn. Pustaka juga memungkinkan aplikasi mendapatkan akses ke layanan awan Microsoft dan Microsoft Graph.
Dalam skenario ini, setelah pengguna masuk, token akses diminta dan ditambahkan ke permintaan HTTP melalui header otorisasi. Akuisisi dan perpanjangan token ditangani oleh MSAL.
Pustaka
Tutorial ini menggunakan pustaka berikut:
| Pustaka | Deskripsi |
|---|---|
| MSAL Angular | Microsoft Authentication Library untuk JavaScript Angular Wrapper |
| Browser MSAL | Pustaka Autentikasi Microsoft untuk paket browser JavaScript v2 |
Anda dapat menemukan kode sumber untuk semua pustaka MSAL.js di microsoft-authentication-library-for-js repositori di GitHub.
Dapatkan sampel kode yang telah selesai
Apakah Anda lebih suka mengunduh proyek sampel yang telah selesai untuk tutorial ini? Mengkloning ms-identity-javascript-angular-spa
git clone https://github.com/Azure-Samples/ms-identity-javascript-angular-spa.git
Untuk melanjutkan tutorial dan membangun aplikasi sendiri, lanjutkan ke bagian berikutnya, Daftarkan pengidentifikasi aplikasi dan rekaman.
Mendaftarkan pengidentifikasi aplikasi dan rekaman
Tip
Langkah-langkah dalam artikel ini mungkin sedikit berbeda berdasarkan portal tempat Anda memulai.
Untuk menyelesaikan pendaftaran, beri nama aplikasi, tentukan jenis akun yang didukung, dan tambahkan URI pengalihan. Setelah terdaftar, panel Gambaran Umum aplikasi menampilkan pengidentifikasi yang diperlukan dalam kode sumber aplikasi.
- Masuk ke pusat admin Microsoft Entra setidaknya sebagai Pengembang Aplikasi.
- Jika Anda memiliki akses ke beberapa penyewa, gunakan ikon
 Pengaturan di menu atas untuk beralih ke penyewa tempat Anda ingin mendaftarkan aplikasi dari menu Direktori + langganan.
 - Telusuri Aplikasi >Identitas>Pendaftaran aplikasi.
- Pilih Pendaftaran baru.
- Masukkan Nama untuk aplikasi, seperti Angular-SPA-auth-code.
- Untuk Jenis akun yang didukung, pilih Hanya akun dalam direktori organisasi ini. Untuk informasi tentang jenis akun yang berbeda, pilih opsi Bantu saya memilih .
- Di bawah URI Pengalihan (opsional), gunakan menu drop-down untuk memilih Aplikasi halaman tunggal (SPA) dan masukkan
http://localhost:4200ke dalam kotak teks. - Pilih Daftarkan.
- Panel Gambaran Umum aplikasi ditampilkan saat pendaftaran selesai. Rekam ID Direktori (penyewa) dan ID Aplikasi (klien) yang akan digunakan dalam kode sumber aplikasi Anda.
Membuat proyek
Buka Visual Studio Code, pilih Buka File>Folder.... Navigasi ke dan pilih lokasi untuk membuat proyek Anda.
Buka terminal baru dengan memilih Terminal> Terminal Baru.
- Anda mungkin perlu beralih jenis terminal. Pilih panah bawah di + samping ikon di terminal dan pilih Prompt Perintah.
Jalankan perintah berikut untuk membuat proyek Angular baru dengan nama
msal-angular-tutorial, instal pustaka komponen Angular Material, MSAL Browser, MSAL Angular dan hasilkan komponen rumah dan profil.npm install -g @angular/cli ng new msal-angular-tutorial --routing=true --style=css --strict=false cd msal-angular-tutorial npm install @angular/material @angular/cdk npm install @azure/msal-browser @azure/msal-angular ng generate component home ng generate component profile
Mengonfigurasi aplikasi dan mengedit UI dasar
Buka src/app/app.module.ts.
MsalModuledanMsalInterceptorperlu ditambahkan bersamaimportsdenganisIEkonstanta. Anda juga akan menambahkan modul material. Ganti seluruh konten file dengan cuplikan berikut:import { BrowserModule } from "@angular/platform-browser"; import { BrowserAnimationsModule } from "@angular/platform-browser/animations"; import { NgModule } from "@angular/core"; import { MatButtonModule } from "@angular/material/button"; import { MatToolbarModule } from "@angular/material/toolbar"; import { MatListModule } from "@angular/material/list"; import { AppRoutingModule } from "./app-routing.module"; import { AppComponent } from "./app.component"; import { HomeComponent } from "./home/home.component"; import { ProfileComponent } from "./profile/profile.component"; import { MsalModule, MsalRedirectComponent } from "@azure/msal-angular"; import { PublicClientApplication } from "@azure/msal-browser"; const isIE = window.navigator.userAgent.indexOf("MSIE ") > -1 || window.navigator.userAgent.indexOf("Trident/") > -1; @NgModule({ declarations: [AppComponent, HomeComponent, ProfileComponent], imports: [ BrowserModule, BrowserAnimationsModule, AppRoutingModule, MatButtonModule, MatToolbarModule, MatListModule, MsalModule.forRoot( new PublicClientApplication({ auth: { clientId: "Enter_the_Application_Id_here", // Application (client) ID from the app registration authority: "Enter_the_Cloud_Instance_Id_Here/Enter_the_Tenant_Info_Here", // The Azure cloud instance and the app's sign-in audience (tenant ID, common, organizations, or consumers) redirectUri: "Enter_the_Redirect_Uri_Here", // This is your redirect URI }, cache: { cacheLocation: "localStorage", storeAuthStateInCookie: isIE, // Set to true for Internet Explorer 11 }, }), null, null ), ], providers: [], bootstrap: [AppComponent, MsalRedirectComponent], }) export class AppModule {}Ganti nilai berikut dengan nilai yang diperoleh dari pusat admin Microsoft Entra. Untuk informasi selengkapnya tentang opsi yang dapat dikonfigurasi yang tersedia, lihat Menginisialisasi aplikasi klien.
clientId- Pengidentifikasi aplikasi, juga disebut sebagai klien. GantiEnter_the_Application_Id_Heredengan nilai ID Aplikasi (klien) yang direkam sebelumnya dari halaman gambaran umum aplikasi terdaftar.authority- Ini terdiri dari dua bagian:- Instans adalah titik akhir penyedia cloud. Untuk cloud Azure utama atau global, masukkan
https://login.microsoftonline.com. Periksa dengan berbagai titik akhir yang tersedia di cloud Nasional. - ID Penyewa adalah pengidentifikasi penyewa tempat aplikasi terdaftar.
_Enter_the_Tenant_Info_HereGanti dengan nilai ID Direktori (penyewa) yang direkam sebelumnya dari halaman gambaran umum aplikasi terdaftar.
- Instans adalah titik akhir penyedia cloud. Untuk cloud Azure utama atau global, masukkan
redirectUri- lokasi tempat server otorisasi mengirim pengguna setelah aplikasi berhasil diotorisasi dan memberikan kode otorisasi atau token akses. GantiEnter_the_Redirect_Uri_Heredenganhttp://localhost:4200.
Buka src/app/app-routing.module.ts dan tambahkan rute ke komponen rumah dan profil . Ganti seluruh konten file dengan cuplikan berikut:
import { NgModule } from "@angular/core";
import { Routes, RouterModule } from "@angular/router";
import { BrowserUtils } from "@azure/msal-browser";
import { HomeComponent } from "./home/home.component";
import { ProfileComponent } from "./profile/profile.component";

const routes: Routes = [
  {
    path: "profile",
    component: ProfileComponent,
  },
  {
    path: "",
    component: HomeComponent,
  },
];

const isIframe = window !== window.parent && !window.opener;

@NgModule({
  imports: [
    RouterModule.forRoot(routes, {
      // Don't perform initial navigation in iframes or popups
      initialNavigation:
        !BrowserUtils.isInIframe() && !BrowserUtils.isInPopup()
          ? "enabledNonBlocking"
          : "disabled", // Set to enabledBlocking to use Angular Universal
    }),
  ],
  exports: [RouterModule],
})
export class AppRoutingModule {}
Buka src/app/app.component.html dan ganti kode yang ada dengan yang berikut ini:
<mat-toolbar color="primary">
  <a class="title" href="/">{{ title }}</a>

  <div class="toolbar-spacer"></div>

  <a mat-button [routerLink]="['profile']">Profile</a>

  <button mat-raised-button *ngIf="!loginDisplay" (click)="login()">Login</button>

</mat-toolbar>
<div class="container">
  <!--This is to avoid reload during acquireTokenSilent() because of hidden iframe -->
  <router-outlet *ngIf="!isIframe"></router-outlet>
</div>
Buka src/style.css untuk menentukan CSS:
@import "~@angular/material/prebuilt-themes/deeppurple-amber.css";

html,
body {
  height: 100%;
}
body {
  margin: 0;
  font-family: Roboto, "Helvetica Neue", sans-serif;
}
.container {
  margin: 1%;
}
Buka src/app/app.component.css untuk menambahkan gaya CSS ke aplikasi:
.toolbar-spacer {
  flex: 1 1 auto;
}

a.title {
  color: white;
}
Masuk menggunakan pop-up
Buka src/app/app.component.ts dan ganti konten file ke yang berikut ini untuk memasukkan pengguna menggunakan jendela pop-up:
import { MsalService } from '@azure/msal-angular';
import { Component, OnInit } from '@angular/core';

@Component({
  selector: 'app-root',
  templateUrl: './app.component.html',
  styleUrls: ['./app.component.css']
})
export class AppComponent implements OnInit {
  title = 'msal-angular-tutorial';
  isIframe = false;
  loginDisplay = false;

  constructor(private authService: MsalService) { }

  ngOnInit() {
    this.isIframe = window !== window.parent && !window.opener;
  }

  login() {
    this.authService.loginPopup()
      .subscribe({
        next: (result) => {
          console.log(result);
          this.setLoginDisplay();
        },
        error: (error) => console.log(error)
      });
  }

  setLoginDisplay() {
    this.loginDisplay = this.authService.instance.getAllAccounts().length > 0;
  }
}
Masuk menggunakan pengalihan
Perbarui src/app/app.module.ts untuk bootstrap
MsalRedirectComponent. Ini adalah komponen pengalihan khusus, yang menangani pengalihan.MsalModuleUbah impor danAppComponentbootstrap agar menyerupai berikut ini:... import { MsalModule, MsalRedirectComponent } from '@azure/msal-angular'; // Updated import ... bootstrap: [AppComponent, MsalRedirectComponent] // MsalRedirectComponent bootstrapped here ...Buka src/index.html dan ganti seluruh konten file dengan cuplikan berikut, yang menambahkan pemilih
<app-redirect>:<!doctype html> <html lang="en"> <head> <meta charset="utf-8"> <title>msal-angular-tutorial</title> <base href="/"> <meta name="viewport" content="width=device-width, initial-scale=1"> <link rel="icon" type="image/x-icon" href="favicon.ico"> </head> <body> <app-root></app-root> <app-redirect></app-redirect> </body> </html>Buka src/app/app.component.ts dan ganti kode dengan yang berikut ini untuk memasukkan pengguna menggunakan pengalihan bingkai penuh:
import { MsalService } from '@azure/msal-angular';
import { Component, OnInit } from '@angular/core';

@Component({
  selector: 'app-root',
  templateUrl: './app.component.html',
  styleUrls: ['./app.component.css']
})
export class AppComponent implements OnInit {
  title = 'msal-angular-tutorial';
  isIframe = false;
  loginDisplay = false;

  constructor(private authService: MsalService) { }

  ngOnInit() {
    this.isIframe = window !== window.parent && !window.opener;
  }

  login() {
    this.authService.loginRedirect();
  }

  setLoginDisplay() {
    this.loginDisplay = this.authService.instance.getAllAccounts().length > 0;
  }
}
Navigasi ke src/app/home/home.component.ts dan ganti seluruh konten file dengan cuplikan berikut untuk berlangganan
LOGIN_SUCCESSacara:import { Component, OnInit } from '@angular/core'; import { MsalBroadcastService, MsalService } from '@azure/msal-angular'; import { EventMessage, EventType, InteractionStatus } from '@azure/msal-browser'; import { filter } from 'rxjs/operators'; @Component({ selector: 'app-home', templateUrl: './home.component.html', styleUrls: ['./home.component.css'] }) export class HomeComponent implements OnInit { constructor(private authService: MsalService, private msalBroadcastService: MsalBroadcastService) { } ngOnInit(): void { this.msalBroadcastService.msalSubject$ .pipe( filter((msg: EventMessage) => msg.eventType === EventType.LOGIN_SUCCESS), ) .subscribe((result: EventMessage) => { console.log(result); }); } }
Penyajian bersyarat
Untuk merender Antarmuka Pengguna (UI) tertentu hanya untuk pengguna yang diautentikasi, komponen harus berlangganan MsalBroadcastService untuk melihat apakah pengguna telah masuk, dan interaksi telah selesai.
Tambahkan
MsalBroadcastServiceke src/app/app.component.ts dan berlanggananinProgress$yang dapat diamati untuk memeriksa apakah interaksi selesai dan akun masuk sebelum merender UI. Kode Anda akan terlihat seperti ini:import { Component, OnInit, OnDestroy } from '@angular/core'; import { MsalService, MsalBroadcastService } from '@azure/msal-angular'; import { InteractionStatus } from '@azure/msal-browser'; import { Subject } from 'rxjs'; import { filter, takeUntil } from 'rxjs/operators'; @Component({ selector: 'app-root', templateUrl: './app.component.html', styleUrls: ['./app.component.css'] }) export class AppComponent implements OnInit, OnDestroy { title = 'msal-angular-tutorial'; isIframe = false; loginDisplay = false; private readonly _destroying$ = new Subject<void>(); constructor(private broadcastService: MsalBroadcastService, private authService: MsalService) { } ngOnInit() { this.isIframe = window !== window.parent && !window.opener; this.broadcastService.inProgress$ .pipe( filter((status: InteractionStatus) => status === InteractionStatus.None), takeUntil(this._destroying$) ) .subscribe(() => { this.setLoginDisplay(); }) } login() { this.authService.loginRedirect(); } setLoginDisplay() { this.loginDisplay = this.authService.instance.getAllAccounts().length > 0; } ngOnDestroy(): void { this._destroying$.next(undefined); this._destroying$.complete(); } }Perbarui kode di src/app/home/home.component.ts untuk juga memeriksa interaksi yang akan diselesaikan sebelum memperbarui UI. Kode Anda akan terlihat seperti ini:
import { Component, OnInit } from '@angular/core';
import { MsalBroadcastService, MsalService } from '@azure/msal-angular';
import { EventMessage, EventType, InteractionStatus } from '@azure/msal-browser';
import { filter } from 'rxjs/operators';

@Component({
  selector: 'app-home',
  templateUrl: './home.component.html',
  styleUrls: ['./home.component.css']
})
export class HomeComponent implements OnInit {
  loginDisplay = false;

  constructor(private authService: MsalService, private msalBroadcastService: MsalBroadcastService) { }

  ngOnInit(): void {
    this.msalBroadcastService.msalSubject$
      .pipe(
        filter((msg: EventMessage) => msg.eventType === EventType.LOGIN_SUCCESS),
      )
      .subscribe((result: EventMessage) => {
        console.log(result);
      });

    this.msalBroadcastService.inProgress$
      .pipe(
        filter((status: InteractionStatus) => status === InteractionStatus.None)
      )
      .subscribe(() => {
        this.setLoginDisplay();
      })
  }

  setLoginDisplay() {
    this.loginDisplay = this.authService.instance.getAllAccounts().length > 0;
  }
}
Ganti kode di src/app/home/home.component.html dengan tampilan bersyarat berikut:
<div *ngIf="!loginDisplay">
    <p>Please sign-in to see your profile information.</p>
</div>

<div *ngIf="loginDisplay">
    <p>Login successful!</p>
    <p>Request your profile information by clicking Profile above.</p>
</div>
Menerapkan Angular Guard
Kelas MsalGuard adalah kelas yang dapat Anda gunakan untuk melindungi rute dan memerlukan autentikasi sebelum mengakses rute yang dilindungi. Langkah-langkah berikut menambahkan MsalGuard ke Profile rute. Melindungi Profile rute berarti bahwa meskipun pengguna tidak masuk menggunakan Login tombol , jika mereka mencoba mengakses Profile rute atau memilih Profile tombol , MsalGuard pengguna akan meminta pengguna untuk mengautentikasi melalui pop-up atau mengalihkan sebelum menampilkan Profile halaman.
MsalGuard adalah kelas kenyamanan yang dapat Anda gunakan untuk meningkatkan pengalaman pengguna, tetapi tidak boleh diandalkan untuk keamanan. Penyerang berpotensi mendapatkan sekitar penjaga sisi klien, dan Anda harus memastikan bahwa server tidak mengembalikan data apa pun yang tidak boleh diakses pengguna.
Tambahkan kelas
MsalGuardsebagai penyedia di aplikasi Anda di src/app/app.module.ts, dan tambahkan konfigurasi untukMsalGuard. Cakupan yang diperlukan untuk memperoleh token nanti dapat disediakan diauthRequest, dan jenis interaksi untuk Penjaga dapat diatur keRedirectatauPopup. Kode Anda akan terlihat seperti ini:import { BrowserModule } from "@angular/platform-browser"; import { BrowserAnimationsModule } from "@angular/platform-browser/animations"; import { NgModule } from "@angular/core"; import { MatButtonModule } from "@angular/material/button"; import { MatToolbarModule } from "@angular/material/toolbar"; import { MatListModule } from "@angular/material/list"; import { AppRoutingModule } from "./app-routing.module"; import { AppComponent } from "./app.component"; import { HomeComponent } from "./home/home.component"; import { ProfileComponent } from "./profile/profile.component"; import { MsalModule, MsalRedirectComponent, MsalGuard, } from "@azure/msal-angular"; // MsalGuard added to imports import { PublicClientApplication, InteractionType, } from "@azure/msal-browser"; // InteractionType added to imports const isIE = window.navigator.userAgent.indexOf("MSIE ") > -1 || window.navigator.userAgent.indexOf("Trident/") > -1; @NgModule({ declarations: [AppComponent, HomeComponent, ProfileComponent], imports: [ BrowserModule, BrowserAnimationsModule, AppRoutingModule, MatButtonModule, MatToolbarModule, MatListModule, MsalModule.forRoot( new PublicClientApplication({ auth: { clientId: "Enter_the_Application_Id_here", authority: "Enter_the_Cloud_Instance_Id_Here/Enter_the_Tenant_Info_Here", redirectUri: "Enter_the_Redirect_Uri_Here", }, cache: { cacheLocation: "localStorage", storeAuthStateInCookie: isIE, }, }), { interactionType: InteractionType.Redirect, // MSAL Guard Configuration authRequest: { scopes: ["user.read"], }, }, null ), ], providers: [ MsalGuard, // MsalGuard added as provider here ], bootstrap: [AppComponent, MsalRedirectComponent], }) export class AppModule {}Atur
MsalGuarddi rute yang ingin Anda lindungi di src/app/app-routing.module.ts:import { NgModule } from "@angular/core"; import { Routes, RouterModule } from "@angular/router"; import { BrowserUtils } from "@azure/msal-browser"; import { HomeComponent } from "./home/home.component"; import { ProfileComponent } from "./profile/profile.component"; import { MsalGuard } from "@azure/msal-angular"; const routes: Routes = [ { path: "profile", component: ProfileComponent, canActivate: [MsalGuard], }, { path: "", component: HomeComponent, }, ]; const isIframe = window !== window.parent && !window.opener; @NgModule({ imports: [ RouterModule.forRoot(routes, { // Don't perform initial navigation in iframes or popups initialNavigation: !BrowserUtils.isInIframe() && !BrowserUtils.isInPopup() ? "enabledNonBlocking" : "disabled", // Set to enabledBlocking to use Angular Universal }), ], exports: [RouterModule], }) export class AppRoutingModule {}Sesuaikan panggilan masuk di src/app/app.component.ts untuk mempertimbangkan
authRequestyang diatur dalam konfigurasi penjaga. Kode Anda sekarang akan terlihat seperti ini:import { Component, OnInit, OnDestroy, Inject } from '@angular/core'; import { MsalService, MsalBroadcastService, MSAL_GUARD_CONFIG, MsalGuardConfiguration } from '@azure/msal-angular'; import { InteractionStatus, RedirectRequest } from '@azure/msal-browser'; import { Subject } from 'rxjs'; import { filter, takeUntil } from 'rxjs/operators'; @Component({ selector: 'app-root', templateUrl: './app.component.html', styleUrls: ['./app.component.css'] }) export class AppComponent implements OnInit, OnDestroy { title = 'msal-angular-tutorial'; isIframe = false; loginDisplay = false; private readonly _destroying$ = new Subject<void>(); constructor(@Inject(MSAL_GUARD_CONFIG) private msalGuardConfig: MsalGuardConfiguration, private broadcastService: MsalBroadcastService, private authService: MsalService) { } ngOnInit() { this.isIframe = window !== window.parent && !window.opener; this.broadcastService.inProgress$ .pipe( filter((status: InteractionStatus) => status === InteractionStatus.None), takeUntil(this._destroying$) ) .subscribe(() => { this.setLoginDisplay(); }) } login() { if (this.msalGuardConfig.authRequest){ this.authService.loginRedirect({...this.msalGuardConfig.authRequest} as RedirectRequest); } else { this.authService.loginRedirect(); } } setLoginDisplay() { this.loginDisplay = this.authService.instance.getAllAccounts().length > 0; } ngOnDestroy(): void { this._destroying$.next(undefined); this._destroying$.complete(); } }
Memperoleh token
Interseptor Angular
MSAL Angular menyediakan kelas Interceptor yang secara otomatis memperoleh token untuk permintaan keluar yang menggunakan klien http Angular ke sumber daya yang dilindungi yang diketahui.
Tambahkan kelas
Interceptorsebagai penyedia ke aplikasi Anda di src/app/app.module.ts, dengan konfigurasinya. Kode Anda sekarang akan terlihat seperti ini:import { BrowserModule } from "@angular/platform-browser"; import { BrowserAnimationsModule } from "@angular/platform-browser/animations"; import { NgModule } from "@angular/core"; import { HTTP_INTERCEPTORS, HttpClientModule } from "@angular/common/http"; // Import import { MatButtonModule } from "@angular/material/button"; import { MatToolbarModule } from "@angular/material/toolbar"; import { MatListModule } from "@angular/material/list"; import { AppRoutingModule } from "./app-routing.module"; import { AppComponent } from "./app.component"; import { HomeComponent } from "./home/home.component"; import { ProfileComponent } from "./profile/profile.component"; import { MsalModule, MsalRedirectComponent, MsalGuard, MsalInterceptor, } from "@azure/msal-angular"; // Import MsalInterceptor import { InteractionType, PublicClientApplication, } from "@azure/msal-browser"; const isIE = window.navigator.userAgent.indexOf("MSIE ") > -1 || window.navigator.userAgent.indexOf("Trident/") > -1; @NgModule({ declarations: [AppComponent, HomeComponent, ProfileComponent], imports: [ BrowserModule, BrowserAnimationsModule, AppRoutingModule, MatButtonModule, MatToolbarModule, MatListModule, HttpClientModule, MsalModule.forRoot( new PublicClientApplication({ auth: { clientId: "Enter_the_Application_Id_Here", authority: "Enter_the_Cloud_Instance_Id_Here/Enter_the_Tenant_Info_Here", redirectUri: "Enter_the_Redirect_Uri_Here", }, cache: { cacheLocation: "localStorage", storeAuthStateInCookie: isIE, }, }), { interactionType: InteractionType.Redirect, authRequest: { scopes: ["user.read"], }, }, { interactionType: InteractionType.Redirect, // MSAL Interceptor Configuration protectedResourceMap: new Map([ ["Enter_the_Graph_Endpoint_Here/v1.0/me", ["user.read"]], ]), } ), ], providers: [ { provide: HTTP_INTERCEPTORS, useClass: MsalInterceptor, multi: true, }, MsalGuard, ], bootstrap: [AppComponent, MsalRedirectComponent], }) export class AppModule {}Sumber daya yang dilindungi disediakan sebagai
protectedResourceMap. URL yang Anda berikan dalam koleksiprotectedResourceMappeka huruf besar/kecil. Untuk setiap sumber daya, tambahkan cakupan yang diminta untuk dikembalikan dalam token akses.Misalnya:
["user.read"]untuk Microsoft Graph["<Application ID URL>/scope"]untuk API web kustom (yaitu,api://<Application ID>/access_as_user)
Ubah nilai di bagian
protectedResourceMapseperti yang dijelaskan di sini:Enter_the_Graph_Endpoint_Hereadalah instans Microsoft Graph API yang harus dikomunikasikan dengan aplikasi. Untuk titik akhir Microsoft Graph API global , ganti string ini denganhttps://graph.microsoft.com. Untuk titik akhir dalam penyebaran cloud nasional, lihat Penyebaran cloud nasional dalam dokumentasi Microsoft Graph.
Ganti kode di src/app/profile/profile.component.ts untuk mengambil profil pengguna dengan permintaan HTTP, dan ganti
GRAPH_ENDPOINTdengan titik akhir Microsoft Graph:import { Component, OnInit } from '@angular/core'; import { HttpClient } from '@angular/common/http'; const GRAPH_ENDPOINT = 'Enter_the_Graph_Endpoint_Here/v1.0/me'; type ProfileType = { givenName?: string, surname?: string, userPrincipalName?: string, id?: string }; @Component({ selector: 'app-profile', templateUrl: './profile.component.html', styleUrls: ['./profile.component.css'] }) export class ProfileComponent implements OnInit { profile!: ProfileType; constructor( private http: HttpClient ) { } ngOnInit() { this.getProfile(); } getProfile() { this.http.get(GRAPH_ENDPOINT) .subscribe(profile => { this.profile = profile; }); } }Ganti UI di src/app/profile/profile.component.html untuk menampilkan informasi profil:
<div>
    <p><strong>First Name: </strong> {{profile?.givenName}}</p>
    <p><strong>Last Name: </strong> {{profile?.surname}}</p>
    <p><strong>Email: </strong> {{profile?.userPrincipalName}}</p>
    <p><strong>Id: </strong> {{profile?.id}}</p>
</div>
Keluar
Perbarui kode dalam src/app/app.component.html untuk menampilkan tombol
Logoutsecara kondisional:<mat-toolbar color="primary"> <a class="title" href="/">{{ title }}</a> <div class="toolbar-spacer"></div> <a mat-button [routerLink]="['profile']">Profile</a> <button mat-raised-button *ngIf="!loginDisplay" (click)="login()">Login</button> <button mat-raised-button *ngIf="loginDisplay" (click)="logout()">Logout</button> </mat-toolbar> <div class="container"> <!--This is to avoid reload during acquireTokenSilent() because of hidden iframe --> <router-outlet *ngIf="!isIframe"></router-outlet> </div>
Keluar menggunakan pengalihan
Perbarui kode di src/app/app.component.ts untuk mengeluarkan pengguna menggunakan pengalihan:
import { Component, OnInit, OnDestroy, Inject } from '@angular/core';
import { MsalService, MsalBroadcastService, MSAL_GUARD_CONFIG, MsalGuardConfiguration } from '@azure/msal-angular';
import { InteractionStatus, RedirectRequest } from '@azure/msal-browser';
import { Subject } from 'rxjs';
import { filter, takeUntil } from 'rxjs/operators';

@Component({
  selector: 'app-root',
  templateUrl: './app.component.html',
  styleUrls: ['./app.component.css']
})
export class AppComponent implements OnInit, OnDestroy {
  title = 'msal-angular-tutorial';
  isIframe = false;
  loginDisplay = false;
  private readonly _destroying$ = new Subject<void>();

  constructor(@Inject(MSAL_GUARD_CONFIG) private msalGuardConfig: MsalGuardConfiguration, private broadcastService: MsalBroadcastService, private authService: MsalService) { }

  ngOnInit() {
    this.isIframe = window !== window.parent && !window.opener;

    this.broadcastService.inProgress$
    .pipe(
      filter((status: InteractionStatus) => status === InteractionStatus.None),
      takeUntil(this._destroying$)
    )
    .subscribe(() => {
      this.setLoginDisplay();
    })
  }

  login() {
    if (this.msalGuardConfig.authRequest){
      this.authService.loginRedirect({...this.msalGuardConfig.authRequest} as RedirectRequest);
    } else {
      this.authService.loginRedirect();
    }
  }

  logout() { // Add log out function here
    this.authService.logoutRedirect({
      postLogoutRedirectUri: 'http://localhost:4200'
    });
  }

  setLoginDisplay() {
    this.loginDisplay = this.authService.instance.getAllAccounts().length > 0;
  }

  ngOnDestroy(): void {
    this._destroying$.next(undefined);
    this._destroying$.complete();
  }
}
Keluar menggunakan popup
Perbarui kode di src/app/app.component.ts untuk mengeluarkan pengguna menggunakan popup:
import { Component, OnInit, OnDestroy, Inject } from '@angular/core';
import { MsalService, MsalBroadcastService, MSAL_GUARD_CONFIG, MsalGuardConfiguration } from '@azure/msal-angular';
import { InteractionStatus, PopupRequest } from '@azure/msal-browser';
import { Subject } from 'rxjs';
import { filter, takeUntil } from 'rxjs/operators';

@Component({
  selector: 'app-root',
  templateUrl: './app.component.html',
  styleUrls: ['./app.component.css']
})
export class AppComponent implements OnInit, OnDestroy {
  title = 'msal-angular-tutorial';
  isIframe = false;
  loginDisplay = false;
  private readonly _destroying$ = new Subject<void>();

  constructor(@Inject(MSAL_GUARD_CONFIG) private msalGuardConfig: MsalGuardConfiguration, private broadcastService: MsalBroadcastService, private authService: MsalService) { }

  ngOnInit() {
    this.isIframe = window !== window.parent && !window.opener;

    this.broadcastService.inProgress$
    .pipe(
      filter((status: InteractionStatus) => status === InteractionStatus.None),
      takeUntil(this._destroying$)
    )
    .subscribe(() => {
      this.setLoginDisplay();
    })
  }

  login() {
    if (this.msalGuardConfig.authRequest){
      this.authService.loginPopup({...this.msalGuardConfig.authRequest} as PopupRequest)
        .subscribe({
          next: (result) => {
            console.log(result);
            this.setLoginDisplay();
          },
          error: (error) => console.log(error)
        });
    } else {
      this.authService.loginPopup()
        .subscribe({
          next: (result) => {
            console.log(result);
            this.setLoginDisplay();
          },
          error: (error) => console.log(error)
        });
    }
  }

  logout() { // Add log out function here
    this.authService.logoutPopup({
      mainWindowRedirectUri: "/"
    });
  }

  setLoginDisplay() {
    this.loginDisplay = this.authService.instance.getAllAccounts().length > 0;
  }

  ngOnDestroy(): void {
    this._destroying$.next(undefined);
    this._destroying$.complete();
  }
}
Menguji kode
Mulai server web untuk mendengarkan port dengan menjalankan perintah berikut ini pada baris perintah dari folder aplikasi:
npm install
npm start
Di browser Anda, masukkan
http://localhost:4200, dan Anda akan melihat halaman yang terlihat seperti berikut ini.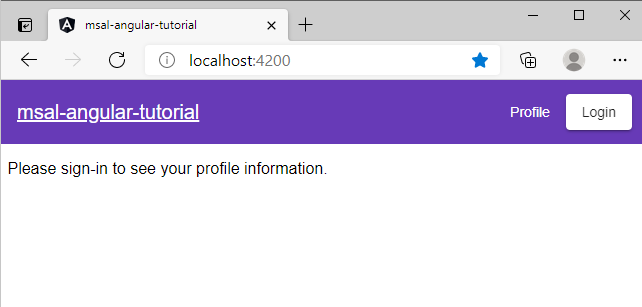
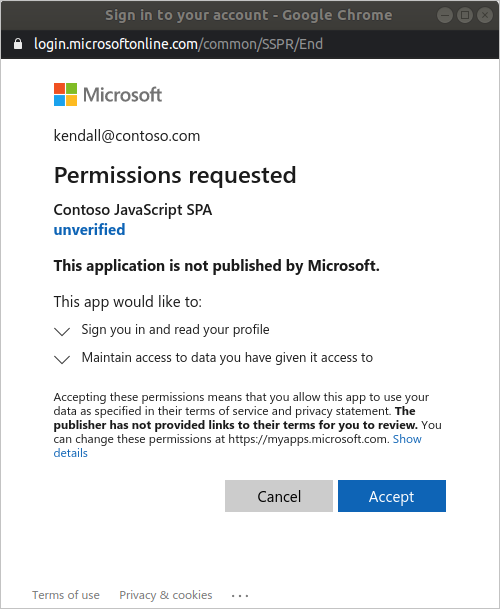
Pilih Terima untuk memberikan izin aplikasi ke profil Anda. Ini akan terjadi pertama kalinya Anda mulai masuk.
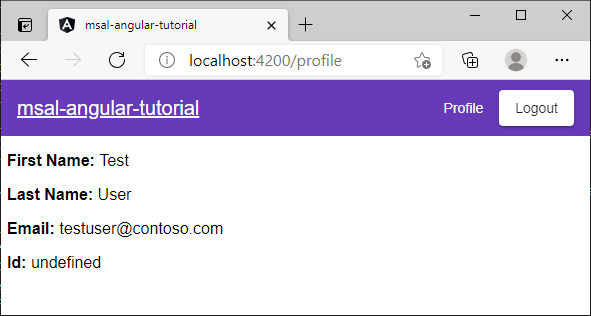
Setelah menyetujui, berikut ini Jika Anda menyetujui izin yang diminta, aplikasi web menunjukkan halaman masuk yang berhasil.

Pilih Profil untuk melihat informasi profil pengguna yang dikembalikan dalam respons dari panggilan ke Microsoft Graph API:
Menambahkan lingkup dan izin delegasi
Microsoft Graph API memerlukan cakupan User.Read untuk membaca profil pengguna. Cakupan User.Read ditambahkan secara otomatis ke setiap pendaftaran aplikasi. API lain untuk Microsoft Graph, dan API kustom untuk server back-end Anda, mungkin memerlukan cakupan lain. Misalnya, Microsoft Graph API memerlukan cakupan Mail.Read untuk mencantumkan email pengguna.
Saat Anda menambahkan cakupan, pengguna Anda mungkin diminta untuk memberikan persetujuan tambahan untuk cakupan yang ditambahkan.
Catatan
Pengguna mungkin diminta untuk memberikan persetujuan tambahan saat Anda meningkatkan jumlah cakupan.
Bantuan dan dukungan
Jika Anda memerlukan bantuan, ingin melaporkan masalah, atau ingin mempelajari opsi dukungan, lihat Bantuan dan dukungan bagi pengembang.
Langkah berikutnya
- Pelajari lebih lanjut dengan membangun aplikasi Halaman tunggal React (SPA) yang memasukkan pengguna dalam seri tutorial multi-bagian berikut.