Membuat sumber data (Android SDK)
Azure Maps Android SDK menyimpan data di sumber data. Menggunakan sumber data akan mengoptimalkan operasi data untuk pembuatan kueri dan penyajian. Saat ini, ada dua jenis sumber data:
- Sumber GeoJSON: Mengelola data lokasi mentah dalam format GeoJSON secara lokal. Baik untuk himpunan data kecil hingga menengah (di atas ratusan ribu bentuk).
- Sumber petak peta vektor: Memuat data yang diformat sebagai petak peta vektor untuk tampilan peta saat ini, didasarkan pada sistem petak peta. Ideal untuk himpunan data besar hingga masif (jutaan atau miliaran bentuk).
Catatan
Penghentian Azure Peta Android SDK
Azure Peta Native SDK untuk Android sekarang tidak digunakan lagi dan akan dihentikan pada 31/3/25. Untuk menghindari gangguan layanan, migrasikan ke Azure Peta Web SDK dengan 3/31/25. Untuk informasi selengkapnya, lihat Panduan migrasi Azure Peta Android SDK.
Sumber data GeoJSON
Azure Maps menggunakan GeoJSON sebagai salah satu model data utamanya. GeoJSON adalah cara standar geospasial terbuka untuk mewakili data geospasial dalam format JSON. Kelas GeoJSON tersedia di Azure Maps Android SDK untuk memudahkan membuat dan menserialisasikan data GeoJSON. Muat dan simpan data GeoJSON di kelas DataSource dan render menggunakan layer. Kode berikut menunjukkan cara objek GeoJSON dapat dibuat di Azure Maps.
/*
    Raw GeoJSON feature

    {
         "type": "Feature",
         "geometry": {
             "type": "Point",
             "coordinates": [-100, 45]
         },
         "properties": {
             "custom-property": "value"
         }
    }

*/

//Create a point feature.
Feature feature = Feature.fromGeometry(Point.fromLngLat(-100, 45));

//Add a property to the feature.
feature.addStringProperty("custom-property", "value");

//Add the feature to the data source.
source.add(feature);
/*
    Raw GeoJSON feature

    {
         "type": "Feature",
         "geometry": {
             "type": "Point",
             "coordinates": [-100, 45]
         },
         "properties": {
             "custom-property": "value"
         }
    }

*/

//Create a point feature.
val feature = Feature.fromGeometry(Point.fromLngLat(-100, 45))

//Add a property to the feature.
feature.addStringProperty("custom-property", "value")

//Add the feature to the data source.
source.add(feature)
Tip
Data GeoJSON dapat ditambahkan ke DataSource instans menggunakan salah satu dari tiga metode; add, importDataFromUrl, dan setShapes. Metode setShapes menyediakan cara yang efisien untuk menimpa semua data dalam sumber data. Jika Anda memanggil clear maka gunakan metode add untuk menggantikan semua sumber data, dua panggilan render kemudian akan dibuat ke peta. Metode setShape menghapus dan menambahkan data ke sumber data dengan satu panggilan render ke peta.
Atau properti dapat dimuat ke dalam JsonObject terlebih dahulu kemudian diteruskan ke fitur saat membuatnya, seperti yang ditunjukkan dalam kode sampel berikut.
//Create a JsonObject to store properties for the feature.
JsonObject properties = new JsonObject();
properties.addProperty("custom-property", "value");

Feature feature = Feature.fromGeometry(Point.fromLngLat(-100, 45), properties);
//Create a JsonObject to store properties for the feature.
val properties = JsonObject()
properties.addProperty("custom-property", "value")

val feature = Feature.fromGeometry(Point.fromLngLat(-100, 45), properties)
Setelah Anda membuat fitur GeoJSON, sumber data dapat ditambahkan ke peta melalui properti sources peta. Kode berikut memperlihatkan cara membuat DataSource, menambahkannya ke peta, dan menambahkan fitur ke sumber data.
//Create a data source and add it to the map.
DataSource source = new DataSource();
map.sources.add(source);

//Add GeoJSON feature to the data source.
source.add(feature);
Kode berikut menunjukkan beberapa cara membuat Fitur GeoJSON, FeatureCollection, dan geometri.
//GeoJSON Point Geometry
Point point = Point.fromLngLat(LONGITUDE, LATITUDE);

//GeoJSON Point Geometry
LineString linestring = LineString.fromLngLats(PointList);

//GeoJSON Polygon Geometry
Polygon polygon = Polygon.fromLngLats(listOfPointList);

Polygon polygonFromOuterInner = Polygon.fromOuterInner(outerLineStringObject,innerLineStringObject);

//GeoJSON MultiPoint Geometry
MultiPoint multiPoint = MultiPoint.fromLngLats(PointList);

//GeoJSON MultiLineString Geometry
MultiLineString multiLineStringFromLngLat = MultiLineString.fromLngLats(listOfPointList);

MultiLineString multiLineString = MultiLineString.fromLineString(singleLineString);

//GeoJSON MultiPolygon Geometry
MultiPolygon multiPolygon = MultiPolygon.fromLngLats(listOflistOfPointList);

MultiPolygon multiPolygonFromPolygon = MultiPolygon.fromPolygon(polygon);

MultiPolygon multiPolygonFromPolygons = MultiPolygon.fromPolygons(PolygonList);

//GeoJSON Feature
Feature pointFeature = Feature.fromGeometry(Point.fromLngLat(LONGITUDE, LATITUDE));

//GeoJSON FeatureCollection
FeatureCollection featureCollectionFromSingleFeature = FeatureCollection.fromFeature(pointFeature);

FeatureCollection featureCollection = FeatureCollection.fromFeatures(listOfFeatures);
//GeoJSON Point Geometry
val point = Point.fromLngLat(LONGITUDE, LATITUDE)

//GeoJSON Point Geometry
val linestring = LineString.fromLngLats(PointList)

//GeoJSON Polygon Geometry
val polygon = Polygon.fromLngLats(listOfPointList)

val polygonFromOuterInner = Polygon.fromOuterInner(outerLineStringObject, innerLineStringObject)

//GeoJSON MultiPoint Geometry
val multiPoint = MultiPoint.fromLngLats(PointList)

//GeoJSON MultiLineString Geometry
val multiLineStringFromLngLat = MultiLineString.fromLngLats(listOfPointList)

val multiLineString = MultiLineString.fromLineString(singleLineString)

//GeoJSON MultiPolygon Geometry
val multiPolygon = MultiPolygon.fromLngLats(listOflistOfPointList)

val multiPolygonFromPolygon = MultiPolygon.fromPolygon(polygon)

val multiPolygonFromPolygons = MultiPolygon.fromPolygons(PolygonList)

//GeoJSON Feature
val pointFeature = Feature.fromGeometry(Point.fromLngLat(LONGITUDE, LATITUDE))

//GeoJSON FeatureCollection
val featureCollectionFromSingleFeature = FeatureCollection.fromFeature(pointFeature)

val featureCollection = FeatureCollection.fromFeatures(listOfFeatures)
Serialisasi dan deserialisasi GeoJSON
Koleksi fitur, fitur, dan kelas geometri semuanya memiliki metode statis fromJson() dan toJson(), yang membantu serialisasi. String JSON yang valid yang diformat melewati fromJson() metode membuat objek geometri. Metode fromJson() ini juga berarti Anda dapat menggunakan Gson atau strategi serialisasi/deserialisasi lainnya. Kode berikut menunjukkan cara mengambil fitur GeoJSON yang diubah ke string dan mendeserialisasikannya ke dalam kelas Fitur, lalu menserialisasikannya kembali ke dalam string GeoJSON.
//Take a stringified GeoJSON object.
String GeoJSON_STRING = "{"
    + "      \"type\": \"Feature\","
    + "      \"geometry\": {"
    + "            \"type\": \"Point\""
    + "            \"coordinates\": [-100, 45]"
    + "      },"
    + "      \"properties\": {"
    + "            \"custom-property\": \"value\""
    + "      },"
    + "}";

//Deserialize the JSON string into a feature.
Feature feature = Feature.fromJson(GeoJSON_STRING);

//Serialize a feature collection to a string.
String featureString = feature.toJson();
//Take a stringified GeoJSON object.
val GeoJSON_STRING = ("{"
        + "      \"type\": \"Feature\","
        + "      \"geometry\": {"
        + "            \"type\": \"Point\""
        + "            \"coordinates\": [-100, 45]"
        + "      },"
        + "      \"properties\": {"
        + "            \"custom-property\": \"value\""
        + "      },"
        + "}")

//Deserialize the JSON string into a feature.
val feature = Feature.fromJson(GeoJSON_STRING)

//Serialize a feature collection to a string.
val featureString = feature.toJson()
Mengimpor data GeoJSON dari folder aset atau web
Sebagian besar file GeoJSON berisi FeatureCollection. Baca file GeoJSON sebagai string dan gunakan metode FeatureCollection.fromJson untuk mendeserialisasinya.
Kelas DataSource ini memiliki metode bawaan yang disebut importDataFromUrl yang dapat dimuat dalam file GeoJSON menggunakan URL ke file di web atau di folder aset. Metode ini harus dipanggil sebelum sumber data ditambahkan ke peta.
zone_pivot_groups: azure-maps-android
//Create a data source and add it to the map.
DataSource source = new DataSource();

//Import the geojson data and add it to the data source.
source.importDataFromUrl("URL_or_FilePath_to_GeoJSON_data");

//Examples:
//source.importDataFromUrl("asset://sample_file.json");
//source.importDataFromUrl("https://example.com/sample_file.json");

//Add data source to the map.
map.sources.add(source);
//Create a data source and add it to the map.
var source = new DataSource()

//Import the geojson data and add it to the data source.
source.importDataFromUrl("URL_or_FilePath_to_GeoJSON_data")

//Examples:
//source.importDataFromUrl("asset://sample_file.json")
//source.importDataFromUrl("https://example.com/sample_file.json")

//Add data source to the map.
map.sources.add(source)
Metode ini importDataFromUrl menyediakan cara mudah untuk memuat umpan GeoJSON ke sumber data tetapi memberikan kontrol terbatas tentang bagaimana data dimuat dan apa yang terjadi setelah dimuat. Kode berikut adalah kelas yang dapat digunakan kembali untuk mengimpor data dari folder web atau aset sebagai string dan menampilkannya ke rangkaian UI melalui fungsi panggilan balik. Selanjutnya, tambahkan lebih banyak logika pemuatan pos dalam panggilan balik untuk memproses data, menambahkannya ke peta, menghitung kotak pembatasnya, dan memperbarui kamera peta.
import android.content.Context;
import android.os.Handler;
import android.os.Looper;
import android.webkit.URLUtil;

import java.io.BufferedReader;
import java.io.IOException;
import java.io.InputStream;
import java.io.InputStreamReader;
import java.net.URL;
import java.util.concurrent.ExecutorService;
import java.util.concurrent.Executors;

import javax.net.ssl.HttpsURLConnection;

public class Utils {

    interface SimpleCallback {
        void notify(String result);
    }

    /**
     * Imports data from a web url or asset file name and returns it to a callback.
     * @param urlOrFileName A web url or asset file name that points to data to load.
     * @param context The context of the app.
     * @param callback The callback function to return the data to.
     */
    public static void importData(String urlOrFileName, Context context, SimpleCallback callback){
        importData(urlOrFileName, context, callback, null);
    }

    /**
     * Imports data from a web url or asset file name and returns it to a callback.
     * @param urlOrFileName A web url or asset file name that points to data to load.
     * @param context The context of the app.
     * @param callback The callback function to return the data to.
     * @param error A callback function to return errors to.
     */
    public static void importData(String urlOrFileName, Context context, SimpleCallback callback, SimpleCallback error){
        if(urlOrFileName != null && callback != null) {
            ExecutorService executor = Executors.newSingleThreadExecutor();
            Handler handler = new Handler(Looper.getMainLooper());

            executor.execute(() -> {
                String data = null;

                try {

                    if(URLUtil.isNetworkUrl(urlOrFileName)){
                        data = importFromWeb(urlOrFileName);
                    } else {
                        //Assume file is in assets folder.
                        data = importFromAssets(context, urlOrFileName);
                    }

                    final String result = data;

                    handler.post(() -> {
                        //Ensure the resulting data string is not null or empty.
                        if (result != null && !result.isEmpty()) {
                            callback.notify(result);
                        } else {
                            error.notify("No data imported.");
                        }
                    });
                } catch(Exception e) {
                    if(error != null){
                        error.notify(e.getMessage());
                    }
                }
            });
        }
    }

    /**
     * Imports data from an assets file as a string.
     * @param context The context of the app.
     * @param fileName The asset file name.
     * @return
     * @throws IOException
     */
    private static String importFromAssets(Context context, String fileName) throws IOException {
        InputStream stream = null;

        try {
            stream = context.getAssets().open(fileName);

            if(stream != null) {
                return readStreamAsString(stream);
            }
        } catch (Exception e) {
            e.printStackTrace();
        } finally {
            // Close Stream and disconnect HTTPS connection.
            if (stream != null) {
                stream.close();
            }
        }

        return null;
    }

    /**
     * Imports data from the web as a string.
     * @param url URL to the data.
     * @return
     * @throws IOException
     */
    private static String importFromWeb(String url) throws IOException {
        InputStream stream = null;
        HttpsURLConnection connection = null;
        String result = null;

        try {
            connection = (HttpsURLConnection) new URL(url).openConnection();

            //For this use case, set HTTP method to GET.
            connection.setRequestMethod("GET");

            //Open communications link (network traffic occurs here).
            connection.connect();

            int responseCode = connection.getResponseCode();
            if (responseCode != HttpsURLConnection.HTTP_OK) {
                throw new IOException("HTTP error code: " + responseCode);
            }

            //Retrieve the response body as an InputStream.
            stream = connection.getInputStream();

            if (stream != null) {
                return readStreamAsString(stream);
            }
        } catch (Exception e) {
            e.printStackTrace();
        } finally {
            // Close Stream and disconnect HTTPS connection.
            if (stream != null) {
                stream.close();
            }
            if (connection != null) {
                connection.disconnect();
            }
        }

        return result;
    }

    /**
     * Reads an input stream as a string.
     * @param stream Stream to convert.
     * @return
     * @throws IOException
     */
    private static String readStreamAsString(InputStream stream) throws IOException {
        //Convert the contents of an InputStream to a String.
        BufferedReader in = new BufferedReader(new InputStreamReader(stream, "UTF-8"));

        String inputLine;
        StringBuffer response = new StringBuffer();

        while ((inputLine = in.readLine()) != null) {
            response.append(inputLine);
        }

        in.close();

        return response.toString();
    }
}
import android.content.Context
import android.os.Handler
import android.os.Looper
import android.webkit.URLUtil
import java.net.URL
import java.util.concurrent.ExecutorService
import java.util.concurrent.Executors

class Utils {
    companion object {

        /**
            * Imports data from a web url or asset file name and returns it to a callback.
            * @param urlOrFileName A web url or asset file name that points to data to load.
            * @param context The context of the app.
            * @param callback The callback function to return the data to.
            */
        fun importData(urlOrFileName: String?, context: Context, callback: (String?) -> Unit) {
            importData(urlOrFileName, context, callback, null)
        }

        /**
            * Imports data from a web url or asset file name and returns it to a callback.
            * @param urlOrFileName A web url or asset file name that points to data to load.
            * @param context The context of the app.
            * @param callback The callback function to return the data to.
            * @param error A callback function to return errors to.
            */
        public fun importData(urlOrFileName: String?, context: Context, callback: (String?) -> Unit, error: ((String?) -> Unit)?) {
            if (urlOrFileName != null && callback != null) {
                val executor: ExecutorService = Executors.newSingleThreadExecutor()
                val handler = Handler(Looper.getMainLooper())
                executor.execute {
                    var data: String? = null

                    try {
                        data = if (URLUtil.isNetworkUrl(urlOrFileName)) {
                            URL(urlOrFileName).readText()
                        } else { //Assume file is in assets folder.
                            context.assets.open(urlOrFileName).bufferedReader().use{
                                it.readText()
                            }
                        }

                        handler.post {
                            //Ensure the resulting data string is not null or empty.
                            if (data != null && !data.isEmpty()) {
                                callback(data)
                            } else {
                                error!!("No data imported.")
                            }
                        }
                    } catch (e: Exception) {
                        error!!(e.message)
                    }
                }
            }
        }
    }
}
Kode berikut menunjukkan cara menggunakan utilitas ini untuk mengimpor data GeoJSON sebagai string dan mengembalikannya ke utas UI melalui panggilan balik. Dalam panggilan balik, data string dapat diserialisasikan ke dalam koleksi Fitur GeoJSON dan ditambahkan ke sumber data. Secara opsional, perbarui kamera peta untuk fokus pada data.
//Create a data source and add it to the map.
DataSource source = new DataSource();
map.sources.add(source);

//Import the geojson data and add it to the data source.
Utils.importData("URL_or_FilePath_to_GeoJSON_data",
    this,
    (String result) -> {
        //Parse the data as a GeoJSON Feature Collection.
        FeatureCollection fc = FeatureCollection.fromJson(result);

        //Add the feature collection to the data source.
        source.add(fc);

        //Optionally, update the maps camera to focus in on the data.

        //Calculate the bounding box of all the data in the Feature Collection.
        BoundingBox bbox = MapMath.fromData(fc);

        //Update the maps camera so it is focused on the data.
        map.setCamera(
            bounds(bbox),
            padding(20));
    });
//Create a data source and add it to the map.
DataSource source = new DataSource();
map.sources.add(source);

//Import the GeoJSON data and add it to the data source.
Utils.importData("SamplePoiDataSet.json", this) {
    result: String? ->
        //Parse the data as a GeoJSON Feature Collection.
            val fc = FeatureCollection.fromJson(result!!)

        //Add the feature collection to the data source.
        source.add(fc)

        //Optionally, update the maps camera to focus in on the data.

        //Calculate the bounding box of all the data in the Feature Collection.
        val bbox = MapMath.fromData(fc);

        //Update the maps camera so it is focused on the data.
        map.setCamera(
            bounds(bbox),

            //Padding added to account for pixel size of rendered points.
            padding(20)
        )
    }
Memperbarui fitur
Kelas DataSource memudahkan untuk menambahkan dan menghapus fitur. Memperbarui geometri atau properti sebuah fitur memerlukan penggantian fitur dalam sumber data. Ada dua metode yang dapat digunakan untuk memperbarui fitur:
- Buat fitur baru dengan pembaruan yang diinginkan dan ganti semua fitur di sumber data menggunakan metode
setShapes. Metode ini bekerja dengan baik ketika Anda ingin memperbarui semua fitur di sumber data.
DataSource source;

private void onReady(AzureMap map) {
    //Create a data source and add it to the map.
    source = new DataSource();
    map.sources.add(source);

    //Create a feature and add it to the data source.
    Feature myFeature = Feature.fromGeometry(Point.fromLngLat(0,0));
    myFeature.addStringProperty("Name", "Original value");

    source.add(myFeature);
}

private void updateFeature(){
    //Create a new replacement feature with an updated geometry and property value.
    Feature myNewFeature = Feature.fromGeometry(Point.fromLngLat(-10, 10));
    myNewFeature.addStringProperty("Name", "New value");

    //Replace all features to the data source with the new one.
    source.setShapes(myNewFeature);
}
var source: DataSource? = null

private fun onReady(map: AzureMap) {
    //Create a data source and add it to the map.
    source = DataSource()
    map.sources.add(source)

    //Create a feature and add it to the data source.
    val myFeature = Feature.fromGeometry(Point.fromLngLat(0.0, 0.0))
    myFeature.addStringProperty("Name", "Original value")
    source!!.add(myFeature)
}

private fun updateFeature() {
    //Create a new replacement feature with an updated geometry and property value.
    val myNewFeature = Feature.fromGeometry(Point.fromLngLat(-10.0, 10.0))
    myNewFeature.addStringProperty("Name", "New value")

    //Replace all features to the data source with the new one.
    source!!.setShapes(myNewFeature)
}
- Lacak instans fitur dalam variabel, dan teruskan ke dalam metode
removesumber data untuk menghapusnya. Buat fitur baru dengan pembaruan yang diinginkan, perbarui referensi variabel, dan tambahkan ke sumber data menggunakan metodeadd.
DataSource source;
Feature myFeature;

private void onReady(AzureMap map) {
    //Create a data source and add it to the map.
    source = new DataSource();
    map.sources.add(source);

    //Create a feature and add it to the data source.
    myFeature = Feature.fromGeometry(Point.fromLngLat(0,0));
    myFeature.addStringProperty("Name", "Original value");

    source.add(myFeature);
}

private void updateFeature(){
    //Remove the feature instance from the data source.
    source.remove(myFeature);

    //Get properties from original feature.
    JsonObject props = myFeature.properties();

    //Update a property.
    props.addProperty("Name", "New value");

    //Create a new replacement feature with an updated geometry.
    myFeature = Feature.fromGeometry(Point.fromLngLat(-10, 10), props);

    //Re-add the feature to the data source.
    source.add(myFeature);
}
var source: DataSource? = null
var myFeature: Feature? = null

private fun onReady(map: AzureMap) {
    //Create a data source and add it to the map.
    source = DataSource()
    map.sources.add(source)

    //Create a feature and add it to the data source.
    myFeature = Feature.fromGeometry(Point.fromLngLat(0.0, 0.0))
    myFeature.addStringProperty("Name", "Original value")
    source!!.add(myFeature)
}

private fun updateFeature() {
    //Remove the feature instance from the data source.
    source!!.remove(myFeature)

    //Get properties from original feature.
    val props = myFeature!!.properties()

    //Update a property.
    props!!.addProperty("Name", "New value")

    //Create a new replacement feature with an updated geometry.
    myFeature = Feature.fromGeometry(Point.fromLngLat(-10.0, 10.0), props)

    //Re-add the feature to the data source.
    source!!.add(myFeature)
}
Tip
Jika Anda memiliki beberapa data yang akan diperbarui secara berkala, dan data lain yang akan jarang diubah, sebaiknya Anda membaginya menjadi instans sumber data yang terpisah. Ketika pembaruan terjadi di sumber data, pembaruan ini memaksa peta untuk menggambar ulang semua fitur dalam sumber data. Dengan membagi data ini, hanya fitur yang diperbarui secara berkala yang akan digambar ulang ketika pembaruan terjadi di satu sumber data, sementara fitur di sumber data lain tidak perlu digambar ulang. Hal ini akan membantu performa.
Sumber petak peta vektor
Sumber petak peta vektor menjelaskan cara mengakses lapisan petak peta vektor. Gunakan kelas VectorTileSource untuk membuat contoh sumber petak peta vektor. Lapisan petak peta vektor mirip lapisan petak peta tetapi tidak sama. Lapisan petak peta adalah gambar raster. Lapisan petak peta vektor adalah file terkompresi, dalam format PBF. File terkompresi ini terdiri atas data peta vektor dan satu atau beberapa lapisan. File dapat dirender dan ditata pada klien, berdasarkan gaya setiap lapisan. Data dalam petak peta vektor terdiri atas fitur geografis dalam bentuk titik, garis, dan poligon. Ada beberapa keuntungan menggunakan lapisan petak peta vektor daripada lapisan petak peta raster:
- Ukuran file petak peta vektor biasanya jauh lebih kecil daripada petak peta raster yang setara. Dengan demikian, lebih sedikit bandwidth akan digunakan. Ini berarti latensi yang lebih rendah, peta yang lebih cepat, dan pengalaman pengguna yang lebih baik.
- Karena petak peta vektor dirender pada klien, petak peta beradaptasi dengan resolusi perangkat tempat peta ditampilkan. Akibatnya, peta yang dirender tampak lebih terdefinisi dengan baik, dengan label sejernih kristal.
- Mengubah gaya data di peta vektor tidak memerlukan pengunduhan data lagi karena gaya baru dapat diterapkan pada klien. Sebaliknya, mengubah gaya lapisan petak peta raster biasanya perlu memuat petak peta dari server, kemudian menerapkan gaya baru.
- Karena data dikirimkan dalam bentuk vektor, ada lebih sedikit pemrosesan sisi server yang diperlukan untuk menyiapkan data. Akibatnya, data yang lebih baru dapat tersedia lebih cepat.
Azure Maps mematuhi Spesifikasi Petak Peta Vektor Mapbox, sebuah standar terbuka. Azure Maps menyediakan layanan petak peta vektor berikut sebagai bagian dari platform:
- Petak peta jalan
- Insiden lalu lintas
- Arus lalu lintas
- Azure Peta Creator juga memungkinkan petak peta vektor kustom dibuat dan diakses melalui REnder - Get Map Tile API
Tip
Saat menggunakan petak peta gambar vektor atau raster dari layanan render Azure Maps dengan SDK web, Anda dapat mengganti atlas.microsoft.com dengan tempat penampung azmapsdomain.invalid. Tempat penampung ini akan diganti dengan domain yang sama, yang digunakan oleh peta dan akan secara otomatis menambahkan detail autentikasi yang sama juga. Ini sangat menyederhanakan autentikasi dengan layanan render saat menggunakan autentikasi Microsoft Entra.
Untuk menampilkan data dari sumber petak peta vektor di peta, sambungkan sumber ke salah satu lapisan penyajian data. Semua lapisan yang menggunakan sumber vektor harus menentukan nilai sourceLayer dalam opsi. Kode berikut memuat layanan petak peta vektor alur lalu lintas Azure Maps sebagai sumber petak peta vektor, lalu menampilkannya di peta menggunakan lapisan baris. Sumber petak peta vektor ini memiliki satu himpunan data di lapisan sumber yang disebut "Alur lalu lintas". Data baris dalam himpunan data ini memiliki properti bernama traffic_level yang digunakan dalam kode ini untuk memilih warna dan menskalakan ukuran baris.
//Formatted URL to the traffic flow vector tiles, with the maps subscription key appended to it.
String trafficFlowUrl = "https://azmapsdomain.invalid/traffic/flow/tile/pbf?api-version=1.0&style=relative&zoom={z}&x={x}&y={y}";

//Create a vector tile source and add it to the map.
VectorTileSource source = new VectorTileSource(
    tiles(new String[] { trafficFlowUrl }),
    maxSourceZoom(22)
);
map.sources.add(source);

//Create a layer for traffic flow lines.
LineLayer layer = new LineLayer(source,
    //The name of the data layer within the data source to pass into this rendering layer.
    sourceLayer("Traffic flow"),

    //Color the roads based on the traffic_level property.
    strokeColor(
        interpolate(
            linear(),
            get("traffic_level"),
            stop(0, color(Color.RED)),
            stop(0.33, color(Color.YELLOW)),
            stop(0.66, color(Color.GREEN))
        )
    ),

    //Scale the width of roads based on the traffic_level property.
    strokeWidth(
        interpolate(
            linear(),
            get("traffic_level"),
            stop(0, 6),
            stop(1,1)
        )
    )
);

//Add the traffic flow layer below the labels to make the map clearer.
map.layers.add(layer, "labels");
//Formatted URL to the traffic flow vector tiles, with the maps subscription key appended to it.
val trafficFlowUrl = "https://azmapsdomain.invalid/traffic/flow/tile/pbf?api-version=1.0&style=relative&zoom={z}&x={x}&y={y}"

//Create a vector tile source and add it to the map.
val source = VectorTileSource(
    tiles(arrayOf(trafficFlowUrl)),
    maxSourceZoom(22)
)
map.sources.add(source)

//Create a layer for traffic flow lines.
val layer = LineLayer(
    source,  //The name of the data layer within the data source to pass into this rendering layer.
    sourceLayer("Traffic flow"),  //Color the roads based on the traffic_level property.
    strokeColor(
        interpolate(
            linear(),
            get("traffic_level"),
            stop(0, color(Color.RED)),
            stop(0.33, color(Color.YELLOW)),
            stop(0.66, color(Color.GREEN))
        )
    ),  //Scale the width of roads based on the traffic_level property.
    strokeWidth(
        interpolate(
            linear(),
            get("traffic_level"),
            stop(0, 6),
            stop(1, 1)
        )
    )
)

//Add the traffic flow layer below the labels to make the map clearer.
map.layers.add(layer, "labels")

Menyambungkan sumber data ke lapisan
Data dirender di peta menggunakan lapisan penyajian. Satu atau beberapa lapisan penyajian dapat mereferensikan satu sumber data. Lapisan penyajian berikut memerlukan sumber data:
- Lapisan gelembung - merender data titik sebagai lingkaran yang diskalakan di peta.
- Lapisan simbol- merender data titik sebagai ikon atau teks.
- Lapisan peta panas - merender data titik sebagai peta panas kepadatan.
- Lapisan baris - merender baris dan atau merender garis luar poligon.
- Lapisan poligon - mengisi area poligon dengan warna solid atau pola gambar.
Kode berikut menunjukkan cara membuat sumber data, menambahkan ke peta, dan menyambungkan ke lapisan gelembung. Kemudian, impor data titik GeoJSON dari lokasi jarak jauh ke sumber data.
//Create a data source and add it to the map.
DataSource source = new DataSource();

//Import the geojson data and add it to the data source.
source.importDataFromUrl("URL_or_FilePath_to_GeoJSON_data");

//Add data source to the map.
map.sources.add(source);

//Create a layer that defines how to render points in the data source and add it to the map.
BubbleLayer layer = new BubbleLayer(source);
map.layers.add(layer);
//Create a data source and add it to the map.
val source = DataSource()

//Import the geojson data and add it to the data source.
source.importDataFromUrl("URL_or_FilePath_to_GeoJSON_data")

//Add data source to the map.
map.sources.add(source)
Ada lebih banyak lapisan penyajian yang tidak terhubung ke sumber data ini, tetapi mereka langsung memuat data untuk penyajian.
- Lapisan petak peta - menggantikan lapisan petak peta raster di atas peta.
Satu sumber data dengan beberapa lapisan
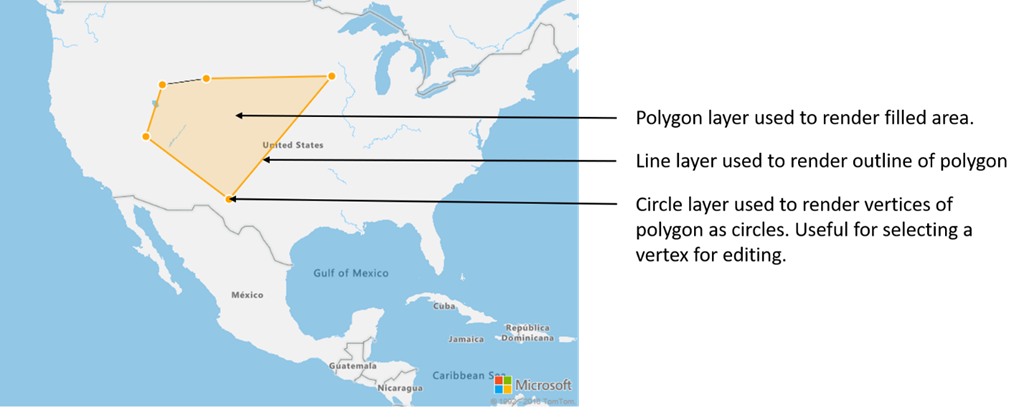
Beberapa lapisan dapat disambungkan ke satu sumber data. Ada banyak skenario berbeda saat opsi ini berguna. Contohnya, pertimbangkan skenario saat pengguna menggambar poligon. Kita harus merender dan mengisi area poligon saat pengguna menambah titik ke peta. Menambah garis bergaya untuk menguraikan poligon membuatnya lebih mudah melihat tepi poligon, saat pengguna menggambar. Untuk mengedit posisi individu dengan mudah di poligon, kita dapat menambahkan handel, seperti pin atau penanda, di atas setiap posisi.
Di sebagian besar platform pemetaan, Anda memerlukan objek poligon, objek baris, dan pin untuk setiap posisi di poligon. Saat poligon dimodifikasi, Anda harus memperbarui baris dan pin secara manual, yang dapat dengan cepat menjadi kompleks.
Dengan Azure Peta, yang Anda butuhkan hanyalah satu poligon dalam sumber data seperti yang ditunjukkan dalam kode berikut.
//Create a data source and add it to the map.
DataSource source = new DataSource();
map.sources.add(source);

//Create a polygon and add it to the data source.
source.add(Polygon.fromLngLats(/* List of points */));

//Create a polygon layer to render the filled in area of the polygon.
PolygonLayer polygonLayer = new PolygonLayer(source,
    fillColor("rgba(255,165,0,0.2)")
);

//Create a line layer for greater control of rendering the outline of the polygon.
LineLayer lineLayer = new LineLayer(source,
    strokeColor("orange"),
    strokeWidth(2f)
);

//Create a bubble layer to render the vertices of the polygon as scaled circles.
BubbleLayer bubbleLayer = new BubbleLayer(source,
    bubbleColor("orange"),
    bubbleRadius(5f),
    bubbleStrokeColor("white"),
    bubbleStrokeWidth(2f)
);

//Add all layers to the map.
map.layers.add(new Layer[] { polygonLayer, lineLayer, bubbleLayer });
//Create a data source and add it to the map.
val source = DataSource()
map.sources.add(source)

//Create a polygon and add it to the data source.
source.add(Polygon.fromLngLats())

//Create a polygon layer to render the filled in area of the polygon.
val polygonLayer = PolygonLayer(
    source,
    fillColor("rgba(255,165,0,0.2)")
)

//Create a line layer for greater control of rendering the outline of the polygon.
val lineLayer = LineLayer(
    source,
    strokeColor("orange"),
    strokeWidth(2f)
)

//Create a bubble layer to render the vertices of the polygon as scaled circles.
val bubbleLayer = BubbleLayer(
    source,
    bubbleColor("orange"),
    bubbleRadius(5f),
    bubbleStrokeColor("white"),
    bubbleStrokeWidth(2f)
)

//Add all layers to the map.
map.layers.add(arrayOf<Layer>(polygonLayer, lineLayer, bubbleLayer))
Tip
Saat menambahkan lapisan ke peta menggunakan metode map.layers.add, ID atau instans lapisan yang ada dapat diteruskan sebagai parameter kedua. Hal ini akan memberi tahu peta itu untuk memasukkan lapisan baru yang ditambahkan di bawah lapisan yang ada. Selain melewati ID lapisan, metode ini juga mendukung nilai-nilai berikut.
"labels"- Memasukkan lapisan baru di bawah lapisan label peta."transit"- Memasukkan lapisan baru di bawah jalan peta dan lapisan transit.
Langkah berikutnya
Lihat artikel berikut untuk mengetahui sampel kode lainnya yang akan ditambahkan ke peta Anda: