Tutorial: Menggunakan Azure Maps untuk membuat pencari lokasi toko
Tutorial ini memandu Anda melalui proses pembuatan pencari lokasi toko sederhana menggunakan Azure Maps.
Dalam tutorial ini, Anda akan mempelajari cara:
- Membuat halaman web baru dengan menggunakan API Kontrol Peta Azure.
- Memuat data kustom dari file dan menampilkan di peta.
- Menggunakan layanan Pencarian Azure Maps untuk menemukan alamat atau memasukkan kueri.
- Mendapatkan lokasi pengguna dari browser dan menunjukkan lokasi pengguna di peta.
- Menggabungkan beberapa lapisan untuk membuat simbol kustom di peta.
- Poin data kluster.
- Menambahkan kontrol perbesaran tampilan ke peta.
Prasyarat
- Visual Studio Code disarankan untuk tutorial ini, tetapi Anda dapat menggunakan lingkungan pengembangan terintegrasi (IDE) yang sesuai.
- Akun Azure Peta
- Kunci langganan
Catatan
Untuk informasi selengkapnya tentang autentikasi di Azure Maps, lihat mengelola autentikasi di Azure Maps.
Kode Sampel
Tutorial ini menunjukkan cara membuat pencari toko untuk perusahaan fiktif bernama Contoso Coffee, bersama dengan tips untuk memperluas pencari toko dengan fungsionalitas tambahan.
Untuk melihat sampel langsung tentang apa yang Anda buat dalam tutorial ini, lihat Pencari Lokasi Penyimpanan Sederhana di situs Sampel Kode Azure Peta.
Untuk lebih mudah mengikuti dan melibatkan tutorial ini, unduh sumber daya berikut:
- Kode sumber Pencari Lokasi Penyimpanan Sederhana.
- Simpan data lokasi yang digunakan untuk mengimpor ke himpunan data pencari lokasi penyimpanan.
- Gambar peta.
Fitur pencari lokasi toko
Bagian ini mencantumkan fitur Azure Maps yang ditunjukkan dalam aplikasi pencari Peyimpanan Contoso Coffee yang dibuat dalam tutorial ini.
Fitur antarmuka pengguna
- Logo penyimpanan di header
- Peta yang mendukung pergeseran dan perbesar tampilan
- Tombol Lokasi Saya untuk menelusuri lokasi pengguna saat ini.
- Tata letak Halaman yang menyesuaikan berdasarkan lebar layar perangkat
- Kotak pencarian dan tombol pencarian
Fitur fungsionalitas
- Peristiwa
keypressyang ditambahkan ke kotak pencarian memicu pencarian saat pengguna menekan Enter. - Saat peta bergerak, jarak ke setiap lokasi dari pusat peta dihitung ulang. Daftar hasil diperbarui untuk menampilkan lokasi terdekat di bagian atas peta.
- Saat pengguna memilih hasil dalam daftar hasil, peta dipusatkan di atas lokasi yang dipilih dan informasi tentang lokasi tersebut muncul di jendela pop-up.
- Saat pengguna memilih lokasi tertentu, peta akan memicu jendela pop-up.
- Saat pengguna memperkecil, lokasi dikelompokkan dalam kluster. Setiap kluster diwakili oleh lingkaran dengan nomor di dalam lingkaran. Kluster terbentuk dan terpisah saat pengguna mengubah tingkat perbesaran tampilan.
- Memilih perbesar tampilan dalam dua tingkat di peta dan berpusat di atas lokasi kluster.
Desain pencari lokasi toko
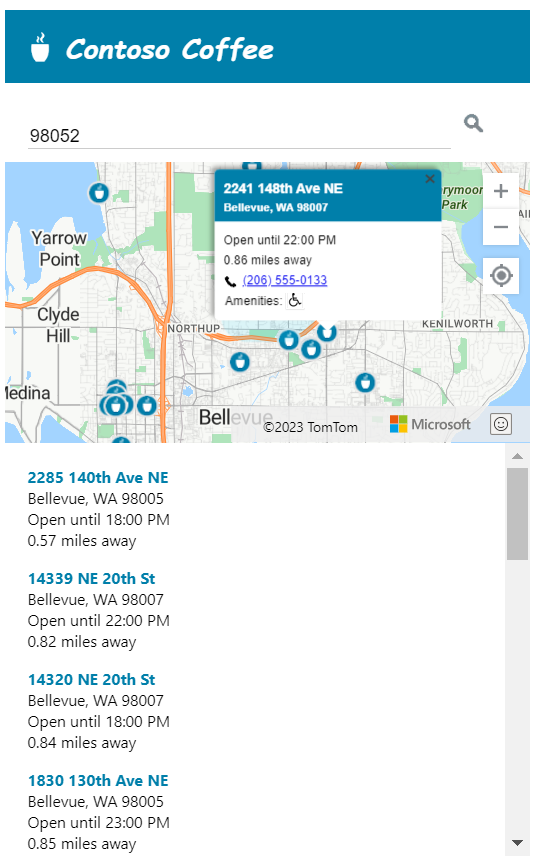
Cuplikan layar berikut menunjukkan tata letak umum aplikasi pencari penyimpanan Contoso Coffee. Untuk melihat dan berinteraksi dengan sampel langsung, lihat aplikasi sampel Pencari Lokasi Penyimpanan Sederhana di situs Sampel Kode Azure Maps.

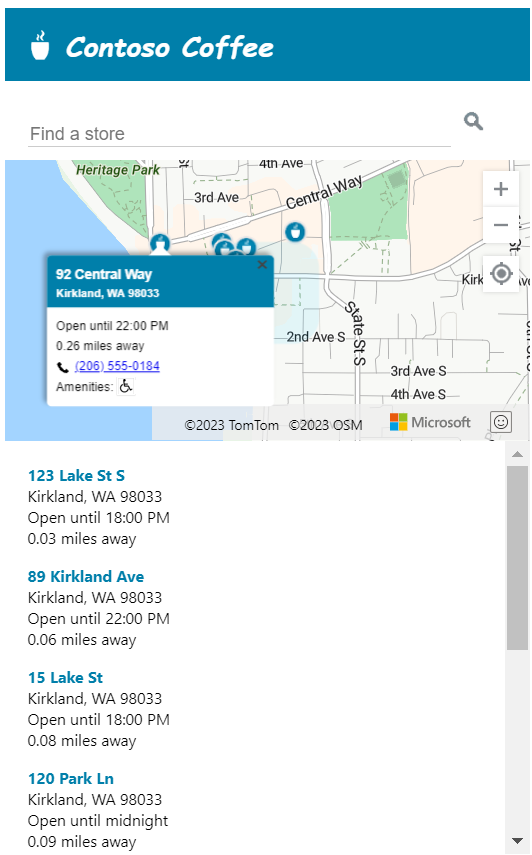
Untuk memaksimalkan kegunaan pencari toko ini, kami menyertakan tata letak responsif yang menyesuaikan saat lebar layar pengguna lebih kecil dari 700 piksel. Tata letak yang responsif memudahkan penggunaan pencari toko di layar kecil, seperti di perangkat seluler. Berikut adalah cuplikan layar yang menunjukkan sampel tata letak layar kecil:
Membuat himpunan data lokasi toko
Bagian ini menjelaskan cara membuat himpunan data toko yang ingin Anda tampilkan di peta. Himpunan data untuk pencari lokasi Contoso Coffee dibuat di dalam buku kerja Excel. Himpunan data tersebut berisi 10.213 lokasi toko kopi dari Contoso Coffee yang tersebar di sembilan negara atau wilayah: Amerika Serikat, Kanada, Inggris Raya, Prancis, Jerman, Italia, Belanda, Denmark, dan Spanyol. Berikut cuplikan layar tampilan data:

Unduh file excel yang berisi himpunan data lengkap untuk aplikasi sampel pencari Contoso Coffee dari folder data repositori sampel kode Azure Peta di GitHub.
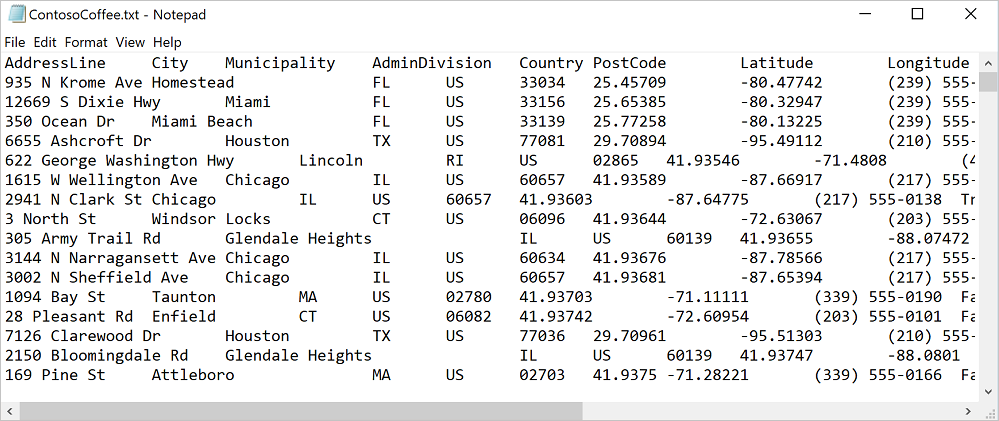
Dari cuplikan layar data di atas, kita dapat melakukan pengamatan berikut:
- Informasi lokasi disimpan dalam enam kolom berikut: AddressLine, Kota, Kota (kabupaten), AdminDivision (negara bagian/provinsi), Kode Pos (kode pos), dan Negara.
- Kolom Lintang dan Bujur berisi koordinat untuk masing-masing lokasi Contoso Coffee. Jika Anda tidak memiliki informasi koordinat, Anda dapat menggunakan layanan Pencarian untuk menentukan koordinat lokasi.
- Beberapa kolom berisi metadata yang terkait dengan kedai kopi: nomor telepon, kolom Boolean, dan waktu buka dan tutup toko dalam format 24 jam. Kolom Boolean adalah untuk Wi-Fi dan aksesibilitas kursi roda. Anda dapat membuat kolom sendiri yang berisi metadata yang lebih relevan dengan data lokasi Anda.
Catatan
Azure Maps merender data dalam proyeksi Mercator Bulat "EPSG:3857" tetapi membaca data dalam "EPSG:4326" yang menggunakan datum WGS84.
Memuat dataset pencari lokasi kedai Contoso Coffee
Himpunan data pencari toko Contoso Coffee kecil, sehingga dapat dikonversi menjadi file teks yang dibatasi tab yang diunduh browser saat aplikasi dimuat.
Tip
Jika himpunan data Anda terlalu besar untuk diunduh klien, atau sering diperbarui, Anda mungkin mempertimbangkan menyimpan himpunan data Anda di database. Setelah data Anda dimuat ke dalam database, Anda kemudian dapat menyiapkan layanan web yang menerima kueri untuk data tersebut, lalu mengirimkan hasilnya ke browser pengguna.
Mengonversi data menjadi file teks yang dibatasi tab
Untuk mengonversi data lokasi kedai Contoso Coffee dari buku kerja Excel menjadi file teks datar tab:
Unduh buku kerja Excel ContosoCoffee.xlsx dan Buka di Excel.
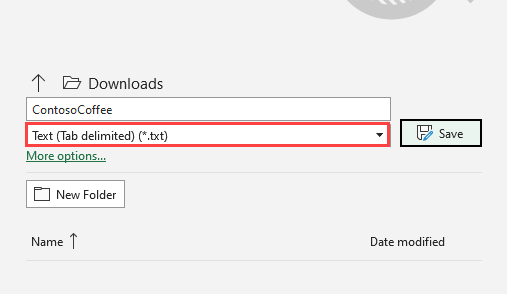
Pilih File > Simpan Sebagai....
Dalam daftar turun Simpan sebagai jenis, pilih Teks (Dibatasi tab)(*.txt).
Beri nama file ContosoCoffee.
Jika Anda membuka file teks di Notepad, tampilannya mirip dengan teks berikut:
Menyiapkan proyek
Buka Visual Studio Code, atau lingkungan pengembangan pilihan Anda.
Pilih File > Buka Ruang Kerja....
Buat folder baru bernama ContosoCoffee.
Pilih ContosoCoffee di penjelajah.
Buat tiga file berikut yang menentukan tata letak, gaya, dan logika untuk aplikasi:
- index.html
- index.css
- index.js
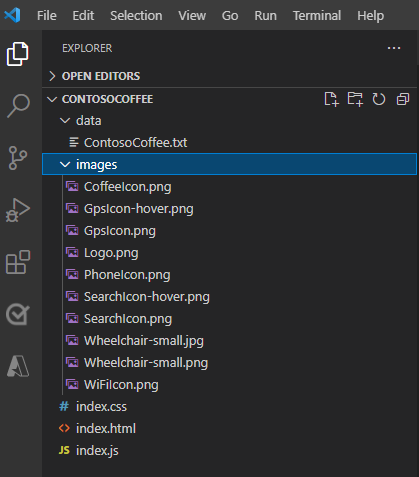
Membuat folder bernama data.
Tambahkan file ContosoCoffee.txt yang sebelumnya Anda buat dari buku kerja Excel ContosoCoffee.xlsx ke folder data.
Membuat folder lain bernama gambar.
Jika Anda belum melakukannya, unduh 10 Gambar peta dari direktori gambar di Repositori GitHub dan tambahkan ke folder gambar.
Folder ruang kerja Anda kini akan terlihat seperti cuplikan layar berikut:
Membuat HTML
Untuk membuat HTML:
Tambahkan tag
metaberikut keheaddari index.html:<meta charset="utf-8"> <meta http-equiv="x-ua-compatible" content="IE=Edge"> <meta name="viewport" content="width=device-width, initial-scale=1, shrink-to-fit=no">Tambahkan referensi ke file JavaScript kontrol web Azure Maps dan CSS:
<!-- Add references to the Azure Maps Map control JavaScript and CSS files. -->
<link rel="stylesheet" href="https://atlas.microsoft.com/sdk/javascript/mapcontrol/3/atlas.min.css" type="text/css">
<script src="https://atlas.microsoft.com/sdk/javascript/mapcontrol/3/atlas.min.js"></script>
Tambahkan referensi ke index.js dan index.css.
<!-- Add references to the store locator JavaScript and CSS files. -->
<link rel="stylesheet" href="index.css" type="text/css">
<script src="index.js"></script>
Di isi dokumen, tambahkan tag
header. Di dalam tagheader, tambahkan logo dan nama perusahaan.<header> <img src="images/Logo.png" /> <span>Contoso Coffee</span> </header>Tambahkan tag
maindan buat panel pencarian yang memiliki kotak teks dan tombol pencarian. Juga, tambahkan referensidivuntuk peta, panel daftar, dan tombol GPS Lokasi Saya.<main> <div class="searchPanel"> <div> <input id="searchTbx" type="search" placeholder="Find a store" /> <button id="searchBtn" title="Search"></button> </div> </div> <div id="listPanel"></div> <div id="myMap"></div> <button id="myLocationBtn" title="My Location"></button> </main>
Setelah selesai, index.html akan terlihat seperti Locator.html Simple Store dalam kode sampel tutorial.
Menentukan gaya CSS
Langkah selanjutnya adalah menentukan gaya CSS. Gaya CSS menentukan bagaimana komponen aplikasi ditata dan tampilan aplikasi.
Buka index.css.
Tambahkan kode css berikut:
Catatan
Gaya
@mediamenentukan opsi gaya alternatif untuk digunakan bila lebar layar lebih kecil dari 700 piksel.html, body { padding: 0; margin: 0; font-family: Gotham, Helvetica, sans-serif; overflow-x: hidden; } header { width: calc(100vw - 10px); height: 30px; padding: 15px 0 20px 20px; font-size: 25px; font-style: italic; font-family: "Comic Sans MS", cursive, sans-serif; line-height: 30px; font-weight: bold; color: white; background-color: #007faa; } header span { vertical-align: middle; } header img { height: 30px; vertical-align: middle; } .searchPanel { position: relative; width: 350px; } .searchPanel div { padding: 20px; } .searchPanel input { width: calc(100% - 50px); font-size: 16px; border: 0; border-bottom: 1px solid #ccc; } #listPanel { position: absolute; top: 135px; left: 0px; width: 350px; height: calc(100vh - 135px); overflow-y: auto; } #myMap { position: absolute; top: 65px; left: 350px; width: calc(100vw - 350px); height: calc(100vh - 65px); } .statusMessage { margin: 10px; } #myLocationBtn, #searchBtn { margin: 0; padding: 0; border: none; border-collapse: collapse; width: 32px; height: 32px; text-align: center; cursor: pointer; line-height: 32px; background-repeat: no-repeat; background-size: 20px; background-position: center center; z-index: 200; } #myLocationBtn { position: absolute; top: 150px; right: 10px; box-shadow: 0px 0px 4px rgba(0,0,0,0.16); background-color: white; background-image: url("images/GpsIcon.png"); } #myLocationBtn:hover { background-image: url("images/GpsIcon-hover.png"); } #searchBtn { background-color: transparent; background-image: url("images/SearchIcon.png"); } #searchBtn:hover { background-image: url("images/SearchIcon-hover.png"); } .listItem { height: 50px; padding: 20px; font-size: 14px; } .listItem:hover { cursor: pointer; background-color: #f1f1f1; } .listItem-title { color: #007faa; font-weight: bold; } .storePopup { min-width: 150px; } .storePopup .popupTitle { border-top-left-radius: 4px; border-top-right-radius: 4px; padding: 8px; height: 30px; background-color: #007faa; color: white; font-weight: bold; } .storePopup .popupSubTitle { font-size: 10px; line-height: 12px; } .storePopup .popupContent { font-size: 11px; line-height: 18px; padding: 8px; } .storePopup img { vertical-align:middle; height: 12px; margin-right: 5px; } /* Adjust the layout of the page when the screen width is fewer than 700 pixels. */ @media screen and (max-width: 700px) { .searchPanel { width: 100vw; } #listPanel { top: 385px; width: 100%; height: calc(100vh - 385px); } #myMap { width: 100vw; height: 250px; top: 135px; left: 0px; } #myLocationBtn { top: 220px; } } .mapCenterIcon { display: block; width: 10px; height: 10px; border-radius: 50%; background: orange; border: 2px solid white; cursor: pointer; box-shadow: 0 0 0 rgba(0, 204, 255, 0.4); animation: pulse 3s infinite; } @keyframes pulse { 0% { box-shadow: 0 0 0 0 rgba(0, 204, 255, 0.4); } 70% { box-shadow: 0 0 0 50px rgba(0, 204, 255, 0); } 100% { box-shadow: 0 0 0 0 rgba(0, 204, 255, 0); } }
Jika Anda menjalankan aplikasi pada saat ini, header, kotak pencarian, dan tombol pencarian muncul. Namun, peta tidak terlihat karena belum dimuat. Jika Anda mencoba melakukan pencarian, tidak ada yang terjadi. Bagian berikutnya menjelaskan penambahan logika JavaScript yang diperlukan untuk mengakses semua fungsionalitas pencari toko.
Menambahkan kode JavaScript
Kode JavaScript di aplikasi pencari lokasi toko Contoso Coffee memungkinkan proses berikut:
Menambahkan pendengar peristiwa yang dipanggil
readyuntuk menunggu hingga proses pemuatan halaman selesai. Ketika pemuatan halaman selesai, penanganan aktivitas membuat lebih banyak pendengar peristiwa untuk memantau pemuatan peta, serta memberikan fungsionalitas pada tombol cari dan Lokasi saya.Ketika pengguna memilih tombol pencarian, atau mengetik lokasi di kotak pencarian lalu menekan enter, pencarian fuzzy terhadap permintaan pengguna dimulai. Teruskan array nilai ISO 2 negara/wilayah ke opsi
countrySetuntuk membatasi hasil pencarian ke negara/wilayah tersebut. Membatasi negara/wilayah untuk mencari bantuan meningkatkan akurasi hasil yang dihasilkan.Setelah pencarian selesai, hasil lokasi pertama digunakan sebagai fokus pusat peta. Saat pengguna memilih tombol Lokasi Saya, kode mengambil lokasi pengguna menggunakan API Geolokasi HTML5 yang ada di dalam browser. Setelah lokasi diambil, kode akan mempusatkan peta di atas lokasi pengguna.
Untuk menambahkan JavaScript:
Buka index.js.
Tambahkan opsi global untuk membuat pengaturan yang lebih mudah diperbarui. Tentukan variabel untuk peta, jendela pop up, sumber data, lapisan ikon, dan penanda HTML. Atur penanda HTML untuk menunjukkan pusat area pencarian. Dan, tentukan instans klien layanan pencarian Azure Maps.
//The maximum zoom level to cluster data point data on the map.
var maxClusterZoomLevel = 11;

//The URL to the store location data.
var storeLocationDataUrl = 'data/ContosoCoffee.txt';

//The URL to the icon image.
var iconImageUrl = 'images/CoffeeIcon.png';

//An array of country region ISO2 values to limit searches to.
var countrySet = ['US', 'CA', 'GB', 'FR','DE','IT','ES','NL','DK'];

//
var map, popup, datasource, iconLayer, centerMarker;

// Used in function updateListItems
var listItemTemplate = '<div class="listItem" onclick="itemSelected(\'{id}\')"><div class="listItem-title">{title}</div>{city}<br />Open until {closes}<br />{distance} miles away</div>';
Tambahkan kode inisialisasi berikut. Pastikan untuk mengganti
<Your Azure Maps Key>dengan kunci langganan Azure Peta Anda.Tip
Saat Anda menggunakan jendela pop-up, sebaiknya buat satu instans
Popupdan menggunakan ulang instans dengan memperbarui konten dan posisinya. Untuk setiapPopupinstans yang Anda tambahkan ke kode, beberapa elemen DOM ditambahkan ke halaman. Semakin banyak elemen DOM yang ada di halaman, semakin banyak hal yang harus dilacak oleh browser. Jika ada terlalu banyak item, browser dapat menjadi lambat.function initialize() { //Initialize a map instance. map = new atlas.Map('myMap', { center: [-90, 40], zoom: 2, //Add your Azure Maps subscription key to the map SDK. authOptions: { authType: 'subscriptionKey', subscriptionKey: '<Your Azure Maps Key>' } }); //Create a pop-up window, but leave it closed so we can update it and display it later. popup = new atlas.Popup(); //If the user selects the search button, geocode the value the user passed in. document.getElementById('searchBtn').onclick = performSearch; //If the user presses Enter in the search box, perform a search. document.getElementById('searchTbx').onkeyup = function(e) { if (e.keyCode === 13) { performSearch(); } }; //If the user selects the My Location button, use the Geolocation API to get the user's location. Center and zoom the map on that location. document.getElementById('myLocationBtn').onclick = setMapToUserLocation; //Wait until the map resources are ready. map.events.add('ready', function() { //Add your maps post load functionality. }); } function performSearch() { var query = document.getElementById('searchTbx').value; //Pass in the array of country/region ISO2 for which we want to limit the search to. var url = `https://atlas.microsoft.com/search/fuzzy/json?api-version=1.0&countrySet=${countrySet}&query=${query}&view=Auto`; //Perform a fuzzy search on the users query. fetch(url, { headers: { "Subscription-Key": map.authentication.getToken() } }) .then((response) => response.json()) .then((response) => { if (Array.isArray(response.results) && response.results.length > 0) { var result = response.results[0]; var bbox = [ result.viewport.topLeftPoint.lon, result.viewport.btmRightPoint.lat, result.viewport.btmRightPoint.lon, result.viewport.topLeftPoint.lat ]; //Set the camera to the bounds of the first result. map.setCamera({ bounds: bbox, padding: 40 }); } else { document.getElementById('listPanel').innerHTML = '<div class="statusMessage">Unable to find the location you searched for.</div>'; } }); } function setMapToUserLocation() { //Request the user's location. navigator.geolocation.getCurrentPosition(function(position) { //Convert the geolocation API position into a longitude/latitude position value the map can understand and center the map over it. map.setCamera({ center: [position.coords.longitude, position.coords.latitude], zoom: maxClusterZoomLevel + 1 }); }, function(error) { //If an error occurs when trying to access the users position information, display an error message. switch (error.code) { case error.PERMISSION_DENIED: alert('User denied the request for geolocation.'); break; case error.POSITION_UNAVAILABLE: alert('Position information is unavailable.'); break; case error.TIMEOUT: alert('The request to get user position timed out.'); break; case error.UNKNOWN_ERROR: alert('An unknown error occurred.'); break; } }); } //Initialize the application when the page is loaded. window.onload = initialize;Pada penanganan aktivitas
readypeta, tambahkan kontrol perbesar tampilan dan penanda HTML untuk menampilkan pusat area pencarian.//Add a zoom control to the map. map.controls.add(new atlas.control.ZoomControl(), { position: 'top-right' }); //Add an HTML marker to the map to indicate the center to use for searching. centerMarker = new atlas.HtmlMarker({ htmlContent: '<div class="mapCenterIcon"></div>', position: map.getCamera().center }); map.markers.add(centerMarker);Di penanganan aktivitas
readypeta, tambahkan sumber data. Kemudian, lakukan panggilan untuk memuat dan mengurai himpunan data. Aktifkan pengklusteran pada sumber data. Pengklusteran pada sumber data mengelompokkan titik yang tumpang tindih bersama-sama dalam sebuah kluster. Saat pengguna memperbesar, kluster terpisah menjadi titik individu. Perilaku ini memberikan pengalaman pengguna yang lebih baik dan meningkatkan performa.//Create a data source, add it to the map, and then enable clustering. datasource = new atlas.source.DataSource(null, { cluster: true, clusterMaxZoom: maxClusterZoomLevel - 1 }); map.sources.add(datasource); //Load all the store data now that the data source has been defined. loadStoreData();Setelah himpunan data dimuat di penanganan aktivitas
readypeta, tentukan kumpulan lapisan untuk merender data. Lapisan gelembung merender titik data berkluster. Lapisan simbol merender jumlah titik pada setiap kluster di atas lapisan gelembung. Lapisan simbol kedua merender ikon kustom untuk masing-masing lokasi di peta.Tambahkan peristiwa
mouseoverdanmouseoutke lapisan gelembung dan ikon untuk mengubah kursor mouse saat pengguna mengarahkan kursor ke kluster atau ikon di peta. Tambahkan peristiwaclickke lapisan gelembung kluster. Peristiwaclickini memperbesar tampilan peta dua tingkat dan memusatkan peta di atas kluster saat pengguna memilih kluster mana pun. Tambahkan peristiwaclickke lapisan ikon. Peristiwaclickini menampilkan jendela pop-up yang menampilkan detail toko kopi saat pengguna memilih ikon masing-masing lokasi. Tambahkan peristiwa ke peta untuk dipantau saat peta selesai dipindahkan. Saat peristiwa ini diaktifkan, perbarui item di panel daftar.//Create a bubble layer to render clustered data points. var clusterBubbleLayer = new atlas.layer.BubbleLayer(datasource, null, { radius: 12, color: '#007faa', strokeColor: 'white', strokeWidth: 2, filter: ['has', 'point_count'] //Only render data points that have a point_count property; clusters have this property. }); //Create a symbol layer to render the count of locations in a cluster. var clusterLabelLayer = new atlas.layer.SymbolLayer(datasource, null, { iconOptions: { image: 'none' //Hide the icon image. }, textOptions: { textField: ['get', 'point_count_abbreviated'], size: 12, font: ['StandardFont-Bold'], offset: [0, 0.4], color: 'white' } }); map.layers.add([clusterBubbleLayer, clusterLabelLayer]); //Load a custom image icon into the map resources. map.imageSprite.add('myCustomIcon', iconImageUrl).then(function() { //Create a layer to render a coffee cup symbol above each bubble for an individual location. iconLayer = new atlas.layer.SymbolLayer(datasource, null, { iconOptions: { //Pass in the ID of the custom icon that was loaded into the map resources. image: 'myCustomIcon', //Optionally, scale the size of the icon. font: ['SegoeUi-Bold'], //Anchor the center of the icon image to the coordinate. anchor: 'center', //Allow the icons to overlap. allowOverlap: true }, filter: ['!', ['has', 'point_count']] //Filter out clustered points from this layer. }); map.layers.add(iconLayer); //When the mouse is over the cluster and icon layers, change the cursor to a pointer. map.events.add('mouseover', [clusterBubbleLayer, iconLayer], function() { map.getCanvasContainer().style.cursor = 'pointer'; }); //When the mouse leaves the item on the cluster and icon layers, change the cursor back to the default (grab). map.events.add('mouseout', [clusterBubbleLayer, iconLayer], function() { map.getCanvasContainer().style.cursor = 'grab'; }); //Add a click event to the cluster layer. When the user selects a cluster, zoom into it by two levels. map.events.add('click', clusterBubbleLayer, function(e) { map.setCamera({ center: e.position, zoom: map.getCamera().zoom + 2 }); }); //Add a click event to the icon layer and show the shape that was selected. map.events.add('click', iconLayer, function(e) { showPopup(e.shapes[0]); }); //Add an event to monitor when the map has finished rendering. map.events.add('render', function() { //Update the data in the list. updateListItems(); }); });Ketika himpunan data kedai kopi diperlukan, itu harus diunduh terlebih dahulu. Setelah diunduh, file harus dibagi menjadi beberapa baris. Baris pertama berisi informasi header. Untuk membuat kode lebih mudah diikuti, kita mengurai header menjadi objek, yang kemudian dapat kita gunakan untuk mencari indeks sel dari setiap properti. Setelah baris pertama, ulangi baris yang tersisa dan buat fitur titik. Tambahkan fitur titik ke sumber data. Terakhir, perbarui panel daftar.
function loadStoreData() {

//Download the store location data.
fetch(storeLocationDataUrl)
    .then(response => response.text())
    .then(function(text) {

        //Parse the tab-delimited file data into GeoJSON features.
        var features = [];

        //Split the lines of the file.
        var lines = text.split('\n');

        //Grab the header row.
        var row = lines[0].split('\t');

        //Parse the header row and index each column to make the code for parsing each row easier to follow.
        var header = {};
        var numColumns = row.length;
        for (var i = 0; i < row.length; i++) {
            header[row[i]] = i;
        }

        //Skip the header row and then parse each row into a GeoJSON feature.
        for (var i = 1; i < lines.length; i++) {
            row = lines[i].split('\t');

            //Ensure that the row has the correct number of columns.
            if (row.length >= numColumns) {

                features.push(new atlas.data.Feature(new atlas.data.Point([parseFloat(row[header['Longitude']]), parseFloat(row[header['Latitude']])]), {
                    AddressLine: row[header['AddressLine']],
                    City: row[header['City']],
                    Municipality: row[header['Municipality']],
                    AdminDivision: row[header['AdminDivision']],
                    Country: row[header['Country']],
                    PostCode: row[header['PostCode']],
                    Phone: row[header['Phone']],
                    StoreType: row[header['StoreType']],
                    IsWiFiHotSpot: (row[header['IsWiFiHotSpot']].toLowerCase() === 'true') ? true : false,
                    IsWheelchairAccessible: (row[header['IsWheelchairAccessible']].toLowerCase() === 'true') ? true : false,
                    Opens: parseInt(row[header['Opens']]),
                    Closes: parseInt(row[header['Closes']])
                }));
            }
        }

        //Add the features to the data source.
        datasource.add(new atlas.data.FeatureCollection(features));

        //Initially, update the list items.
        updateListItems();
    });
}
Saat panel daftar diperbarui, jarak dihitung. Jarak ini dari pusat peta ke semua fitur titik dalam tampilan peta saat ini. Fitur-fitur tersebut kemudian diurutkan berdasarkan jarak. HTML dihasilkan untuk menampilkan setiap lokasi di panel daftar.
var listItemTemplate = '<div class="listItem" onclick="itemSelected(\'{id}\')"><div class="listItem-title">{title}</div>{city}<br />Open until {closes}<br />{distance} miles away</div>';

function updateListItems() {
    //Hide the center marker.
    centerMarker.setOptions({
        visible: false
    });

    //Get the current camera and view information for the map.
    var camera = map.getCamera();
    var listPanel = document.getElementById('listPanel');

    //Check to see if the user is zoomed out a substantial distance. If they are, tell them to zoom in and to perform a search or select the My Location button.
    if (camera.zoom < maxClusterZoomLevel) {
        //Close the pop-up window; clusters might be displayed on the map.
        popup.close();
        listPanel.innerHTML = '<div class="statusMessage">Search for a location, zoom the map, or select the My Location button to see individual locations.</div>';
    } else {
        //Update the location of the centerMarker property.
        centerMarker.setOptions({
            position: camera.center,
            visible: true
        });

        //List the ten closest locations in the side panel.
        var html = [], properties;

        /*
        Generating HTML for each item that looks like this:
        <div class="listItem" onclick="itemSelected('id')">
            <div class="listItem-title">1 Microsoft Way</div>
            Redmond, WA 98052<br />
            Open until 9:00 PM<br />
            0.7 miles away
        </div>
        */

        //Get all the shapes that have been rendered in the bubble layer.
        var data = map.layers.getRenderedShapes(map.getCamera().bounds, [iconLayer]);

        //Create an index of the distances of each shape.
        var distances = {};

        data.forEach(function (shape) {
            if (shape instanceof atlas.Shape) {

                //Calculate the distance from the center of the map to each shape and store in the index. Round to 2 decimals.
                distances[shape.getId()] = Math.round(atlas.math.getDistanceTo(camera.center, shape.getCoordinates(), 'miles') * 100) / 100;
            }
        });

        //Sort the data by distance.
        data.sort(function (x, y) {
            return distances[x.getId()] - distances[y.getId()];
        });

        data.forEach(function(shape) {
            properties = shape.getProperties();
            html.push('<div class="listItem" onclick="itemSelected(\'', shape.getId(), '\')"><div class="listItem-title">',
            properties['AddressLine'],
            '</div>',
            //Get a formatted addressLine2 value that consists of City, Municipality, AdminDivision, and PostCode.
            getAddressLine2(properties),
            '<br />',

            //Convert the closing time to a format that is easier to read.
            getOpenTillTime(properties),
            '<br />',

            //Get the distance of the shape.
            distances[shape.getId()],
            ' miles away</div>');
        });

        listPanel.innerHTML = html.join('');

        //Scroll to the top of the list panel in case the user has scrolled down.
        listPanel.scrollTop = 0;
    }
}

//This converts a time that's in a 24-hour format to an AM/PM time or noon/midnight string.
function getOpenTillTime(properties) {
    var time = properties['Closes'];
    var t = time / 100;
    var sTime;

    if (time === 1200) {
        sTime = 'noon';
    } else if (time === 0 || time === 2400) {
        sTime = 'midnight';
    } else {
        sTime = Math.round(t) + ':';

        //Get the minutes.
        t = (t - Math.round(t)) * 100;

        if (t === 0) {
            sTime += '00';
        } else if (t < 10) {
            sTime += '0' + t;
        } else {
            sTime += Math.round(t);
        }

        if (time < 1200) {
            sTime += ' AM';
        } else {
            sTime += ' PM';
        }
    }

    return 'Open until ' + sTime;
}

//Create an addressLine2 string that contains City, Municipality, AdminDivision, and PostCode.
function getAddressLine2(properties) {
    var html = [properties['City']];

    if (properties['Municipality']) {
        html.push(', ', properties['Municipality']);
    }

    if (properties['AdminDivision']) {
        html.push(', ', properties['AdminDivision']);
    }

    if (properties['PostCode']) {
        html.push(' ', properties['PostCode']);
    }

    return html.join('');
}
Saat pengguna memilih item di panel daftar, bentuk yang terkait dengan item akan diambil dari sumber data. Jendela pop-up dibuat berdasarkan informasi properti yang disimpan dalam bentuk. Peta berpusat di atas bentuk. Jika lebar peta kurang dari 700 piksel, tampilan peta diseimbangkan sehingga jendela pop-up terlihat.
//When a user selects a result in the side panel, look up the shape by its ID value and display the pop-up window.
function itemSelected(id) {
    //Get the shape from the data source by using its ID.
    var shape = datasource.getShapeById(id);
    showPopup(shape);

    //Center the map over the shape on the map.
    var center = shape.getCoordinates();
    var offset;

    //If the map is fewer than 700 pixels wide, then the layout is set for small screens.
    if (map.getCanvas().width < 700) {
        //When the map is small, offset the center of the map relative to the shape so that there is room for the popup to appear.
        offset = [0, -80];
    }

    map.setCamera({
        center: center,
        centerOffset: offset
    });
}

function showPopup(shape) {
    var properties = shape.getProperties();

    /* Generating HTML for the pop-up window that looks like this:

        <div class="storePopup">
            <div class="popupTitle">
                3159 Tongass Avenue
                <div class="popupSubTitle">Ketchikan, AK 99901</div>
            </div>
            <div class="popupContent">
                Open until 22:00 PM<br/>
                <img title="Phone Icon" src="images/PhoneIcon.png">
                <a href="tel:1-800-XXX-XXXX">1-800-XXX-XXXX</a>
                <br>Amenities:
                <img title="Wi-Fi Hotspot" src="images/WiFiIcon.png">
                <img title="Wheelchair Accessible" src="images/WheelChair-small.png">
            </div>
        </div>
    */

     //Calculate the distance from the center of the map to the shape in miles, round to 2 decimals.
    var distance = Math.round(atlas.math.getDistanceTo(map.getCamera().center, shape.getCoordinates(), 'miles') * 100)/100;

    var html = ['<div class="storePopup">'];
    html.push('<div class="popupTitle">',
        properties['AddressLine'],
        '<div class="popupSubTitle">',
        getAddressLine2(properties),
        '</div></div><div class="popupContent">',

        //Convert the closing time to a format that's easier to read.
        getOpenTillTime(properties),

        //Add the distance information.
        '<br/>', distance,
        ' miles away',
        '<br /><img src="images/PhoneIcon.png" title="Phone Icon"/><a href="tel:',
        properties['Phone'],
        '">',
        properties['Phone'],
        '</a>'
    );

    if (properties['IsWiFiHotSpot'] || properties['IsWheelchairAccessible']) {
        html.push('<br/>Amenities: ');

        if (properties['IsWiFiHotSpot']) {
            html.push('<img src="images/WiFiIcon.png" title="Wi-Fi Hotspot"/>');
        }

        if (properties['IsWheelchairAccessible']) {
            html.push('<img src="images/WheelChair-small.png" title="Wheelchair Accessible"/>');
        }
    }

    html.push('</div></div>');

    //Update the content and position of the pop-up window for the specified shape information.
    popup.setOptions({

        //Create a table from the properties in the feature.
        content:  html.join(''),
        position: shape.getCoordinates()
    });

    //Open the pop-up window.
    popup.open(map);
}
Sekarang, Anda memiliki pencari toko yang berfungsi penuh. Buka file index.html di penelusuran web. Saat kluster muncul di peta, Anda dapat mencari lokasi menggunakan salah satu metode berikut:
- Kotak pencarian.
- Memilih tombol Lokasi Saya
- Memilih kluster
- Memperbesar tampilan peta untuk melihat lokasi individu.
Pertama kali pengguna memilih tombol Lokasi Saya, browser menampilkan peringatan keamanan yang meminta izin untuk mengakses lokasi pengguna. Jika pengguna setuju untuk membagikan lokasi mereka, peta akan memperbesar tampilan lokasi pengguna, dan toko kopi terdekat akan ditampilkan.

Saat Anda memperbesar tampilan cukup dekat di area yang memiliki lokasi toko kopi, kluster terpisah menjadi beberapa lokasi. Pilih salah satu ikon di peta atau pilih item di panel samping untuk melihat jendela pop-up. Pop-up menampilkan informasi untuk lokasi yang dipilih.

Jika Anda mengubah ukuran jendela browser menjadi kurang dari 700 piksel atau membuka aplikasi di perangkat seluler, tata letak akan berubah agar lebih cocok untuk layar yang lebih kecil.
Dalam tutorial ini, Anda belajar cara membuat pencari toko dasar dengan menggunakan Azure Maps. Pencari toko yang Anda buat dalam tutorial ini dapat memiliki semua fungsi yang Anda butuhkan. Anda dapat menambahkan fitur ke pencari toko atau menggunakan lebih banyak fitur tingkat lanjut untuk pengalaman pengguna yang lebih kustom:
- Aktifkan saran saat Anda mengetik di kotak pencarian.
- Tambahkan dukungan untuk beberapa bahasa.
- Izinkan pengguna untuk memfilter lokasi di sepanjang rute.
- Tambahkan kemampuan untuk mengatur filter.
- Tambahkan dukungan untuk menentukan nilai pencarian awal dengan menggunakan string kueri. Saat Anda menyertakan opsi ini di pencari lokasi toko, pengguna akan dapat menandai dan membagikan pencarian. Ini juga menyediakan metode mudah bagi Anda untuk meneruskan pencarian ke halaman ini dari halaman lain.
- Sebarkan pencari toko Anda sebagai Aplikasi Web Azure App Service.
- Simpan data Anda dalam database dan cari lokasi terdekat. Untuk mempelajari selengkapnya, lihat ringkasan jenis data spasial SQL Server dan Kueri data spasial untuk tetangga terdekat.
Informasi Tambahan
- Untuk kode yang telah selesai, lihat tutorial Simple Store Locator di GitHub.
- Untuk melihat contoh ini secara langsung, lihat Pencari Penyimpanan Sederhana di situs Sampel Kode Azure Maps.
- pelajari lebih lanjut tentang cakupan dan kemampuan Azure Maps dengan menggunakan Tingkat perbesar tampilan dan petak peta.
- Anda juga dapat Menggunakan ekspresi gaya berdasarkan data untuk diterapkan pada logika bisnis Anda.
Langkah berikutnya
Untuk melihat contoh kode lainnya dan pengalaman pengodean interaktif: