Integrasi dengan aplikasi klien menggunakan Speech SDK
Penting
Perintah Kustom akan dihentikan pada 30 April 2026. Mulai 30 Oktober 2023 Anda tidak dapat membuat aplikasi Perintah Kustom baru di Speech Studio. Terkait perubahan ini, LUIS akan dihentikan pada 1 Oktober 2025. Mulai 1 April 2023 Anda tidak dapat membuat sumber daya LUIS baru.
Dalam artikel ini, Anda akan mempelajarai cara membuat permintaan ke aplikasi Perintah Kustom yang diterbitkan dari Speech SDK yang berjalan dalam aplikasi UWP. Untuk membuat koneksi ke aplikasi Perintah Kustom, Anda perlu:
- Publikasikan aplikasi Perintah Kustom dan dapatkan pengidentifikasi aplikasi (ID Aplikasi)
- Buat aplikasi klien Universal Windows Platform (UWP) menggunakan Speech SDK agar Anda dapat berbicara dengan aplikasi Perintah Kustom
Prasyarat
Aplikasi Perintah Kustom diperlukan untuk menyelesaikan artikel ini. Coba mulai cepat untuk membuat aplikasi perintah kustom:
Anda juga perlu:
- Visual Studio 2019 atau lebih tinggi. Panduan ini didasarkan pada Visual Studio 2019.
- Kunci dan wilayah sumber daya Azure AI Speech: Buat sumber daya Ucapan di portal Azure. Untuk informasi selengkapnya, lihat Membuat sumber daya multi-layanan.
- Aktifkan perangkat Anda untuk pengembangan
Langkah 1: Terbitkan aplikasi Perintah Kustom
Buka aplikasi Perintah Kustom yang dibuat sebelumnya.
Buka Pengaturan, pilih sumber daya LUIS.
Jika Sumber daya Prediksi tidak ditetapkan, pilih kunci prediksi kueri atau buat yang baru.
Kunci prediksi kueri selalu diperlukan sebelum menerbitkan aplikasi. Untuk informasi selengkapnya tentang sumber daya LUIS, referensi Buat Luis Resource
Kembali ke perintah pengeditan, Pilih Terbitkan.
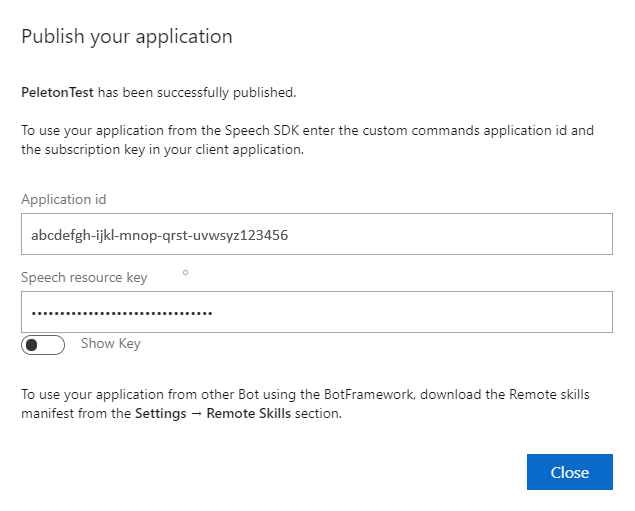
Salin ID Aplikasi dari pemberitahuan "terbitkan" untuk digunakan nanti.
Salin Kunci Sumber Daya Ucapan untuk digunakan nanti.
Langkah 2: Buat proyek Visual Studio
Buat proyek Visual Studio untuk pengembangan UWP dan instal Speech SDK.
Langkah 3: Tambahkan kode sampel
Dalam langkah ini, kami menambahkan kode XAML yang mendefinisikan antarmuka pengguna aplikasi, dan menambahkan C# kode di belakang implementasi.
Kode XAML
Buat antarmuka pengguna aplikasi dengan menambahkan kode XAML.
Di Penjelajah Solusi, buka
MainPage.xamlDalam tampilan XAML desainer, ganti seluruh konten dengan cuplikan kode berikut:
<Page
    x:Class="helloworld.MainPage"
    xmlns="http://schemas.microsoft.com/winfx/2006/xaml/presentation"
    xmlns:x="http://schemas.microsoft.com/winfx/2006/xaml"
    xmlns:local="using:helloworld"
    xmlns:d="http://schemas.microsoft.com/expression/blend/2008"
    xmlns:mc="http://schemas.openxmlformats.org/markup-compatibility/2006"
    mc:Ignorable="d"
    Background="{ThemeResource ApplicationPageBackgroundThemeBrush}">

    <Grid>
        <StackPanel Orientation="Vertical" HorizontalAlignment="Center"
                    Margin="20,50,0,0" VerticalAlignment="Center" Width="800">
            <Button x:Name="EnableMicrophoneButton" Content="Enable Microphone"
                    Margin="0,10,10,0" Click="EnableMicrophone_ButtonClicked"
                    Height="35"/>
            <Button x:Name="ListenButton" Content="Talk"
                    Margin="0,10,10,0" Click="ListenButton_ButtonClicked"
                    Height="35"/>
            <StackPanel x:Name="StatusPanel" Orientation="Vertical"
                        RelativePanel.AlignBottomWithPanel="True"
                        RelativePanel.AlignRightWithPanel="True"
                        RelativePanel.AlignLeftWithPanel="True">
                <TextBlock x:Name="StatusLabel" Margin="0,10,10,0"
                           TextWrapping="Wrap" Text="Status:" FontSize="20"/>
                <Border x:Name="StatusBorder" Margin="0,0,0,0">
                    <ScrollViewer VerticalScrollMode="Auto"
                                  VerticalScrollBarVisibility="Auto" MaxHeight="200">
                        <!-- Use LiveSetting to enable screen readers to announce
                             the status update. -->
                        <TextBlock
                            x:Name="StatusBlock" FontWeight="Bold"
                            AutomationProperties.LiveSetting="Assertive"
                            MaxWidth="{Binding ElementName=Splitter, Path=ActualWidth}"
                            Margin="10,10,10,20" TextWrapping="Wrap"  />
                    </ScrollViewer>
                </Border>
            </StackPanel>
        </StackPanel>
        <MediaElement x:Name="mediaElement"/>
    </Grid>
</Page>
Tampilan Desain diperbarui untuk menampilkan antarmuka pengguna aplikasi.
C# kode di belakang sumber
Tambahkan kode di belakang sumber sehingga aplikasi berfungsi seperti yang diharapkan. Kode di belakang sumber meliputi:
- Pernyataan yang
Speechdiperlukanusinguntuk namespace layanan danSpeech.Dialog. - Implementasi sederhana untuk memastikan akses mikrofon, kabel ke handler tombol.
- Pembantu antarmuka pengguna dasar untuk menyajikan pesan dan kesalahan dalam aplikasi.
- Titik pendaratan untuk jalur kode inisialisasi.
- Pembantu untuk memutar kembali teks ke ucapan (tanpa dukungan streaming).
- Handler tombol kosong untuk mulai mendengarkan.
Tambahkan kode di belakang sumber sebagai berikut:
Di Penjelajah Solusi, buka file kode di belakang sumber
MainPage.xaml.cs(dikelompokkan di bawahMainPage.xaml)Ganti konten file dengan kode berikut:
using Microsoft.CognitiveServices.Speech;
using Microsoft.CognitiveServices.Speech.Audio;
using Microsoft.CognitiveServices.Speech.Dialog;
using System;
using System.IO;
using System.Text;
using Windows.UI.Xaml;
using Windows.UI.Xaml.Controls;
using Windows.UI.Xaml.Media;

namespace helloworld
{
    public sealed partial class MainPage : Page
    {
        private DialogServiceConnector connector;

        private enum NotifyType
        {
            StatusMessage,
            ErrorMessage
        };

        public MainPage()
        {
            this.InitializeComponent();
        }

        private async void EnableMicrophone_ButtonClicked(
            object sender, RoutedEventArgs e)
        {
            bool isMicAvailable = true;
            try
            {
                var mediaCapture = new Windows.Media.Capture.MediaCapture();
                var settings =
                    new Windows.Media.Capture.MediaCaptureInitializationSettings();
                settings.StreamingCaptureMode =
                    Windows.Media.Capture.StreamingCaptureMode.Audio;
                await mediaCapture.InitializeAsync(settings);
            }
            catch (Exception)
            {
                isMicAvailable = false;
            }
            if (!isMicAvailable)
            {
                await Windows.System.Launcher.LaunchUriAsync(
                    new Uri("ms-settings:privacy-microphone"));
            }
            else
            {
                NotifyUser("Microphone was enabled", NotifyType.StatusMessage);
            }
        }

        private void NotifyUser(
            string strMessage, NotifyType type = NotifyType.StatusMessage)
        {
            // If called from the UI thread, then update immediately.
            // Otherwise, schedule a task on the UI thread to perform the update.
            if (Dispatcher.HasThreadAccess)
            {
                UpdateStatus(strMessage, type);
            }
            else
            {
                var task = Dispatcher.RunAsync(
                    Windows.UI.Core.CoreDispatcherPriority.Normal,
                    () => UpdateStatus(strMessage, type));
            }
        }

        private void UpdateStatus(string strMessage, NotifyType type)
        {
            switch (type)
            {
                case NotifyType.StatusMessage:
                    StatusBorder.Background = new SolidColorBrush(
                        Windows.UI.Colors.Green);
                    break;
                case NotifyType.ErrorMessage:
                    StatusBorder.Background = new SolidColorBrush(
                        Windows.UI.Colors.Red);
                    break;
            }
            StatusBlock.Text += string.IsNullOrEmpty(StatusBlock.Text)
                ? strMessage : "\n" + strMessage;

            if (!string.IsNullOrEmpty(StatusBlock.Text))
            {
                StatusBorder.Visibility = Visibility.Visible;
                StatusPanel.Visibility = Visibility.Visible;
            }
            else
            {
                StatusBorder.Visibility = Visibility.Collapsed;
                StatusPanel.Visibility = Visibility.Collapsed;
            }
            // Raise an event if necessary to enable a screen reader
            // to announce the status update.
            var peer = Windows.UI.Xaml.Automation.Peers.FrameworkElementAutomationPeer.FromElement(StatusBlock);
            if (peer != null)
            {
                peer.RaiseAutomationEvent(
                    Windows.UI.Xaml.Automation.Peers.AutomationEvents.LiveRegionChanged);
            }
        }

        // Waits for and accumulates all audio associated with a given
        // PullAudioOutputStream and then plays it to the MediaElement. Long spoken
        // audio will create extra latency and a streaming playback solution
        // (that plays audio while it continues to be received) should be used --
        // see the samples for examples of this.
        private void SynchronouslyPlayActivityAudio(
            PullAudioOutputStream activityAudio)
        {
            var playbackStreamWithHeader = new MemoryStream();
            playbackStreamWithHeader.Write(Encoding.ASCII.GetBytes("RIFF"), 0, 4); // ChunkID
            playbackStreamWithHeader.Write(BitConverter.GetBytes(UInt32.MaxValue), 0, 4); // ChunkSize: max
            playbackStreamWithHeader.Write(Encoding.ASCII.GetBytes("WAVE"), 0, 4); // Format
            playbackStreamWithHeader.Write(Encoding.ASCII.GetBytes("fmt "), 0, 4); // Subchunk1ID
            playbackStreamWithHeader.Write(BitConverter.GetBytes(16), 0, 4); // Subchunk1Size: PCM
            playbackStreamWithHeader.Write(BitConverter.GetBytes(1), 0, 2); // AudioFormat: PCM
            playbackStreamWithHeader.Write(BitConverter.GetBytes(1), 0, 2); // NumChannels: mono
            playbackStreamWithHeader.Write(BitConverter.GetBytes(16000), 0, 4); // SampleRate: 16kHz
            playbackStreamWithHeader.Write(BitConverter.GetBytes(32000), 0, 4); // ByteRate
            playbackStreamWithHeader.Write(BitConverter.GetBytes(2), 0, 2); // BlockAlign
            playbackStreamWithHeader.Write(BitConverter.GetBytes(16), 0, 2); // BitsPerSample: 16-bit
            playbackStreamWithHeader.Write(Encoding.ASCII.GetBytes("data"), 0, 4); // Subchunk2ID
            playbackStreamWithHeader.Write(BitConverter.GetBytes(UInt32.MaxValue), 0, 4); // Subchunk2Size

            byte[] pullBuffer = new byte[2056];

            uint lastRead = 0;
            do
            {
                lastRead = activityAudio.Read(pullBuffer);
                playbackStreamWithHeader.Write(pullBuffer, 0, (int)lastRead);
            }
            while (lastRead == pullBuffer.Length);

            var task = Dispatcher.RunAsync(
                Windows.UI.Core.CoreDispatcherPriority.Normal, () =>
            {
                mediaElement.SetSource(
                    playbackStreamWithHeader.AsRandomAccessStream(), "audio/wav");
                mediaElement.Play();
            });
        }

        private void InitializeDialogServiceConnector()
        {
            // New code will go here
        }

        private async void ListenButton_ButtonClicked(
            object sender, RoutedEventArgs e)
        {
            // New code will go here
        }
    }
}
Catatan
Jika Anda melihat kesalahan: "Jenis 'Objek' didefinisikan dalam perakitan yang tidak direferensikan"
- Klien yang tepat adalah solusi Anda.
- Pilih Kelola Paket NuGet untuk Solusi, Pilih Pembaruan
- Jika Anda melihat Microsoft.NETCore.UniversalWindowsPlatform dalam daftar pembaruan, Perbarui Microsoft.NETCore.UniversalWindowsPlatform ke versi terbaru
Tambahkan kode berikut ke metode boy
InitializeDialogServiceConnector// This code creates the `DialogServiceConnector` with your resource information. // create a DialogServiceConfig by providing a Custom Commands application id and Speech resource key // The RecoLanguage property is optional (default en-US); note that only en-US is supported in Preview const string speechCommandsApplicationId = "YourApplicationId"; // Your application id const string speechSubscriptionKey = "YourSpeechSubscriptionKey"; // Your Speech resource key const string region = "YourServiceRegion"; // The Speech resource region. var speechCommandsConfig = CustomCommandsConfig.FromSubscription(speechCommandsApplicationId, speechSubscriptionKey, region); speechCommandsConfig.SetProperty(PropertyId.SpeechServiceConnection_RecoLanguage, "en-us"); connector = new DialogServiceConnector(speechCommandsConfig);Ganti string
YourApplicationId, , danYourServiceRegiondengan nilai Anda sendiri untuk aplikasi, kunci ucapan, danYourSpeechSubscriptionKeywilayah AndaTambahkan cuplikan kode berikut ke akhir bodi metode
InitializeDialogServiceConnector// // This code sets up handlers for events relied on by `DialogServiceConnector` to communicate its activities, // speech recognition results, and other information. // // ActivityReceived is the main way your client will receive messages, audio, and events connector.ActivityReceived += (sender, activityReceivedEventArgs) => { NotifyUser( $"Activity received, hasAudio={activityReceivedEventArgs.HasAudio} activity={activityReceivedEventArgs.Activity}"); if (activityReceivedEventArgs.HasAudio) { SynchronouslyPlayActivityAudio(activityReceivedEventArgs.Audio); } }; // Canceled will be signaled when a turn is aborted or experiences an error condition connector.Canceled += (sender, canceledEventArgs) => { NotifyUser($"Canceled, reason={canceledEventArgs.Reason}"); if (canceledEventArgs.Reason == CancellationReason.Error) { NotifyUser( $"Error: code={canceledEventArgs.ErrorCode}, details={canceledEventArgs.ErrorDetails}"); } }; // Recognizing (not 'Recognized') will provide the intermediate recognized text // while an audio stream is being processed connector.Recognizing += (sender, recognitionEventArgs) => { NotifyUser($"Recognizing! in-progress text={recognitionEventArgs.Result.Text}"); }; // Recognized (not 'Recognizing') will provide the final recognized text // once audio capture is completed connector.Recognized += (sender, recognitionEventArgs) => { NotifyUser($"Final speech to text result: '{recognitionEventArgs.Result.Text}'"); }; // SessionStarted will notify when audio begins flowing to the service for a turn connector.SessionStarted += (sender, sessionEventArgs) => { NotifyUser($"Now Listening! Session started, id={sessionEventArgs.SessionId}"); }; // SessionStopped will notify when a turn is complete and // it's safe to begin listening again connector.SessionStopped += (sender, sessionEventArgs) => { NotifyUser($"Listening complete. Session ended, id={sessionEventArgs.SessionId}"); };Tambahkan cuplikan kode berikut ke bodi metode
ListenButton_ButtonClickeddiMainPagekelas// This code sets up `DialogServiceConnector` to listen, since you already established the configuration and // registered the event handlers. if (connector == null) { InitializeDialogServiceConnector(); // Optional step to speed up first interaction: if not called, // connection happens automatically on first use var connectTask = connector.ConnectAsync(); } try { // Start sending audio await connector.ListenOnceAsync(); } catch (Exception ex) { NotifyUser($"Exception: {ex.ToString()}", NotifyType.ErrorMessage); }Dari bilah menu, pilih File>Simpan Semuauntuk menyimpan perubahan Anda
Cobalah
Dari bilah menu, pilih Build>Solusi Build untuk membuat aplikasi. Kode harus dikompilasi tanpa kesalahan.
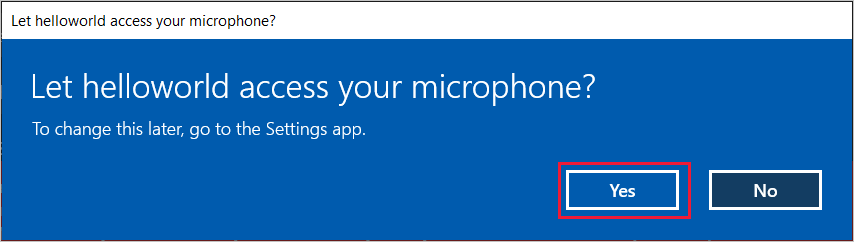
Pilih Debug>Mulai Penelusuran Kesalahan (atau tekan F5) untuk memulai aplikasi. Jendela helloworld akan muncul.

Pilih Aktifkan mikrofon. Jika permintaan izin akses muncul, pilih Ya
Pilih Bicara, lalu ucapkan frasa atau kalimat bahasa Inggris di mikrofon perangkat Anda. Pidato Anda dikirimkan ke saluran Direct Line Speech dan ditranskripsikan menjadi teks, yang muncul di jendela.