Manually Integrate Jamf Pro with Intune for compliance
Important
Jamf macOS device support for Conditional Access is being deprecated.
Beginning on September 1, 2024, the platform that Jamf Pro’s Conditional Access feature is built on will no longer be supported.
If you use Jamf Pro’s Conditional Access integration for macOS devices, follow Jamf’s documented guidelines to migrate your devices to Device Compliance integration at Migrating from macOS Conditional Access to macOS Device Compliance – Jamf Pro Documentation.
If you need help, contact Jamf Customer Success. For more information, see the blog post at https://aka.ms/Intune/Jamf-Device-Compliance.
Tip
For guidance for integrating Jamf Pro with Intune and Microsoft Entra ID, including how to configure Jamf Pro to deploy the Intune Company Portal app to devices you manage with Jamf Pro, see Integrate Jamf Pro with Intune to report compliance to Microsoft Entra ID.
Microsoft Intune supports integrating your Jamf Pro deployment to bring device compliance and Conditional Access policies to your macOS devices. Through integration, you can require that your macOS devices that are managed by Jamf Pro meet your Intune device compliance requirements before those devices are allowed to access your organization's resources. Resource access is controlled by your Microsoft Entra Conditional Access policies in the same way as for devices managed through Intune.
When Jamf Pro integrates with Intune, you can sync the inventory data from macOS devices with Intune, through Microsoft Entra ID. Intune's compliance engine then analyzes the inventory data to generate a report. Intune's analysis is combined with intelligence about the device user's Microsoft Entra identity to drive enforcement through Conditional Access. Devices that are compliant with the Conditional Access policies can gain access to protected company resources.
This article can help you manually integrate Jamf Pro with Intune.
Tip
Instead of manually configuring Jamf Pro integration with Intune, we recommend configuring and using the Jamf Cloud Connector with Microsoft Intune. The Cloud Connector automates many of the steps that are required when you manually configure integration.
After you configure integration, you'll then configure Jamf and Intune to enforce compliance with Conditional Access on devices managed by Jamf.
Prerequisites
Products and services
You need the following to configure Conditional Access with Jamf Pro:
- Jamf Pro 10.1.0 or later
- Microsoft Intune and Microsoft Entra ID P1 licenses (recommended Microsoft Enterprise Mobility + Security license bundle)
- Global admin role in Microsoft Entra ID.
- A user with Microsoft Intune Integration privileges in Jamf Pro
- Company Portal app for macOS
- macOS devices with OS X 10.12 Yosemite or later
Network ports
The following ports should be accessible for Jamf and Intune to integrate correctly:
- Intune: Port 443
- Apple: Ports 2195, 2196, and 5223 (push notifications to Intune)
- Jamf: Ports 80 and 5223
To allow APNS to function correctly on the network, you must also enable outgoing connections to, and redirects from:
- the Apple 17.0.0.0/8 block over TCP ports 5223 and 443 from all client networks.
- ports 2195 and 2196 from Jamf Pro servers.
For more information about these ports, see the following articles:
- Intune network configuration requirements and bandwidth.
- Network Ports Used by Jamf Pro on jamf.com.
- TCP and UDP ports used by Apple software products on support.apple.com
Connect Intune to Jamf Pro
To connect Intune with Jamf Pro:
- Create a new application in Azure.
- Enable Intune to integrate with Jamf Pro.
- Configure Conditional Access in Jamf Pro.
Create an application in Microsoft Entra ID
In the Azure portal, go to Microsoft Entra ID > App Registrations, and then select New registration.
On the Register an application page, specify the following details:
- In the Name section, enter a meaningful application name, for example Jamf Conditional Access.
- For the Supported account types section, select Accounts in any organizational directory.
- For Redirect URI, leave the default of Web, and then specify the URL for your Jamf Pro instance.
Select Register to create the application and to open the Overview page for the new app.
On the app Overview page, copy the Application (client) ID value and record it for later use. You'll need this value in later procedures.
Select Certificates & secrets under Manage. Select the New client secret button. Enter a value in Description, select any option for Expires and choose Add.
Important
Before you leave this page, copy the value for the client secret and record it for later use. You will need this value in later procedures. This value isn't available again, without recreating the app registration.
Select API permissions under Manage.
On the API permissions page, remove all permissions from this app by selecting the ... icon next to each existing permission. This removal is required; the integration won't succeed if there are any unexpected extra permissions in this app registration.
Next, add permissions to update device attributes. At the top left of the API permissions page, select Add a permission to add a new permission.
On the Request API permissions page, select Intune, and then select Application permissions. Select only the check box for update_device_attributes and save the new permission.
Under Microsoft Graph, select Application permissions, then select Application.Read.All.
Select Add permissions.
Navigate to APIs my organization uses. Search for and select Windows Azure Active Directory. Select Application permissions, and then select Application.Read.All.
Select Add permissions.
Next, grant admin consent for this app by selecting Grant admin consent for <your tenant> in the top left of the API permissions page. You may need to reauthenticate your account in the new window and grant the application access by following the prompts.
Refresh the page by selecting Refresh at the top of the page. Confirm that admin consent has been granted for the update_device_attributes permission.
After the app is registered successfully, the API permissions should only contain one permission called update_device_attributes, and should appear as follows:
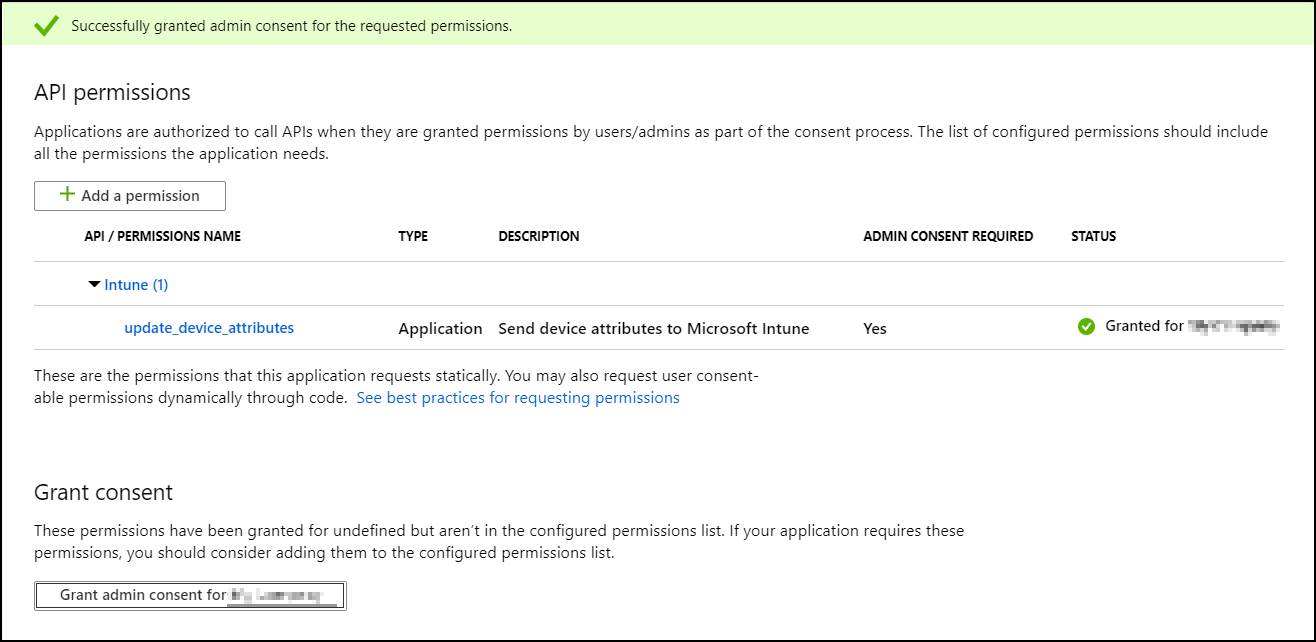
The app registration process in Microsoft Entra ID is complete.
Note
If the client secret expires, you must create a new client secret in Azure and then update the Conditional Access data in Jamf Pro. Azure allows you to have both the old secret and new key active to prevent service disruptions.
Enable Intune to integrate with Jamf Pro
Sign in to the Microsoft Intune admin center.
Select Tenant administration > Connectors and tokens > Partner device management.
Enable the Compliance Connector for Jamf by pasting the Application ID you saved during the previous procedure into the Specify the Microsoft Entra App ID for Jamf field.
Select Save.
Configure Microsoft Intune Integration in Jamf Pro
Activate the connection in the Jamf Pro console:
- Open the Jamf Pro console and navigate to Global Management > Conditional Access. Select Edit on the macOS Intune Integration tab.
- Select the check box for Enable Intune Integration for macOS. When this setting is enabled, Jamf Pro sends inventory updates to Microsoft Intune. Clear the selection if you want to disable the connection but save your configuration.
- Select Manual under Connection type.
- From the Sovereign Cloud pop-up menu, select the location of your Sovereign Cloud from Microsoft.
- Select Open administrator consent URL and follow the onscreen instructions to allow the Jamf Native macOS Connector app to be added to your Microsoft Entra tenant.
- Add the Microsoft Entra tenant Name from Microsoft Azure.
- Add the Application ID and Client Secret (previously called Application Key) for the Jamf Pro application from Microsoft Azure.
- Select Save. Jamf Pro tests your settings and verifies your success.
Return to the Partner device management page in Intune to complete the configuration.
In Intune, go to the Partner device management page. Under Connector Settings configure groups for assignment:
- Select Include and specify which User groups you want to target for macOS enrollment with Jamf.
- Use Exclude to select groups of Users that won't enroll with Jamf and instead will enroll their Macs directly with Intune.
Exclude overrides Include, which means any device that is in both groups is excluded from Jamf and directed to enroll with Intune.
Note
This method of including and excluding user groups affects the enrollment experience of the user. Any user with a macOS device thats already enrolled in either Jamf or Intune who is then targeted to enroll with the other MDM must unenroll their device and then re-enroll it with the new MDM before management of the device works properly.
Select Evaluate to determine how many devices will be enrolled with Jamf, based on your group configurations.
Select Save when you're ready to apply the configuration.
To proceed, you'll next need to use Jamf to deploy the Company Portal for Mac so that users can register their devices to Intune.
Set up compliance policies and register devices
After you configure integration between Intune and Jamf, you need to apply compliance policies to Jamf-managed devices.
Disconnect Jamf Pro and Intune
Should you need to remove integration of Jamf Pro with Intune, use one of the following methods. Both methods apply to integration that is configured manually or by using the Cloud Connector.
Deprovision Jamf Pro from within the Microsoft Intune admin center
In the Microsoft Intune admin center, go to Tenant administration > Connectors and tokens > Partner device management.
Select the option Terminate. Intune displays a message about the action. Review the message and when ready, select OK. The option to Terminate the integration only appears when the Jamf connection exists.
After you terminate the integration, refresh the view of the admin center to update the view. Your organization's macOS devices are removed from Intune in 90 days.
Deprovision Jamf Pro from within the Jamf Pro console
Use the following steps to remove the connection from within the Jamf Pro console.
In the Jamf Pro console, go to Global Management > Conditional Access. On the macOS Intune Integration tab, select Edit.
Clear the Enable Intune Integration for macOS check box.
Select Save. Jamf Pro sends your configuration to Intune and the integration will be terminated.
Sign in to the Microsoft Intune admin center.
Select Tenant administration > Connectors and tokens > Partner device management to verify that the status is now Terminated.
After you terminate the integration, your organization's macOS devices will be removed at the date shown in your console, which is after three months.
Next steps
Feedback
Coming soon: Throughout 2024 we will be phasing out GitHub Issues as the feedback mechanism for content and replacing it with a new feedback system. For more information see: https://aka.ms/ContentUserFeedback.
Submit and view feedback for