Tutorial: Deploy Azure Digital Twins Preview and configure a spatial graph
Important
A new version of the Azure Digital Twins service has been released. In light of the new service's expanded capabilities, the original Azure Digital Twins service (described in this documentation set) has been retired.
To view the documentation for the new service, visit the active Azure Digital Twins Documentation.
You can use the Azure Digital Twins Preview service to bring together people, places, and devices in a coherent spatial system. This series of tutorials demonstrates how to use Azure Digital Twins to detect room occupancy with optimal conditions of temperature and air quality.
These tutorials will walk you through a .NET console application to build a scenario of an office building. The building has multiple floors and rooms within each floor. The rooms contain devices with attached sensors that detect motion, ambient temperature, and air quality.
You'll learn how to replicate the physical areas and entities in the building as digital objects by using the Azure Digital Twins service. You'll simulate device events by using another console application. Then, you'll learn how to monitor the events that come from these physical areas and entities in near real time.
An office administrator can use this information to help an employee working in this building to book meeting rooms with optimal conditions. An office facilities manager can use your setup to get usage trends of the rooms, and to monitor working conditions for maintenance purposes.
In the first tutorial of this series, you learn how to:
- Deploy Digital Twins.
- Grant permissions to your app.
- Modify a Digital Twins sample app.
- Provision your building.
These tutorials use and modify the same samples that the quickstart to find available rooms uses, for a more detailed and in-depth coverage of the concepts.
Prerequisites
An Azure subscription. If you don't have an Azure account, create a free account.
The .NET Core SDK. The Azure Digital Twins samples used in these tutorials are written in C#. Make sure to install .NET Core SDK version 2.1.403 or later on your development machine to build and run the sample. Check that the right version is installed on your machine by running
dotnet --versionin a command window.Visual Studio Code to explore the sample code.
Deploy Digital Twins
Use the steps in this section to create a new instance of the Azure Digital Twins service. Only one instance can be created per subscription. Skip to the next section if you already have one running.
Sign in to the Azure portal.
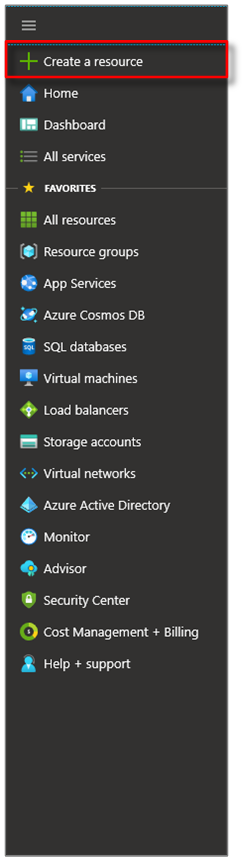
Select the home side-bar, then + Create a resource.
Search for Digital Twins, and select Digital Twins.

Alternatively, select Internet of Things, and select Digital Twins (preview).
Select Create to start the deployment process.

In the Digital Twins pane, enter the following information:
Resource Name: Create a unique name for your Digital Twins instance.
Subscription: Choose the subscription that you want to use to create this Digital Twins instance.
Resource group: Select or create a resource group for the Digital Twins instance.
Location: Select the closest location to your devices.

Review your Digital Twins information, and then select Create. Your Digital Twins instance might take a few minutes to be created. You can monitor the progress in the Notifications pane.
Open the Overview pane of your Digital Twins instance. Note the link under Management API. The Management API URL is formatted as:
https://yourDigitalTwinsName.yourLocation.azuresmartspaces.net/management/swaggerThis URL takes you to the Azure Digital Twins REST API documentation that applies to your instance. Read How to use Azure Digital Twins Swagger to learn how to read and use this API documentation. Copy and modify the Management API URL to this format:
https://yourDigitalTwinsName.yourLocation.azuresmartspaces.net/management/api/v1.0/Your application will use the modified URL as the base URL to access your instance. Copy this modified URL to a temporary file. You'll need this in the next section.


Grant permissions to your app
Digital Twins uses Azure Active Directory (Azure AD) to control read/write access to the service. Any application that needs to connect with your Digital Twins instance must be registered with Azure AD. The steps in this section show how to register your sample app.
If you already have an app registration, you can reuse it for your sample. However, browse through this section to make sure your app registration is configured correctly.
Note
This section provides instructions for Azure AD app registration.
In the Azure portal, open Azure Active Directory from the expandable left menu, and then open the App registrations pane.

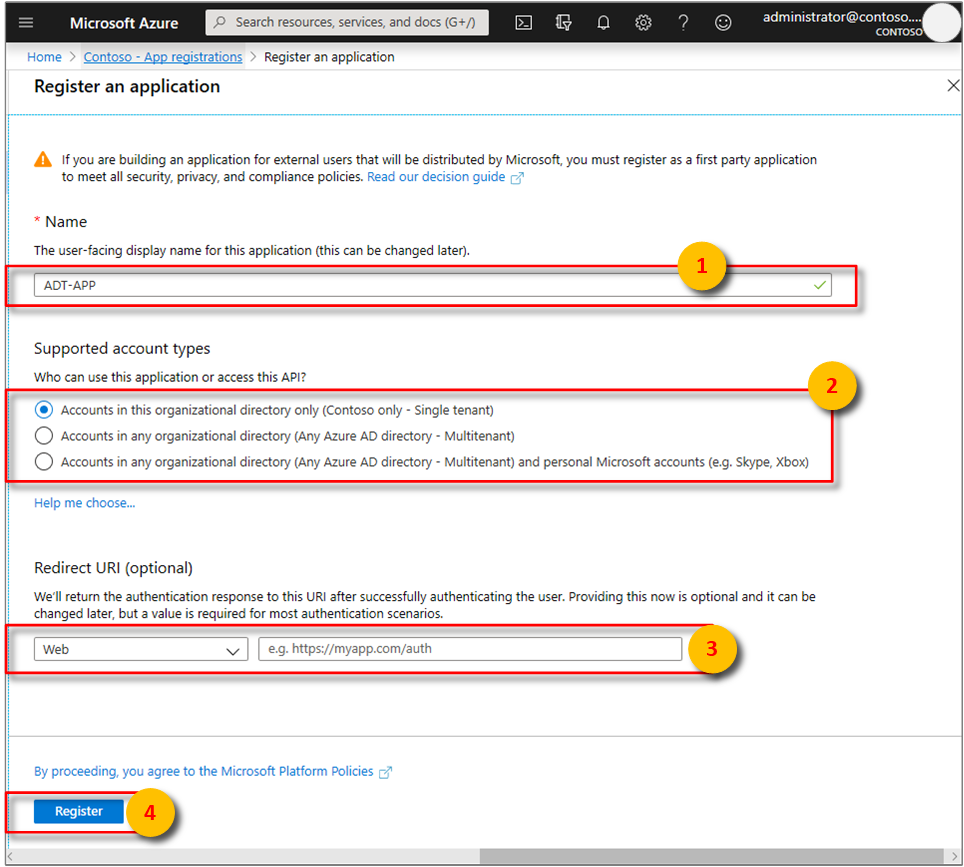
Select the + New registration button.

Give a friendly name for this app registration in the Name box.
Under Redirect URI (optional) section, enter
https://microsoft.comin the textbox.Verify which accounts and tenants are supported by your Azure Active Directory app.
Select Register.
The Authentication blade specifies important authentication configuration settings.
Add Redirect URIs and configure Access Tokens by selecting + Add a platform.
Select Yes to specify that the app is a public client.
Verify which accounts and tenants are supported by your Azure Active Directory app.

After selecting the appropriate platform, configure your Redirect URIs and Access Tokens in the side panel to the right of the user interface.
Redirect URIs must match the address supplied by the authentication request:
- For apps hosted in a local development environment, select Public client (mobile & desktop). Make sure to set public client to Yes.
- For Single-Page Apps hosted on Azure App Service, select Web.
Determine whether a Logout URL is appropriate.
Enable the implicit grant flow by checking Access tokens or ID tokens.

Click Configure, then Save.
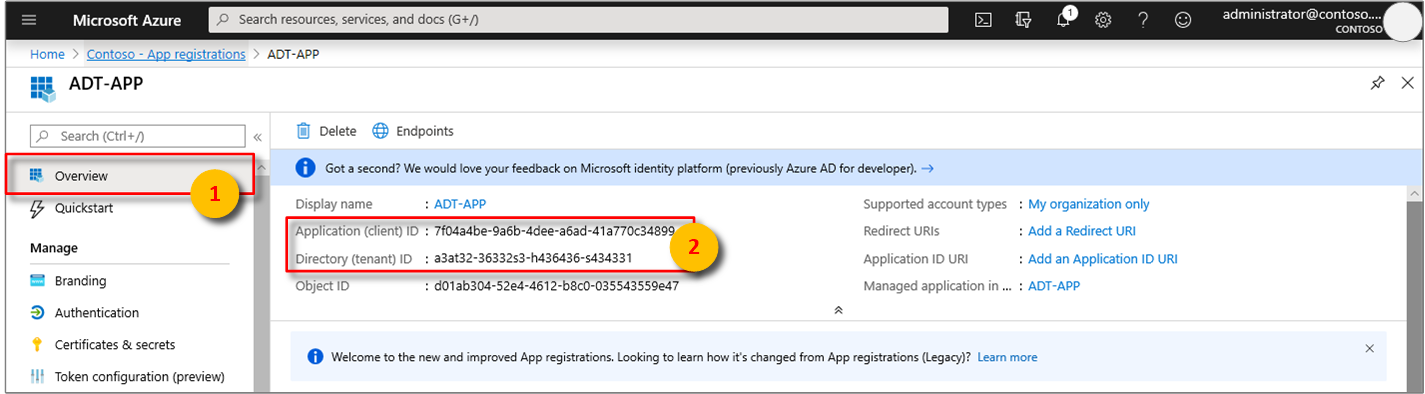
Open the Overview pane of your registered app, and copy the values of the following entities to a temporary file. You'll use these values to configure your sample application in the following sections.
- Application (client) ID
- Directory (tenant) ID
Open the API permissions pane for your app registration. Select + Add a permission button. In the Request API permissions pane, select the APIs my organization uses tab, and then search for one of the following:
Azure Digital Twins. Select the Azure Digital Twins API.
Alternatively, search for
Azure Smart Spaces Service. Select the Azure Smart Spaces Service API.
Important
The Azure AD API name and ID that will appear depends on your tenant:
- Test tenant and customer accounts should search for
Azure Digital Twins. - Other Microsoft accounts should search for
Azure Smart Spaces Service.
Either API will appear as Azure Digital Twins in the same Request API permissions pane once selected. Select the Read drop-down option, and then select the Read.Write checkbox. Select the Add permissions button.

Depending on your organization's settings, you might need to take additional steps to grant admin access to this API. Contact your administrator for more information. Once the admin access is approved, the Admin Consent Required column in the API permissions pane will display your permissions.
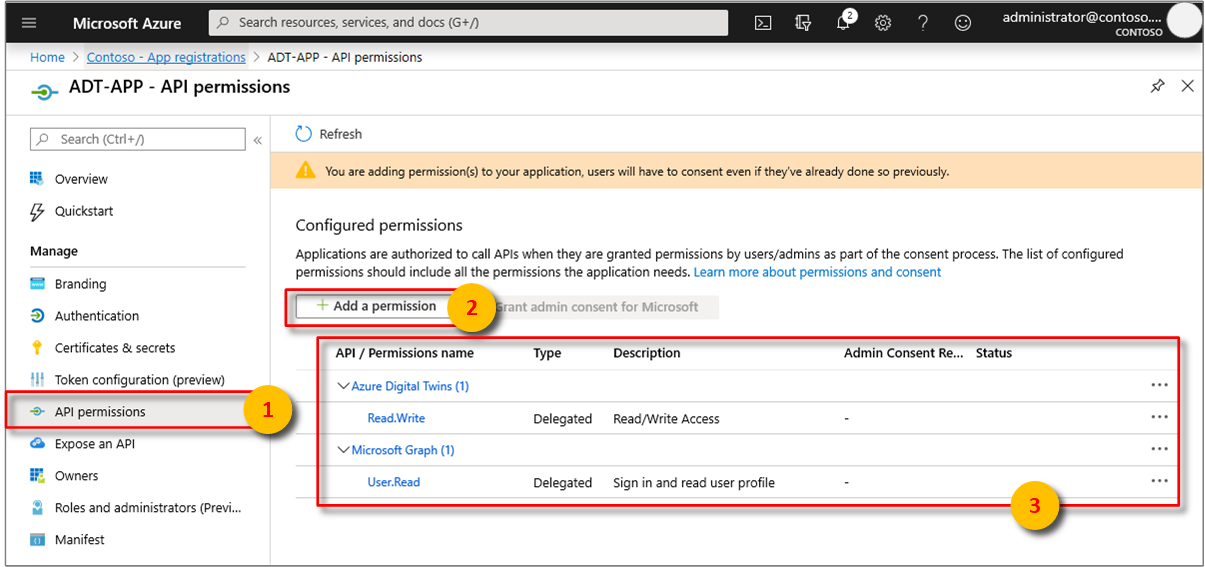
Verify that Azure Digital Twins appears.


Configure the Digital Twins sample
This section walks you through an Azure Digital Twins application that communicates with the Digital Twins REST APIs.
Download the sample
If you already have the samples downloaded for the quickstart to find available rooms, you can skip these steps.
- Download the Digital Twins .NET samples.
- Extract the contents of the zip folder on your machine.
Explore the sample
In the extracted sample folder, open the file digital-twins-samples-csharp\digital-twins-samples.code-workspace in Visual Studio Code. It contains two projects:
You can use the provisioning sample occupancy-quickstart to configure and provision a spatial intelligence graph. This graph is the digitized image of your physical spaces and the resources in them. It uses an object model, which defines objects for a smart building. For a complete list of Digital Twins objects and REST APIs, visit this REST API documentation or the Management API URL that was created for your instance.
To explore the sample to understand how it communicates with your Digital Twins instance, you can start with the src\actions folder. The files in this folder implement the commands that you'll use in these tutorials:
- The provisionSample.cs file shows how to provision your spatial graph.
- The getSpaces.cs file gets information about the provisioned spaces.
- The getAvailableAndFreshSpaces.cs file gets the results of a custom function called a user-defined function.
- The createEndpoints.cs file creates endpoints to interact with other services.
The simulation sample device-connectivity simulates sensor data and sends it to the IoT hub that's provisioned for your Digital Twins instance. You'll use this sample in the next tutorial after you provision your spatial graph. The sensor and device identifiers that you use to configure this sample should be the same as what you'll use to provision your graph.
Configure the provisioning sample
Open a command window and go to the downloaded sample. Run the following command:
cd occupancy-quickstart/srcRestore dependencies to the sample project by running this command:
dotnet restoreIn Visual Studio Code, open the appSettings.json file in the occupancy-quickstart project. Update the following values:
- ClientId: Enter the application ID of your Azure AD app registration. You noted this ID in the section where you set app permissions.
- Tenant: Enter the directory ID of your Azure AD tenant. You also noted this ID in the section where you set app permissions.
- BaseUrl: Enter the URL of your Digital Twins instance. To get this URL, replace the placeholders in this URL with values for your instance:
https://yourDigitalTwinsName.yourLocation.azuresmartspaces.net/management/api/v1.0/. You can also get this URL by modifying the Management API URL from the deployment section. Replace swagger/ with api/v1.0/.
Review a list of Digital Twins features that you can explore by using the sample. Run the following command:
dotnet run
Understand the provisioning process
This section shows how the sample provisions a spatial graph of a building.
In Visual Studio Code, browse to the occupancy-quickstart\src\actions folder and open the file provisionSample.cs. Note the following function:
public static async Task<IEnumerable<ProvisionResults.Space>> ProvisionSample(HttpClient httpClient, ILogger logger)
{
    IEnumerable<SpaceDescription> spaceCreateDescriptions;
    using (var r = new StreamReader("actions/provisionSample.yaml"))
    {
        spaceCreateDescriptions = await GetProvisionSampleTopology(r);
    }

    var results = await CreateSpaces(httpClient, logger, spaceCreateDescriptions, Guid.Empty);

    Console.WriteLine($"Completed Provisioning: {JsonConvert.SerializeObject(results, Formatting.Indented)}");

    return results;
}
This function uses provisionSample.yaml in the same folder. Open this file, and note the hierarchy of an office building: Venue, Floor, Area, and Rooms. Any of these physical spaces can contain devices and sensors. Each entry has a predefined type—for example, Floor, Room.
The sample yaml file shows a spatial graph that uses the Default Digital Twins object model. This model provides generic names for most types. Generic names are sufficient for a building. Examples are Temperature for SensorDataType, and Map for SpaceBlobType. An example space type is Room with subtypes FocusRoom, ConferenceRoom, and so on.
If you had to create a spatial graph for a different type venue, such as a factory, you might need a different object model. You can find out which models are available to use by running the command dotnet run GetOntologies on the command line for the provisioning sample.
For more information on spatial graphs and object models, read Understanding Digital Twins object models and spatial intelligence graph.
Modify the sample spatial graph
The provisionSample.yaml file contains the following nodes:
resources: The
resourcesnode creates an Azure IoT Hub resource to communicate with the devices in your setup. An IoT hub at the root node of your graph can communicate with all the devices and sensors in your graph.spaces: In the Digital Twins object model,
spacesrepresent the physical locations. Each space has aType—for example, Region, Venue, or Customer—and a friendlyName. Spaces can belong to other spaces, creating a hierarchical structure. The provisionSample.yaml file has a spatial graph of an imaginary building. Note the logical nesting of spaces of typeFloorwithinVenue,Areain a floor, andRoomnodes in an area.devices: Spaces can contain
devices, which are physical or virtual entities that manage a number of sensors. For example, a device might be a user's phone, a Raspberry Pi sensor pod, or a gateway. In the imaginary building in your sample, note how the room named Focus Room contains a Raspberry Pi 3 A1 device. Each device node is identified by a uniquehardwareId, which is hardcoded in the sample. To configure this sample for an actual production, replace these with values from your setup.sensors: A device can contain multiple
sensors. They can detect and record physical changes like temperature, motion, and battery level. Each sensor node is uniquely identified by ahardwareId, hardcoded here. For an actual application, replace these by using the unique identifiers of the sensors in your setup. The provisionSample.yaml file has two sensors to record Motion and CarbonDioxide. Add another sensor to record Temperature, by adding the following lines, below the lines for the CarbonDioxide sensor. These are provided in provisionSample.yaml as commented-out lines. You can uncomment them by removing the#character in the front of each line.- dataType: Temperature hardwareId: SAMPLE_SENSOR_TEMPERATURENote
Make sure the
dataTypeandhardwareIdkeys align with the statements above this snippet. Also make sure that your editor does not replace spaces with tabs.
Save and close the provisionSample.yaml file. In the next tutorial, you'll add more information to this file, and then provision your Azure Digital Twins sample building.
Tip
You can view and modify your spatial graph using the Azure Digital Twins Graph Viewer.
Clean up resources
If you want to stop exploring Azure Digital Twins at this point, feel free to delete resources created in this tutorial:
From the left menu in the Azure portal, select All resources, select your Digital Twins resource group, and select Delete.
Tip
If you experienced trouble deleting your Digital Twins instance, a service update has been rolled out with the fix. Please retry deleting your instance.
If necessary, delete the sample application on your work machine.
Next steps
To learn how to implement a custom logic to monitor conditions in your sample building, go to the next tutorial in the series: