Preparare i certificati PKI dell'hub di Azure Stack per la distribuzione o la rotazione
Nota
Questo articolo riguarda solo la preparazione dei certificati esterni, usati per proteggere gli endpoint su infrastrutture e servizi esterni. I certificati interni vengono gestiti separatamente durante il processo di rotazione dei certificati.
Nota
Se si installa Registro Azure Container (ACR), è consigliabile allineare le date di scadenza dei certificati ACR esterni con le date di scadenza degli altri certificati dell'hub di Azure Stack esterno. È inoltre consigliabile proteggere PFX per ACR con la stessa password usata per proteggere gli altri PFX esterni.
I file di certificato ottenuti dall'autorità di certificazione (CA) devono essere importati ed esportati con proprietà corrispondenti ai requisiti del certificato dell'hub di Azure Stack.
Questo articolo illustra come importare, creare pacchetti e convalidare certificati esterni per preparare la distribuzione o la rotazione dei segreti dell'hub di Azure Stack.
Prerequisiti
Il sistema deve soddisfare i prerequisiti seguenti prima di creare certificati PKI per una distribuzione dell'hub di Azure Stack:
- I certificati restituiti dall'autorità di certificazione vengono archiviati in una singola directory, in formato cer (altri formati configurabili, ad esempio .cert, sst o pfx).
- Windows 10 o Windows Server 2016 o versioni successive.
- Usare lo stesso sistema che ha generato la richiesta di firma del certificato (a meno che non si stia puntando a un certificato preconfezionato in PFX).
- Usare sessioni di PowerShell con privilegi elevati.
Continuare con la sezione Preparazione certificati appropriati (controllo idoneità di Azure Stack) o Preparare i certificati (passaggi manuali).
Preparare i certificati (controllo di idoneità di Azure Stack)
Usare questa procedura per creare pacchetti di certificati usando i cmdlet di PowerShell di idoneità di Azure Stack:
Installare il modulo di verifica dell'idoneità di Azure Stack da un prompt di PowerShell (5.1 o versione successiva), eseguendo il cmdlet seguente:
Install-Module Microsoft.AzureStack.ReadinessChecker -Force -AllowPrereleaseSpecificare il percorso dei file di certificato. Ad esempio:
$Path = "$env:USERPROFILE\Documents\AzureStack"Dichiarare pfxPassword. Ad esempio:
$pfxPassword = Read-Host -AsSecureString -Prompt "PFX Password"Dichiarare ExportPath in cui verranno esportati i PFX risultanti. Ad esempio:
$ExportPath = "$env:USERPROFILE\Documents\AzureStack"Convertire i certificati in Certificati dell'hub di Azure Stack. Ad esempio:
ConvertTo-AzsPFX -Path $Path -pfxPassword $pfxPassword -ExportPath $ExportPathEsaminare l'output:
ConvertTo-AzsPFX v1.2005.1286.272 started.

Stage 1: Scanning Certificates
    Path: C:\Users\[*redacted*]\Documents\AzureStack Filter: CER Certificate count: 11
    adminmanagement_east_azurestack_contoso_com_CertRequest_20200710235648.cer
    adminportal_east_azurestack_contoso_com_CertRequest_20200710235645.cer
    management_east_azurestack_contoso_com_CertRequest_20200710235644.cer
    portal_east_azurestack_contoso_com_CertRequest_20200710235646.cer
    wildcard_adminhosting_east_azurestack_contoso_com_CertRequest_20200710235649.cer
    wildcard_adminvault_east_azurestack_contoso_com_CertRequest_20200710235642.cer
    wildcard_blob_east_azurestack_contoso_com_CertRequest_20200710235653.cer
    wildcard_hosting_east_azurestack_contoso_com_CertRequest_20200710235652.cer
    wildcard_queue_east_azurestack_contoso_com_CertRequest_20200710235654.cer
    wildcard_table_east_azurestack_contoso_com_CertRequest_20200710235650.cer
    wildcard_vault_east_azurestack_contoso_com_CertRequest_20200710235647.cer

Detected ExternalFQDN: east.azurestack.contoso.com

Stage 2: Exporting Certificates
    east.azurestack.contoso.com\Deployment\ARM Admin\ARMAdmin.pfx
    east.azurestack.contoso.com\Deployment\Admin Portal\AdminPortal.pfx
    east.azurestack.contoso.com\Deployment\ARM Public\ARMPublic.pfx
    east.azurestack.contoso.com\Deployment\Public Portal\PublicPortal.pfx
    east.azurestack.contoso.com\Deployment\Admin Extension Host\AdminExtensionHost.pfx
    east.azurestack.contoso.com\Deployment\KeyVaultInternal\KeyVaultInternal.pfx
    east.azurestack.contoso.com\Deployment\ACSBlob\ACSBlob.pfx
    east.azurestack.contoso.com\Deployment\Public Extension Host\PublicExtensionHost.pfx
    east.azurestack.contoso.com\Deployment\ACSQueue\ACSQueue.pfx
    east.azurestack.contoso.com\Deployment\ACSTable\ACSTable.pfx
    east.azurestack.contoso.com\Deployment\KeyVault\KeyVault.pfx

Stage 3: Validating Certificates.

Validating east.azurestack.contoso.com-Deployment-AAD certificates in C:\Users\[*redacted*]\Documents\AzureStack\east.azurestack.contoso.com\Deployment

Testing: KeyVaultInternal\KeyVaultInternal.pfx
Thumbprint: E86699****************************4617D6
    PFX Encryption: OK
    Expiry Date: OK
    Signature Algorithm: OK
    DNS Names: OK
    Key Usage: OK
    Key Length: OK
    Parse PFX: OK
    Private Key: OK
    Cert Chain: OK
    Chain Order: OK
    Other Certificates: OK
Testing: ARM Public\ARMPublic.pfx
    ...
Log location (contains PII): C:\Users\[*redacted*]\AppData\Local\Temp\AzsReadinessChecker\AzsReadinessChecker.log
ConvertTo-AzsPFX Completed
Nota
Per un utilizzo aggiuntivo, usare get-help ConvertTo-AzsPFX -Full per un ulteriore utilizzo, ad esempio disabilitando la convalida o il filtro per formati di certificato diversi.
Dopo aver completato la convalida dei certificati, è possibile presentare la distribuzione o la rotazione senza alcun passaggio aggiuntivo.
Preparare i certificati (passaggi manuali)
Usare questa procedura per creare pacchetti di certificati per i nuovi certificati PKI dell'hub di Azure Stack usando i passaggi manuali.
Importare il certificato
Copiare le versioni originali del certificato ottenute dalla CA a scelta in una directory nell'host di distribuzione.
Avviso
Non copiare i file già importati, esportati o modificati in alcun modo dai file forniti direttamente dalla CA.
Fare clic con il pulsante destro del mouse sul certificato e scegliere Installa certificato o Installa PFX, a seconda della modalità di consegna del certificato dalla CA.
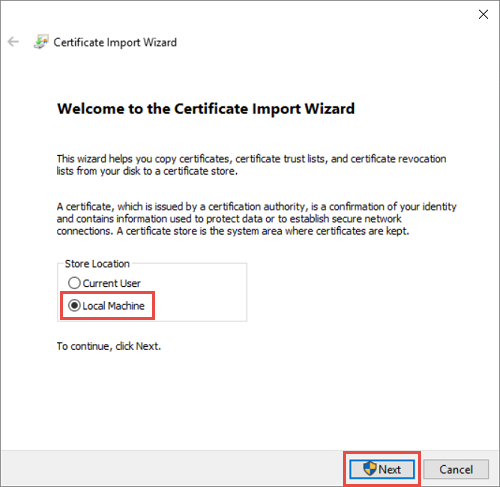
Nella Procedura guidata Importazione certificati selezionare Computer locale come percorso di importazione. Selezionare Avanti. Nella schermata seguente selezionare di nuovo avanti.
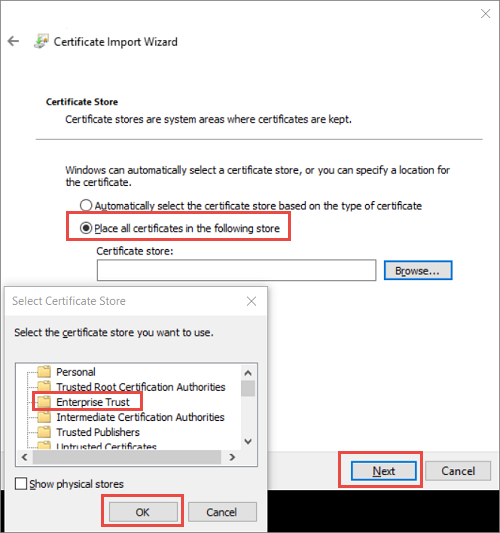
Scegliere Posiziona tutto il certificato nell'archivio seguente e quindi selezionare Attendibilità aziendale come percorso. Selezionare OK per chiudere la finestra di dialogo di selezione dell'archivio certificati e quindi selezionare Avanti.
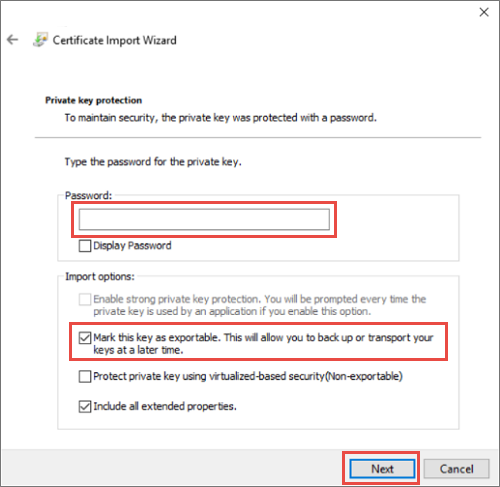
a. Se si importa un PFX, verrà visualizzato un dialogo aggiuntivo. Nella pagina Protezione chiave privata immettere la password per i file di certificato e quindi abilitare l'opzione Contrassegna questa chiave come esportabile. Consente di eseguire il backup o il trasporto delle chiavi in un secondo momento. Selezionare Avanti.
Selezionare Fine per completare l'importazione.
Nota
Dopo aver importato un certificato per l'hub di Azure Stack, la chiave privata del certificato viene archiviata come file PKCS 12 (PFX) nell'archiviazione cluster.
Esportare il certificato
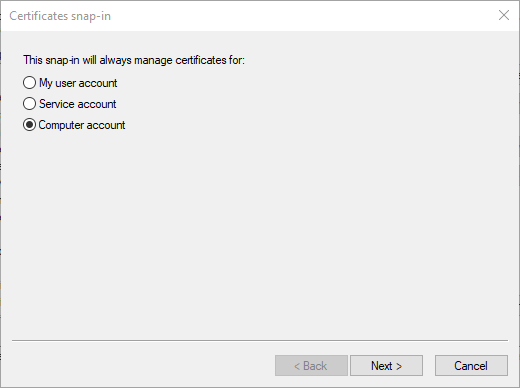
Aprire la console MMC di Gestione certificati e connettersi all'archivio certificati del computer locale.
Aprire Microsoft Management Console. Per aprire la console in Windows 10, fare clic con il pulsante destro del mouse sul menu Start, scegliere Esegui, quindi digitare mmc e premere INVIO.
>SelezionareAggiungi file/Rimuovi snap-in, quindi selezionare Certificati e selezionare Aggiungi.
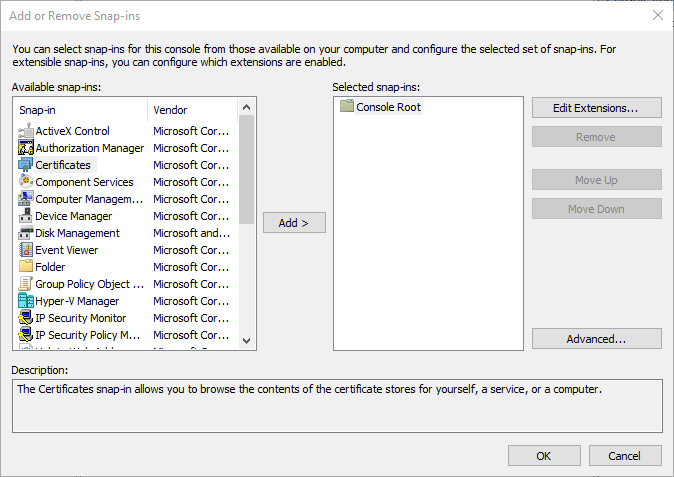
Selezionare Account computer e quindi Avanti. Selezionare Computer locale e quindi Fine. Selezionare OK per chiudere la pagina Aggiungi/Rimuovi Snap-In.
Passare a Certificate Enterprise TrustCertificate location (Percorso certificato>di attendibilità> aziendale). Verificare che il certificato sia visualizzato a destra.
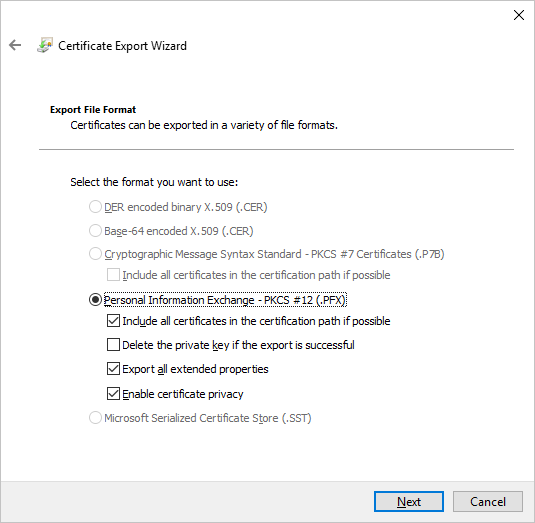
Nella barra delle applicazioni Console di Gestione certificati selezionare Azioni>Esporta tuttele attività>. Selezionare Avanti.
Nota
A seconda del numero di certificati dell'hub di Azure Stack, potrebbe essere necessario completare il processo più di una volta.
Selezionare Sì, Esportare la chiave privata e quindi selezionare Avanti.
Nella sezione Esporta formato file:
Selezionare Includi tutti i certificati nel certificato, se possibile.
Selezionare Esporta tutte le proprietà estese.
Selezionare Abilita privacy del certificato.
Selezionare Avanti.
Selezionare Password e specificare una password per i certificati. Creare una password che soddisfi i requisiti di complessità delle password seguenti:
- Lunghezza minima di otto caratteri.
- Almeno tre dei caratteri seguenti: lettera maiuscola, lettera minuscola, numeri da 0 a 9, caratteri speciali, carattere alfabetico non maiuscolo o minuscolo.
Prendere nota di questa password. Verrà usato come parametro di distribuzione.
Selezionare Avanti.
Scegliere un nome file e un percorso per il file PFX da esportare. Selezionare Avanti.
Selezionare Fine.
Passaggi successivi
Commenti e suggerimenti
Presto disponibile: Nel corso del 2024 verranno gradualmente disattivati i problemi di GitHub come meccanismo di feedback per il contenuto e ciò verrà sostituito con un nuovo sistema di feedback. Per altre informazioni, vedere https://aka.ms/ContentUserFeedback.
Invia e visualizza il feedback per