Build and consume data entities
Important
Customers using Human Resources, the functionality noted in this article is currently available in both the stand-alone Dynamics 365 Human Resources and the merged Finance infrastructure. Navigation might be different than noted while we make updates. If you need to find a specific page, you can use Search.
This tutorial shows how to build an entity and how to consume some out-of-band (OOB) entities in an integration scenario. You will also preview how these data entities will be consumed in various integrations scenarios, such as data import and export, integration, and OData services.
When you are ready to build your first entity for production, you will need to:
- Create your own package and model. For more information, see Models and packages.
- Create a new project and set the model property to the one that you just created.
Prerequisites
This tutorial requires that you access an environment by using Remote Desktop, and that you are provisioned as an administrator on the instance.
Throughout this tutorial, baseUrl refers to the base URL of the instance.
- In the cloud environment, the base URL is obtained from Microsoft Dynamics Lifecycle Services (LCS).
- On a local virtual machine (VM), the base URL is
https://usnconeboxax1aos.cloud.onebox.dynamics.com. - Download FMLab sample code to C:. For details, see FMLab sample code.
Key concepts
- Developing a data entity in Microsoft Visual Studio
- Enabling a data entity for data management and OData services
- Consuming a data entity in integration scenarios
Business problem
Fleet Management stores customer data in the FMCustomer table and address data in the FMAddressTable table. To access or update customer information, users must access multiple tables. Instead, you can create a business object that functionally represents customer information, and that you can use to build integration solutions.
Building the FMLabCustomer entity
In this section, you must create a data entity for FMLabCustomer in the Fleet Management model. This entity will be used to manage master data through import/export and integration services. The primary data source is FMCustomer, and the secondary data source is FMAddressTable.
Data entity
FMLabCustomerEntity
Data entity fields
| Name | Mapping |
|---|---|
| CellPhone | FMCustomer.CellPhone |
| DriversLicense | FMCustomer.DriversLicense |
| FMCustomer.Email | |
| FirstName | FMCustomer.FirstName |
| LastName | FMCustomer.LastName |
| CustomerGroup | FMCustomer.CustGroup |
| AddressLine1 | FMAddressTable.AddressLine1 |
| AddressLine2 | FMAddressTable.AddressLine2 |
| City | FMAddressTable.City |
| State | FMAddressTable.State |
| ZipCode | FMAddressTable.ZipCode |
| Country | FMAddressTable.Country |
Corresponding staging table
Staging tables are used in import/export scenarios to provide intermediary storage during file parsing and transformation. These tables are also used in connector integration scenarios. In many cases, staging tables are mapped 1:1 to an entity. The staging table that corresponds to the FMLabCustomerEntity entity is named FMLabCustomerStaging.
Create a new project
- In Visual Studio click File > New > Project, and then select finance and operations Project.
- Right-click the project, click Properties, and verify that the project is in the Fleet Management model. If it isn't, set the Model property to Fleet Management.
Add a new data entity to your project
Create a new entity that is named FMLabCustomerEntity. Right-click you project, and then click Add > New item. The Add New Item dialog box opens.
Select Data Entity, and then set the Name property to FMLabCustomerEntity.
Click Add.
In the Data entity wizard, specify the properties for the data entity that you're creating. Use the values that are shown in the following image.
Note
The name of an entity must not have '_' or any numeric digits (0…9). Using these characters may result in mapping errors later.
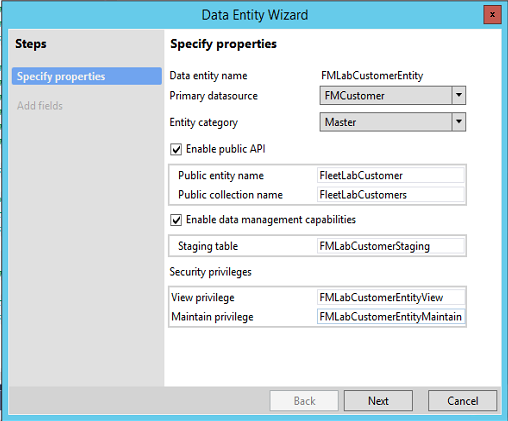
Click Next. For more information about the function of each property, see "Categories of entities" and "Building an entity" in Data entities overview.
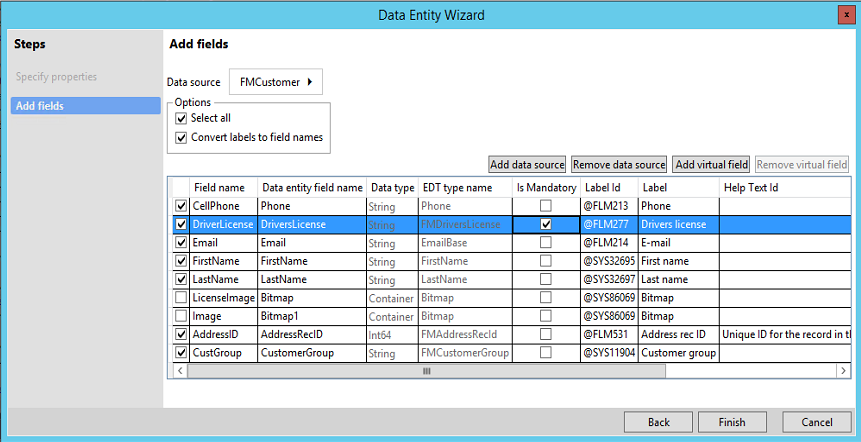
Add fields to the new entity from your data source, as shown in the following image. You can add fields from the primary data source, FMCustomer. For this entity, clear the check box for the Image and LicenseImage container types to simplify testing.
Rename the data entity fields to reflect public data contract standards, or click Convert labels to field names to generate names from the existing labels.
On the line for the DriversLicense field, select the Is mandatory check box. This field will be used as the natural key for the entity.
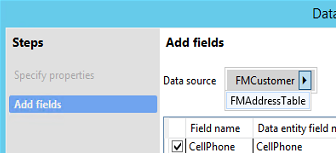
In the Data source field, select PrimaryAddress. Notice that the PrimaryAddress data source is automatically added because of automatic expansion or the surrogate foreign key replacement of AddressID.
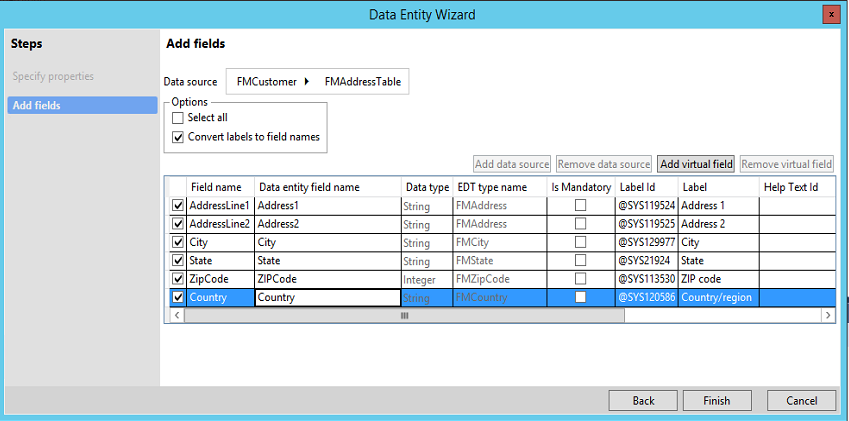
Select the fields from the PrimaryAddress data source that you want to be part of your entity. Additionally, rename the following fields to reflect proper public data contract naming:
- PrimaryAddress _AddressLine1 > AddressLine1
- PrimaryAddress _AddressLine2 > AddressLine2
- PrimaryAddress _City > City
- PrimaryAddress _State > State
- PrimaryAddress _ZipCode > ZipCode
- PrimaryAddress _Country > Country
Click Finish. A data entity item and staging table are added to the project.
Build your project
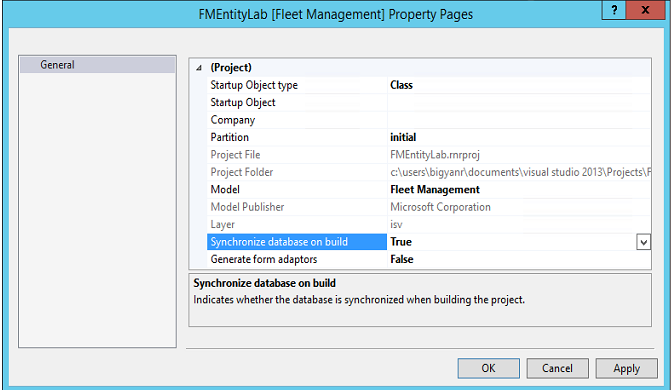
In Solution Explorer, right-click your project, and then click Properties.
Change the value of the Synchronize database on build property to True, and then click OK. This property must be set only one time per project.
Note
Entities are created as views in Microsoft SQL Server, and staging tables are also added. Therefore, you must sync a database when you build entities.
On the Visual Studio toolbar, click Build > Build Solution to build the project.
Verify that the build doesn't contain any errors. At this point in the tutorial, warnings are allowed.
Visually validate and customize an entity
In Solution Explorer, right-click the FMLabCustomerEntity node, and then click Open. The designer for the entity opens in the middle pane.
Validate the properties of the FMLabCustomerEntity entity. Select the entity in Solution Explorer, and compare the Properties pane values to the following image.
Set the Label property to Fleet Lab Customers.

In the left pane, click Data Sources > FMCustomer > Data Sources > FMAddressTable.
Change the Is Read Only property to No. This is a known issue. Eventually, the value will be set to Yes or No automatically, based on the type of join. The value should be Yes for composition scenarios, and No for associations (surrogate foreign key expansions). This property enables the data source to be read/write.

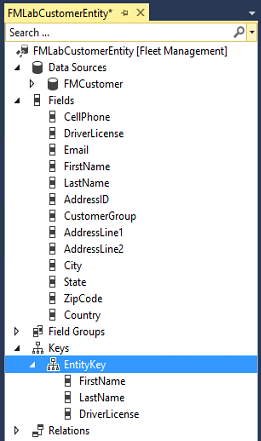
In the FMLabCustomerEntity designer, click Keys > EntityKey, and then expand the Fields node. Verify that the list of fields matches the following image.
To visually validate the staging table that will be used for import/export, open the FMLabCustomerStaging table in the designer, and then select the FMLabCustomerStaging node.
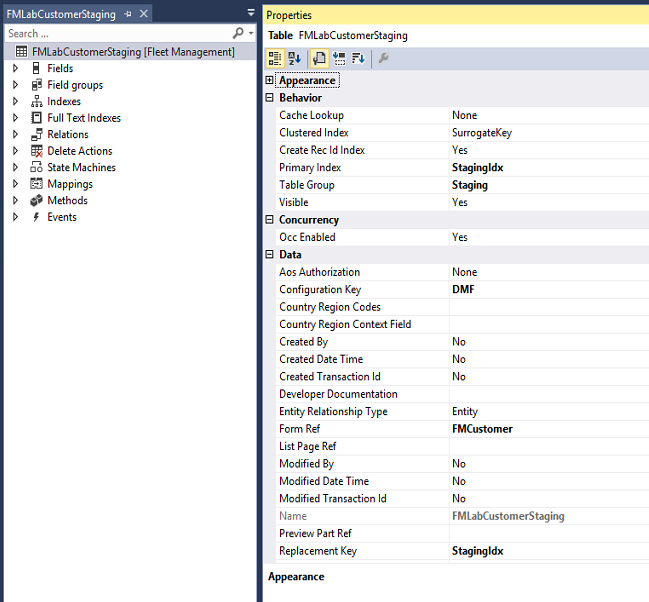
Click FMLabCustomerStaging > Fields. In the following image, the standard fields of the staging tables are selected. All entity staging tables have these standard fields. The image also shows the data fields that belong on this data entity.

In Solution Explorer, right-click your project, and then select Rebuild to rebuild and synchronize the project.
Testing data entities
Entities can be tested by using various methods in X++, through data import/export, or through integrations. In this section, we'll explore scenarios for validating entities.
Test the entity by using X++ code
One of the most common ways of interacting with data entities is through X++, by using a unit test or a runnable job to validate that the entities have been built. In this example, we will use a runnable job.
In Solution Explorer, click Add > New item > Runnable class to add a runnable class to your project.
Copy and paste the following code into the class to test your data entity.
public static void main(Args _args)
{
    FMLabCustomerEntity customer;
    str license = "License";
    Random r = new Random();
    int rand = r.nextInt();
    license = license + int2str(rand);

    //Create a new record in FM lab customer entity
    customer.clear();
    customer.FirstName = "Bob";
    customer.LastName = "Smith";
    customer.DriversLicense = license;
    customer.insert();

    info(strfmt("Tried to insert customer '%1 %2' with license %3",
        customer.FirstName, customer.LastName, customer.DriversLicense));

    //Display newly created record
    select forupdate customer where customer.DriversLicense==license;
    info(strfmt("Found newly created customer '%1 %2' with license %3",
        customer.FirstName, customer.LastName, customer.DriversLicense));

    //Now delete the record from the entity
    customer.delete();
    select customer where customer.DriversLicense==license ;
    info(strfmt("Deleted customer does not exist: license- %1", customer.DriversLicense));
}
Run the code in debugger to set it as a startup object.
To validate the entity, view the Infolog in the debugger window or in notifications on the website. You will see that three successful messages are logged. You will also see the actions that were taken.
Importing data by using entities
Data entities that have the Data Management Enabled property can be used to import and export data in various file formats. In this section, you will import data in a CSV file format for the FMLabCustomer entity.
File import
After you create your data entity, you can validate import/export.
Create a sample CSV file that you can import. Copy the following text, and save it as FM Lab Customer Import.csv.
CELLPHONE,DRIVERSLICENSE,EMAIL,FIRSTNAME,LASTNAME,CUSTOMERGROUP,ADDRESSLINE1,ADDRESSLINE2,CITY,STATE,ZIPCODE,COUNTRY(999) 555-0100,S615-3939-2349,chris.spencer@adatum.com,Chris,Spencer,adv\_mem\_1,444 Main Street,,Orlando,FL,77899,US(188) 555-0101,S615-3939-2350,Ichiro.lannin@blueyonderairlines.com,Ichiro,Lannin,non\_mem\_1,12 Long Street,,New York City,NY,99087,US(777) 555-0102,S615-3939-2351,josh.smith@fourthcoffee.com,Josh,Smith,adv\_mem\_1,9606 122th Avenue,,Sydney,TX,99874,US(456) 555-0103,S615-3939-2352,Vince@fabrikam.us,Vince,Ahmed,non\_mem\_1,123 Microsoft Way,Unit 87,Seattle,WA,90001,US(345) 555-0104,S615-3939-2353,tony.parker@lucernepublishing.com,Tony,Parker,non\_mem\_1,12012 11th PLNE,Apt 160,San Francisco,CA,75645,US(312) 555-0105,S615-3939-2354,Julia@fineartschool.net,Julia,Natarajan,exec\_mem\_1,449 Long Street,Apt 160,Bruxelles,ID,34213,USClick User Dashboard > Data management.
In the Data Management workspace, click the Import tile.
On the Import page, enter the import details, as shown in the following image.
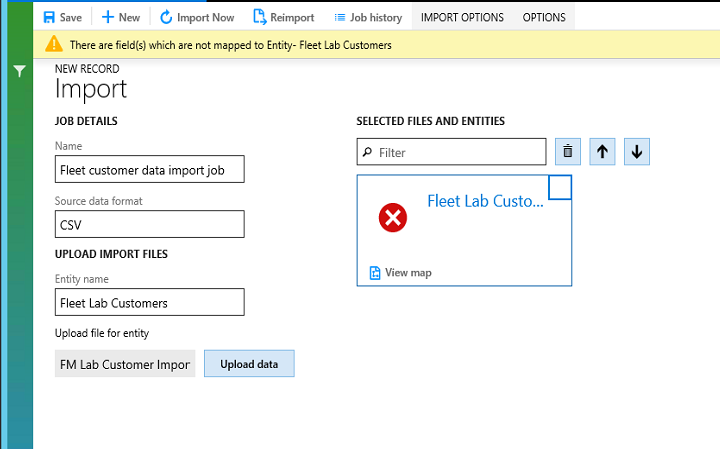
Click the Upload data button next to the Upload file for entity field, and select the CSV file that you created.
After the file is uploaded, you will notice that the entity is added to the middle section. You will also receive an error that states that the mapping isn't valid. A few fields aren't mapped correctly between the source file and the target entity.
In the entities list, click View map.
AddressLine1 and AddressLine2 are two fields in the source that aren't mapped to target fields. In the visual mapper, or details view, map these fields as follows, and then click Save:
- AddressLine1 – Address1
- AddressLine2 – Address2
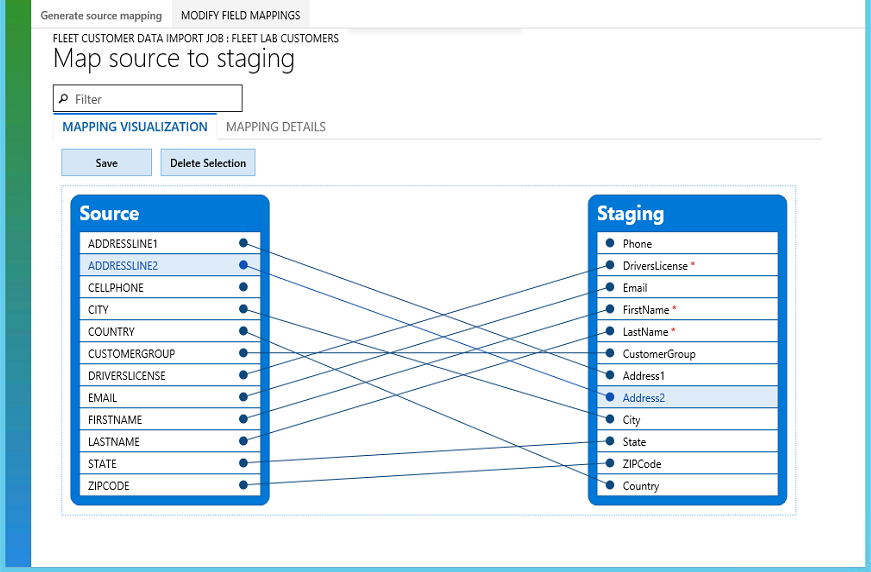
Click the Back button in your browser to go back to the Import job page. The check mark in the entities list indicates that the entity is now ready for import.
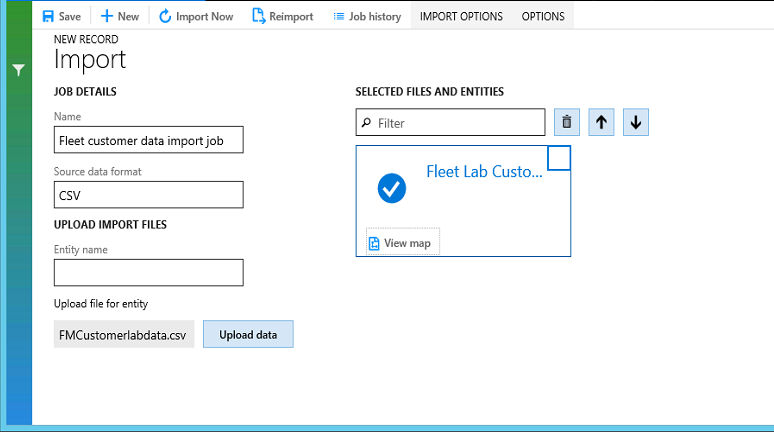
Click Import Now. After the import is completed, the job status page opens.
Consuming entities by using OData
In this section, you will learn how to expose and consume an entity for OData. Before you begin, verify that the Fleet demo data is loaded from the client: [baseURL]/?f=FMSetup
Review the FleetRental entity and add a navigation property for OData
You will review the existing FleetRental entity and then create a relationship from one data entity to another. This relationship will be used as a navigation property for OData entities.
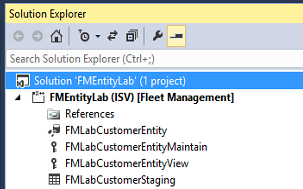
In Solution Explorer, verify that you're in the FMEntityLab project.
In Application Explorer, search for FMRentalEntity, right-click it, and then select Add to Project.
In Application Explorer, search for FMCustomerEntity, right-click it, and then select Add to project.
In Solution Explorer, right-click FMRentalEntity, and then select Open.
In the view designer, select the root node, FMRentalEntity, and review the following properties.
Property Value Description IsPublic Yes When this property is set to Yes, the entity is visible by using the OData application programming interface (API). Public Entity Name FleetRental The name that will be used in the OData APIs for EntityType. Public Collection Name FleetRentals The name that will be used for the OData collection entity. In the view designer, expand the Relations node.
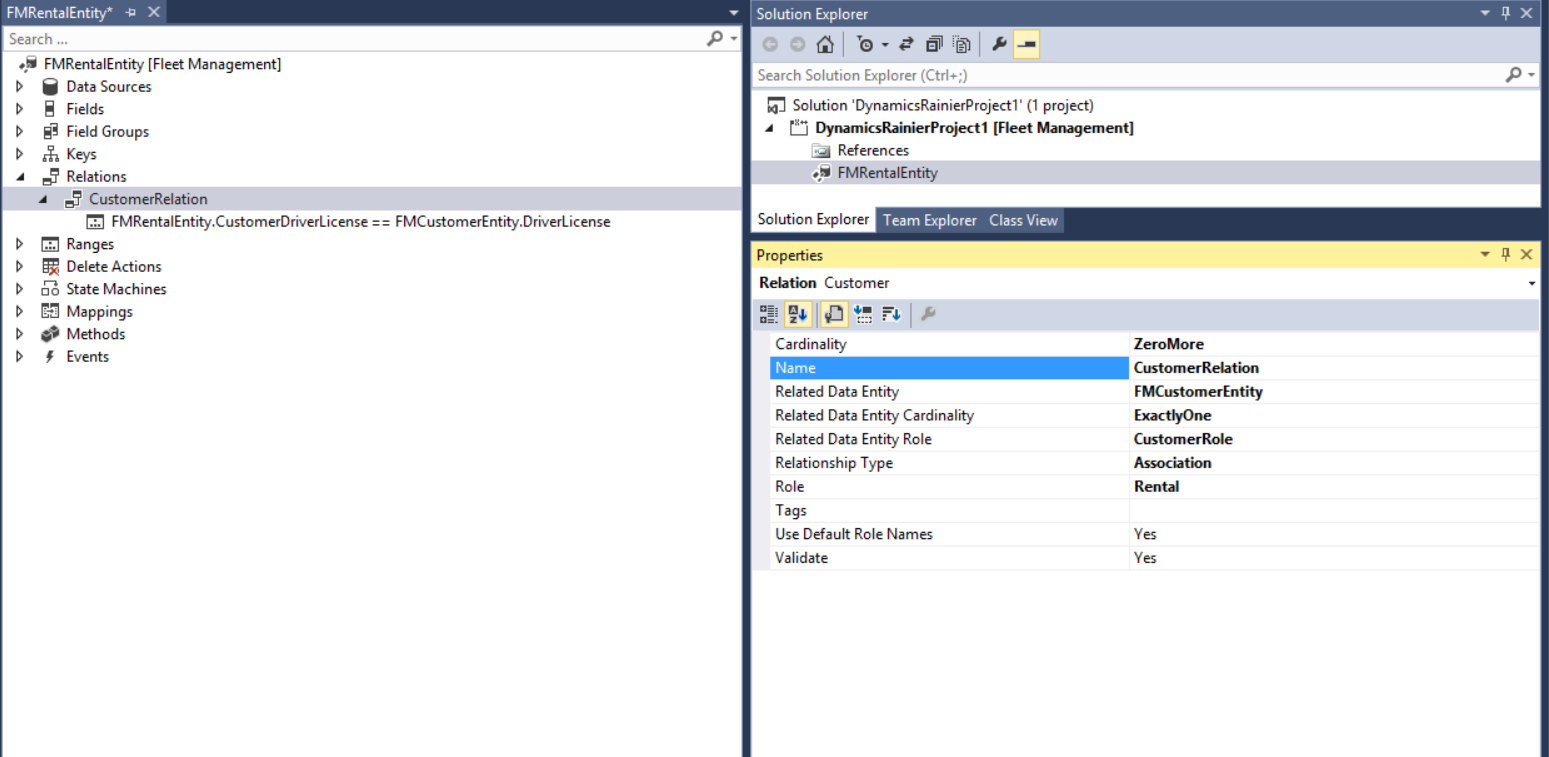
Select Customer Relation, and then click Delete.
Right-click Relations, and then select New > Relation.
Select Relation1, and set the following properties.
Property Value Cardinality ZeroMore Name CustomerRelation Related Data Entity FMCustomerEntity Related Data Entity Cardinality ExactlyOne Related Data Entity Role CustomerRole Relationship Type Association Role Rental In the view designer, right-click the CustomerRelation node, and then select New > Normal.
Right-click the new node under CustomerRelation, and then select Properties.
Set the following properties.
Property Value Field CustomerDriversLicense - This is the foreign key field on FMRentalEntity. Related Field DriversLicense - This is the unique key on FMCustomerEntity. The following image shows the relation in Visual Studio.
On the BUILD menu, click Build Solution to save your changes and build the project. You can view the build progress in the Output window.
To update the OData endpoint with the changes, you must run an iisreset command. Open a Command Prompt window as an administrator, and enter iisreset.
You've now created a navigation property between FMRentalEntity and FMCustomerEntity.
Use standard OData syntax to retrieve data
In this section, you will use some of the standard OData syntax to navigate and query the OData entities that are exposed in the Fleet Management model. First, follow these steps to enable Internet Explorer to view JSON formatted data.
- Close all Internet Explorer windows.
- Go to C:\FMLab, and select and double-click the json-ie.reg file.
- In the Registry Editor dialog box, click Yes.
- Click OK.
You can now use Internet Explorer to explore some OData URIs.
Start Internet Explorer, and enter the following URL in the address bar: [baseURL]/data/$metadata You will see all the metadata that is associated with OData entities.
Note
The metadata might take a few minutes to appear the first time that you access it. In the XML, you can see all of the properties and navigation properties associated with the OData entities.
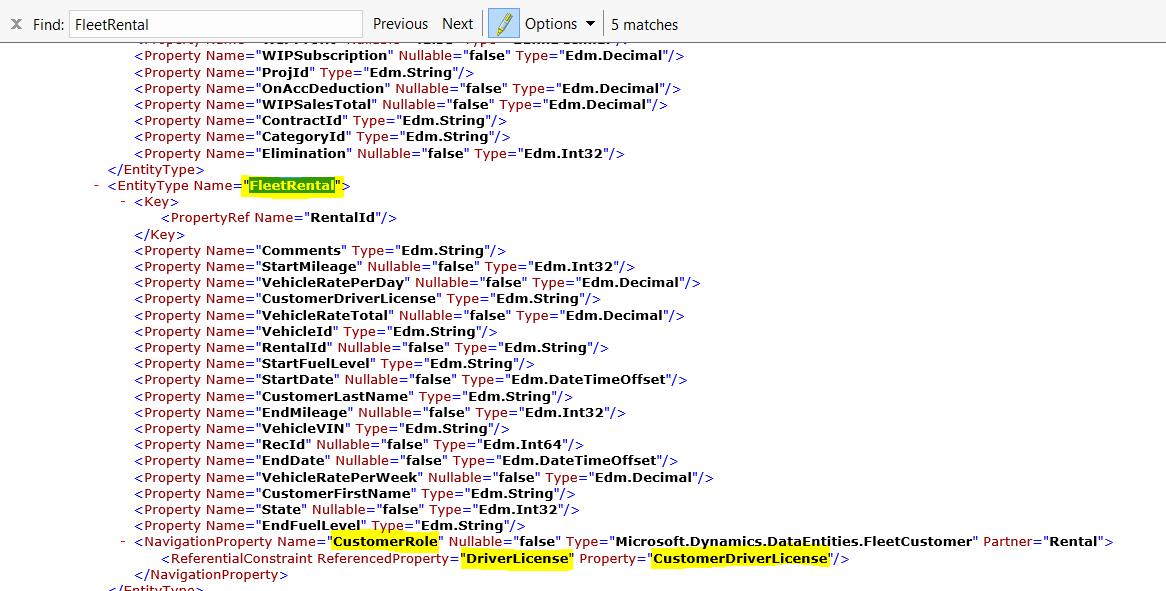
In the browser, find FleetRental. The following image shows the metadata of the FleetRental entity, together with the new relationship, NavigationProperty.
To view all the customers in the Fleet Management application in JSON format, enter the following URL into the address bar of your browser: [baseURL]/data/FleetCustomer
Note
Entity names are case-sensitive.
If you don't want to retrieve all properties for the customers, you can retrieve just selected properties. For example, to retrieve only FirstName and LastName, enter the following URL: [baseURL]/data/FleetCustomers?$filter=FirstName.LastName
You can also apply filters. For example, to filter on all customers where FirstName=Phil, enter the following URL: [baseUrl]/data/FleetCustomers?$filter=FirstName%20eq%20'Phil'
Note
These URLs won't work if you copy and paste them. You must manually enter them in the address bar.
To retrieve all the Rental records, together with all details of the customers, enter the following URL: [baseURL]/data/FleetRentals?$expand=CustomerRole The following example shows a Rental record, together with details of the linked customer, in JSON format.
"@odata.context":"https://testax32aos.cloud.test.dynamics.com/en/data/$metadata#FleetRentals","value":
{
    {
        "@odata.etag":"W/"JzEsNTYzNzE0NDU3NjsxLDU2MzcxNDQ1NzY7MTc4NjA2OTg1Niw1NjM3MTQ0NjA1Jw=="",
        "Comments":"","StartMileage":0,"VehicleRatePerDay":40,"CustomerDriversLicense":
        "S468-3184-6541","VehicleRateTotal":280,"VehicleId":"Litware_LitwareFour_1",
        "RentalId":"000001",
        "StartFuelLevel":"Full","StartDate":"2010-04-09T00:00:00Z","CustomerLastName":"Spencer",
        "EndMileage":0,"VehicleVIN":"2J4FY19P0NJ710529",
        "RecId":5637144576,"EndDate":"2010-04-16T00:00:00Z",
        "VehicleRatePerWeek":270,"CustomerFirstName":"Phil","State":3,
        "EndFuelLevel":"","CustomerRole":

        {"@odata.etag":"W/"JzEsNTYzNzE0NDU3NjsxLDU2MzcxNDQ1NzYn"",
        "CellPhone":"(999) 555-0100",
        "DriversLicense":"S468-3184-6541","AddressLine2":"",
        "State":"FL","Country":"US","FirstName":"Phil",
        "Email":"phil.spencer@adatum.com","CustomerGroup":
        "adv_mem_1","AddressLine1":"167 BBN Way","City":"Orlando",
        "ZipCode":77899,"RecId":5637144576,"LastName":"Spencer"
    }
}
Add an action to OData entity
Actions provide a way to inject behaviors into the data model. In Dynamics 'AX 7,' you add actions by adding a method to the data entity and then decorating the method with specific attributes. In this section, we'll walk through the steps for adding an action.
In Solution Explorer, right-click FMRentalEntity, and then select View code.
Copy the following code lines, and paste them into the Code window.
public class FMRentalEntity extends common
{
    [SysODataActionAttribute("ReturnRental", true)]
    public str ReturnRental()
    {
        //do something
        return "Rental was successfully returned. Thanks for your business";
    }
}
On the BUILD menu, click Rebuild Solution to save your changes and build the project. You can view the build progress in the Output window.
To update the OData endpoint with the changes, you must run an iisreset command. Open a Command Prompt window as an administrator, and enter iisreset.
The action that you just added can be invoked through code, as you will see in the next section.
Consume the OData API from an external console application
In this section, you will use a console application to consume the OData endpoints that are exposed in the Fleet Management application. The console application first creates a new customer and then creates a new reservation for that customer. This tutorial shows how easy it is to use OData together with standard .NET Windows Communication Foundation (WCF) data service libraries to integrate with Dynamics AX.
Start a new instance of Visual Studio.
On the File menu, click Open > Project/Solution.
In the Open Project dialog box, browse to C:\FMLab\Odata4ConsoleApplication, and then select Odata4ConsoleApplication.csproj.
Click Open. The Odata4ConsoleApplication project appears in Solution Explorer.
In Solution Explorer, double-click OdataProxyGenerator.tt.
In the code editor, replace the following string with your organization's URL.
<baseURL> public const string MetadataDocumentUri = "<baseURL>/data/"Save the OdataProxyGenerator.tt file.
In the Save of Read-only file dialog box, click Overwrite. The proxy class for the OData metadata endpoint is generated. This operation might take a few minutes.
In Solution Explorer, double-click Program.cs.
Replace the value of the dynamicsBaseUri variable with your organization's URL.
Verify that there is a final closing slash (/) in the URL, and then click Save.
In the Save of Read-only file dialog box, click Overwrite.
Press F5 to run the application, and then follow the instructions in the output console window. The application might prompt you for your Dynamics AX credentials. After the application has run, the new customer and the corresponding reservation are created.
Follow these steps to verify that the new reservation appears on the Rental page:
Start Internet Explorer, and enter the following URL in the address bar: [baseURL]/?mi=FMRental The FMRental page shows the list of rentals.
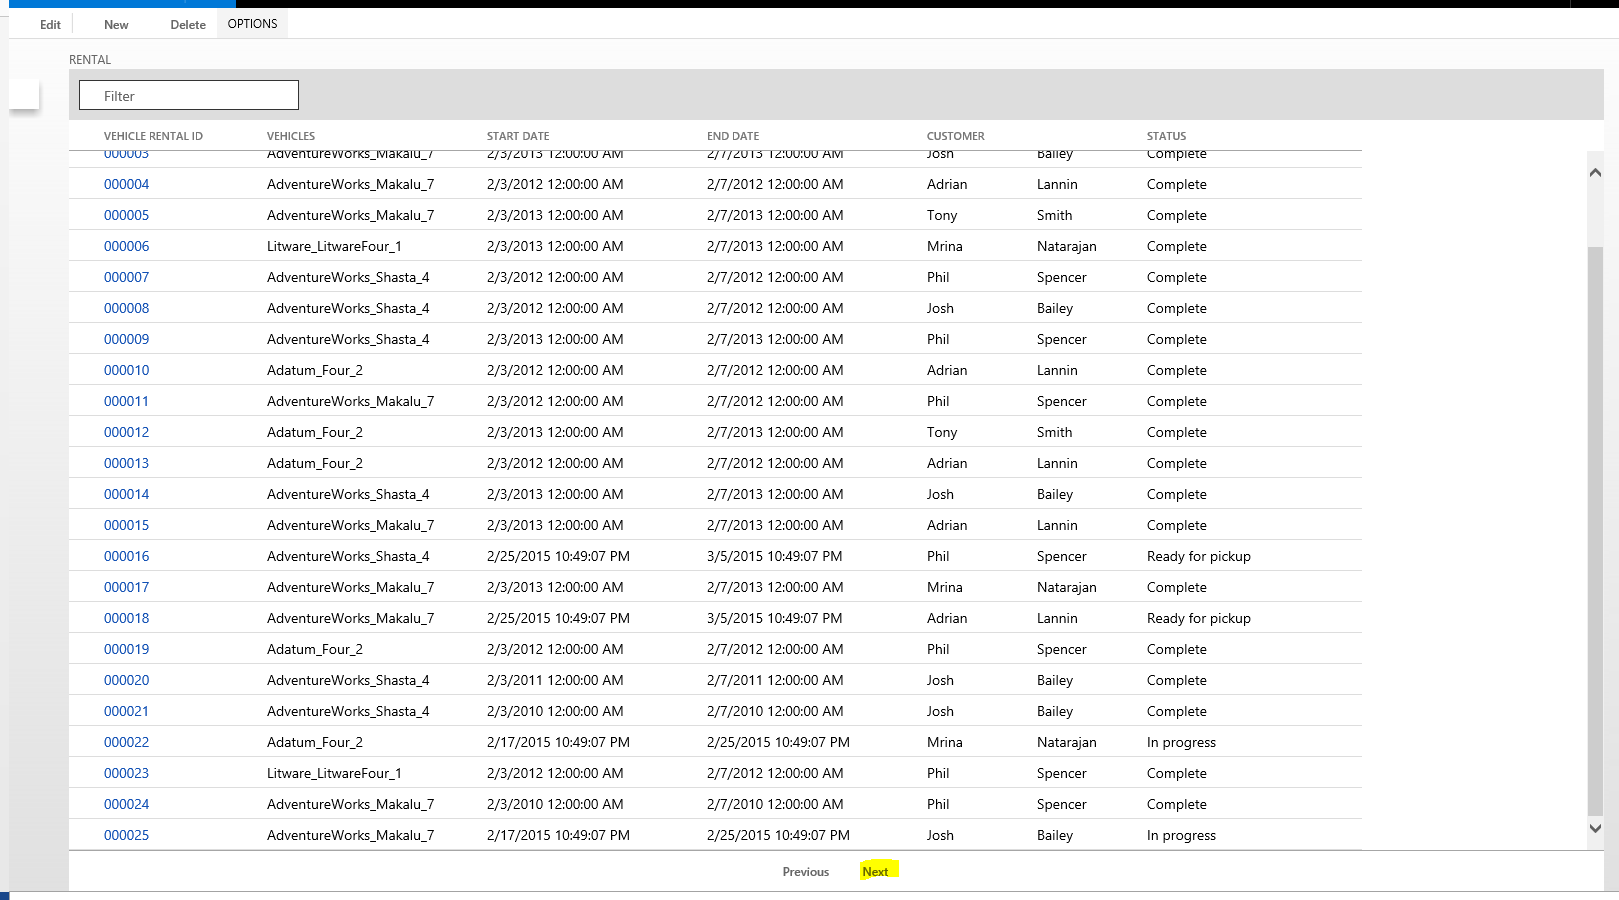
At the bottom of the list, click Next to view the next page. On this page, you can see that the reservation was created for the new customer that you added.

This completes the walkthrough, where you've seen an external client interacting with the Fleet Management model by using OData endpoint.
Casing rules in data entities
XML format
During an export, the entity name and the field names are exported in uppercase. If there is a need to apply a transformation, the transformation must use uppercase in all references.
During an import, data management accepts input file in any casing. However, care must be taken to have the same format for a given attribute/element in the file. When applying a transformation, ensure that the transformation is using the same casing rules in all references as in the incoming file.
Excel format
During an export, column names will be exported in uppercase. Imports are not case sensitive.
CSV format
During an export, column names will be exported in uppercase. Imports are not case sensitive.
Tips and tricks
Max join limits
During entity development, ensure that the overall structure of the entity does not exceed the max join limit of 26. This is the default limit. Increasing the join limit is not recommended because it can have unintended consequences. If this limit is exceeded, the entity will most likely fail to process records and will result in the following SQL error. We also recommend managing the total number of columns in the entity to avoid this error.
Cannot create a row of size xxx which is greater than the allowable maximum row size of 8060
Exporting container fields
If an entity has container fields and these fields need to be exported, the entity must implement getFieldsToBeConvertedToFile to allow each container field to export its data value to a separate file. This allows for container fields to be exportable and at the same time, prevents making the entity export file (core entity data without the container fields) unreadable. If getFieldsToBeConvertedToFile is not implemented, then these fields will not be exported but the rest of the entity data will export as usual.
Additional resources
Commenti e suggerimenti
Presto disponibile: nel corso del 2024 verranno dismessi i problemi di GitHub come meccanismo di feedback per il contenuto e verranno sostituiti con un nuovo sistema di feedback. Per altre informazioni, vedere: https://aka.ms/ContentUserFeedback.
Invia e visualizza il feedback per